S10 and S20
S10 and S20
S10 and S20

Create successful ePaper yourself
Turn your PDF publications into a flip-book with our unique Google optimized e-Paper software.
Vetario <strong>S10</strong>/<strong>S20</strong> GB Issue 2<br />
<strong>S10</strong> <strong>and</strong> <strong>S20</strong><br />
Thermal Life-support Cabinets<br />
User Instructions<br />
Medical intensive care unit for mammals, reptiles <strong>and</strong> birds.<br />
Contents<br />
Section Subject Page<br />
1 Introduction 2<br />
2 Unpacking 4<br />
3 Location <strong>and</strong> Installation 4<br />
4 Temperature 5<br />
5 Humidity 6<br />
6 Introducing your Patient 6<br />
7 Auxiliary Components 6<br />
8 Cleaning up 7<br />
9 Servicing 8<br />
10 Specifications 9<br />
1
Vetario <strong>S10</strong>/<strong>S20</strong> GB Issue 2<br />
IMPORTANT NOTICE<br />
The Manufacturer of Vetario products <strong>and</strong> its agents or distributors will not be<br />
responsible for loss of animals in the event of failure however caused <strong>and</strong> the user is<br />
advised to arrange his own insurance cover where loss of power or mechanical or<br />
electrical failure might result in unacceptable losses. It is not recommended that<br />
animals of significant value be housed in this product unless it is used in conjunction<br />
with an independent temperature alarm system. Such systems are available from the<br />
Vetario range of products.<br />
1. Introduction<br />
Congratulations on the purchase of your new Vetario Intensive Care Unit. The <strong>S10</strong> <strong>and</strong> <strong>S20</strong><br />
provide the ideal veterinary intensive care environment for peri-operative patients sensitive to<br />
hypothermia, shock <strong>and</strong> other post-operative complications. These products give patients the<br />
best possible chance of a successful recovery.<br />
These instructions detail the operation of your new Vetario intensive care unit. Please read<br />
them carefully before setting up your unit to achieve best results <strong>and</strong> keep these instructions<br />
safe for future reference. Your Intensive Care Unit is designed to allow the user to vary the<br />
environmental conditions to suit recovery of a wide range of species <strong>and</strong> the specific set-up for<br />
every recovery scenario is beyond the scope of these instructions. There are a range of books<br />
<strong>and</strong> veterinarian texts available covering animal recovery techniques.<br />
The principle applications for the <strong>S10</strong> <strong>and</strong> <strong>S20</strong> are as an advanced Intensive Care unit for sick,<br />
injured or post operative animals <strong>and</strong> birds.<br />
Care must be taken to ensure patients do not cause damage to the interior, particularly<br />
interference with the filter or components above the filter. Damage to these parts could<br />
cause injury or death to an animal.<br />
The <strong>S10</strong> <strong>and</strong> <strong>S20</strong> include a Nebuliser head <strong>and</strong> oxygen supply socket, allowing drugs <strong>and</strong><br />
oxygen to be introduced to the chamber.<br />
www.vetario.com<br />
2
Vetario <strong>S10</strong>/<strong>S20</strong> GB Issue 2<br />
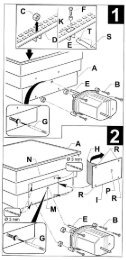
Fig. 1 Functional features of the <strong>S10</strong> <strong>and</strong> <strong>S20</strong>.<br />
Carrying H<strong>and</strong>le<br />
Control Panel<br />
<strong>S10</strong><br />
Auxiliary Panel<br />
Air inlet filter<br />
<strong>S20</strong><br />
(Component Layout as <strong>S10</strong>)<br />
Water<br />
reservoir<br />
Circulation filter<br />
Sliding Door<br />
Liner<br />
Removable<br />
Clear Door<br />
Removable<br />
Inner Door<br />
Control Panel: -<br />
Auxiliary Panel: -<br />
Light<br />
Switch<br />
Temperature<br />
Control<br />
Indicator<br />
Temperature<br />
Display<br />
Temperature<br />
Adjustment<br />
Oxygen<br />
Supply<br />
Connector<br />
Temp. Alarm<br />
Input Socket<br />
Nebuliser Solution<br />
Fitting<br />
Mains<br />
Input<br />
Socket<br />
Feature Listing:-<br />
Control<br />
Panel<br />
Carrying<br />
H<strong>and</strong>le<br />
Auxiliary<br />
Panel<br />
Circulation<br />
Filter<br />
Air Inlet<br />
Filter<br />
Liner<br />
Removable<br />
Inner Door<br />
Outer Door<br />
Water<br />
Reservour<br />
<strong>S10</strong> <br />
<strong>S20</strong> <br />
3
Vetario <strong>S10</strong>/<strong>S20</strong> GB Issue 2<br />
2.0 Unpacking<br />
Your <strong>S10</strong> / <strong>S20</strong> Intensive Care Unit has been supplied in protective packaging. Please remove<br />
all tape, strapping <strong>and</strong> packing. Retain the carton <strong>and</strong> packing materials to enable the unit to<br />
be repacked.<br />
Unpack to find the following:-:<br />
Quantity<br />
Item<br />
1 <strong>S10</strong> / <strong>S20</strong> Intensive Care Unit (with filters fitted)<br />
1 Plastic Liner for Base<br />
1 Nebuliser head<br />
1 Clip <strong>and</strong> screw for nebuliser head (<strong>S10</strong> only)<br />
1 Mains Lead<br />
1 Guarantee Card<br />
2.2 Check that the electrical supply matches the machine’s requirements (marked on the technical<br />
label on the rear of the product). UK machines are fitted with a 3 Amp fuse in the mains plug<br />
– if replaced always use this rating.<br />
3.0 Location <strong>and</strong> Installation<br />
Your <strong>S10</strong> / <strong>S20</strong> will give best results in a room free from wide temperature variations <strong>and</strong> with<br />
generous ventilation – particularly important if several units are in use at the same time.<br />
Ensure that the room temperature cannot drop on a cold night. Ideally thermostatically control<br />
the room at between 20 <strong>and</strong> 27°C (68 <strong>and</strong> 80°F). Never allow the room temperature to drop<br />
below 15°C (59°F) <strong>and</strong> ensure that the product cannot be exposed to direct sunlight.<br />
Note that exposure to direct sunlight may cause fading of plastic colours. This does not<br />
adversely affect the performance of the material in any way.<br />
3.1 Place the <strong>S10</strong> / <strong>S20</strong> on a flat, level surface (workbench height is ideal) with the door facing<br />
forwards. A second <strong>S10</strong> / <strong>S20</strong> can be stacked on top. Ensure that the feet of the upper unit<br />
locate in the recesses on the top of the lower unit <strong>and</strong> that the door is facing forwards on both<br />
machines.<br />
3.2 Your <strong>S10</strong> / <strong>S20</strong> is supplied with filter media fitted (see fig.1). For details of filter replacement<br />
see servicing section.<br />
3.4 Plug the mains lead into the ‘Figure 8’ socket on he rear auxiliary panel of the machine.<br />
Connecting the power will start the fan(s) (which run continuously), illuminate the red LED<br />
on the control panel <strong>and</strong> the digital temperature display will indicate the air temperature within<br />
the intensive care chamber. See section 4 below on temperature adjustment. Ensure the sliding<br />
door is closed before adjusting temperature.<br />
3.5 The interior of the <strong>S10</strong> / <strong>S20</strong> can be illuminated to make cleaning or inspection of patients<br />
easier by pressing the red button on the control panel.<br />
4
Vetario <strong>S10</strong>/<strong>S20</strong> GB Issue 2<br />
4.0 Temperature<br />
Stable <strong>and</strong> correct temperature is essential for a good recovery. Adjust with care <strong>and</strong> read the<br />
following points <strong>and</strong> procedures carefully before setting up the intensive care unit.<br />
WARNING:-<br />
THE CIRCULATING FAN AND THE METABOLIC HEAT FROM PATIENT<br />
CONTRIBUTE HEAT TO THE INTENSIVE CARE UNIT. THE INTENSIVE CARE<br />
UNIT MAY NOT CONTROL PROPERLY IF THE ROOM TEMPERATURE IS LESS<br />
THAN 3ºC (10°F) LOWER THAN THE TEMPERATURE REQUIRED INSIDE THE<br />
PRODUCT. (FOR THE <strong>S20</strong> PRODUCT ADDITIONAL VENTILATION CAN BE<br />
ACHIEVED BY SLIDING OPEN THE OUTER DOOR).<br />
4.1 The internal light contributes heat to the <strong>S10</strong> / <strong>S20</strong> when switched on. If room temperature is<br />
high <strong>and</strong> close to the set temperature the light can cause overheating when left on. It is<br />
recommended that the light is not left on for periods longer than 5 minutes.<br />
4.3 The <strong>S10</strong> / <strong>S20</strong> has a thermal cut-out feature as st<strong>and</strong>ard. In the unlikely event of the unit<br />
overheating the heater will cut-out at approx 45ºC immediately, <strong>and</strong> will not come back on<br />
until the unit has cooled to approximately 35ºC.<br />
4.4 Your <strong>S10</strong> / <strong>S20</strong> is fitted with a high quality, individually calibrated digital thermometer. Be<br />
cautious of the accuracy of other thermometers used <strong>and</strong> have them calibrated if necessary.<br />
4.5 After connecting power the <strong>S10</strong> / <strong>S20</strong> warms up <strong>and</strong> after a period of time the red LED will<br />
change from continuously on to flashing. When flashing regularly the <strong>S10</strong> / <strong>S20</strong> is controlling<br />
at the set temperature. Allow at least half an hour for the temperature to fully stabilise<br />
throughout the unit before making adjustments to achieve the desired temperature.<br />
4.6 To adjust temperatures rotate the knob on the right h<strong>and</strong> side of the control panel, clockwise to<br />
increase temperature, anticlockwise to reduce it. Follow the approximate guide below to<br />
achieve desired temperature settings. Always allow half an hour between adjustments for the<br />
temperature to stabilise <strong>and</strong> refer to the digital temperature display to confirm that the desired<br />
temperature has been reached.<br />
Temperature Setting Guide (Approx.)<br />
20ºC<br />
(64ºF)<br />
30ºC<br />
(80ºF)<br />
40ºC<br />
(96ºF)<br />
4.7 When reducing temperature the red LED may go out while the <strong>S10</strong> / <strong>S20</strong> cools – this is<br />
normal.<br />
4.8 For most applications involving intensive care the unit should be set to between 30 <strong>and</strong> 35ºC<br />
(86 <strong>and</strong> 95ºF). Note that the temperature should be gradually reduced to room temperature (20<br />
– 25ºC or 68 – 77ºF) as the patient recovers to avoid sudden temperature change when the<br />
patient is removed.<br />
4.9 Care should be taken about cooling that occurs during feeding or inspection of very small<br />
patients. Keep the room warm, hold the patient in a cloth to prevent chilling from cold h<strong>and</strong>s<br />
<strong>and</strong> use warmed feeding utensils.<br />
5
Vetario <strong>S10</strong>/<strong>S20</strong> GB Issue 2<br />
5.0 Humidity<br />
Elevated air temperatures in the <strong>S10</strong> / <strong>S20</strong> will reduce the relative humidity level (RH) <strong>and</strong><br />
can cause dehydration. A water reservoir is fitted to counteract this effect.<br />
5.1 Your <strong>S10</strong> / <strong>S20</strong> intensive care unit is fitted with a water reservoir (see fig.1) which humidifies<br />
air as it is drawn into the brooder through the air inlet filter. Use a solution of a proprietary<br />
water-based disinfectant (1 part concentrate to 100 parts water) in the water reservoir to inhibit<br />
bacterial build-up. It is recommended that the reservoir is topped up with solution daily to<br />
reduce dehydration. This can be a particular problem with chick(s).<br />
5.2 To further increase humidity levels within the intensive care unit the water reservoir is fitted<br />
with a block of absorbent paper mesh as st<strong>and</strong>ard. This block may be cut down in length with<br />
a sharp knife or removed entirely to give lower humidity levels. The block can provide a<br />
breeding ground for bacteria. In addition to the use of water-based disinfectant concentrate in<br />
the water, it is recommended that the block is replaced every 2 months of use.<br />
6.0 Introducing your Patients<br />
Once the correct temperature has been established <strong>and</strong> the air humidified the <strong>S10</strong> / <strong>S20</strong> is<br />
ready for use. Place the patient(s) directly onto the liner provided.<br />
6.1 Young patients of similar age <strong>and</strong> size can be placed together <strong>and</strong> benefit from the warmth <strong>and</strong><br />
comfort. If disparity in size is too great a smaller patient is at risk of being crushed or<br />
smothered.<br />
6.3 Follow feeding regimes recommended for your patient ensuring the highest st<strong>and</strong>ards of<br />
hygiene at all times.<br />
6.4 In order to maintain maximum air-flow through the recovery chamber the filters should be<br />
checked once a week for dust or down, <strong>and</strong> cleaned if necessary.<br />
7.0 Auxiliary Components<br />
7.1 FITTING NEBULISER HEAD (<strong>S10</strong> Only):- Screw the black clip onto the side of the <strong>S10</strong> as<br />
shown below. DO NOT OVER TIGHTEN THE FIXING SCREW.<br />
Hole Leader<br />
Indent<br />
Clip<br />
Top Moulding<br />
Self-Tapping<br />
Screw<br />
6
Vetario <strong>S10</strong>/<strong>S20</strong> GB Issue 2<br />
7.2 The translucent Nebuliser solution holder (supplied) can be connected to your Nebuliser pump<br />
<strong>and</strong> fitted into the clip such that the mouthpiece enters the <strong>S10</strong> / <strong>S20</strong> through the hole on the<br />
rear of the auxiliary plate just above the clip.<br />
7.3 Note that the <strong>S10</strong> / <strong>S20</strong> draws air into the main chamber through the ceiling <strong>and</strong> so the mist<br />
created by the Nebuliser will be drawn into the main chamber too.<br />
7.4 Nebuliser pumps to match the solution holder supplied with the <strong>S10</strong> / <strong>S20</strong> are available from<br />
your Vetario distributor).<br />
7.5 OXYGEN SUPPLY INPUT – Use the Oxygen Supply Connector on the Auxiliary panel of the<br />
<strong>S10</strong> / <strong>S20</strong> to attach oxygen supply tubes. As a guide, Oxygen flow rate should be set to 2<br />
litres per minute to raise the concentration to approximately 30-35%. If higher concentrations<br />
are required it is recommended to feed the oxygen directly to a suitable mouthpiece in<br />
accordance with usual veterinary practice. Be sure to closely monitor the temperature while<br />
operating the <strong>S20</strong> with the outer door fully closed, an animal's body heat may significantly<br />
raise the temperature in the unit (see section 4). Never introduce flammable gases / solutions<br />
(e.g. some anaesthetics) as this may create a risk of fire/explosion.<br />
7.6 TEMPERATURE ALARM SOCKET - The <strong>S10</strong> / <strong>S20</strong> products are fitted with a 3.5mm<br />
Temperature Alarm Input Socket as st<strong>and</strong>ard. This is allows a Vetario T20 Temperature<br />
Alarm Module to be fitted to the product. Contact your distributor for more details on this<br />
product.<br />
8.0 Cleaning Up<br />
8.1 IMPORTANT:<br />
DISCONNECT THE <strong>S10</strong> / <strong>S20</strong> INTENSIVE CARE UNIT FROM THE MAINS<br />
POWER SUPPLY DURING CLEANING.<br />
ENSURE THAT ALL ELECTRICAL PARTS ARE KEPT DRY.<br />
ALWAYS USE WATER BASED DISINFECTANTS WHEN CLEANING.<br />
8.2 Following each patient recovery in your <strong>S10</strong> / <strong>S20</strong> intensive care unit remove all debris from<br />
the floor. Wipe all internal surfaces with a soft cloth soaked in 100:1 water-based disinfectant<br />
solution. Filters should be inspected on a weekly basis <strong>and</strong> be cleaned if necessary. To clean<br />
filters remove <strong>and</strong> gently h<strong>and</strong> wash them in warm water then allow to dry before use. Filters<br />
need replacing every six months. Immerse <strong>and</strong> soak the liner in disinfectant solution.<br />
8.3 The exterior of the <strong>S10</strong> / <strong>S20</strong> may be cleaned with a damp cloth.<br />
On the <strong>S20</strong> unit, remove doors to clean hard to reach places.<br />
Removing Outer Door:-<br />
Removing Inner Door:-<br />
Clear outer door slides out of<br />
groove on the rear of the unit.<br />
7<br />
Remove inner wire door by opening<br />
then lifting the door from its hinges,<br />
reverse this technique to put door back<br />
in place.
Vetario <strong>S10</strong>/<strong>S20</strong> GB Issue 2<br />
8.4 Always clean the <strong>S10</strong> / <strong>S20</strong> intensive care unit before storage <strong>and</strong> ensure that the unit is totally<br />
dry inside <strong>and</strong> out.<br />
8.5 Re-order disinfectant, filters, evaporating block, liners or light bulbs from your Vetario<br />
distributor.<br />
9.0 Servicing<br />
IMPORTANT. THE HEATER IS AT MAINS VOLTAGE. NEVER DRILL INTO OR PUNCTURE<br />
THE CURVED SIDES OF THE INCUBATOR. RISK OF ELECTRIC SHOCK.<br />
9.1 Replace both filters every six months of use.<br />
9.2 The interior light bulb can be replaced if necessary. Spares are available from your Vetario<br />
distributor.<br />
ENSURE THAT THE <strong>S10</strong> / <strong>S20</strong> IS DISCONNECTED FROM THE MAINS SUPPLY.<br />
Remove the twelve screws that retain the ceiling <strong>and</strong> replace the bulb with 15 Watt pygmy BC<br />
type. Do not exceed the recommended Wattage.<br />
9.3 In case of failure first check that the mains power supply is working <strong>and</strong> that the mains plug<br />
fuse is intact. If the problem persists contact your distributor.<br />
The functional parts of the <strong>S10</strong> <strong>and</strong> <strong>S20</strong> are modular <strong>and</strong> parts are available <strong>and</strong> are readily<br />
exchanged by a suitably qualified person equipped with basic tools.<br />
Fitting instructions are supplied with replacement parts.<br />
8
Vetario <strong>S10</strong>/<strong>S20</strong> GB Issue 2<br />
10.0 Specification<br />
<strong>S10</strong><br />
Construction:<br />
Top <strong>and</strong> base mouldings: structural, insulated polyurethane<br />
Curved sides: Twin skin ABS<br />
Door opening frames: Anodised extruded aluminium<br />
Clear door: ‘Plexiglas’ or similar scratch resistant clear acrylic<br />
Dimensions :<br />
Weight:<br />
(External) 475mm high x 450mm diameter (18 ¾” high x 17 ¾” diameter)<br />
(Max. Internal) 370mm high x 395mm diameter (14 ½ high x 15 ½” dia.)<br />
5.5Kg (12lbs)<br />
Power Consumption: 120 Watts (maximum)<br />
60 Watts (typical average)<br />
Electrical Supply:<br />
230v 50Hz or 115v 60Hz as ordered<br />
<strong>S20</strong><br />
Construction:<br />
Top <strong>and</strong> Bottom mouldings: Structural, insulated Polyurethane<br />
Curved Sides: Twin skinned ABS<br />
Door opening frames: Anodised Extruded Aluminium<br />
Removable Inner Door: Chromed Welded Steel Wire Cage<br />
Removable Clear Outer Door: Flexible clear ‘PETG’ sheet plastic with<br />
anodised extruded h<strong>and</strong>les<br />
Dimensions:<br />
(External) 760mm Wide x 510mm Deep x 600 High<br />
(30“ Wide x 20“ Deep x 23 ¾” High)<br />
(Internal) 680mm Wide x 430mm Deep x 470mm High<br />
(26 ¾” Wide x 17” Deep x 18 ½” High)<br />
Weight:<br />
Electrical:<br />
Supply:<br />
10kg (24lbs)<br />
230v, 50Hz or 115v, 60Hz<br />
200 watts (Maximum)<br />
90 watts (Typical Average)<br />
www.vetario.com<br />
Vetario Products are manufactured by<br />
Brinsea Products Ltd, Station Road, S<strong>and</strong>ford, N. Somerset, BS25 5RA, Engl<strong>and</strong><br />
9