RT4-5se object device. Installation manual. - Korteks
RT4-5se object device. Installation manual. - Korteks
RT4-5se object device. Installation manual. - Korteks

You also want an ePaper? Increase the reach of your titles
YUMPU automatically turns print PDFs into web optimized ePapers that Google loves.
<strong>RT4</strong>-<strong>5se</strong> <strong>object</strong> <strong>device</strong>.<br />
<strong>Installation</strong> <strong>manual</strong>.<br />
Year 2003.
Main features.<br />
<strong>RT4</strong>-<strong>5se</strong> is made for gathering information about secured <strong>object</strong>,<br />
it’s handling and transmitting to alarm receiver. Also, <strong>RT4</strong>-<strong>5se</strong><br />
realizes external supply control, and when it is lower critical limit or<br />
restores in normal condition, sends this information to the alarm<br />
receiver. If the outer input condition had not been changing for a long<br />
time, than a test message is sent to the alarm receiver.<br />
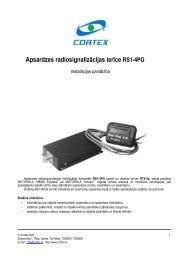
<strong>RT4</strong>-<strong>5se</strong> <strong>object</strong> <strong>device</strong> is made in closed metal frame. Appearance<br />
and control and indication units are shown on the Pic.1.<br />
1. Antenna socket.<br />
2. Programming slot.<br />
3. Registration button.<br />
4. Terminal board for work modes setting.<br />
5. Transfer mode indicator.<br />
6. Power supply and diagnostics indicator.<br />
7. Terminal board for power and additional <strong>device</strong> wiring.<br />
©<strong>Korteks</strong><br />
Zilupes st. 7, Riga, Latvia, Ph./fax: (+371)7505604,<br />
(+371)7505603 E-mail: info@cortex.lv, http://www.cortex.lv
Pic.1<br />
©<strong>Korteks</strong><br />
Zilupes st. 7, Riga, Latvia, Ph./fax: (+371)7505604,<br />
(+371)7505603 E-mail: info@cortex.lv, http://www.cortex.lv
General performance attributes<br />
Frequency range<br />
139 -174MHz<br />
Radiation class<br />
8K0F1D<br />
Carrier power, at most<br />
5W<br />
Frequency deviation, at most<br />
2,5kHz<br />
Carrier frequency instability, at most<br />
10ppm<br />
Off-frequency emission power, at most<br />
0.25µW<br />
Transmitting time<br />
128ms<br />
Number of transmissions for one event 3*<br />
Test transmission number 3*<br />
Test transmission period, hours 10*<br />
Power supply 11-14V<br />
Input current:<br />
In asleep mode, at most<br />
15mA<br />
In transmitting mode, at most 1.7A<br />
Dimensions, mm<br />
160х70х25<br />
Category temperature range<br />
-10 - +50° С<br />
* - Programmable parameter, default value specified.<br />
©<strong>Korteks</strong><br />
Zilupes st. 7, Riga, Latvia, Ph./fax: (+371)7505604,<br />
(+371)7505603 E-mail: info@cortex.lv, http://www.cortex.lv
Transmitter programming and mode setting.<br />
Control panel programming is made with the help of programmer<br />
through personal computer’s parallel port.<br />
<strong>RT4</strong>-<strong>5se</strong> <strong>object</strong> <strong>device</strong> allows to program:<br />
· Object <strong>device</strong> physical address<br />
· Address of the relay, on witch transmitter is<br />
registered<br />
· Number of transmission sessions for every<br />
event<br />
· Number of transmission sessions for every<br />
test<br />
· Test period<br />
<strong>RT4</strong>-<strong>5se</strong> <strong>object</strong> <strong>device</strong> has two modes of<br />
operation.<br />
Pic.2<br />
1. Parallel input mode.<br />
In this mode <strong>object</strong> <strong>device</strong> works like six-input translator i.e.<br />
transmits any change in inputs to the alarm receiver. All <strong>object</strong> <strong>device</strong><br />
inputs can work with signals like «Short to ground» (by default) or<br />
«short to +12V». To switch <strong>object</strong> <strong>device</strong> inputs into «short to +12V»<br />
mode simply mount jumper between contacts 2 and 3 (Pic.2).<br />
©<strong>Korteks</strong><br />
Zilupes st. 7, Riga, Latvia, Ph./fax: (+371)7505604,<br />
(+371)7505603 E-mail: info@cortex.lv, http://www.cortex.lv
2. Serial interface mode.<br />
To turn his mode on simply mount jumper between contacts 1 and<br />
2 (Pic.2).<br />
Object <strong>device</strong> power supply must be turned off!<br />
When in this mode, <strong>object</strong> <strong>device</strong> uses synchronized serial<br />
interface to receive information (Z1 input – data, Z2 – time units) and<br />
can transmit to alarm receiver up to 8 bytes of information. This<br />
allows receiving a detailed information (alarm types, users Ids, ect.)<br />
from control panels, using basic additional <strong>device</strong>s, and transmit it to<br />
alarm receiver. Functions of the other four inputs are kept.<br />
Object <strong>device</strong> registration on the relay.<br />
This mode doesn’t used in multi-access nets!<br />
<strong>RT4</strong>-<strong>5se</strong> <strong>object</strong> <strong>device</strong> can work in relaying system with<br />
transmitter registration on relays. In this system relays automatically<br />
trace transmission of test signals from registered <strong>object</strong> <strong>device</strong>s<br />
without transmitting them to alarm receiver. This allows to shorten<br />
test time without lowering system capacity.<br />
To register <strong>object</strong> <strong>device</strong> you need:<br />
1. to program relay address 00 (condition by default),<br />
2. sending test signals from <strong>object</strong> <strong>device</strong>, determine, using<br />
alarm receiver data, through witch relay signal is<br />
transmitted with the highest level,<br />
3. program this relay’s address into the <strong>object</strong> <strong>device</strong>,<br />
4. press «Register» button,<br />
5. receive a alarm receiver confirmation, about <strong>object</strong><br />
registration on the chosen relay,<br />
6. repeat all actions from p.3 if needed.<br />
After <strong>object</strong> <strong>device</strong> registration, it’s test messages won’t be<br />
transmitted by any relay. If relay doesn’t receive test messages from<br />
<strong>object</strong> <strong>device</strong> during proper time (by default 36min.), it forms an<br />
alarm message and periodically (by default 36min.) sends it to alarm<br />
receiver until transmission is recovered. If transmission isn’t<br />
recovered during a long time (by default 24h.), <strong>object</strong> is erases from<br />
©<strong>Korteks</strong><br />
Zilupes st. 7, Riga, Latvia, Ph./fax: (+371)7505604,<br />
(+371)7505603 E-mail: info@cortex.lv, http://www.cortex.lv
the registration and message is sent to alarm receiver. After erasing<br />
from registration <strong>object</strong> control is not made!<br />
To restore registration – repeat all the procedure again.<br />
Diagnostic.<br />
When using PWR indicator (Pic.1) it is possible to locate<br />
following troubles:<br />
· Object <strong>device</strong> power supply is lower than 11V – indicator<br />
blinks once a second – Change battery or power source.<br />
· Fixed memory failure or wrong programming – indicator<br />
blinks 4 times a second – program your <strong>device</strong> again.<br />
Mounting recommendations.<br />
It is recommended to realize <strong>device</strong> power supply right through<br />
battery, that is used as a spare power source, or from VSCS-1,5<br />
supply «+12V» output.<br />
Before <strong>object</strong> <strong>device</strong> power supply, it is necessary to wire antenna.<br />
Antenna can be wired to the antenna joint, or by coaxial cable.<br />
It is recommended to choose <strong>device</strong>-mounting place according<br />
to the best signal reception by the alarm receiver. Signal reception<br />
level is determined by the alarm receiver indication level (see alarm<br />
receiver description). When mounting <strong>object</strong> <strong>device</strong>, it is important to<br />
keep in mind the following aspects:<br />
- Wires connecting <strong>object</strong> <strong>device</strong> and battery should be the<br />
minimum length<br />
- Wires, that lead to the <strong>object</strong> <strong>device</strong> terminal board<br />
shouldn’t lie near antenna, and never should be laid<br />
lengthwise it<br />
When using “dipole“ type antenna, cable connected to it should<br />
be laid athwart it for at least 1m lengths<br />
©<strong>Korteks</strong><br />
Zilupes st. 7, Riga, Latvia, Ph./fax: (+371)7505604,<br />
(+371)7505603 E-mail: info@cortex.lv, http://www.cortex.lv