Free pillowcase pattern - Stitch This! The Martingale Blog ...
Free pillowcase pattern - Stitch This! The Martingale Blog ...
Free pillowcase pattern - Stitch This! The Martingale Blog ...

Create successful ePaper yourself
Turn your PDF publications into a flip-book with our unique Google optimized e-Paper software.
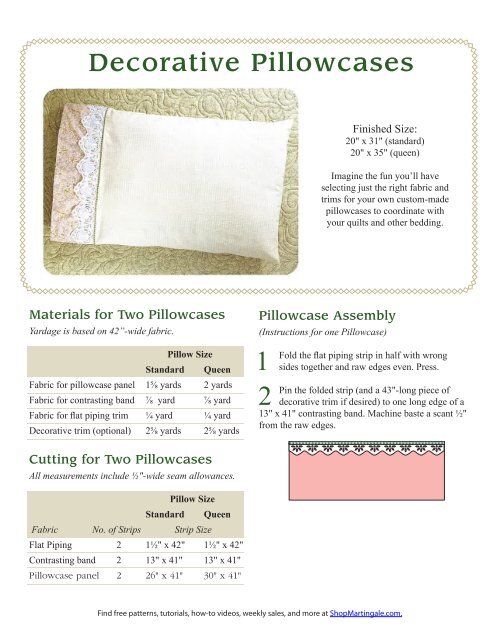
Decorative Pillowcases<br />
Finished Size:<br />
20" x 31" (standard)<br />
20" x 35" (queen)<br />
Imagine the fun you’ll have<br />
selecting just the right fabric and<br />
trims for your own custom-made<br />
<strong>pillowcase</strong>s to coordinate with<br />
your quilts and other bedding.<br />
Materials for Two Pillowcases<br />
Yardage is based on 42”-wide fabric.<br />
Pillow Size<br />
Standard Queen<br />
Fabric for <strong>pillowcase</strong> panel 1⅝ yards 2 yards<br />
Fabric for contrasting band ⅞ yard ⅞ yard<br />
Fabric for flat piping trim ¼ yard ¼ yard<br />
Decorative trim (optional) 2⅝ yards 2⅝ yards<br />
Pillowcase Assembly<br />
(Instructions for one Pillowcase)<br />
1<br />
2<br />
Fold the flat piping strip in half with wrong<br />
sides together and raw edges even. Press.<br />
Pin the folded strip (and a 43"-long piece of<br />
decorative trim if desired) to one long edge of a<br />
13" x 41" contrasting band. Machine baste a scant ½"<br />
from the raw edges.<br />
Cutting for Two Pillowcases<br />
All measurements include ½"-wide seam allowances.<br />
Pillow Size<br />
Standard Queen<br />
Fabric No. of Strips Strip Size<br />
Flat Piping 2 1½" x 42" 1½" x 42"<br />
Contrasting band 2 13" x 41" 13" x 41"<br />
Pillowcase panel 2 26" x 41" 30" x 41"<br />
Find free <strong>pattern</strong>s, tutorials, how-to videos, weekly sales, and more at Shop<strong>Martingale</strong>.com.
Decorative <strong>pillowcase</strong>s 2<br />
3<br />
With right sides together, pin the piped edge of<br />
the band to one long edge of a <strong>pillowcase</strong> panel.<br />
<strong>Stitch</strong> ½" from the raw edges. Press the seam toward<br />
the band.<br />
5<br />
Turn the band to the inside of the<br />
<strong>pillowcase</strong> with the folded edge just<br />
past the stitching line. Press. Baste in place.<br />
4<br />
Fold the <strong>pillowcase</strong> in half lengthwise with right<br />
sides together and raw edges even. Beginning<br />
at the folded edge, stitch ½" from the raw edges,<br />
pivoting at the corner and continuing to the band<br />
edge. Turn under and press ½" at the raw edge of<br />
the band.<br />
Baste folded edge of band in place at seam line.<br />
6<br />
Turn the <strong>pillowcase</strong> right side out.<br />
Topstitch or edgestitch along the band seam<br />
line through all layers to catch the folded inner<br />
edge of the band. Remove the basting.<br />
Topstitch or edgestitch through all layers.<br />
© 2004 by Pamela Lindquist<br />
First published in Pillow Party! Creating Pillows from Quilt Blocks<br />
Turn under 2" at edge.<br />
19021 120th Ave. NE, Ste. 102<br />
Bothell, WA 98011 USA<br />
800.426.3126<br />
www.Shop<strong>Martingale</strong>.com<br />
Register at Shop<strong>Martingale</strong>.com to get a free subscription<br />
to the <strong>Stitch</strong> <strong>This</strong>! blog. You’ll get free <strong>pattern</strong>s, tutorials,<br />
how-to videos, giveaways, and the first word on sales.<br />
Find free <strong>pattern</strong>s, tutorials, how-to videos, weekly sales, and more at Shop<strong>Martingale</strong>.com.
More Pillowcase Patterns<br />
from <strong>Martingale</strong><br />
“Four-Patch Pillowcase” from Four Patch Frolic<br />
“Just Leaves Shams” from Make Your Bed<br />
“Pie in the Sky” <strong>pillowcase</strong> from Simple Graces<br />
“Best Friends Pillow Sham” ePattern from Cool Girls Quilt<br />
Find free <strong>pattern</strong>s, tutorials, how-to videos, weekly sales, and more at Shop<strong>Martingale</strong>.com.