Vivotek NR8201 Network Video Recorder Installation Guide - Use-IP
Vivotek NR8201 Network Video Recorder Installation Guide - Use-IP
Vivotek NR8201 Network Video Recorder Installation Guide - Use-IP

Create successful ePaper yourself
Turn your PDF publications into a flip-book with our unique Google optimized e-Paper software.
<strong>NR8201</strong>/8301<br />
H.264 Compatible with VAST CMS Lockable HDD & Rack Mount Design<br />
<strong>NR8201</strong><br />
4-CH Viewing & Recording<br />
External eSATA Interface<br />
NR8301<br />
8-CH Viewing & Recording<br />
RAID 0, 1 Scalable Storage<br />
Rev. 1.1
NR8301 <strong>Network</strong> <strong>Video</strong> <strong>Recorder</strong><br />
NR8301 <strong>Network</strong> <strong>Video</strong> <strong>Recorder</strong><br />
Power PoE<br />
WAN LAN1 LAN2 LAN3 LAN4 LAN5 LAN6 LAN7 LAN8<br />
Status H D<br />
Power PoE<br />
WAN LAN1 LAN2 LAN3 LAN4 LAN5 LAN6 LAN7 LAN8<br />
Status H D<br />
NR8301 <strong>Network</strong> <strong>Video</strong> <strong>Recorder</strong><br />
Power PoE<br />
WAN LAN1 LAN2 LAN3 LAN4 LAN5 LAN6 LAN7 LAN8<br />
Status H D<br />
NR8301 <strong>Network</strong> <strong>Video</strong> <strong>Recorder</strong><br />
Power PoE<br />
WAN LAN1 LAN2 LAN3 LAN4 LAN5 LAN6 LAN7 LAN8<br />
Status H D<br />
Warning Before <strong>Installation</strong><br />
English<br />
Power off the <strong>Network</strong> <strong>Video</strong> <strong>Recorder</strong><br />
as soon as it is found smoking or<br />
smelt unusual.<br />
Keep the <strong>Network</strong> <strong>Video</strong> <strong>Recorder</strong><br />
away from water. If the <strong>Video</strong> <strong>Recorder</strong><br />
is wet, power off immediately.<br />
Contact your distributor when such cases<br />
happen.<br />
Contact your distributor when such cases<br />
happen.<br />
Do not place the <strong>Network</strong> <strong>Video</strong><br />
<strong>Recorder</strong> around the heat sources,<br />
such as television or oven.<br />
Refer to your user's manual for the<br />
operating temperature.<br />
Keep the <strong>Network</strong> <strong>Video</strong> <strong>Recorder</strong><br />
away from direct sunlight.<br />
Do not place the <strong>Network</strong> <strong>Video</strong><br />
<strong>Recorder</strong> in high humidity<br />
environments.<br />
EN - 1
NR8301 <strong>Network</strong> <strong>Video</strong> <strong>Recorder</strong><br />
Power PoE<br />
WAN LAN1 LAN2 LAN3 LAN4 LAN5 LAN6 LAN7 LAN8<br />
Status H D<br />
NR8301 <strong>Network</strong> <strong>Video</strong> <strong>Recorder</strong><br />
Power PoE<br />
Status H D<br />
NR8301 <strong>Network</strong> <strong>Video</strong> <strong>Recorder</strong><br />
NR8301 <strong>Network</strong> <strong>Video</strong> <strong>Recorder</strong><br />
Power PoE<br />
WAN LAN1 LAN2 LAN3 LAN4 LAN5 LAN6 LAN7 LAN8<br />
Status H D<br />
Power PoE<br />
WAN LAN1 LAN2 LAN3 LAN4 LAN5 LAN6 LAN7 LAN8<br />
Status H D<br />
Do not place the <strong>Network</strong> <strong>Video</strong><br />
<strong>Recorder</strong> on unsteady surfaces.<br />
Do not touch the <strong>Network</strong> <strong>Video</strong><br />
<strong>Recorder</strong> when it's lightening.<br />
Do not drop the <strong>Network</strong> <strong>Video</strong><br />
<strong>Recorder</strong>.<br />
Do not insert any object into the<br />
<strong>Network</strong> <strong>Video</strong> <strong>Recorder</strong>, such as<br />
needles.<br />
WAN LAN1 LAN2 LAN3 LAN4 LAN5 LAN6 LAN7 LAN8<br />
EN - 2
Power PoE<br />
Status H D<br />
NR8301 <strong>Network</strong> <strong>Video</strong> <strong>Recorder</strong><br />
WAN LAN1 LAN2 LAN3 LAN4<br />
Power PoE<br />
Status H D<br />
510000210G<br />
<strong>NR8201</strong> <strong>Network</strong> <strong>Video</strong> <strong>Recorder</strong><br />
1<br />
Package Contents<br />
English<br />
<strong>NR8201</strong> (4CH) or NR8301 (8CH)<br />
Power Cord<br />
<strong>NR8201</strong><br />
NR8301<br />
WAN LAN1 LAN2 LAN3 LAN4 LAN5 LAN6 LAN7 LAN8<br />
Software CD<br />
Rack Mount Kit<br />
<strong>NR8201</strong>:<br />
Rack Mount Ear x 2<br />
Screws x 4 (Black)<br />
Screws x 4 (Grey)<br />
Key x 2<br />
NR8301:<br />
Rack Mount Ear x 2<br />
Screws x 4 (Black)<br />
Screws x 8 (Grey)<br />
Key x 2<br />
Warranty Card<br />
Quick <strong>Installation</strong> <strong>Guide</strong><br />
EN - 3
NR8301 <strong>Network</strong> <strong>Video</strong> <strong>Recorder</strong><br />
Power<br />
Status<br />
PoE<br />
HDD<br />
Power<br />
Status<br />
PoE<br />
HDD<br />
WAN LAN1 LAN2 LAN3 LAN4<br />
WAN LAN1 LAN2 LAN3 LAN4 LAN5 LAN6 LAN7 LAN8<br />
RESET<br />
<strong>NR8201</strong> <strong>Network</strong> <strong>Video</strong> <strong>Recorder</strong><br />
RESET<br />
eSATA<br />
1 234 5 6 7 8 9 101112<br />
2<br />
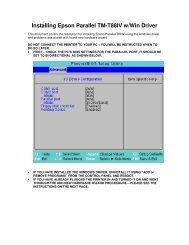
Physical Description<br />
NR8301<br />
USB Socket<br />
Status Indicator<br />
Removable & Lockable Hard Disk Trays x 2<br />
Power Cord Socket<br />
Ethernet 10/100 RJ45 Socket x 8 (LAN);<br />
Gigabit Ethernet RJ45 Socket x 1 (WAN)<br />
LAN2<br />
LAN4<br />
LAN6<br />
LAN8<br />
POWER<br />
AC IN 100V-240V<br />
LAN1<br />
LAN3<br />
LAN5<br />
LAN7<br />
WAN<br />
1 234 5 6 7 8 9 101112<br />
Power Button<br />
Recessed Reset Button<br />
General I/O Terminal Block<br />
<strong>NR8201</strong><br />
Status Indicator Removable & Lockable Hard Disk Tray x 1<br />
USB Socket<br />
Power Cord Socket<br />
Ethernet 10/100 RJ45 Socket x 4 (LAN);<br />
Gigabit Ethernet RJ45 Socket x 1 (WAN)<br />
eSATA Socket<br />
POWER<br />
AC IN 100V-240V<br />
LAN1<br />
LAN3<br />
LAN5<br />
LAN7<br />
WAN<br />
Power Button<br />
Recessed Reset Button<br />
General I/O Terminal Block<br />
EN - 4
NR8301 <strong>Network</strong> <strong>Video</strong> <strong>Recorder</strong><br />
Power PoE<br />
Status HDD<br />
NR8301 <strong>Network</strong> <strong>Video</strong> <strong>Recorder</strong><br />
Power PoE<br />
Status H D<br />
NR8301 <strong>Network</strong> <strong>Video</strong> <strong>Recorder</strong><br />
Power PoE<br />
Status H D<br />
NR8301 <strong>Network</strong> <strong>Video</strong> <strong>Recorder</strong><br />
Power PoE<br />
Status H D<br />
3<br />
Hardware <strong>Installation</strong><br />
English<br />
Before using the <strong>Network</strong> <strong>Video</strong> <strong>Recorder</strong>, please prepare SATA hard disk(s) for recording<br />
video.<br />
1. Make sure the power is disconnected.<br />
2. Install the supplied rack mount ears if you want to install the enclosure into a rack cabinet.<br />
3. Open the drive tray bezel as shown below and remove the drive trays.<br />
4. Install your hard disk to the drive tray, and secure it with the supplied four screws.<br />
5. Open the drive tray bezel and insert hard disk(s) into the drive bays.<br />
6. <strong>Use</strong> the supplied bezel key to lock the drive trays in place to prevent unauthorized access.<br />
2<br />
WAN LAN1 LAN2 LAN3 LAN4 LAN5 LAN6 LAN7 LAN8<br />
3 4<br />
WAN LAN1 LAN2 LAN3 LAN4 LAN5 LAN6 LAN7 LAN8<br />
5<br />
6<br />
WAN LAN1 LAN2 LAN3 LAN4 LAN5 LAN6 LAN7 LAN8<br />
WAN LAN1 LAN2 LAN3 LAN4 LAN5 LAN6 LAN7 LAN8<br />
EN - 5
NR8301 <strong>Network</strong> <strong>Video</strong> <strong>Recorder</strong><br />
Power PoE<br />
WAN LAN1 LAN2 LAN3 LAN4<br />
Status H D<br />
POWER<br />
<strong>NR8201</strong> <strong>Network</strong> <strong>Video</strong> <strong>Recorder</strong><br />
AC IN 100V-240V<br />
Power/MIC<br />
Activity<br />
RESET<br />
Power/MIC<br />
LAN2<br />
LAN1<br />
Activity<br />
LAN4<br />
LAN3<br />
LAN6<br />
LAN5<br />
LAN8<br />
LAN7<br />
WAN<br />
1 234 5 6 7 8 9 101112<br />
4<br />
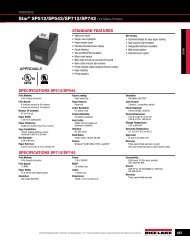
<strong>Network</strong> Deployment<br />
1. Connect the supplied power cable from the <strong>Network</strong> <strong>Video</strong> <strong>Recorder</strong> (NVR) to a power<br />
outlet.<br />
2. Push the power button to run the NVR.<br />
3. Connect network cameras to the NVR’s PoE LAN ports. Connect a management PC to the<br />
WAN port directly or via LAN. The NVR comes with an embedded DHCP server for its LAN<br />
ports. It is necessary to configure the LAN ports and the WAN port into different Class C<br />
subnets, e.g., 192.168.100.xxx for LAN and 192.168.4.xxx for WAN.<br />
4. If you want to access NVR over the Internet, connect the NVR to the Internet via the<br />
WAN port.<br />
5. If you have external devices such as sensors and alarms, make connections from the<br />
general I/O terminal block.<br />
NVR embedded<br />
DHCP server<br />
5<br />
2<br />
1<br />
Private LAN<br />
LAN<br />
4<br />
3<br />
Cable, DSL<br />
Modem, or router<br />
<strong>Network</strong> Camera<br />
(PoE)<br />
Internet<br />
x8<br />
Class C<br />
subnet #0<br />
Class C<br />
subnet #1<br />
Management<br />
PC<br />
3<br />
Power PoE<br />
WAN LAN1 LAN2 LAN3 LAN4 LAN5 LAN6 LAN7 LAN8<br />
Status H D<br />
NR8301<br />
8-CH PoE<br />
Data Transmitting<br />
Power Supply<br />
4-CH PoE<br />
Data Transmitting<br />
5<br />
1: Power<br />
2: Relay output COM<br />
3: Relay output N.O.<br />
4: Digital Input 1<br />
5: Digital Input 1 Ground<br />
6: Digital Input 2<br />
7: Digital Input 2 Ground<br />
8: Digital Input 3<br />
9: Digital Input 3 Ground<br />
10: Digital Input 4<br />
11: Digital Input 4 Ground<br />
12: Ground<br />
<strong>NR8201</strong><br />
Power Supply<br />
EN - 6
5<br />
Assigning an <strong>IP</strong> Address<br />
English<br />
1. 1-1. If your local network does not have a DHCP server, you may temporarily<br />
connect a PC to a LAN port for initial configuration. The NVR comes with a default <strong>IP</strong>,<br />
192.168.100.1. You can access the NVR server using this <strong>IP</strong>, and then manaully assign<br />
an <strong>IP</strong> to the NVR WAN port.<br />
1-2. If your local network has a DHCP server, connect the WAN port to your local<br />
network, and use the IW2 utility to find the NVR server <strong>IP</strong>. You may then access the NVR<br />
server by entering the discovered <strong>IP</strong> in the address bar of a web browser.<br />
1-3 Once connected to the NVR server, please keep the LAN setting as default.<br />
You may let DHCP server assign an <strong>IP</strong> to your NVR WAN port - or - if you need to access<br />
NVR over Internet, please configure a WAN port <strong>IP</strong> address in Router/firewall using port<br />
forwarding or DMZ.<br />
2. If you need to access NVR over the Internet, please assign a WAN <strong>IP</strong> address in the<br />
configuration page. You may use DDNS for Internet access. There are three ways to get<br />
WAN <strong>IP</strong> address: DHCP (Dynamic <strong>IP</strong>), Static <strong>IP</strong> address, and PPPoE (DSL).<br />
If your network environment is DHCP, you can use VIVOTEK <strong>Installation</strong> Wizard 2 (IW2)<br />
to discover the <strong>IP</strong> address for the WAN port.<br />
(1) Install “<strong>Installation</strong> Wizard 2” from the Software Utility directory on the software CD.<br />
(2) The program will conduct an analysis of your network environment. After your network<br />
is analyzed, please click on the “Next” button to continue the program.<br />
<strong>Installation</strong><br />
Wizard 2<br />
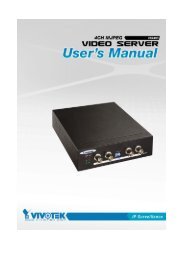
(3) The program will search the VIVOTEK <strong>Network</strong> Devices on the same LAN.<br />
(4) After searching, the main installer window will pop up.<br />
Click on the MAC that matches the one labeled<br />
on your device to connect to the <strong>Network</strong><br />
<strong>Video</strong> <strong>Recorder</strong> via Internet Explorer.<br />
00-02-D1-07-89-3F 192.168.5.131 NR8301<br />
0002D107893F<br />
NR8301<br />
0002D107893F<br />
3. <strong>Use</strong> the WAN <strong>IP</strong> address to access the <strong>Network</strong> <strong>Video</strong> <strong>Recorder</strong> from the Internet.<br />
EN - 7
6<br />
Ready to <strong>Use</strong><br />
Following is the Homepage of the <strong>Network</strong> <strong>Video</strong> <strong>Recorder</strong>.<br />
Configuration page<br />
Note<br />
If you want to record live video and playback the recorded video, you have<br />
to add devices to the <strong>Network</strong> <strong>Video</strong> <strong>Recorder</strong> on the Configuration page.<br />
For further setup, please refer to user's manual on the software CD.<br />
EN - 8
New Taipei City<br />
P/N: 625013601G Ver.1.1<br />
Copyright c 2011 VIVOTEK INC. All rights reserved.