Sealing Cable Ducts Data Sheet Download - Triton Chemicals
Sealing Cable Ducts Data Sheet Download - Triton Chemicals
Sealing Cable Ducts Data Sheet Download - Triton Chemicals

Create successful ePaper yourself
Turn your PDF publications into a flip-book with our unique Google optimized e-Paper software.
Specification for <strong>Sealing</strong> <strong>Cable</strong> <strong>Ducts</strong><br />
Methodology<br />
1. Clean out the inside of the duct thoroughly of loose debris, dirt and contaminants.<br />
2. Raise the cables from the bottom section of the duct so they are suspended throughout the duct length. This will<br />
ensure that the <strong>Triton</strong> 190 Resin will fully encapsulate the cables. Spray the inside of the pipe duct with clean water.<br />
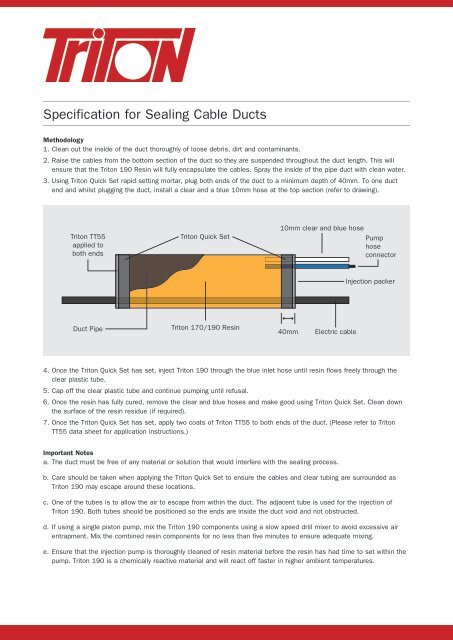
3. Using <strong>Triton</strong> Quick Set rapid setting mortar, plug both ends of the duct to a minimum depth of 40mm. To one duct<br />
end and whilst plugging the duct, install a clear and a blue 10mm hose at the top section (refer to drawing).<br />
<strong>Triton</strong> TT55<br />
applied to<br />
both ends<br />
<strong>Triton</strong> Quick Set<br />
10mm clear and blue hose<br />
Pump<br />
hose<br />
connector<br />
Injection packer<br />
Duct Pipe<br />
<strong>Triton</strong> 170/190 Resin<br />
40mm<br />
Electric cable<br />
4. Once the <strong>Triton</strong> Quick Set has set, inject <strong>Triton</strong> 190 through the blue inlet hose until resin flows freely through the<br />
clear plastic tube.<br />
5. Cap off the clear plastic tube and continue pumping until refusal.<br />
6. Once the resin has fully cured, remove the clear and blue hoses and make good using <strong>Triton</strong> Quick Set. Clean down<br />
the surface of the resin residue (if required).<br />
7. Once the <strong>Triton</strong> Quick Set has set, apply two coats of <strong>Triton</strong> TT55 to both ends of the duct. (Please refer to <strong>Triton</strong><br />
TT55 data sheet for application instructions.)<br />
Important Notes<br />
a. The duct must be free of any material or solution that would interfere with the sealing process.<br />
b. Care should be taken when applying the <strong>Triton</strong> Quick Set to ensure the cables and clear tubing are surrounded as<br />
<strong>Triton</strong> 190 may escape around these locations.<br />
c. One of the tubes is to allow the air to escape from within the duct. The adjacent tube is used for the injection of<br />
<strong>Triton</strong> 190. Both tubes should be positioned so the ends are inside the duct void and not obstructed.<br />
d. If using a single piston pump, mix the <strong>Triton</strong> 190 components using a slow speed drill mixer to avoid excessive air<br />
entrapment. Mix the combined resin components for no less than five minutes to ensure adequate mixing.<br />
e. Ensure that the injection pump is thoroughly cleaned of resin material before the resin has had time to set within the<br />
pump. <strong>Triton</strong> 190 is a chemically reactive material and will react off faster in higher ambient temperatures.
Typical Usage<br />
Length Diameter <strong>Triton</strong> Quick Set <strong>Triton</strong> 190<br />
300 50 0.26kg 0.44 litres<br />
300 100 1.00kg 1.73 litres<br />
300 150 2.27kg 3.89 litres<br />
400 50 0.26kg 0.63 litres<br />
400 100 1.00kg 2.52 litres<br />
400 150 2.27kg 5.66 litres<br />
500 50 0.26kg 0.83 litres<br />
500 100 1.00kg 3.30 litres<br />
500 150 2.27kg 7.42 litres<br />
The above quantities show typical usage and should be used as a guidance to material consumption only. Other factors<br />
such as wastage and allowances for internal cables should be taken into account when calculating consumption.<br />
<strong>Triton</strong> Contact Details:<br />
<strong>Triton</strong> Systems<br />
Units 3 – 5 Crayford Commercial Centre, Greyhound Way, Crayford, Kent DA1 4HF<br />
Tel: 01322 318830<br />
Fax: 01322 524017<br />
Email: info@tritonsystems.co.uk<br />
www.tritonsystems.co.uk<br />
0624 11/11