ARP Magazine - Associate Reformed Presbyterian Church
ARP Magazine - Associate Reformed Presbyterian Church
ARP Magazine - Associate Reformed Presbyterian Church

Create successful ePaper yourself
Turn your PDF publications into a flip-book with our unique Google optimized e-Paper software.
Give Thanks!<br />
30 days of Gratitude for the Thanksgiving<br />
month of November!<br />
By Jennifer Jordan and family<br />
Materials:<br />
Wood board (although you can use just about any flat surface you want)<br />
Canvas (any color)<br />
Staple gun<br />
Mod Podge<br />
Glue gun<br />
Glue stick<br />
Variety of coordinating scrapbook paper<br />
Different colored thin ribbons (I used brown, green, yellow and orange)<br />
Light-colored Cardstock for writing your “thankful message” on.<br />
30 Coin Envelopes. Mine were 3 3/8” x 6”.<br />
Hole punch<br />
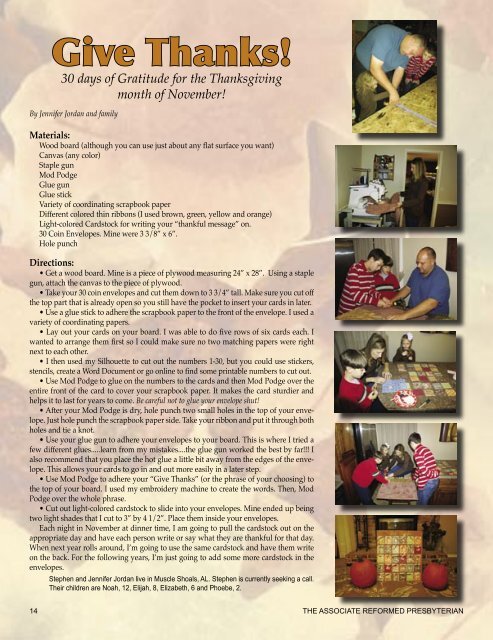
Directions:<br />
• Get a wood board. Mine is a piece of plywood measuring 24” x 28”. Using a staple<br />
gun, attach the canvas to the piece of plywood.<br />
• Take your 30 coin envelopes and cut them down to 3 3/4” tall. Make sure you cut off<br />
the top part that is already open so you still have the pocket to insert your cards in later.<br />
• Use a glue stick to adhere the scrapbook paper to the front of the envelope. I used a<br />
variety of coordinating papers.<br />
• Lay out your cards on your board. I was able to do five rows of six cards each. I<br />
wanted to arrange them first so I could make sure no two matching papers were right<br />
next to each other.<br />
• I then used my Silhouette to cut out the numbers 1-30, but you could use stickers,<br />
stencils, create a Word Document or go online to find some printable numbers to cut out.<br />
• Use Mod Podge to glue on the numbers to the cards and then Mod Podge over the<br />
entire front of the card to cover your scrapbook paper. It makes the card sturdier and<br />
helps it to last for years to come. Be careful not to glue your envelope shut!<br />
• After your Mod Podge is dry, hole punch two small holes in the top of your envelope.<br />
Just hole punch the scrapbook paper side. Take your ribbon and put it through both<br />
holes and tie a knot.<br />
• Use your glue gun to adhere your envelopes to your board. This is where I tried a<br />
few different glues.....learn from my mistakes....the glue gun worked the best by far!!! I<br />
also recommend that you place the hot glue a little bit away from the edges of the envelope.<br />
This allows your cards to go in and out more easily in a later step.<br />
• Use Mod Podge to adhere your “Give Thanks” (or the phrase of your choosing) to<br />
the top of your board. I used my embroidery machine to create the words. Then, Mod<br />
Podge over the whole phrase.<br />
• Cut out light-colored cardstock to slide into your envelopes. Mine ended up being<br />
two light shades that I cut to 3” by 4 1/2”. Place them inside your envelopes.<br />
Each night in November at dinner time, I am going to pull the cardstock out on the<br />
appropriate day and have each person write or say what they are thankful for that day.<br />
When next year rolls around, I’m going to use the same cardstock and have them write<br />
on the back. For the following years, I’m just going to add some more cardstock in the<br />
envelopes.<br />
Stephen and Jennifer Jordan live in Muscle Shoals, AL. Stephen is currently seeking a call.<br />
Their children are Noah, 12, Elijah, 8, Elizabeth, 6 and Phoebe, 2.<br />
14 THE ASSOCIATE REFORMED PRESBYTERIAN