XRAY M18 PRO Instruction Manual
XRAY M18 PRO Instruction Manual
XRAY M18 PRO Instruction Manual

Create successful ePaper yourself
Turn your PDF publications into a flip-book with our unique Google optimized e-Paper software.
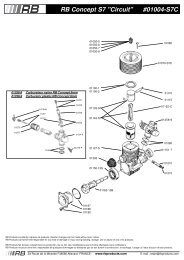
1. 2. 3.<br />
ALIGN FLAT SPOTS<br />
DETAIL<br />
CUT OFF<br />
FACTORY PRE-ASSEMBLED<br />
VERY IMPORTANT<br />
ALIGN FLAT<br />
SPOTS<br />
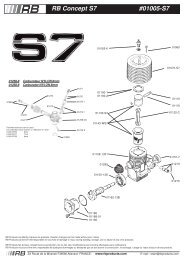
DIFFERENTIAL BREAK-IN AND ADJUSTMENT:<br />
The ball differentials in the <strong>M18</strong> <strong>PRO</strong> comes pre-built from the factory, but you must still<br />
perform a proper break-in on them in order to have them perform properly and give long<br />
life. The key is to gradually tighten the diff to break it in properly and obtain the correct<br />
tightness. DO NOT overtighten the diff initially or damage will result.<br />
When initially tightening the diff, the screw should be tightened enough so that diff cannot be rotated<br />
while holding both<br />
When breaking in the diff, the balls create a groove in the diff rings; this is normal and essential for proper<br />
operation. If you overtighten the diff initially, the balls will mar the surface of the rings (and damage the parts)<br />
instead of creating a proper groove in the rings.<br />
Adjusting the differentials is easy to do. Tighten the diff until you feel some resistance; you do not need to make large adjustments - 1/16 or 1/8 of a<br />
turn will make a noticeable change in diff tightness.<br />
Reassemble the car, run it for a few minutes, and then tighten each diff a little bit. Repeat this several times to break in the diff and set the correct<br />
tightness.<br />
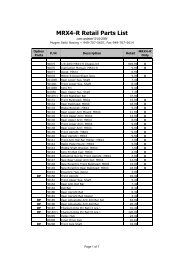
930020<br />
B 2.4<br />
930407<br />
BB 4x7x2.5<br />
907270<br />
2.5x20<br />
960025<br />
N M2.5<br />
930025<br />
BA 2.5x0.8<br />
930812<br />
BB 8x12x3.5<br />
5