Instruction Manual - Minicars
Instruction Manual - Minicars
Instruction Manual - Minicars

Create successful ePaper yourself
Turn your PDF publications into a flip-book with our unique Google optimized e-Paper software.
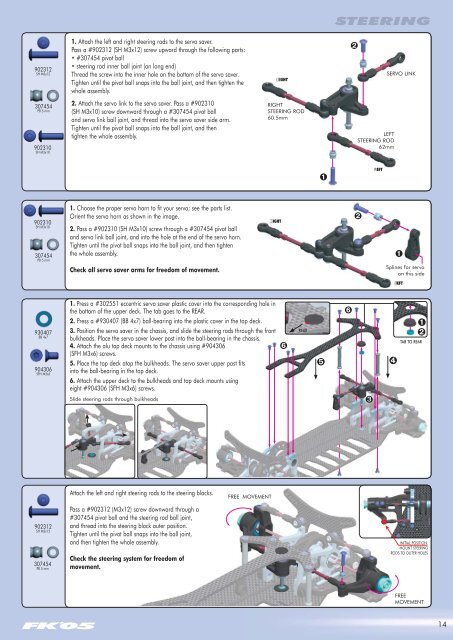
STEERING<br />
902312<br />
SH M3x12<br />
1. Attach the left and right steering rods to the servo saver.<br />
Pass a #902312 (SH M3x12) screw upward through the following parts:<br />
• #307454 pivot ball<br />
• steering rod inner ball joint (on long end)<br />
Thread the screw into the inner hole on the bottom of the servo saver.<br />
Tighten until the pivot ball snaps into the ball joint, and then tighten the<br />
whole assembly.<br />
➋<br />
SERVO LINK<br />
307454<br />
PB 5 mm<br />
902310<br />
SH M3x10<br />
2. Attach the servo link to the servo saver. Pass a #902310<br />
(SH M3x10) screw downward through a #307454 pivot ball<br />
and servo link ball joint, and thread into the servo saver side arm.<br />
Tighten until the pivot ball snaps into the ball joint, and then<br />
tighten the whole assembly.<br />
RIGHT<br />
STEERING ROD<br />
60.5mm<br />
LEFT<br />
STEERING ROD<br />
62mm<br />
➊<br />
902310<br />
SH M3x10<br />
307454<br />
PB 5 mm<br />
1. Choose the proper servo horn to fit your servo; see the parts list.<br />
Orient the servo horn as shown in the image.<br />
2. Pass a #902310 (SH M3x10) screw through a #307454 pivot ball<br />
and servo link ball joint, and into the hole at the end of the servo horn.<br />
Tighten until the pivot ball snaps into the ball joint, and then tighten<br />
the whole assembly.<br />
Check all servo saver arms for freedom of movement.<br />
➋<br />
➊<br />
Splines for servo<br />
on this side<br />
930407<br />
BB 4x7<br />
904306<br />
SFH M3x6<br />
1. Press a #302551 eccentric servo saver plastic cover into the corresponding hole in<br />
the bottom of the upper deck. The tab goes to the REAR.<br />
2. Press a #930407 (BB 4x7) ball-bearing into the plastic cover in the top deck.<br />
3. Position the servo saver in the chassis, and slide the steering rods through the front<br />
bulkheads. Place the servo saver lower post into the ball-bearing in the chassis.<br />
4. Attach the alu top deck mounts to the chassis using #904306<br />
(SFH M3x6) screws.<br />
5. Place the top deck atop the bulkheads. The servo saver upper post fits<br />
into the ball-bearing in the top deck.<br />
6. Attach the upper deck to the bulkheads and top deck mounts using<br />
eight #904306 (SFH M3x6) screws.<br />
➏<br />
REAR<br />
➎<br />
➏<br />
➍<br />
➊<br />
➋<br />
TAB TO REAR<br />
Slide steering rods through bulkheads<br />
➌<br />
Attach the left and right steering rods to the steering blocks.<br />
FREE MOVEMENT<br />
902312<br />
SH M3x12<br />
307454<br />
PB 5 mm<br />
Pass a #902312 (M3x12) screw downward through a<br />
#307454 pivot ball and the steering rod ball joint,<br />
and thread into the steering block outer position.<br />
Tighten until the pivot ball snaps into the ball joint,<br />
and then tighten the whole assembly.<br />
Check the steering system for freedom of<br />
movement.<br />
INITIAL POSITION:<br />
MOUNT STEERING<br />
RODS TO OUTER HOLES<br />
FREE<br />
MOVEMENT<br />
14