Instruction Manual - Minicars
Instruction Manual - Minicars
Instruction Manual - Minicars

You also want an ePaper? Increase the reach of your titles
YUMPU automatically turns print PDFs into web optimized ePapers that Google loves.
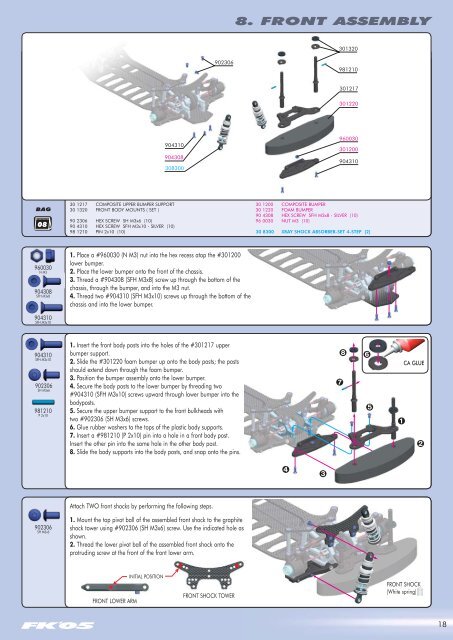
8. FRONT ASSEMBLY<br />
301320<br />
902306<br />
981210<br />
301217<br />
301220<br />
904310<br />
904308<br />
308300<br />
960030<br />
301200<br />
904310<br />
BAG<br />
08<br />
30 1217 COMPOSITE UPPER BUMPER SUPPORT<br />
30 1320 FRONT BODY MOUNTS ( SET )<br />
90 2306 HEX SCREW SH M3x6 (10)<br />
90 4310 HEX SCREW SFH M3x10 - SILVER (10)<br />
98 1210 PIN 2x10 (10)<br />
30 1200 COMPOSITE BUMPER<br />
30 1220 FOAM BUMPER<br />
90 4308 HEX SCREW SFH M3x8 - SILVER (10)<br />
96 0030 NUT M3 (10)<br />
30 8300 XRAY SHOCK ABSORBER-SET 4-STEP (2)<br />
960030<br />
N M3<br />
904308<br />
SFH M3x8<br />
904310<br />
SFH M3x10<br />
1. Place a #960030 (N M3) nut into the hex recess atop the #301200<br />
lower bumper.<br />
2. Place the lower bumper onto the front of the chassis.<br />
3. Thread a #904308 (SFH M3x8) screw up through the bottom of the<br />
chassis, through the bumper, and into the M3 nut.<br />
4. Thread two #904310 (SFH M3x10) screws up through the bottom of the<br />
chassis and into the lower bumper.<br />
904310<br />
SFH M3x10<br />
902306<br />
SH M3x6<br />
981210<br />
P 2x10<br />
1. Insert the front body posts into the holes of the #301217 upper<br />
bumper support.<br />
2. Slide the #301220 foam bumper up onto the body posts; the posts<br />
should extend down through the foam bumper.<br />
3. Position the bumper assembly onto the lower bumper.<br />
4. Secure the body posts to the lower bumper by threading two<br />
#904310 (SFH M3x10) screws upward through lower bumper into the<br />
bodyposts.<br />
5. Secure the upper bumper support to the front bulkheads with<br />
two #902306 (SH M3x6) screws.<br />
6. Glue rubber washers to the tops of the plastic body supports.<br />
7. Insert a #981210 (P 2x10) pin into a hole in a front body post.<br />
Insert the other pin into the same hole in the other body post.<br />
8. Slide the body supports into the body posts, and snap onto the pins.<br />
➑<br />
➐<br />
➏<br />
➎<br />
➊<br />
CA GLUE<br />
➋<br />
➍<br />
➌<br />
Attach TWO front shocks by performing the following steps.<br />
902306<br />
SH M3x6<br />
1. Mount the top pivot ball of the assembled front shock to the graphite<br />
shock tower using #902306 (SH M3x6) screw. Use the indicated hole as<br />
shown.<br />
2. Thread the lower pivot ball of the assembled front shock onto the<br />
protruding screw at the front of the front lower arm.<br />
FRONT LOWER ARM<br />
INITIAL POSITION<br />
FRONT SHOCK TOWER<br />
FRONT SHOCK<br />
(White spring)<br />
18