4400 Series Mounting Instructions - Knox Box
4400 Series Mounting Instructions - Knox Box
4400 Series Mounting Instructions - Knox Box

You also want an ePaper? Increase the reach of your titles
YUMPU automatically turns print PDFs into web optimized ePapers that Google loves.
8" H<br />
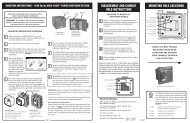
Recessed <strong>Mounting</strong> Kit (RMK)<br />
The optional Recessed <strong>Mounting</strong> Kit is for use in<br />
new concrete or masonry construction only. The kit<br />
includes a shell housing and mounting hardware to<br />
be cast-in-place. The KNOX-VAULT is mounted into<br />
the shell housing after construction is completed.<br />
Rough in Dimensions: 8 1/2"H x 8 1/2"W x 7"D<br />
Installation: <strong>Mounting</strong> kit may be fastened to inside<br />
wall of a concrete form or set in place<br />
during masonry wall construction.<br />
Wiring conduit may be connected<br />
through knock-out hole(s) in the<br />
shell housing.<br />
Recessed <strong>Mounting</strong> Using<br />
Recessed <strong>Mounting</strong> Kit (RMK)<br />
KNOX-VAULT<br />
mounts inside<br />
RMK shell after<br />
completion of<br />
construction<br />
RMK shell is<br />
mounted in wall<br />
during new<br />
construction<br />
Knockouts<br />
for alarm<br />
wire conduit<br />
Trim rebar<br />
for tie-in<br />
to wall if<br />
necessary<br />
IMPORTANT: Take care to make sure that the front of the shell<br />
housing, including the cover plate and screw heads, are flush with<br />
the finish wall. Leave cover and screws in place until the KNOX-<br />
VAULT is ready for mounting inside. The five (5) mounting studs<br />
may be replaced with bolts or longer studs if required. Do not<br />
over tighten mounting nuts as this may distort the outside flange.<br />
Two (2) long sheet metal screws are provided for attachment of<br />
shell housing to the inside of a concrete form. With the housing<br />
held firmly in place, drill two (2) 1/8" holes through the form wall<br />
and the housing front cover. Insert screws and pull housing tight<br />
against form wall. Remove screws before removing form.<br />
Recessed<br />
Flange<br />
<strong>Mounting</strong> studs<br />
provided inside RMK<br />
shell to accommodate<br />
KNOX-VAULT<br />
8 1/8" W<br />
6 1/8" D<br />
Concrete or<br />
masonry wall<br />
construction<br />
Recessed <strong>Mounting</strong> in Solid Concrete Wall<br />
1. Bore 9-1/2” or 10” diameter hole through solid wall.<br />
2. Install KNOX-VAULT per General <strong>Mounting</strong><br />
<strong>Instructions</strong>, including steel mounting plate.<br />
3. Install electrical wiring if required.<br />
4. Grout-in visible hole on all four sides of<br />
KNOX-VAULT.<br />
5. Patch exterior paint if needed.<br />
Circular Bore Hole<br />
BACK VIEW<br />
9-1/2" or 10" Diameter<br />
SIDE VIEW<br />
Concrete<br />
Grout<br />
Backfill<br />
FRONT VIEW<br />
Solid<br />
Concrete Wall<br />
1/4” Steel <strong>Mounting</strong> Plate Required<br />
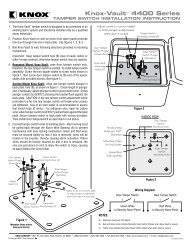
MOUNTING INSTRUCTIONS<br />
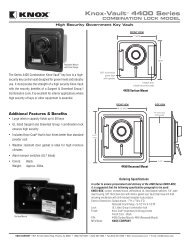
<strong>4400</strong> <strong>Series</strong><br />
KNOX-VAULT ®<br />
MOUNTING INSTRUCTIONS<br />
<strong>4400</strong> <strong>Series</strong><br />
KNOX-VAULT ®<br />
Models<br />
<strong>4400</strong> Surface Mount<br />
<strong>4400</strong> Recessed Mount<br />
Models<br />
<strong>4400</strong> Surface Mount<br />
<strong>4400</strong> Recessed Mount<br />
Issue Date: November 2010<br />
Issue Date: November 2010<br />
1601 W. Deer Valley Road, Phoenix, AZ 85027<br />
800-552-5669 • Fax 623-687-2299<br />
E-mail: info@knoxbox.com<br />
1601 W. Deer Valley Road, Phoenix, AZ 85027<br />
800-552-5669 • Fax 623-687-2299<br />
E-mail: info@knoxbox.com<br />
OPE-KBSPEC-0035-B<br />
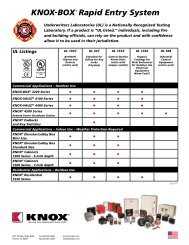
<strong>Knox</strong> ® Rapid Entry System<br />
The <strong>Knox</strong> Company manufactures a complete line of high security products<br />
including <strong>Knox</strong>-<strong>Box</strong> ® key boxes, key vaults, armored cabinets, key switches,<br />
padlocks and electronic master key retention devices.<br />
For information and technical assistance, call:<br />
800-552-5669
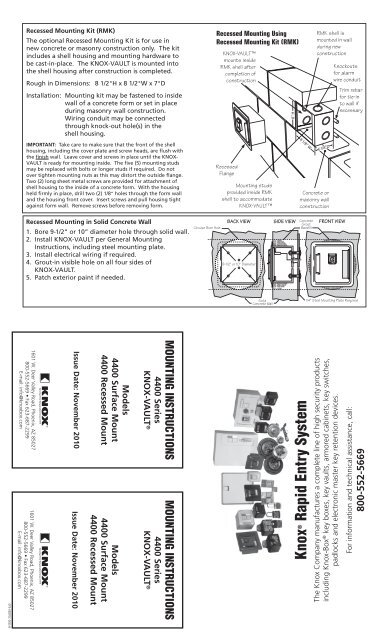
MOUNTING INSTRUCTIONS<br />
<strong>4400</strong> <strong>Series</strong> KNOX-VAULT ®<br />
Dust Cover<br />
Hinge<br />
Tamper<br />
Switch<br />
Warning<br />
Label<br />
Read instructions carefully before mounting.<br />
The <strong>4400</strong> <strong>Series</strong> KNOX-VAULT ® is a heavy-duty, high-security key vault that<br />
stores building keys, access cards and floor plans for emergency entry. Each key<br />
vault is coated with the <strong>Knox</strong>-Coat ® proprietary finishing process* and includes<br />
a 1/8” thick stainless steel dust cover to protect the lock. For maximum security,<br />
mount the unit properly in an area sheltered from excessive moisture. All keys<br />
stored in the unit must be hung on the key hooks supplied inside.<br />
All <strong>4400</strong> <strong>Series</strong> <strong>Knox</strong>-Vaults are fully tested and listed by Underwriters<br />
Laboratories as anti-theft devices. Alarm tamper switches are UL listed as Central<br />
Station Alarm Units. UL Electrical Range: Max Voltage of 24 VDC at 50 mA.<br />
WARNING: While mounting, vault door may swing suddenly and pinch fingers.<br />
Always handle with one hand on door and one hand on vault to prevent injury.<br />
Surface Mounted Models<br />
Surface models are designed for mounting on a flat wall. Do not mount face<br />
down from ceiling or overhang area. When the KNOX-VAULT model includes<br />
tamper switches, set the tamper switches aside until the box is mounted on<br />
the wall. Do not allow the top right-hand bolt to extend too far into the box<br />
so as to interfere with the door tamper switch. Check to see that the “box to<br />
wall” tamper plunger is properly depressed. If switch plunger does not properly<br />
depress, adjust the screw on the plunger for the proper length.<br />
If installing on a thin or hollow wall, use a solid backing (ex: 1/4" steel plate) to<br />
properly reinforce for secure mounting. <strong>Mounting</strong> to solid studs or steel support is<br />
required. Alarm wiring/testing should be performed by a qualified alarm installer.<br />
Recess Mounted Models<br />
Recess models are designed for flush mounting. Do not mount face down from<br />
ceiling or overhang area. Units can be adapted to fit a variety of solid walls or<br />
in a concrete wall. A Recessed <strong>Mounting</strong> Kit is recommended for concrete or<br />
masonry walls under construction. Do not over tighten mounting bolts as this<br />
will distort the flange.<br />
When the KNOX-VAULT model includes tamper switches, set the tamper switches<br />
aside until the box is flush mounted. Do not allow the top right mounting bolt<br />
to extend too far into the box so as to interfere with the door tamper switch.<br />
Wiring should be pulled tight so that attempts to force the box out of the wall<br />
will break the wire or pull the terminals loose. If installing the box on a thin<br />
or hollow wall, use a solid backing (like 3/8" steel plate fastened to solid studs<br />
on both sides) for secure mounting. <strong>Mounting</strong> to solid studs or steel support is<br />
always required. Alarm wiring/testing should be performed by a qualified alarm<br />
installer.<br />
General <strong>Mounting</strong> <strong>Instructions</strong><br />
1. Always mount your KNOX-VAULT to a secure, solid wall, beam or post. A six<br />
foot height level is recommended to resist vandalism.<br />
2. Use a small level to plumb the vault square.<br />
3. Mount the KNOX-VAULT with the green mounting markers pointed up so<br />
the small moisture drain hole is on the bottom. Remove green markers after<br />
installation.<br />
4. Use at least four(4) (5th center hole is optional) Grade 5 or Grade 8 fasteners<br />
(carriage bolts, etc.) of 3/8" diameter. Units may also be welded into place.<br />
<strong>Mounting</strong> to solid studs or steel supports is required. <strong>Mounting</strong> face down<br />
from ceiling or overhang area may cause contents to jam lock.<br />
5. Caulk the sides and the top between the wall and the box for water proofing.<br />
Leave the bottom open for drainage.<br />
6. Use of a professional locksmith or alarm products installer is highly<br />
recommended.<br />
IMPORTANT: When mounting of the KNOX-BOX is complete, contact your local fire<br />
department to inform them the box is ready for lock up. They have the only key.<br />
For private, industrial or commercial use: keys will be sent separately to address<br />
requested.<br />
Door Removal and Adjustment<br />
If door must be removed, remove only the top and bottom hinge pin screws. Do<br />
not remove the three hinge bracket screws as these are factory set for proper door<br />
alignment. When replacing the door, adjust hinge pin screws loose enough so that<br />
door swings freely. Thread locker (LOCTITE) must be used on hinge pin screws.<br />
<strong>Series</strong> <strong>4400</strong> Recessed<br />
All mounting<br />
holes are 7/16"<br />
diameter<br />
<strong>Mounting</strong> holes<br />
for key hooks<br />
Door<br />
Alarm wire<br />
exit opening<br />
3-9/16"<br />
2" 7/8"<br />
3-1/2"<br />
3/8" Grade 5 or<br />
Grade 8 fastener<br />
Flange<br />
INSIDE VIEW<br />
7" WIDE<br />
<strong>Series</strong> <strong>4400</strong><br />
Surface Mount<br />
with optional<br />
Tamper Switch<br />
2-1/2"<br />
3/8"<br />
3/8"<br />
Rear Tamper<br />
Switch<br />
<strong>Mounting</strong> Holes<br />
1"<br />
TYP.<br />
1-1/8"<br />
1"<br />
1-1/4"<br />
2-1/2"<br />
7"<br />
HIGH<br />
1-1/4"<br />
Suggested minimum mounting height<br />
6 feet above ground<br />
Tamper<br />
Switches (2)<br />
Solid concrete wall<br />
Solid concrete wall<br />
1"<br />
Large<br />
Thick Steel<br />
Washer<br />
To building alarm system<br />
<strong>Series</strong> <strong>4400</strong> Surface Mount<br />
<strong>Series</strong> <strong>4400</strong> Recessed Mount<br />
CAUTION! The KNOX-VAULT door<br />
is equipped with a security relocking<br />
device. Do not lock vault<br />
with the lock mechanism cover<br />
removed or lockout will result.<br />
The large plastic washers holding<br />
this cover are special and must not<br />
be changed to another type.<br />
* <strong>Knox</strong>-Coat is a proprietary finishing process<br />
that protects <strong>Knox</strong> products up to four times<br />
better than standard powder coat.<br />
1601 W. Deer Valley Road, Phoenix, AZ 85027<br />
800-552-5669 • Fax 623-687-2299 • E-mail: info@knoxbox.com<br />
© 2005 <strong>Knox</strong> Company. All rights reserved. OPE-KBSPEC-0035-B