
Create successful ePaper yourself
Turn your PDF publications into a flip-book with our unique Google optimized e-Paper software.
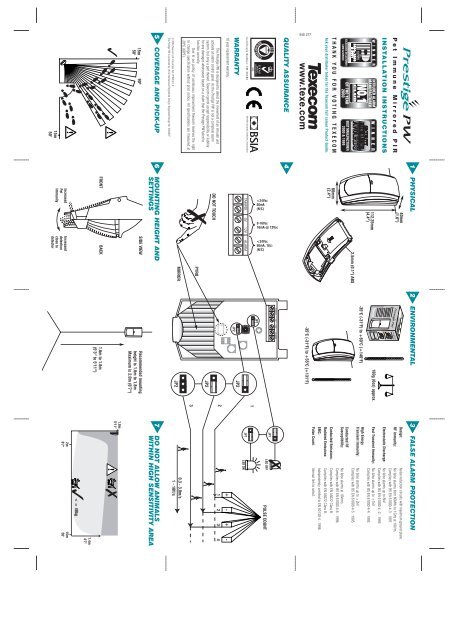
15m<br />
50’<br />
!<br />
✓<br />
!<br />
15m<br />
50’<br />
90º<br />
5 COVERAGE AND PICK-UP<br />
© 2004 Texe<strong>com</strong> Ltd. Document Ref: PPW/EU/1.0<br />
The Prestige PW is protected by UK & International Registered Design. Registered Design No: 3004997<br />
The Prestige PW is designed to detect the movement of an intruder and<br />
activate an alarm control panel. As the Prestige PW is not a <strong>com</strong>plete alarm<br />
system, but only a part thereof, Texe<strong>com</strong> cannot accept responsibility or liability<br />
for any damages whatsoever based on a claim that the Prestige PW failed to<br />
function correctly.<br />
Due to our policy of continuous improvement Texe<strong>com</strong> reserves the right<br />
to change specification without prior notice. All specifications are measured at<br />
20ºC (68ºF).<br />
10 year replacement warranty.<br />
WARRANTY<br />
Certificate Number: FM 35285<br />
QUALITY ASSURANCE<br />
INS 277<br />
<strong>www</strong>.<strong>texe</strong>.<strong>com</strong><br />
Ask your distributor today for the Texe<strong>com</strong> full colour Product Guide.<br />
THANK YOU FOR VOTING TEXECOM<br />
W I N N E R<br />
INSTALLATION INSTRUCTIONS<br />
P et Immune Mirrored PIR<br />
1 PHYSICAL<br />
40mm<br />
(1.6”)<br />
112.25mm<br />
(4.4”)<br />
2.5mm (0.1”) ABS<br />
60mm<br />
(2.4”)<br />
4<br />
DO NOT TOUCH<br />
✗<br />
PYRO<br />
MIRROR<br />
6 MOUNTING HEIGHT AND<br />
SETTINGS<br />
SIDE VIEW<br />
FRONT BACK<br />
Increased<br />
Pet<br />
Immunity<br />
Increased<br />
detection<br />
close to<br />
detector<br />
2 ENVIRONMENTAL<br />
<br />
180g (6oz) approx.<br />
-35°C (-31°F) to +60°C (+140°F)<br />
-35°C (-31°F) to +55°C (+131°F)<br />
Re<strong>com</strong>mended mounting<br />
height is 1.6m to 1.8m<br />
Maximum is 2.0m (6’7’’)<br />
1.6m to 1.8m<br />
(5’3’’ to 5’11’’)<br />
<br />
1<br />
2<br />
3<br />
3 FALSE ALARM PROTECTION<br />
Design: Noise reduction circuits with maximum ground plane.<br />
RF Immunity: No false alarms from 80MHz to 1GHz at 10V/m.<br />
Complies with BS EN 61000-4-3 : 1997.<br />
Electrostatic Discharge: No false alarms up to 8kV.<br />
Complies with BS EN 61000-4 -2 : 1995.<br />
Fast Transient Immunity: No false alarms up to ±1kV.<br />
Complies with BS EN 61000-4-4 : 1995.<br />
High Energy<br />
Transient Immunity: No false alarms up to ±2kV.<br />
Complies with BS EN 61000-4-5 : 1995.<br />
Conducted RF<br />
Susceptibility: No false alarms at 10Vrms.<br />
Complies with BS EN 61000-4-6 : 1996.<br />
Conducted Emissions: Complies with EN 55022 Class B.<br />
Radiated Emissions: Complies with EN 55022 Class B.<br />
EMC: Independently certified to EN 50130-4 : 1996.<br />
Pulse Count: Internal link to select.<br />
JP1 ✗<br />
LED OFF<br />
PULSE COUNT<br />
JP1<br />
LED ON<br />
0.3 - 3.0m/s<br />
1 - 10ft/s<br />
7 DO NOT ALLOW ANIMALS<br />
WITHIN HIGH SENSITIVITY AREA<br />
1.8m<br />
5'11''<br />
!<br />
✗<br />
2m<br />
6'7''<br />
✓<br />
< = 40kg<br />
15m<br />
50'<br />
1.4m<br />
4'7''
INS 277<br />
2<br />
1 3<br />
16 WALL MOUNT BRACKET<br />
✓<br />
230V<br />
110V<br />
✗<br />
12 WIRING<br />
Do not run cable parallel to mains wiring<br />
See Mounting Height Diagram (Section 6)<br />
8 COVERAGE PATTERN<br />
230V<br />
110V<br />
4<br />
9 PET IMMUNITY ADJUSTMENT<br />
For maximum pet immunity install at 1.8m &<br />
pull mirror fully forwards<br />
13 CHOOSING A LOCATION<br />
Avoid <strong>com</strong>mon false alarm sources<br />
5<br />
6<br />
10 MOUNTING THE PRESTIGE PW<br />
For indoor use only<br />
11 MOUNTING THE PRESTIGE PW<br />
Mount on a stable surface<br />
✗ ✗ ✓ ✓<br />
✓<br />
14 HOW TO REMOVE THE CHASSIS<br />
Remove chassis before mounting the detector<br />
15 DETECTOR KNOCKOUTS<br />
1<br />
2<br />
✗<br />
7<br />
8<br />
Seal all holes<br />
✓<br />
!<br />
Ensure mirror is in correct position<br />
(see Section 9)