repair s5 window - Leisure Spares
repair s5 window - Leisure Spares
repair s5 window - Leisure Spares

Create successful ePaper yourself
Turn your PDF publications into a flip-book with our unique Google optimized e-Paper software.
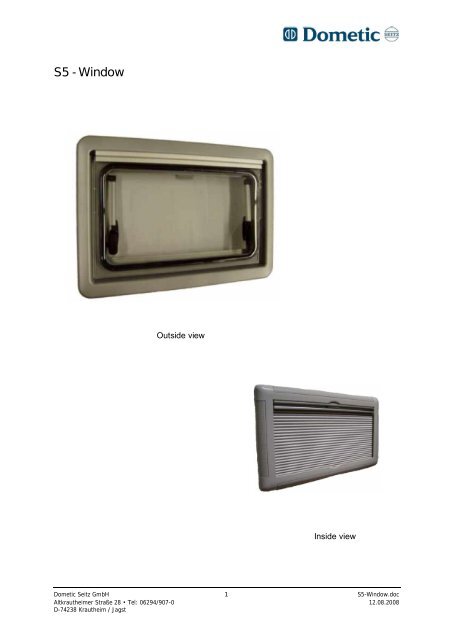
S5 - Window<br />
Outside view<br />
Inside view<br />
Dometic Seitz GmbH 1 S5-Window.doc<br />
Altkrautheimer Straße 28 • Tel: 06294/907-0 12.08.2008<br />
D-74238 Krautheim / Jagst
Exterior frame<br />
End cap<br />
Sealing rubber between<br />
exterior frame and wall<br />
(Foam rubber)<br />
Frame<br />
hinge strip<br />
Seal between exterior<br />
frame and pane<br />
PROBLEM:<br />
Replacement of the exterior frame<br />
Replacement of the sealing rubber<br />
Replacement of the end cap<br />
Dometic Seitz GmbH 2 S5-Window.doc<br />
Altkrautheimer Straße 28 • Tel: 06294/907-0 12.08.2008<br />
D-74238 Krautheim / Jagst
Replacement of the exterior frame<br />
For dismounting the exterior frame remove the ventilation grating of the interior frame first<br />
and then loosen all screws from the interior frame.<br />
Caution !: Before the screwed connections of the exterior frame are loosened, it must be<br />
ensured that the <strong>window</strong> is secured from outside against falling out.<br />
Carefully remove the interior frame and exterior frame completely, beginning at a corner of<br />
the partition wall of vehicle. Before the insertion of the new exterior frame, the sealing surface<br />
of the wall section is to be cleaned. With the installation, a suitable caulking material must be<br />
employed. Permanently-plastic sealant mass (bead ø 6-8mm) is applied all round in the corner<br />
of the frame to seal the exterior frame. From inside, the exterior and interior frames are<br />
screwed together with each other, where it is to be ensured that the screws are not tightened<br />
too much (max. tightening torque 3 Nm).<br />
Replacement of the sealing rubber<br />
Remove sealing rubber from the slot<br />
Caution!:<br />
Bond at the corners and at the joint with superglue..<br />
Remove adhesive residue with the aid of a small screwdriver. While<br />
inserting the new sealing rubber, it is to be ensured that the joint of the<br />
rubber seats centrally below. In order to stabilize the rubber, it is required<br />
to fix the corners and the joint with superglue.<br />
Replacement of the end cap<br />
If the end cap has broken-off, there is a possibility of replacing it. For<br />
this, it is necessary to disconnect the rear leg of the flush end cap. Bond<br />
front side and leg to the frame hinge with the aid of superglue.<br />
Dometic Seitz GmbH 3 S5-Window.doc<br />
Altkrautheimer Straße 28 • Tel: 06294/907-0 12.08.2008<br />
D-74238 Krautheim / Jagst
Interior frame<br />
Fly protection<br />
Bushing<br />
Cord brake +<br />
spring<br />
Guide rail<br />
Ventilation<br />
section profile<br />
Spring drive<br />
Guide profile<br />
Closure rod<br />
laminated spring<br />
Latch<br />
Clamp bolt<br />
Ball<br />
End piece<br />
Closure rod<br />
Black-out material<br />
PROBLEM:<br />
Replacement of the complete interior frame<br />
Replacement of the fly protection <strong>window</strong> blind<br />
Replacement of the shade roller blind<br />
Replacement of the spring drive motor<br />
Replacement of the close-off<br />
Dometic Seitz GmbH 4 S5-Window.doc<br />
Altkrautheimer Straße 28 • Tel: 06294/907-0 12.08.2008<br />
D-74238 Krautheim / Jagst
Replacement of the complete interior frame<br />
Loosen and pull out ventilation section profile with the aid of a<br />
screwdriver at the side through lifting. Loosen screws and remove interior<br />
frame Before the loosening the last screw, it is to be ensured that the<br />
exterior frames with <strong>window</strong>pane cannot fall out. Installation<br />
implemented in reverse order. The tightening torque of 3 Nm is to be<br />
considered.<br />
Replacement of the fly protection <strong>window</strong> blind<br />
Loosen spring drive motor from receptacle frame with the aid of pointed<br />
pliers.<br />
Caution !:<br />
Spring is under stress. Danger of injury!<br />
The <strong>window</strong> blind can then be removed by tilting the closure rod from<br />
the interior frame. The installation is implemented in reverse order,<br />
considering the clamping bar.<br />
Clamping bar:<br />
Example:<br />
Tube length in mm/100 +3= rotation of the spring drive motor shaft<br />
Tube length =1000mm 1000mm/100+3= 13 that is: 13 rotations clockwise<br />
Replacement of the shade roller blind<br />
The shade roller blind is a cord-guided <strong>window</strong> blind. For the dismantling<br />
of the <strong>window</strong> blind the stress in the cord-pull brake must be relieved.<br />
Loosen all four cross-slotted screws at the corners completely.<br />
Caution !: Under the two cross-slotted screws on the black-out side is<br />
located a steel ball in each case. This must not be lost since it is required<br />
for the stressing.<br />
The remove the stapler clip from the bracket profile of the frame with a<br />
suitable screwdriver.<br />
Dometic Seitz GmbH 5 S5-Window.doc<br />
Altkrautheimer Straße 28 • Tel: 06294/907-0 12.08.2008<br />
D-74238 Krautheim / Jagst
Take the <strong>window</strong> blind from guide channel by slight tilting. Mounting of<br />
new fold-curtain roller blind in reverse order.<br />
Caution !: In fixing the <strong>window</strong> blind it is to be ensured that the cord<br />
with spring is installed above (on the fly protection <strong>window</strong> blind)<br />
without steel ball, so that the spring effect is guaranteed.<br />
Tighten <strong>window</strong> blind cords in parallel, i.e. springs at the upper end must be half tensed.<br />
Release one cord and securely tightening the held one with the aid of the cross-slotted screw<br />
and steel ball. Fix second cord then under the same stress. The roller blind run can be adjusted<br />
by tighter fixing of the cords. Carrying out sample closures after installation has been<br />
implemented and paying attention to right-angled closing of the closure rods with respect to<br />
the interior frame. Where appropriate, readjust.<br />
Replacement of the spring drive motor<br />
Release interior frames as described under replacement of the complete<br />
interior frame. Then remove <strong>window</strong> blind as described under<br />
replacement of the fly protection. Pull out the spring drive motor<br />
sideways and mount new part in reverse order.<br />
Caution !:<br />
Note clamping bar<br />
Clamping bar:<br />
Example:<br />
Tube length in mm/100 +3= rotation of the spring drive motor shaft<br />
Tube length =1000mm 1000mm/100+3= 13 that is: 13 rotations clockwise<br />
Replacement of the close-off<br />
Dismantling of the complete interior frame, as described under<br />
replacement of the complete interior frame. Then take out the fly<br />
protection <strong>window</strong> blind as described under replacement of the fly<br />
protection <strong>window</strong> blind.<br />
Removing side end cap from the single-sided closure rod with the aid of a<br />
plastic hammer.<br />
To remove the old part, insert screwdriver into slot and knock out<br />
sideways over the center point. With the insertion of the new part, it is to<br />
be ensured that the leaf spring is inserted together with the close-off.<br />
Subsequent assembling of the leaf spring is possible only under<br />
complicated conditions.<br />
Dometic Seitz GmbH 6 S5-Window.doc<br />
Altkrautheimer Straße 28 • Tel: 06294/907-0 12.08.2008<br />
D-74238 Krautheim / Jagst
Windowpane<br />
Articulated<br />
lug<br />
Windowpane<br />
hinge<br />
Opener with close-off<br />
(cick-clack or rotary<br />
opener)<br />
Fixed crossbar for fixed <strong>window</strong>s<br />
le<br />
re<br />
Rotary clamp left<br />
Rotary clamp right<br />
Disk<br />
PROBLEM:<br />
Windowpane replacement<br />
Replacement of the opener<br />
Replacement of the rotary clamps<br />
Dometic Seitz GmbH 7 S5-Window.doc<br />
Altkrautheimer Straße 28 • Tel: 06294/907-0 12.08.2008<br />
D-74238 Krautheim / Jagst
Windowpane<br />
replacement<br />
Loosen the cross-slotted screws at the side articulated supports of the<br />
opener. Unlock pane on the lock.<br />
Caution !: With opening the <strong>window</strong>pane through 90° it releases itself<br />
from the frame hinge and falls out.<br />
With fixing in a new acrylic pane, it must be ensured that the<br />
<strong>window</strong>pane hinge is positioned properly in the frame hinge. With fixing<br />
the <strong>window</strong>pane, the fitting angle must be >90°, so that the <strong>window</strong>pane<br />
hinge can be inserted into the frame hinge. Before closing, ensure<br />
freedom of movement in order to avoid possible damage in the hinge<br />
area. Then close <strong>window</strong> and fasten opener to the frame.<br />
Replacement of the opener<br />
In order to replace the opener, open <strong>window</strong> pane by approx. 45°. Then clip off the opener<br />
from the opener receptacle (rotary clamp). Dismantle openers at the articulated lug of the<br />
exterior frame. Mount the spare part in reverse order again.<br />
Replacement of the rotary clamp<br />
Loosen rotary clamp at the fixing screws and install new part in reverse order.<br />
Dometic Seitz GmbH 8 S5-Window.doc<br />
Altkrautheimer Straße 28 • Tel: 06294/907-0 12.08.2008<br />
D-74238 Krautheim / Jagst