

Tent Trailer ProFormance Bike Rack Installation ... - Racks For All
Tent Trailer ProFormance Bike Rack Installation ... - Racks For All
Tent Trailer ProFormance Bike Rack Installation ... - Racks For All

Create successful ePaper yourself
Turn your PDF publications into a flip-book with our unique Google optimized e-Paper software.
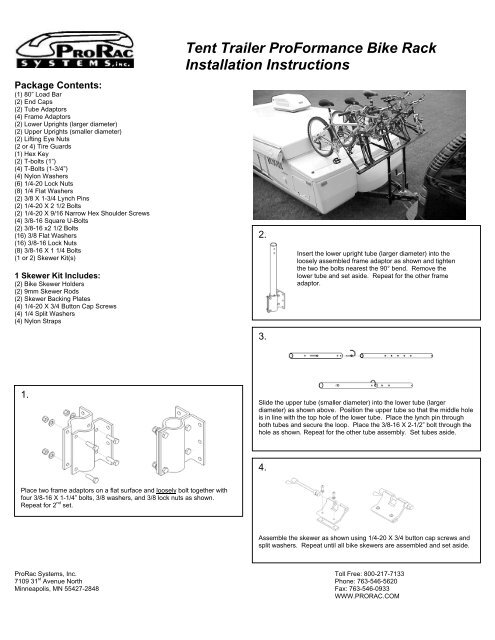
Package Contents:<br />
(1) 80” Load Bar<br />
(2) End Caps<br />
(2) Tube Adaptors<br />
(4) Frame Adaptors<br />
(2) Lower Uprights (larger diameter)<br />
(2) Upper Uprights (smaller diameter)<br />
(2) Lifting Eye Nuts<br />
(2 or 4) Tire Guards<br />
(1) Hex Key<br />
(2) T-bolts (1”)<br />
(4) T-Bolts (1-3/4”)<br />
(4) Nylon Washers<br />
(6) 1/4-20 Lock Nuts<br />
(8) 1/4 Flat Washers<br />
(2) 3/8 X 1-3/4 Lynch Pins<br />
(2) 1/4-20 X 2 1/2 Bolts<br />
(2) 1/4-20 X 9/16 Narrow Hex Shoulder Screws<br />
(4) 3/8-16 Square U-Bolts<br />
(2) 3/8-16 x2 1/2 Bolts<br />
(16) 3/8 Flat Washers<br />
(16) 3/8-16 Lock Nuts<br />
(8) 3/8-16 X 1 1/4 Bolts<br />
(1 or 2) Skewer Kit(s)<br />
1 Skewer Kit Includes:<br />
(2) <strong>Bike</strong> Skewer Holders<br />
(2) 9mm Skewer Rods<br />
(2) Skewer Backing Plates<br />
(4) 1/4-20 X 3/4 Button Cap Screws<br />
(4) 1/4 Split Washers<br />
(4) Nylon Straps<br />
<strong>Tent</strong> <strong>Trailer</strong> <strong>Pro<strong>For</strong>mance</strong> <strong>Bike</strong> <strong>Rack</strong><br />
<strong>Installation</strong> Instructions<br />
2.<br />
3.<br />
Insert the lower upright tube (larger diameter) into the<br />
loosely assembled frame adaptor as shown and tighten<br />
the two the bolts nearest the 90° bend. Remove the<br />
lower tube and set aside. Repeat for the other frame<br />
adaptor.<br />
1.<br />
Slide the upper tube (smaller diameter) into the lower tube (larger<br />
diameter) as shown above. Position the upper tube so that the middle hole<br />
is in line with the top hole of the lower tube. Place the lynch pin through<br />
both tubes and secure the loop. Place the 3/8-16 X 2-1/2” bolt through the<br />
hole as shown. Repeat for the other tube assembly. Set tubes aside.<br />
4.<br />
Place two frame adaptors on a flat surface and loosely bolt together with<br />
four 3/8-16 X 1-1/4” bolts, 3/8 washers, and 3/8 lock nuts as shown.<br />
Repeat for 2 nd set.<br />
Assemble the skewer as shown using 1/4-20 X 3/4 button cap screws and<br />
split washers. Repeat until all bike skewers are assembled and set aside.<br />
ProRac Systems, Inc. Toll Free: 800-217-7133<br />
7109 31 st Avenue North Phone: 763-546-5620<br />
Minneapolis, MN 55427-2848 Fax: 763-546-0933<br />
WWW.PRORAC.COM
5.<br />
10.<br />
Screw the 1/4-20 X 9/16 narrow hex shoulder screw into the end cap<br />
using the hex key as shown. Repeat for other end cap. Set aside.<br />
Position the assembled end cap as shown. Hold the end cap with one<br />
hand against the load bar and tighten with the narrow shoulder hex bolt<br />
with the hex key with the other hand. Repeat for other side and set<br />
aside.<br />
6.<br />
11.<br />
With a level, adjust trailer until frame is level front to back.<br />
With the flat side of the load bar facing up, slide four 1-3/4" T-bolts into<br />
the load bar as shown.<br />
12. TOP VIEW<br />
7.<br />
Place the tube adaptor over the 1-3/4" t-bolts. Place the 1/4 flat washers<br />
and loosely tighten 1/4-20 lock nuts onto the 1-3/4" T-bolts. Repeat for<br />
the other tube adaptor.<br />
8.<br />
Using a assembled frame adaptor, examine the trailer to locate a<br />
suitable area to mount the frame adaptors that clears any interference<br />
from cross members, wiring harness clips, etc. Mount the frame adaptor<br />
as far rearward as possible, preferably on the outside of the frame.<br />
Check the opposite side of the trailer for clearance.<br />
13.<br />
Turn the load bar over and slide on the desired amount of bike skewers.<br />
If spacing bikes close together, alternate skewers front to back to stagger<br />
the bike handle bars. Tighten the skewers to the load bar using the<br />
supplied hex key.<br />
Assemble the frame adaptor to the trailer frame with the supplied U-<br />
bolts and hardware as shown below. <strong>All</strong>ow the U-bolts to rest on the<br />
trailer frame and tighten until the frame adaptors are secured to the<br />
frame of the trailer but able to be moved.<br />
9.<br />
14.<br />
Slide the nylon washer over the 1” T-bolt. Slide the 1” T-bolt into the<br />
slotted guide and place another nylon washer on top. Tighten the eye<br />
nut onto the 1” T-bolt and tighten to the load bar at one end of the load<br />
bar. Repeat for the other end of load bar.<br />
With a level, position the frame adaptor until level with the trailer<br />
frame. Tighten U-bolts and recheck for level. Readjust if necessary.
15.<br />
22.<br />
Measure the distance of that frame adaptor back to the frame support<br />
running perpendicular to the trailer. Record the distance.<br />
16.<br />
Place the other frame adaptor on the opposite side of the trailer and<br />
loosely secure with U-bolts.<br />
17.<br />
Mark the distance recorded in step 15 on the opposite side.<br />
Place the 1/4 X 2-1/2” bolt with hardware through the tube adaptor<br />
and upright tube and torque to 5 ft-lbs (60 in-lbs). Caution: Do not<br />
over tighten bolts as they may shear.<br />
23.<br />
18. TOP VIEW<br />
Place the assembled frame adaptor at the distance marked, making<br />
sure the frame adaptor is level. Tighten U-bolts.<br />
Tighten the outermost two bolts on each frame adaptor as shown until<br />
the tube is firmly held in place.<br />
19.<br />
24.<br />
Remove the 3/8 x 2-1/2" bolt from the lower tube and save in case<br />
rack is to be removed and reassembled.<br />
25.<br />
With one hand holding the load bar up, remove both safety lynch pins.<br />
Place the assembled uprights into the frame adaptors as shown.<br />
Place the 3/8 x 2-1/2” bolt so the bolt shaft is sitting on top of the<br />
frame adaptors.<br />
26.<br />
Lower load bar until it is as far down as it can go.<br />
20.<br />
27.<br />
Using a tape measure, center the load bar on the uprights. Adjust as<br />
necessary by sliding the load bar.<br />
28.<br />
With both tubes in place, adjust the tube adaptors on the load bar<br />
assembly to fit over the upright tubes.<br />
21.<br />
Orient the tubes so that the hole in the tube adaptor lines up with the<br />
hole on the upright.<br />
Secure the load bar by tightening the 1/4-20 lock nuts (4) on the tube<br />
adaptors. Torque to 5 ft-lbs (60 in-lbs). Caution: Do not over tighten<br />
bolts as they may shear.
29.<br />
31.<br />
With all bicycles in their desired locations, apply the enclosed tire<br />
guard under each rear tire following the tire guard directions below.<br />
32.<br />
Adjust the height of the load bar so the skewers are lower than the top<br />
surface of the trailer. Remove the safety lynch pins, adjust load bar to<br />
desired height and re-pin and secure with loop. Leave clearance<br />
between bike sprocket and top of trailer.<br />
30.<br />
Remove the front tire of the bicycle(s). Place the rear tire of the bicycle<br />
on top of the trailer and position front fork to the centermost fork skewer.<br />
Mount fork onto skewer as you would your wheel, using the<br />
manufacturers recommended installation instructions. Make sure the<br />
skewer firmly holds the fork! Repeat until all bicycles are secured to the<br />
skewers.<br />
To prevent the bicycle from moving side to side and potential upward<br />
movement, secure the rear of the bicycle by using the provided nylon<br />
straps. Stabilize the rear of the bicycle by looping the strap around<br />
the seat post and back to the adjacent fork skewer. Do this on each<br />
side of each bicycle. Secure the outermost bicycles to the eye nut in<br />
step 9. Tie off excess strap material before traveling.<br />
Caution! Be aware of your vehicles turning radius and the proximity of the load bar to the rear edges of your vehicle. Damage<br />
may occur if corners are taken too tightly.<br />
Caution! When placing tire back on bicycle make certain all brakes are in place and adjusted correctly. Make sure the tire is<br />
securely fastened.<br />
TIRE GUARD INSTRUCTIONS<br />
1. Apply when temp is above 70° F (22°C) and to surfaces that are smooth, dry, and free of oils and dust.<br />
2. Mix a solution to a ratio of 25% isopropyl alcohol (rubbing alcohol) and 75% water. Do not use any soaps.<br />
3. Carefully remove the protective liner on the Abrasive Resistant Film, taking care not to touch or contaminate the adhesive.<br />
4. Flood the adhesive side of the film with the mixture of alcohol/water solution. This will help in handling and prevent the film from sticking to itself.<br />
5. Spray the trailer surface with the alcohol/water solution, and position the film on the surface.<br />
6. Use a squeegee to press the film in place and force out the excess solution.<br />
7. To remove any entrapped air, puncture the film with a pin and press out the air with a squeegee or use finger pressure. Do not use razor blades or knives to<br />
puncture film as these can leave visible marks.<br />
8. Wipe the application area with a clean cloth.<br />
PRO RAC GUIDELINES<br />
Please review the instructions and warranty carefully. Assembly and installation are the purchaser’s responsibility and beyond ProRac’s control. Therefore, ProRac<br />
exclusively limits its warranty to the repair or replacement of a defective ProRac product for up to three years from retail purchase. Warranty excludes damage to<br />
your vehicle, cargo, or any person or property during assembly, installation, and use.<br />
♦<br />
♦<br />
♦<br />
♦<br />
♦<br />
♦<br />
♦<br />
♦<br />
Do not carry more than 150 pounds (68KG) of combined cargo and accessories on ProRac load bars. ProRac cannot warranty loads that exceed this limit.<br />
Do not use ProRac load bars and accessories for purposes other than those for which they were designed. Do not exceed their carrying capacity. Failure to<br />
follow these guidelines or the product instructions will void the warranty.<br />
Make sure all knobs, bolts, screws, straps, and locks are firmly attached, tightened, and locked before every trip. <strong>All</strong> fasteners must be periodically inspected<br />
for signs of wear, corrosion, and fatigue. Check your load at stops during long trips to ensure continued fastening security.<br />
Check all local and state laws governing projection of objects beyond the width of vehicle. Be aware of the width and height of your cargo since low-clearance<br />
branches, bridges, and parking garages can affect the load. Never drive with any lock, knob, or rack in an open or unlocked position.<br />
Remove valuable gear if your vehicle is unattended.<br />
<strong>All</strong> cargo will affect the vehicle’s driving behavior. <strong>For</strong> your safety, adapt your speed to the conditions of the road and load being carried. Obey all posted<br />
speed limits and traffic cautions.<br />
Due to their wind resistance, do not carry disks or wheels with covers on the ProRac bike carrier.<br />
Consult your ProRac dealer if you have questions regarding the operation and limits of ProRac products. Review all instructions and warranty information<br />
carefully.<br />
©2006 ProRac Systems, Inc. 7109 31 st Ave. N. Minneapolis, MN 55427 RVPB020-I REV. 6-08-06


