B04 onion skin lab
B04 onion skin lab
B04 onion skin lab

Create successful ePaper yourself
Turn your PDF publications into a flip-book with our unique Google optimized e-Paper software.
<strong>B04</strong> <strong>onion</strong> <strong>skin</strong> <strong>lab</strong><br />
SNC 2D<br />
Name:______________________________<br />
Lab: Investigation of the Structure of Onions Cells<br />
Purpose: To investigate the structure of <strong>onion</strong> cells and become familiar with some of the basic parts of<br />
a cell. This <strong>lab</strong> will also introduce you to the technique of preparing a wet mount slide.<br />
Materials:<br />
microscope blank white paper glass slides<br />
pencil ruler eraser<br />
cover slips known field of views medicine dropper<br />
lens paper beaker lens cleaning solution<br />
paper towels tweezers iodine solution (Lugol's solution)<br />
Procedure:<br />
____ 1. Place a check mark (√) in the space provided as you<br />
perform each step.<br />
____ 2. Check the condition of your microscope and report any<br />
problems to your teacher.<br />
____ 3. Obtain a sheet of lens tissue paper with lens cleaning<br />
solution and clean all the lenses of your microscope gently.<br />
____ 4. Obtain a microscope glass slide. Hold it by the edges and<br />
wet it with water. Wipe both sides dry with a paper towel. Always<br />
hold the slide by the edges or you will leave fingerprints on the<br />
slide.<br />
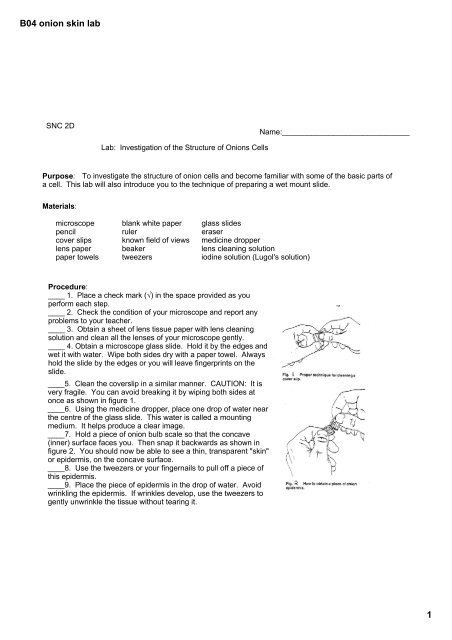
____5. Clean the coverslip in a similar manner. CAUTION: It is<br />
very fragile. You can avoid breaking it by wiping both sides at<br />
once as shown in figure 1.<br />
____6. Using the medicine dropper, place one drop of water near<br />
the centre of the glass slide. This water is called a mounting<br />
medium. It helps produce a clear image.<br />
____7. Hold a piece of <strong>onion</strong> bulb scale so that the concave<br />
(inner) surface faces you. Then snap it backwards as shown in<br />
figure 2. You should now be able to see a thin, transparent "<strong>skin</strong>"<br />
or epidermis, on the concave surface.<br />
____8. Use the tweezers or your fingernails to pull off a piece of<br />
this epidermis.<br />
____9. Place the piece of epidermis in the drop of water. Avoid<br />
wrinkling the epidermis. If wrinkles develop, use the tweezers to<br />
gently unwrinkle the tissue without tearing it.<br />
1
<strong>B04</strong> <strong>onion</strong> <strong>skin</strong> <strong>lab</strong><br />
____10. Hold a coverslip by the edges and lower one edge so<br />
that it touches one side of the drop of water at an angle of about<br />
45 o . See figure 3 for a visual guide to these procedures.<br />
____11. Slowly lower the cover slip by supporting the upper<br />
edge with a pencil or dissecting needle. This will prevent the<br />
trapping of air bubbles under the coverslip which interferes with<br />
your viewing. A few small air bubbles will not cause serious<br />
problems. Do not confuse air bubbles with your specimen. Air<br />
bubbles appear as circular objects with thick dark lines under the<br />
microscope.<br />
____12. Examine the sample under low power (4x ocular for a<br />
total magnification of 40x). Follow the procedure you learned in<br />
the previous <strong>lab</strong> to properly focus on the specimen. Don't forget<br />
to adjust the lighting to see the most detail possible in your<br />
specimen.<br />
____13. Move the slide around until you find a group of cells<br />
that clearly show their cell contents. Select one cell that<br />
appears to be the best for viewing and move it to the centre of<br />
the field of view.<br />
____14. Switch to medium power. Be careful to observe that<br />
the lens does not touch the coverslip by looking at the stage<br />
from the side while you rotate the nosepiece. Refocus with the<br />
fine adjustment knob only once the medium power ocular is in<br />
place.<br />
____15. Draw a small group (not the entire specimen) of<br />
<strong>onion</strong> <strong>skin</strong>s cells. Remember to follow proper biological<br />
drawing rules as you draw your cells. A sample drawing as<br />
been provided with this <strong>lab</strong>.<br />
____16. Prepare a second wet mount of the <strong>onion</strong> epidermis.<br />
This time use the iodine solution as the mounting medium. This<br />
solution is a stain its purpose is to make some parts to stand<br />
out.<br />
____17. With the new wet mount, focus the new slide under low<br />
finding a good group of cells. Centre this group and change to<br />
medium power. Centre a single cell before moving to high<br />
power . Refocus the image with only the fine adjustment knob.<br />
Focus up and down carefully to see details on one cell. Adjust<br />
the lighting with the diaphragm control. Draw a single <strong>onion</strong><br />
<strong>skin</strong> cell following proper biological drawing rules.<br />
____18. Read the discussion questions and answer the<br />
questions as you work on your sketches.<br />
____19. Clean and put away your microscope. Clean and put<br />
away the glass slides and coverslips. Wash the counter tops off<br />
and make sure all the pieces of <strong>onion</strong> <strong>skin</strong> are placed in the<br />
garbage.<br />
2
<strong>B04</strong> <strong>onion</strong> <strong>skin</strong> <strong>lab</strong><br />
Discussion Questions<br />
1. Describe the shape of a single cell of an <strong>onion</strong> epidermis.<br />
2. Describe the arrangement of the cells with respect to one another.<br />
3. Describe the cytoplasm (cell fluid) of a cell. Include colour, clearness,<br />
and evidence of any motion. The outer edge of the cytoplasm is called the<br />
plasma membrane or cell membrane. It is difficult to see since it is<br />
normally pushed tightly against the cell wall.<br />
4. Describe the nucleus of a cell. If you saw them, include descriptions of<br />
the nuclear membrane, nucleoplasm, and nucleoli (there may be several).<br />
Are the nuclei always in the same position in the cell?<br />
5. Describe how the iodine stain that you used helped you see the cellular<br />
detail.<br />
6. The empty spaces that you saw in the cytoplasm are called vacuoles.<br />
The contain mainly water and dissolved substances. Each vacuole is<br />
surrounded by part of the cytoplasm called a vacuolar membrane. You<br />
probably noticed that some cells had only one vacuole that filled most of<br />
the cell. Explain why the nucleus in those cells was so close to the cell<br />
wall.<br />
7. The droplets in the cytoplasm are the oil that gives <strong>onion</strong>s their smell<br />
and make your eyes run. Describe an oil droplet.<br />
8. Estimate the length of a single cell in micrometres (μm) using the<br />
method described in class. Use the diameter of the field of view for your<br />
microscope determined in an earlier activity. Check the ocular and<br />
objective used before making your calculations.<br />
9. Label all the parts of a cell that you can see such as the cell wall,<br />
nucleus, cytoplasm, cell membrane, nuclear membrane, nucleolus,<br />
nucleoplasm, vacuole, vacuolar membrane, oil droplet. Make sure you<br />
follow proper <strong>lab</strong>eling rules check the exemplar provided to be sure.<br />
3
<strong>B04</strong> <strong>onion</strong> <strong>skin</strong> <strong>lab</strong><br />
4