Create successful ePaper yourself
Turn your PDF publications into a flip-book with our unique Google optimized e-Paper software.
<strong>BELUGA</strong><br />
DE<br />
Badewannenlifter<br />
Gebrauchsanweisung<br />
EN<br />
Bathlift<br />
Operating Instructions<br />
FR<br />
Elévateur de bain<br />
Mode d’emploi<br />
NL<br />
Badlift<br />
Gebruiksaanwijzing<br />
ES<br />
Aparato elevador de bañera<br />
Instrucciones de manejo<br />
PT<br />
Elevador de banheira<br />
Manual de instruções<br />
SV<br />
Badkarslyft<br />
Bruksanvisning<br />
NO<br />
Badekarløfter<br />
Bruksanvisning<br />
IT<br />
Sollevatore per vasca da bagno<br />
Istruzioni per l’uso
DE<br />
ES<br />
WICHTIG!<br />
Bitte lesen Sie diese Gebrauchsanweisung aufmerksam<br />
durch, bevor Sie das Produkt benutzen. Beachten<br />
Sie alle Hinweise, insbesondere die Sicherheitshinweise,<br />
und handeln Sie danach.<br />
¡IMPORTANTE!<br />
Por favor lea este manual de instrucciones atentamente<br />
antes de utilizar el producto. Tenga en cuenta todas las<br />
indicaciones, especialmente las relativas a la seguridad,<br />
y sígalas.<br />
EN<br />
IMPORTANT!<br />
Before you use the product, please read these operating<br />
instructions carefully. Pay attention to all instructions,<br />
especially those regarding safety, and follow them<br />
at all times.<br />
FR<br />
IMPORTANT !<br />
Veuillez lire attentivement ce mode d'emploi avant d'utiliser<br />
le produit. Veuillez respecter toutes les consignes,<br />
notamment les consignes de sécurité, et agir en conséquence.<br />
PT<br />
Por favor, leia atentamente este manual de instruções<br />
antes de utilizar o seu Elevador de banheira AQUATEC.<br />
Tenha em consideração todas as recomendações e advertências,<br />
especialmente referentes á segurança e aos<br />
procedimentos de utilização.<br />
SV<br />
IMPORTANTE!<br />
VIKTIGT!<br />
Läs igenom bruksanvisningen noggrant innan produkten<br />
används. Beakta och följ alla anvisningar, i synnerhet<br />
säkerhetsanvisningarna.<br />
NL<br />
BELANGRIJK!<br />
Lees deze gebruiksaanwijzing aandachtig door, voordat<br />
u het product gebruikt. Neem alle instructies in acht,<br />
vooral de veiligheidsinstructies en volg deze op.<br />
NO<br />
VIKTIG!<br />
Les bruksanvisningen nøye før du tar i bruk produktet.<br />
Følg alle henvisningene, spesielt ang. sikkerhet.<br />
IT<br />
IMPORTANTE!<br />
Si prega di leggere attentamente queste istruzioni per<br />
l'uso prima di utilizzare il prodotto. Attenersi a tutte le indicazioni,<br />
in particolar modo a quelle relative alla sicurezza<br />
e procedere di conseguenza.
1<br />
2<br />
3<br />
4<br />
5<br />
6 7 8<br />
9<br />
10<br />
11<br />
12 13<br />
14
Contents<br />
1 General instructions. . . . . . . . . . . . . . . . 10<br />
1.1 Introduction . . . . . . . . . . . . . . . . . . . . . . . . 10<br />
1.2 Proper use . . . . . . . . . . . . . . . . . . . . . . . . 10<br />
1.3 Warranty . . . . . . . . . . . . . . . . . . . . . . . . . . 10<br />
1.4 Re-use/Reconditioning . . . . . . . . . . . . . . . 10<br />
1.5 Disposal . . . . . . . . . . . . . . . . . . . . . . . . . . 10<br />
1.6 CE marking . . . . . . . . . . . . . . . . . . . . . . . . 11<br />
2 Safety instructions . . . . . . . . . . . . . . . . . 11<br />
2.1 Warnings and symbols . . . . . . . . . . . . . . . 11<br />
2.2 General instructions . . . . . . . . . . . . . . . . . 11<br />
2.3 Instructions on the battery and charger . . 11<br />
3 Description . . . . . . . . . . . . . . . . . . . . . . . 12<br />
3.1 Scope of delivery . . . . . . . . . . . . . . . . . . . 12<br />
3.2 Technical data. . . . . . . . . . . . . . . . . . . . . . 12<br />
4 Transport . . . . . . . . . . . . . . . . . . . . . . . . . 12<br />
5 Setting up . . . . . . . . . . . . . . . . . . . . . . . . 12<br />
5.1 Recharging the battery . . . . . . . . . . . . . . . 12<br />
5.2 Attaching the suction cups . . . . . . . . . . . . 13<br />
5.2.1 Preparing for assembly. . . . . . . . . . . . . . . 13<br />
5.2.2 Attaching the front suction cups . . . . . . . . 13<br />
5.2.3 Attaching the rear suction cups. . . . . . . . . 13<br />
5.2.4 Completing assembly . . . . . . . . . . . . . . . . 13<br />
5.3 Setting up the bathlift in the bathtub . . . . . 13<br />
5.4 Removing the bathlift from the bathtub. . . 14<br />
6 Operation. . . . . . . . . . . . . . . . . . . . . . . . . 15<br />
6.1 Control . . . . . . . . . . . . . . . . . . . . . . . . . . . 15<br />
6.1.1 Lifting . . . . . . . . . . . . . . . . . . . . . . . . . . . . 15<br />
6.1.2 Lowering . . . . . . . . . . . . . . . . . . . . . . . . . . 15<br />
6.1.3 Emergency stop . . . . . . . . . . . . . . . . . . . . 15<br />
6.2 Using the bathlift . . . . . . . . . . . . . . . . . . . . 15<br />
6.3 Troubleshooting . . . . . . . . . . . . . . . . . . . . 16<br />
7 Care and maintenance . . . . . . . . . . . . . . 16<br />
7.1 Seat and backrest. . . . . . . . . . . . . . . . . . . 16<br />
7.2 Charger and battery . . . . . . . . . . . . . . . . . 16<br />
7.3 Maintenance . . . . . . . . . . . . . . . . . . . . . . . 16<br />
1 General instructions<br />
1.1 Introduction<br />
These operating instructions contain information and<br />
instructions regarding the safe and proper use of your<br />
bathlift.<br />
In the text, we refer to figures and individual items<br />
within the figures. These references are shown in<br />
brackets.<br />
Example: (3, fig. 1) refers to figure 1, item 3.<br />
Keep all documents in a safe place.<br />
1.2 Proper use<br />
The bathlift is designed exclusively for lowering and<br />
lifting a person in a bathtub.<br />
Any other use is prohibited.<br />
Never use the bathlift as an aid to get in or out of anything,<br />
nor as a support, lifting platform or for other similar<br />
purposes.<br />
1.3 Warranty<br />
The warranty depends on the legal specifications in<br />
the country of destination or on the specifications<br />
made by our sales partners.<br />
In the event of damage, please notify your specialist<br />
dealer or contact one of the addresses printed in these<br />
operating instructions.<br />
The covers, suction cups and the battery are not covered<br />
by the warranty.<br />
The warranty period begins at the delivery date as<br />
shown on the delivery note.<br />
1.4 Re-use/Reconditioning<br />
The product is designed for repeated use. The maximum<br />
number of times you can re-use the product depends<br />
on its general state and condition.<br />
On reconditioning, always follow the AQUATEC reconditioning<br />
and hygiene instructions. These are available<br />
on request from AQUATEC.<br />
1.5 Disposal<br />
This product has been supplied from an environmentally<br />
aware manufacturer that complies<br />
with the Waste Electrical and Electronic<br />
Equipment (WEEE) Directive 2002/96/CE.<br />
This product may contain substances that<br />
could be harmful to the environment if disposed<br />
of in places (landfills) that are not appropriate<br />
according to legislation.<br />
10 EN
The "crossed out wheelie bin" symbol is<br />
placed on this product to encourage you to<br />
recycle wherever possible.<br />
Please be environmentally responsible and<br />
recycle this product through your recycling<br />
facility at its end of life.<br />
1.6 CE marking<br />
The product complies with EU Directive 93/42/EEC for<br />
medical equipment.<br />
2 Safety instructions<br />
2.1 Warnings and symbols<br />
The following warnings and symbols are used in these<br />
operating instructions:<br />
*<br />
CAUTION!<br />
This notice indicates a potential hazard.<br />
Not following these instructions can result<br />
in injury or damage.<br />
Important!<br />
This symbol indicates additional instructions,<br />
information or tips.<br />
2.2 General instructions<br />
The bathlift may only be used for lowering<br />
and lifting a person within a bathtub.<br />
If you are unable to take a bath on your own,<br />
use the device only under supervision.<br />
Example: You might not always be able to<br />
reach the emergency stop button on the<br />
hand control while you are operating the device.<br />
Observe the information on the label. Do not<br />
overload the bathlift.<br />
Never expose the product to direct sunlight.<br />
If you detect any malfunction, please contact<br />
your authorised dealer immediately.<br />
Do not modify or reconstruct the device.<br />
2.3 Instructions on the battery and charger<br />
Never throw the battery into a fire. Do not<br />
store it near naked flames.<br />
Do not open the battery.<br />
If the battery becomes damaged and diluted<br />
sulphuric acid comes into contact with skin or<br />
clothing, wash the area immediately with<br />
plenty of water.<br />
If diluted sulphuric acid comes into contact<br />
with eyes, immediately rinse the eye with<br />
plenty of water and go to a doctor.<br />
Recharge the battery as soon as possible after<br />
each use.<br />
To increase the life of the battery, recharge it<br />
once a month if you do not use the device for<br />
extended periods.<br />
Only use the battery for running your bathlift<br />
and only use the charger for recharging the<br />
battery supplied.<br />
Only plug the charger into the mains when<br />
the battery is connected to the charger.<br />
If you are using bath oils or bath salts, do not<br />
exceed the recommended dosage. These<br />
additives may impair the operation of the lifting<br />
scissors.<br />
Store the product in a dry room at a temperature<br />
of between 0 °C and 30 °C.<br />
Never store the product directly next to heat<br />
sources.<br />
* In the text, a picture illustrating the type of risk replaces<br />
the asterisk.<br />
EN<br />
11
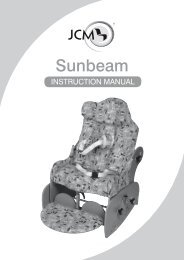
3 Description<br />
3.1 Scope of delivery<br />
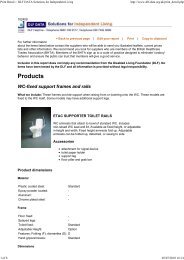
The AQUATEC <strong>BELUGA</strong> is supplied with the following<br />
parts (fig. 1 to fig. 3):<br />
Seat (fig. 1) consisting of:<br />
1 Sideflap<br />
2 Seat plate<br />
3 Hinge for backrest<br />
4 Guide<br />
5 Lifting scissors<br />
6 Track<br />
7 Spindle foot retainer<br />
8 Base plate<br />
9 Gliding shoe<br />
10 Front suction cup (single strap with head)<br />
11 Rear suction cup (double strap with thread)<br />
Backrest (fig. 2) consisting of:<br />
1 Hand control<br />
2 Drive unit cover<br />
3 Curled cable for hand control<br />
4 Backrest<br />
5 Spindle<br />
6 Catch for spindle<br />
7 Clamp ring<br />
8 Spindle foot<br />
9 Battery guide with plug<br />
Battery and charger (fig. 3)<br />
2 Battery<br />
5 Charger<br />
Operating instructions (not illustrated)<br />
Cover (optional)<br />
Seat cover<br />
Backrest cover<br />
3.2 Technical data<br />
Seat width with sideflaps folded out: 700 mm<br />
Seat width with sideflaps folded in:<br />
380 mm<br />
Seat height at lowest position:<br />
60 mm<br />
Seat height at highest position:<br />
420 mm<br />
Maximum load:<br />
135 kg<br />
Total weight without battery:<br />
12.9 kg<br />
Seat weight:<br />
8.6 kg<br />
Weight of backrest:<br />
4.3 kg<br />
Weight of battery:<br />
1.6 kg<br />
Weight of charger:<br />
0.5 kg<br />
Operating voltage:<br />
12 V<br />
Charge time as from low-voltage warning: approx. 5 h<br />
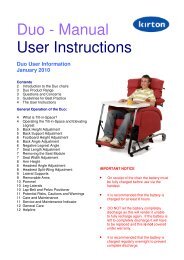
The label (fig. 14) provides important information.<br />
The label is on the rear side of the backrest.<br />
4 Transport<br />
Important<br />
● The backrest is not locked on the seat<br />
when it is folded together.<br />
●<br />
●<br />
Do not remove the suction cups when<br />
transporting the bathlift.<br />
You may not transport the device with the<br />
battery inserted into the guide on the backrest.<br />
Take the battery out of the guide and always disassemble<br />
the bathlift into two sections for transport (the<br />
seat and the backrest).<br />
For detailed instructions on how to dismantle the device,<br />
please refer to section 5.4.<br />
5 Setting up<br />
Important!<br />
● Before setting up, inspect all parts for damage<br />
caused by transport.<br />
●<br />
During assembly, make sure the parts are<br />
positioned correctly in relation to each other.<br />
5.1 Recharging the battery<br />
CAUTION!<br />
There is a risk of injury from electric shock.<br />
Only recharge the battery in dry rooms (not<br />
in the bathroom).<br />
Important!<br />
● Recharge the battery completely each time<br />
before you use the bathlift.<br />
●<br />
Make sure that the voltage specifications<br />
shown on the charger correspond to those<br />
of the power mains.<br />
1. Insert the jack plug (1, fig. 3) of the charger (5,<br />
fig. 3) into the socket (6, fig. 3) of the battery (2,<br />
fig. 3).<br />
2. Insert the power plug (3, fig. 3) of the charger into<br />
the power socket.<br />
The red indicator lamp (4, fig. 3) on the charger stays<br />
on until the battery is fully recharged.<br />
3. Pull the charger out of the power socket.<br />
4. Disconnect the jack plug of the charger from the<br />
battery socket.<br />
12 EN
5.2 Attaching the suction cups<br />
CAUTION!<br />
There is a risk of injury when the lifting scissors<br />
move.<br />
Do not reach between the lifting scissors<br />
during assembly.<br />
Important!<br />
To detach the suction cups, follow these instructions<br />
in reverse order.<br />
5.2.1 Preparing for assembly<br />
1. Place the seat on its side.<br />
2. Press the red button (1, fig. 4) in the spindle foot<br />
retainer (2, fig. 4).<br />
The locking mechanism between the base plate and<br />
seat plate opens.<br />
3. Carefully pull the base plate (8, fig. 1) and the seat<br />
plate (2, fig. 1) apart.<br />
The seat is now lying in a stable position on its side.<br />
5.2.2 Attaching the front suction cups<br />
Important!<br />
● The procedure is the same for the right and<br />
the left sides.<br />
●<br />
The front suction cups have only one strap<br />
and a head that can be inserted into the<br />
plate.<br />
1. Press the red suction cup lid (2, fig. 5) from below<br />
out of the slotted hole (3, fig. 5) in the base plate.<br />
Important!<br />
Lubricant film facilitates assembly.<br />
2. Apply a thin layer of commercial skin cream to the<br />
head of the suction cup (4, fig. 5).<br />
Important!<br />
The strap with the toggle must point backwards<br />
when you insert it.<br />
3. Insert the suction cup head from the bottom into<br />
the large opening in the slotted hole.<br />
4. Pull the suction cup head all the way to the front of<br />
the smaller opening of the slotted hole.<br />
5. Bend up the strap (5, fig. 5) and hook the toggle<br />
into the groove (1, fig. 5).<br />
6. Push the red suction cup lid back in.<br />
5.2.3 Attaching the rear suction cups<br />
Screw the suction cup (1, fig. 6) from below into the<br />
threaded liner (2, fig. 6) provided for this.<br />
Important!<br />
● The procedure is the same for the right and<br />
the left sides.<br />
●<br />
●<br />
The rear suction cups have two straps and<br />
a thread.<br />
Attach the suction cups in such a way that<br />
you can reach one strap of each suction<br />
cup when the lift is set up in the bath.<br />
The threaded liner is located on the same side of the<br />
base plate (3, fig. 6) as the spindle foot retainer (4,<br />
fig. 6).<br />
5.2.4 Completing assembly<br />
1. Carefully push the lifting scissors back together.<br />
The locking mechanism between the base plate and<br />
seat plate closes automatically.<br />
2. Place the seat on the attached suction cups.<br />
5.3 Setting up the bathlift in the bathtub<br />
CAUTION!<br />
The seat may slip if the suction cups do not<br />
adhere properly.<br />
●<br />
●<br />
Before you set up the bathlift, clean the<br />
bathtub and the suction cups.<br />
Do not move the bathlift once you have<br />
installed it in the bathtub.<br />
Important!<br />
● The suction cups have to be attached.<br />
●<br />
●<br />
●<br />
The battery must be fully charged.<br />
When lifting, please remember: The seat<br />
weighs 8.6 kg and the backrest weighs<br />
4.3 kg (without the battery).<br />
If your bath has a handrail, use the sideflap<br />
diverter (optional).<br />
1. Place the seat (2, fig. 7) onto the base of the empty<br />
bathtub. The spindle foot retainer (3, fig. 7)<br />
must point towards the end of the bath opposite<br />
the drain (1, fig. 7).<br />
EN<br />
13
2. Fold the sideflaps of the seat outwards (fig. 8).<br />
3. Place the backrest (without the battery) (3, fig. 9)<br />
onto the seat so that the slots (4, fig. 9) in the<br />
backrest fit in the hinges (6, fig. 9) of the seat<br />
plate (5, fig. 9).<br />
4. Press the spindle (1, fig. 9) into the spindle catch<br />
(2, fig. 9) until it is engaged.<br />
CAUTION!<br />
There is a risk of damage if the spindle foot<br />
slips out.<br />
●<br />
●<br />
Before you lift up the backrest, check<br />
that the spindle is pushed into the catch.<br />
After you have folded the backrest out,<br />
check that the spindle foot is in the spindle<br />
foot retainer and is locked.<br />
5. Carefully lift the backrest by pulling it up at the<br />
head end (fig. 9).<br />
The pegs on the clamp ring (4, fig. 10) fit in the guides<br />
(6, fig. 10) on the seat plate. The spindle (2, fig. 10) is<br />
released from the catch (1, fig. 10). The spindle foot (5,<br />
fig. 10) is in the spindle foot retainer of the base plate.<br />
The ratchet (3, fig. 4) locks the spindle foot.<br />
6. Insert the charged battery (2, fig. 11) into the<br />
guide (3, fig. 11) in the backrest from above.<br />
7. Push the battery down completely.<br />
The battery should click in.<br />
The bathlift is now ready for use.<br />
5.4 Removing the bathlift from the bathtub<br />
1. Let the water out of the bath.<br />
2. Lower the bathlift (1, fig. 12) by pressing the<br />
DOWN button (5, fig. 13), until the backrest is at<br />
the stop.<br />
Important!<br />
Grasp deep into the grip so that you can hold<br />
the battery safely.<br />
Important!<br />
● When folding the backrest, ensure that the<br />
curled cable of the hand control does not<br />
get caught.<br />
●<br />
Do not fold the backrest down if there is water<br />
in the bath.<br />
5. Hold the head end of the backrest in one hand.<br />
6. With your other hand, hold the spindle near the<br />
red spot (3, fig. 10).<br />
7. Push the spindle forward and at the same time<br />
slowly fold the backrest all the way forward (3,<br />
fig. 12).<br />
8. Press the spindle into the catch (2, fig. 9).<br />
Important!<br />
When lifting, please remember: The seat<br />
weighs 8.6 kg, and the backrest weighs 4.3 kg<br />
(without the battery).<br />
9. Pull the backrest up off the seat (4, fig. 12) and out<br />
of the bath tub.<br />
10. Fold the sideflaps on the seat inwards (5, fig. 12).<br />
Important!<br />
Release the suction cups at the rear simultaneously.<br />
11. To release the rear suction cups, pull the straps<br />
(11, fig. 1).<br />
12. Lift the rear end of the seat further (6, fig. 12). This<br />
releases the front suction cups.<br />
Important!<br />
If you have installed the height adapters (optional),<br />
you also have to pull the straps on the<br />
front suction cups to release them.<br />
13. Take the seat out of the bath.<br />
14. Carefully put away all components of the bathlift.<br />
3. Unlock the battery by pulling the grip (1, fig. 11) up<br />
slightly.<br />
4. Pull the battery upwards out of the guide (2,<br />
fig. 12).<br />
14 EN
6 Operation<br />
6.1 Control<br />
Important!<br />
● Only use the battery supplied.<br />
●<br />
●<br />
●<br />
If the battery does not have enough charge,<br />
the red battery pilot light goes on (2,<br />
fig. 13). In this case, the lowering function is<br />
disabled. However, you can still raise the<br />
lift. Recharge the battery immediately after<br />
you have raised it.<br />
The hand control device may only be used<br />
when the backrest is properly mounted and<br />
in upright position.<br />
If you let go of the button, the lift stops instantly<br />
in its position.<br />
You use the hand control (fig. 13) for controlling the<br />
bathlift.<br />
6.1.1 Lifting<br />
Important!<br />
If the backrest is folded down, it first moves to<br />
the upright position.<br />
Press the UP button (3, fig. 13) on the hand control (4,<br />
fig. 13).<br />
The backrest moves to the upright position, or the seat<br />
moves up.<br />
6.1.2 Lowering<br />
Important!<br />
If the seat is already lowered, the backrest<br />
leans backwards.<br />
Press the DOWN button (5, fig. 13) on the hand control<br />
(4, fig. 13).<br />
The seat moves downwards, or the backrest moves<br />
back.<br />
6.1.3 Emergency stop<br />
Important!<br />
Only press the red emergency stop button in<br />
the case of an emergency.<br />
In an emergency situation, such as if the UP or DOWN<br />
button is jammed, press the emergency stop button (1,<br />
fig. 13).<br />
The bathlift stops moving immediately.<br />
On letting go of the emergency stop button and after<br />
having repaired the fault if this is the case, the bathlift<br />
is ready for use again.<br />
6.2 Using the bathlift<br />
CAUTION!<br />
The seat may slip if the suction cups do not<br />
adhere properly.<br />
Before you use the bathlift, make sure that it<br />
is securely positioned and cannot tip over,<br />
and that the spindle foot is sitting properly in<br />
the spindle foot retainer.<br />
Important!<br />
● Before you take a bath, do a test run* to<br />
make sure that the bathlift functions properly.<br />
● Before using the bathlift, check the temperature<br />
of the bath water.<br />
Section 5.3 describes how to set up the bathlift in the<br />
bathtub.<br />
1. Raise the seat until it is level with the edge of the<br />
bath by pressing the UP button (3, fig. 13).<br />
The sideflaps should be level and rest on the edge of<br />
the bathtub.<br />
2. Fill the bath with water and check the temperature.<br />
3. Sit down on the sideflap nearest to you as you<br />
would sit down on a chair.<br />
4. Slide backwards until you are sitting in the middle<br />
of the seat.<br />
5. Turn yourself so that you can be comfortably lowered<br />
into the water. Lift one leg after the other over<br />
the edge of the bathtub.<br />
6. Once you are sitting correctly, press the DOWN<br />
button (5, fig. 13) to lower the seat into the water.<br />
Once the seat has reached its lowest position, you can<br />
tilt the backrest back, so that you can lean back deeper<br />
in the water.<br />
7. Keep pressing the DOWN button until the backrest<br />
is at the right position.<br />
To get out of the bath, follow the above steps in reverse<br />
order.<br />
To lift the seat, press the UP button (3, fig. 13).<br />
8. Take the battery out of the guide and recharge it<br />
as described in section 5.1 or remove the bathlift<br />
as described in section 5.4.<br />
* Run the bathlift unloaded once to the top and then<br />
back to the bottom.<br />
EN<br />
15
6.3 Troubleshooting<br />
Important!<br />
The following table provides information on<br />
faults and their probable cause. If you cannot<br />
rectify a fault using the table, please contact<br />
your authorised dealer directly.<br />
Problem<br />
No motor noise/<br />
bathlift does not<br />
move<br />
The bathlift can be<br />
raised but not lowered<br />
The bathlift stops<br />
while being raised<br />
The battery cannot<br />
be recharged<br />
The bathlift slips<br />
Possible<br />
causes<br />
The battery is not<br />
properly inserted<br />
The battery is flat<br />
The contacts are<br />
dirty<br />
The cable is damaged<br />
Low-voltage protection<br />
is activated<br />
The load is excessive<br />
The fuse is faulty<br />
The battery is<br />
faulty<br />
The suction cups<br />
are old or damaged<br />
Remedy<br />
Insert the battery<br />
(see section 5.3)<br />
Recharge the battery<br />
(see<br />
section 5.1)<br />
Clean the contacts<br />
Have your authorised<br />
dealer replace<br />
the cable<br />
Recharge the battery<br />
Note max. load<br />
Have your authorised<br />
dealer check<br />
the battery<br />
Replace the battery<br />
Replace the suction<br />
cups<br />
3. Dry the product with a cloth.<br />
4. Lightly grease the track (6, fig. 1) using Vaseline.<br />
5. Remove the covers (optional) from the seat and<br />
backrest.<br />
CAUTION!<br />
There is a risk of damage.<br />
Do not tumble-dry the covers (optional).<br />
6. Wash the covers (optional) in the washing machine<br />
at maximum 60 °C using a mild detergent.<br />
7.2 Charger and battery<br />
CAUTION!<br />
There is a risk of injury from electric shock.<br />
● Before cleaning the charger, always pull<br />
the plug out of the power socket.<br />
●<br />
●<br />
Never plug objects made of conducting<br />
material (e.g. knitting needles, metal<br />
pins) into the battery socket.<br />
Only use a dry cloth to clean the charger<br />
and the battery.<br />
Wipe down the charger and the battery with a dry<br />
cloth.<br />
7.3 Maintenance<br />
The bathlift is maintenance-free provided you follow<br />
the care instructions described above.<br />
7 Care and maintenance<br />
7.1 Seat and backrest<br />
CAUTION!<br />
There is a risk of injury when the lifting scissors<br />
move.<br />
Be especially careful when cleaning the<br />
seat.<br />
There is a risk of damage.<br />
Never clean the backrest with a high pressure<br />
cleaner.<br />
Important!<br />
● Regularly clean the seat and backrest and<br />
keep them clean.<br />
●<br />
Do not use abrasive cleaning agents.<br />
1. Wash the product with commercial detergents and<br />
disinfectants using a cloth or brush.<br />
2. Rinse the product with warm water.<br />
16 EN
© 2005 AQUATEC GmbH D-88316 Isny<br />
Art.-Nr.: 15623 - Stand 10/05<br />
AQT-0005-04XM