Paper Ornament Tutorial - Julie's Stamping Spot
Paper Ornament Tutorial - Julie's Stamping Spot
Paper Ornament Tutorial - Julie's Stamping Spot

Create successful ePaper yourself
Turn your PDF publications into a flip-book with our unique Google optimized e-Paper software.
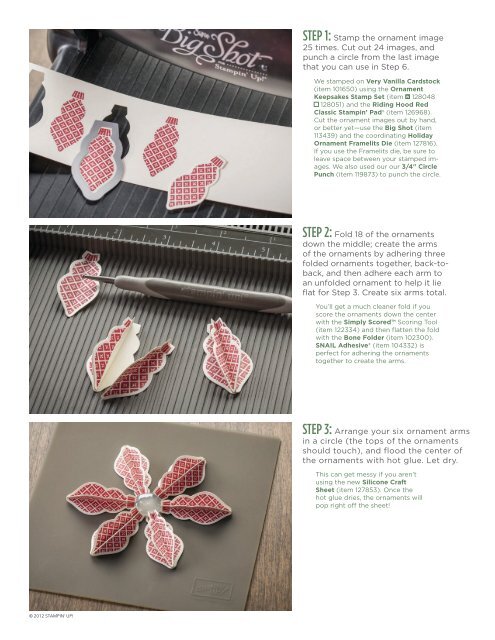
STEP 1: Stamp the ornament image<br />
25 times. Cut out 24 images, and<br />
punch a circle from the last image<br />
that you can use in Step 6.<br />
We stamped on Very Vanilla Cardstock<br />
(item 101650) using the <strong>Ornament</strong><br />
Keepsakes Stamp Set (item 128048<br />
128051) and the Riding Hood Red<br />
Classic Stampin’ Pad® (item 126968).<br />
Cut the ornament images out by hand,<br />
or better yet—use the Big Shot (item<br />
113439) and the coordinating Holiday<br />
<strong>Ornament</strong> Framelits Die (item 127816).<br />
If you use the Framelits die, be sure to<br />
leave space between your stamped images.<br />
We also used our our 3/4" Circle<br />
Punch (item 119873) to punch the circle.<br />
STEP 2: Fold 18 of the ornaments<br />
down the middle; create the arms<br />
of the ornaments by adhering three<br />
folded ornaments together, back-toback,<br />
and then adhere each arm to<br />
an unfolded ornament to help it lie<br />
flat for Step 3. Create six arms total.<br />
You’ll get a much cleaner fold if you<br />
score the ornaments down the center<br />
with the Simply Scored Scoring Tool<br />
(item 122334) and then flatten the fold<br />
with the Bone Folder (item 102300).<br />
SNAIL Adhesive® (item 104332) is<br />
perfect for adhering the ornaments<br />
together to create the arms.<br />
STEP 3: Arrange your six ornament arms<br />
in a circle (the tops of the ornaments<br />
should touch), and flood the center of<br />
the ornaments with hot glue. Let dry.<br />
This can get messy if you aren’t<br />
using the new Silicone Craft<br />
Sheet (item 127853). Once the<br />
hot glue dries, the ornaments will<br />
pop right off the sheet!<br />
© 2012 STAMPIN’ UP!