Free Standing Pop Up Card Tutorial
Free Standing Pop Up Card Tutorial
Free Standing Pop Up Card Tutorial
- TAGS
- tutorial
- juliedavison.com

Create successful ePaper yourself
Turn your PDF publications into a flip-book with our unique Google optimized e-Paper software.
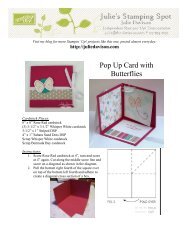
<strong>Free</strong>-<strong>Standing</strong> <strong>Pop</strong>-<strong>Up</strong> <strong>Card</strong><br />
Source: Unknown<br />
You will need:<br />
11" X 4 1/4" piece of card stock...piece A (main body of card)<br />
5" X 2 1/2" piece of card stock...piece B (message card)<br />
5 ¼” x 2 ¾” mat piece.<br />
2 1/2" X 1 1/2" piece of card stock...piece C (front greeting card)<br />
2 ¾” x 1 ¾” mat piece.<br />
• Decorate the "A" piece of card stock.<br />
• Turn "A" over and with scoring blade, score at 1”, 2 ¾”, 3 ¾”, 5 ½”, 7 ¼”, 8 ¼”, and 10”<br />
• With cutting blade cut on 5 ½” line leaving ½”-¾” uncut on either side, this is where your card<br />
will “pop” out so do not cut all the way through.<br />
• Take card stock piece "B" and stamp the message you want for your card, on one side.<br />
• Be sure not to stamp on the bottom 1"(This area will be inside the card and won't be seen.)<br />
• Mat piece.<br />
• Apply Sticky Strip to bottom of both sides of piece B<br />
• Thread the message area of "B" through the center slot of "A".<br />
• Fold up 1” scored piece on either end of piece"A".<br />
• Tape Piece B even with the fold on both sides forming a sandwich with piece B in the center.<br />
• Stamp a greeting onto the front of card stock "C" mat and glue to the front of the card.<br />
When you are finished...your card will slide up and down through the slot. Flat for mailing and<br />
<strong>Free</strong> standing once it is opened.