PRODUCT CATALOG - Red Lion
PRODUCT CATALOG - Red Lion
PRODUCT CATALOG - Red Lion

Create successful ePaper yourself
Turn your PDF publications into a flip-book with our unique Google optimized e-Paper software.
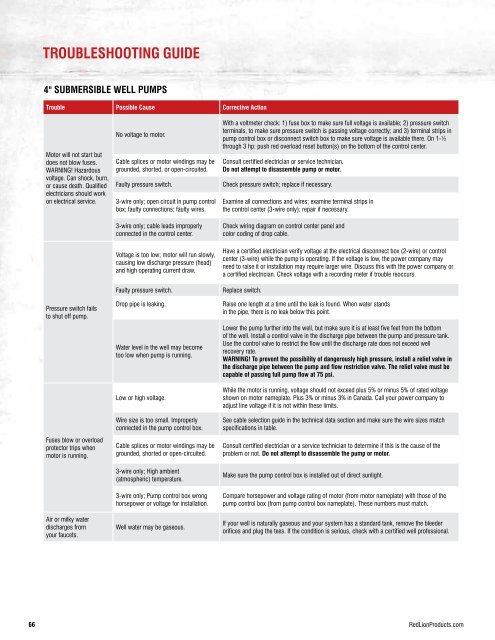
TROUBLESHOOTING GUIDE<br />
4" SUBMERSIBLE WELL PUMPS<br />
Trouble Possible Cause Corrective Action<br />
Motor will not start but<br />
does not blow fuses.<br />
WARNING! Hazardous<br />
voltage. Can shock, burn,<br />
or cause death. Qualified<br />
electricians should work<br />
on electrical service.<br />
Pressure switch fails<br />
to shut off pump.<br />
Fuses blow or overload<br />
protector trips when<br />
motor is running.<br />
Air or milky water<br />
discharges from<br />
your faucets.<br />
No voltage to motor.<br />
Cable splices or motor windings may be<br />
grounded, shorted, or open-circuited.<br />
Faulty pressure switch.<br />
3-wire only; open circuit in pump control<br />
box; faulty connections; faulty wires.<br />
3-wire only; cable leads improperly<br />
connected in the control center.<br />
Voltage is too low; motor will run slowly,<br />
causing low discharge pressure (head)<br />
and high operating current draw.<br />
Faulty pressure switch.<br />
Drop pipe is leaking.<br />
Water level in the well may become<br />
too low when pump is running.<br />
Low or high voltage.<br />
Wire size is too small. Improperly<br />
connected in the pump control box.<br />
Cable splices or motor windings may be<br />
grounded, shorted or open-circuited.<br />
3-wire only; High ambient<br />
(atmospheric) temperature.<br />
3-wire only; Pump control box wrong<br />
horsepower or voltage for installation.<br />
Well water may be gaseous.<br />
With a voltmeter check: 1) fuse box to make sure full voltage is available; 2) pressure switch<br />
terminals, to make sure pressure switch is passing voltage correctly; and 3) terminal strips in<br />
pump control box or disconnect switch box to make sure voltage is available there. On 1-½<br />
through 3 hp: push red overload reset button(s) on the bottom of the control center.<br />
Consult certified electrician or service technician.<br />
Do not attempt to disassemble pump or motor.<br />
Check pressure switch; replace if necessary.<br />
Examine all connections and wires; examine terminal strips in<br />
the control center (3-wire only); repair if necessary.<br />
Check wiring diagram on control center panel and<br />
color coding of drop cable.<br />
Have a certified electrician verify voltage at the electrical disconnect box (2-wire) or control<br />
center (3-wire) while the pump is operating. If the voltage is low, the power company may<br />
need to raise it or installation may require larger wire. Discuss this with the power company or<br />
a certified electrician. Check voltage with a recording meter if trouble reoccurs.<br />
Replace switch.<br />
Raise one length at a time until the leak is found. When water stands<br />
in the pipe, there is no leak below this point.<br />
Lower the pump further into the well, but make sure it is at least five feet from the bottom<br />
of the well. Install a control valve in the discharge pipe between the pump and pressure tank.<br />
Use the control valve to restrict the flow until the discharge rate does not exceed well<br />
recovery rate.<br />
WARNING! To prevent the possibility of dangerously high pressure, install a relief valve in<br />
the discharge pipe between the pump and flow restriction valve. The relief valve must be<br />
capable of passing full pump flow at 75 psi.<br />
While the motor is running, voltage should not exceed plus 5% or minus 5% of rated voltage<br />
shown on motor nameplate. Plus 3% or minus 3% in Canada. Call your power company to<br />
adjust line voltage if it is not within these limits.<br />
See cable selection guide in the technical data section and make sure the wire sizes match<br />
specifications in table.<br />
Consult certified electrician or a service technician to determine if this is the cause of the<br />
problem or not. Do not attempt to disassemble the pump or motor.<br />
Make sure the pump control box is installed out of direct sunlight.<br />
Compare horsepower and voltage rating of motor (from motor nameplate) with those of the<br />
pump control box (from pump control box nameplate). These numbers must match.<br />
If your well is naturally gaseous and your system has a standard tank, remove the bleeder<br />
orifices and plug the tees. If the condition is serious, check with a certified well professional.<br />
66 <strong>Red</strong><strong>Lion</strong>Products.com