Wolfgang Puck - Meijer
Wolfgang Puck - Meijer
Wolfgang Puck - Meijer

Create successful ePaper yourself
Turn your PDF publications into a flip-book with our unique Google optimized e-Paper software.
DL_ElecWokmanual09 6/2/09 11:38 AM Page 7<br />
<strong>Meijer</strong>.com<br />
Before Your First Use<br />
Using Your Electric Wok<br />
Wash, rinse and dry the wok, lid, rack,<br />
and detachable base to remove any dust or<br />
particles due to shipping. DO NOT<br />
IMMERSE THE PROBE IN WATER OR<br />
ANY OTHER LIQUID.<br />
WARNING: Ensure that your temperature<br />
probe and wok socket are completely dry<br />
prior to inserting probe into Wok socket<br />
Season the cooking surface by applying a<br />
thin coat of cooking oil to the nonstick surface<br />
with a paper towel. This appliance requires<br />
1500 watts and should be the only appliance<br />
operating on the circuit. Plug the Wok into a<br />
120 volt 60 Hz AC only outlet.<br />
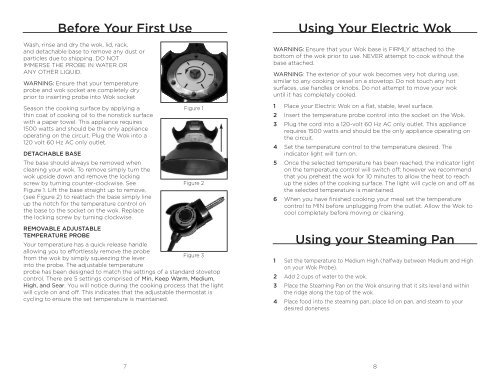
DETACHABLE BASE<br />
The base should always be removed when<br />
cleaning your wok. To remove simply turn the<br />
wok upside down and remove the locking<br />
screw by turning counter-clockwise. See<br />
Figure 1. Lift the base straight up to remove,<br />
(see Figure 2) to reattach the base simply line<br />
up the notch for the temperature control on<br />
the base to the socket on the wok. Replace<br />
the locking screw by turning clockwise.<br />
Figure 1<br />
Figure 2<br />
WARNING: Ensure that your Wok base is FIRMLY attached to the<br />
bottom of the wok prior to use. NEVER attempt to cook without the<br />
base attached.<br />
WARNING: The exterior of your wok becomes very hot during use,<br />
similar to any cooking vessel on a stovetop. Do not touch any hot<br />
surfaces, use handles or knobs. Do not attempt to move your wok<br />
until it has completely cooled.<br />
1 Place your Electric Wok on a flat, stable, level surface.<br />
2 Insert the temperature probe control into the socket on the Wok.<br />
3 Plug the cord into a 120-volt 60 Hz AC only outlet. This appliance<br />
requires 1500 watts and should be the only appliance operating on<br />
the circuit.<br />
4 Set the temperature control to the temperature desired. The<br />
indicator light will turn on.<br />
5 Once the selected temperature has been reached, the indicator light<br />
on the temperature control will switch off; however we recommend<br />
that you preheat the wok for 10 minutes to allow the heat to reach<br />
up the sides of the cooking surface. The light will cycle on and off as<br />
the selected temperature is maintained.<br />
6 When you have finished cooking your meal set the temperature<br />
control to MIN before unplugging from the outlet. Allow the Wok to<br />
cool completely before moving or cleaning.<br />
REMOVABLE ADJUSTABLE<br />
TEMPERATURE PROBE<br />
Your temperature has a quick release handle<br />
allowing you to effortlessly remove the probe<br />
from the wok by simply squeezing the lever<br />
Figure 3<br />
into the probe. The adjustable temperature<br />
probe has been designed to match the settings of a standard stovetop<br />
control. There are 5 settings comprised of Min, Keep Warm, Medium,<br />
High, and Sear. You will notice during the cooking process that the light<br />
will cycle on and off. This indicates that the adjustable thermostat is<br />
cycling to ensure the set temperature is maintained.<br />
Using your Steaming Pan<br />
1 Set the temperature to Medium High (halfway between Medium and High<br />
on your Wok Probe).<br />
2 Add 2 cups of water to the wok.<br />
3 Place the Steaming Pan on the Wok ensuring that it sits level and within<br />
the ridge along the top of the wok.<br />
4 Place food into the steaming pan, place lid on pan, and steam to your<br />
desired doneness.<br />
7 8