3 Operating the MiniVario - Lehner Agrar GmbH
3 Operating the MiniVario - Lehner Agrar GmbH
3 Operating the MiniVario - Lehner Agrar GmbH

You also want an ePaper? Increase the reach of your titles
YUMPU automatically turns print PDFs into web optimized ePapers that Google loves.
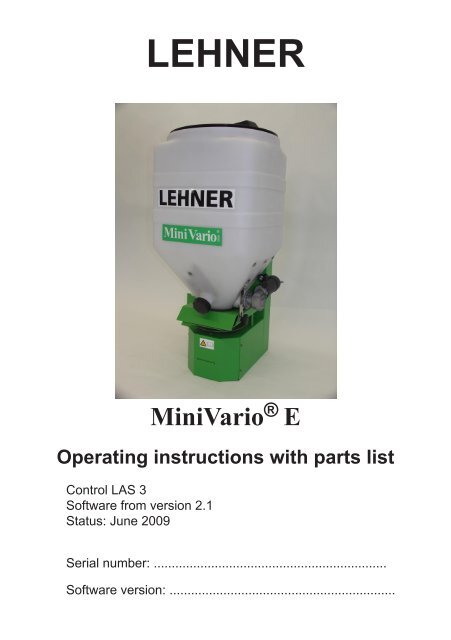
LEHNER<br />
<strong>MiniVario</strong> ® E<br />
<strong>Operating</strong> instructions with parts list<br />
Control LAS 3<br />
Software from version 2.1<br />
Status: June 2009<br />
Serial number: .................................................................<br />
Software version: ...............................................................
<strong>Lehner</strong> <strong>Agrar</strong> <strong>GmbH</strong><br />
Häuslesäcker 5-9<br />
D-89198 Westerstetten<br />
Tel.: (+49) 07348 95 96 0<br />
Fax: (+49) 07348 95 96 40<br />
www.lehner.eu<br />
info@lehner.eu<br />
English
Table of contents<br />
2<br />
1 What you should know ......................................................4<br />
1.1 Foreword ................................................................................................ 4<br />
1.2 About <strong>the</strong>se operating instructions ......................................................... 4<br />
1.3 Intended use........................................................................................... 5<br />
1.4 Warranty ................................................................................................. 5<br />
1.5 About your safety ................................................................................... 6<br />
2 Starting up <strong>the</strong> <strong>MiniVario</strong> ® ................................................7<br />
2.1 Mounting <strong>the</strong> frame ................................................................................ 7<br />
2.2 Electrical connection .............................................................................. 7<br />
2.3 Mounting <strong>the</strong> <strong>MiniVario</strong> ® ........................................................................ 8<br />
2.4 Mounting <strong>the</strong> control panel ..................................................................... 9<br />
3 <strong>Operating</strong> <strong>the</strong> <strong>MiniVario</strong> ® .................................................10<br />
3.1 Controls on <strong>the</strong> control panel ............................................................... 10<br />
3.2 The display ........................................................................................... 11<br />
3.3 Switching on / off .................................................................................. 12<br />
3.4 Setting <strong>the</strong> speed ................................................................................. 13<br />
3.5 Setting <strong>the</strong> slide opening ...................................................................... 14<br />
3.6 Opening/closing <strong>the</strong> slide ..................................................................... 14<br />
3.7 Performing <strong>the</strong> slide reference run ....................................................... 15<br />
3.8 Setting <strong>the</strong> spreading width .................................................................. 15<br />
3.9 Setting spreading zone......................................................................... 16<br />
3.10 Empty indicator..................................................................................... 16
Table of contents<br />
4 Settings and displays ......................................................17<br />
4.1 Undertaking settings............................................................................. 17<br />
4.2 Language ............................................................................................. 17<br />
4.3 Selecting <strong>the</strong> empty indicator ............................................................... 18<br />
4.4 Setting signal for electronic lifting gear control (EHR) .......................... 18<br />
4.5 Adjusting <strong>the</strong> empty indicator ............................................................... 19<br />
4.6 Displaying <strong>the</strong> spreader type ................................................................ 20<br />
4.7 Headland manager (optional accessory).............................................. 20<br />
4.8 Controls ................................................................................................ 22<br />
4.9 Spreading width and turning procedure ............................................... 23<br />
5 Maintenance and cleaning ..............................................24<br />
5.1 Maintenance ......................................................................................... 24<br />
5.2 Cleaning ............................................................................................... 25<br />
6 Appendix ...........................................................................26<br />
6.1 EC declaration of conformity ................................................................ 26<br />
6.2 Identification ......................................................................................... 27<br />
6.3 Distribution box reference list ............................................................... 28<br />
6.4 Troubleshooting .................................................................................... 29<br />
6.5 Parts list................................................................................................ 30<br />
6.6 Spreading charts .................................................................................. 34<br />
3
1 What you should know<br />
1.1 Foreword<br />
4<br />
Thank you for placing your trust in us. We congratulate you on your<br />
decision. With <strong>the</strong> <strong>MiniVario</strong> ® , you have acquired a high-quality and<br />
innovative product.<br />
Thanks to its advanced design, meticulous material selection, stateof-<strong>the</strong><br />
art manufacturing techniques and <strong>the</strong> precision work of our<br />
employees, this device meets all efficiency, quality, reliability and value<br />
requirements.<br />
Maintaining and servicing in accordance with <strong>the</strong> operating instructions<br />
ensures <strong>the</strong> safety of <strong>the</strong> device and maintains <strong>the</strong> value of your<br />
<strong>MiniVario</strong> ® .<br />
1.2 About <strong>the</strong>se operating instructions<br />
These operating instructions are part of <strong>the</strong> <strong>MiniVario</strong> ® and must always<br />
be readily available. All persons who work with <strong>the</strong> <strong>MiniVario</strong> ® must read<br />
and follow <strong>the</strong> operating instructions.<br />
You must become acquainted with <strong>the</strong> intricacies of <strong>the</strong> device, have<br />
command of <strong>the</strong> device and optimise its operation.<br />
Warning notices<br />
Warning notices in <strong>the</strong>se operating instructions are identified as follows:<br />
Danger!<br />
Warning of immediate danger. Non-observance of<br />
appropriate measures may result in death and severe<br />
personal injury or serious damage to property.<br />
Warning!<br />
Warning of possible danger. Death, severe personal injury<br />
or serious damage to property is possible.<br />
Caution!<br />
Warning of possible dangerous situations. Slight personal<br />
injury or damage to property is possible.
1 What you should know<br />
1.3 Intended use<br />
The <strong>MiniVario</strong> ® is used exclusively for spreading fertiliser, catch crops,<br />
grass, granulates, salt and seed.<br />
1.4 Warranty<br />
We provide a guarantee of 6 months and warranty of 24 months on <strong>the</strong><br />
<strong>MiniVario</strong> ® .<br />
Caution!<br />
Defective plugs and cables or those of <strong>the</strong> wrong size can<br />
lead to functional deficiencies.<br />
Use original or cables and plugs approved by <strong>the</strong><br />
manufacturer only.<br />
Any changes to cable or plug connections without factory approval<br />
automatically invalidate <strong>the</strong> warranty. Motors may not be opened or<br />
dismantled.<br />
Warranty repairs must be coordinated with <strong>the</strong> manufacturer before any<br />
work is started.<br />
For replacement parts, additional expenses are automatically<br />
charged for any changes made to cables and plugs by <strong>the</strong> customer.<br />
Replacement parts are to be returned carriage paid.<br />
Rusted bearings are not subject to <strong>the</strong> manufacturer's warranty.<br />
Upon receipt:<br />
Check your <strong>MiniVario</strong> ® for any damage caused in transit. Such<br />
damage(s) must be reported to <strong>the</strong> manufacturer within 24 hours of<br />
receipt.<br />
5
1 What you should know<br />
1.5 About your safety<br />
6<br />
• Carefully read and observe <strong>the</strong>se operating instructions before use.<br />
Always keep <strong>the</strong>se instructions to hand at <strong>the</strong> point of use.<br />
• Observe <strong>the</strong> accident prevention regulations, safety and operating<br />
regulations and <strong>the</strong> regulations for environmental protection.<br />
• Observe all applicable standards and guidelines.<br />
• When travelling on public roads and streets, follow <strong>the</strong> legal rules of <strong>the</strong><br />
road.<br />
• Observe <strong>the</strong> safety instructions.<br />
• Do not start up <strong>the</strong> <strong>MiniVario</strong> ® if it has any safety-related deficiencies.<br />
Immediately resolve any safety-related deficiencies.<br />
• It is forbidden to stay in <strong>the</strong> spreading zone. Make sure that nobody is<br />
in <strong>the</strong> spreading zone.<br />
• Do not touch <strong>the</strong> hopper during operation.<br />
• Do not undertake any repairs, maintenance or cleaning procedures on<br />
<strong>the</strong> <strong>MiniVario</strong> ® when <strong>the</strong> mains plug is connected.
2 Starting up <strong>the</strong> <strong>MiniVario</strong> ®<br />
2.1 Mounting <strong>the</strong> frame<br />
The <strong>MiniVario</strong> ® can be screwed on directly or an auxiliary bracket used.<br />
Mounting holes are provided on <strong>the</strong> back of <strong>the</strong> framework.<br />
The recommended delivery height is approx. 0.60 m.<br />
The <strong>MiniVario</strong> ® can be attached at <strong>the</strong> front or rear both on <strong>the</strong> tractor or<br />
ATV or directly to <strong>the</strong> soil cultivation equipment.<br />
Because <strong>the</strong> <strong>MiniVario</strong> ® is considerably heavier when <strong>the</strong> hopper is<br />
full, <strong>the</strong> load capacity of <strong>the</strong> consoles used for attachment should be<br />
checked.<br />
2.2 Electrical connection<br />
Technical data<br />
<strong>Operating</strong> voltage 12 to 15 volts<br />
Fuse 25 A<br />
Power of drive motor<br />
(spreading disc)<br />
100 watts<br />
Power of mixer motor 150 watts<br />
Speed range 40 to 600 rpm<br />
Power consumption of motor Start up to 25 A, normal<br />
operation up to 13 A<br />
<strong>Operating</strong> temperature -10 to +70 °C<br />
Storage temperature -30 to +70 °C<br />
Any changes to cable or plug connections without factory approval<br />
automatically invalidate <strong>the</strong> entire warranty. Changes to cables<br />
undertaken by <strong>the</strong> customer are taken into account in <strong>the</strong> case of<br />
repairs.<br />
7
2 Starting up <strong>the</strong> <strong>MiniVario</strong> ®<br />
2.3 Mounting <strong>the</strong> <strong>MiniVario</strong> ®<br />
8<br />
1. Check whe<strong>the</strong>r <strong>the</strong> hopper fits well in <strong>the</strong> hopper platform.<br />
2. Using screws, attach <strong>the</strong> included deflector plate (arrow) to <strong>the</strong><br />
spreader.<br />
3. Check that <strong>the</strong> <strong>MiniVario</strong> ® is securely attached.
2 Starting up <strong>the</strong> <strong>MiniVario</strong> ®<br />
2.4 Mounting <strong>the</strong> control panel<br />
Caution, risk of short circuits!<br />
Ensure that <strong>the</strong> cable is not routed over any sharp edges.<br />
1<br />
2 3 4<br />
1. Mount support for <strong>the</strong> control panel in <strong>the</strong> vehicle cabin.<br />
2. Plug <strong>the</strong> control panel cable into <strong>the</strong> 3-pin plug 1 of <strong>the</strong> carrier vehicle.<br />
If <strong>the</strong> plug is not available, use <strong>the</strong> provided battery cable:<br />
Connect terminal 2 to -pin of <strong>the</strong> battery<br />
(not to <strong>the</strong> body).<br />
Connect terminal 3 (with fuse 4) to +pin of <strong>the</strong> battery<br />
Place cable end with socket in carrier vehicle.<br />
3. Plug <strong>the</strong> spreader cable into <strong>the</strong> 16-pin plug of <strong>the</strong> control panel.<br />
The battery cable supplied must be used to ensure an optimum<br />
power supply.<br />
Your device is now ready to operate.<br />
9
3 <strong>Operating</strong> <strong>the</strong> <strong>MiniVario</strong> ®<br />
3.1 Controls on <strong>the</strong> control panel<br />
10<br />
1 2 3<br />
1 Switching on / off<br />
2<br />
Display<br />
3 Opening and closing <strong>the</strong> slide<br />
Slide open: green LED lights up<br />
Slide closed: yellow LED lights up<br />
4<br />
5<br />
Setting <strong>the</strong> speed or slide opening<br />
4<br />
Switch to change between speed and slide<br />
6<br />
Empty indicator<br />
5<br />
6
3 <strong>Operating</strong> <strong>the</strong> <strong>MiniVario</strong> ®<br />
3.2 The display<br />
1 2<br />
> RPM 200<br />
Slide 29 ok<br />
1 Arrow denotes <strong>the</strong> active line<br />
2 Spreading disc speed<br />
3 Slide opening<br />
4 OK sign for open slide<br />
Disc blocking<br />
Slide not open<br />
3 4<br />
Error messages, also see Troubleshooting chapter.<br />
11
3 <strong>Operating</strong> <strong>the</strong> <strong>MiniVario</strong> ®<br />
3.3 Switching on / off<br />
12<br />
Risk of injury!<br />
The drive motor starts immediately when switched on.<br />
Make sure <strong>the</strong> danger area is clear when starting.<br />
Press <strong>the</strong> button.<br />
The speed of <strong>the</strong> spreading disc and<br />
<strong>the</strong> slide opening is displayed. The slide<br />
is always closed when switching on <strong>the</strong><br />
drive motor.<br />
If this message is displayed, a cable is damaged<br />
or a plug disconnected.<br />
> Speed 200<br />
Slide 29<br />
> Speed 200<br />
Connecting spr.<br />
Low temperatures can cause <strong>the</strong> empty indicator to respond slowly.<br />
To check <strong>the</strong> adjustment:<br />
Allow <strong>the</strong> spreader to run for approx. 1 minute with <strong>the</strong> slide closed.<br />
If <strong>the</strong> slide is <strong>the</strong>n opened, <strong>the</strong> empty indicator must be activated<br />
after approx. 5 seconds.<br />
If this doesn't happen, move <strong>the</strong> empty indicator 5% into <strong>the</strong> negative<br />
range; see Settings and displays chapter, Adjusting <strong>the</strong> empty indicator.<br />
Autostart/automatic freewheeling<br />
If a motor is difficult to start due to heavy loads, start <strong>the</strong> motor up to<br />
10 times in alternating motor directions. If <strong>the</strong> mixer or spreading plate<br />
cannot break free as a result, <strong>the</strong> motor is automatically switched off.<br />
The following message is displayed:<br />
Mixer stationary, if <strong>the</strong> mixer cannot break free.<br />
Disc blocking, if <strong>the</strong> spreading plate cannot break free.
3 <strong>Operating</strong> <strong>the</strong> <strong>MiniVario</strong> ®<br />
Risk of injury!<br />
Never open <strong>the</strong> hopper or touch <strong>the</strong> spreading disc when<br />
<strong>the</strong> drive motor is running.<br />
Switch off <strong>the</strong> drive motor and ensure that <strong>the</strong> motor<br />
is stopped before opening <strong>the</strong> hopper or touching <strong>the</strong><br />
spreading disc.<br />
To eliminate <strong>the</strong> blockage:<br />
1. Switch off <strong>the</strong> machine.<br />
2. Manually turn <strong>the</strong> spreading disc or empty <strong>the</strong> hopper.<br />
3.4 Setting <strong>the</strong> speed<br />
If necessary, press <strong>the</strong> toggle switch to<br />
select <strong>the</strong> speed; <strong>the</strong> arrow points to <strong>the</strong><br />
first line in <strong>the</strong> display.<br />
Press <strong>the</strong> button to set <strong>the</strong> speed.<br />
The speed can be adjusted continuously<br />
from 40 - 600 rpm.<br />
You can take <strong>the</strong> required speed from <strong>the</strong><br />
spreading chart.<br />
The setpoint speed is displayed for 10<br />
seconds, after which <strong>the</strong> actual speed is<br />
displayed.<br />
> Speed 200<br />
Slide 29<br />
13
3 <strong>Operating</strong> <strong>the</strong> <strong>MiniVario</strong> ®<br />
3.5 Setting <strong>the</strong> slide opening<br />
14<br />
If necessary, press <strong>the</strong> button to select <strong>the</strong><br />
slide. The arrow points to <strong>the</strong> second line<br />
in <strong>the</strong> display.<br />
Press <strong>the</strong> button to adjust <strong>the</strong> slide<br />
opening.<br />
You can take <strong>the</strong> required slide opening<br />
from <strong>the</strong> spreading chart.<br />
3.6 Opening/closing <strong>the</strong> slide<br />
Press <strong>the</strong> button to open or close <strong>the</strong> slide.<br />
Slide open: green LED lights up<br />
Slide closed: yellow LED lights up<br />
Slide monitoring<br />
Speed 200<br />
> Slide 29<br />
> Speed 200<br />
Slide 29 ok<br />
If <strong>the</strong> slide does not reach <strong>the</strong> specified position within 10 seconds, <strong>the</strong><br />
spreader switches off.<br />
The following message is displayed:<br />
Slide not open or Slide not closed. 5 warning signals also sound.<br />
Switch off <strong>the</strong> machine to remedy <strong>the</strong> fault. For more information, see<br />
Troubleshooting chapter.
3 <strong>Operating</strong> <strong>the</strong> <strong>MiniVario</strong> ®<br />
3.7 Performing <strong>the</strong> slide reference run<br />
The slide motor and control panel are adjusted to one ano<strong>the</strong>r at <strong>the</strong><br />
factory. The setting can be lost over time or when replacing <strong>the</strong> control<br />
panel.<br />
Switch off <strong>the</strong> machine.<br />
Press and hold down <strong>the</strong> button for switching<br />
between speed and slide and <strong>the</strong> + button<br />
while also pressing <strong>the</strong> On button for around 3<br />
seconds.<br />
The slide performs its reference run.<br />
Approx. 240 is displayed as <strong>the</strong> upper value and approx. 40 as <strong>the</strong> lower<br />
value.<br />
Switch off <strong>the</strong> machine at <strong>the</strong> main switch; <strong>the</strong> values are saved.<br />
If a slide reference run cannot be performed, <strong>the</strong> following message<br />
flashes on <strong>the</strong> display: slide not calib.<br />
Check that <strong>the</strong> slide unit is not blocked by foreign bodies and perform<br />
ano<strong>the</strong>r reference run.<br />
3.8 Setting <strong>the</strong> spreading width<br />
The spreading width depends on <strong>the</strong> condition of <strong>the</strong> spreading material<br />
and <strong>the</strong> speed of <strong>the</strong> spreading disc. The more coarse <strong>the</strong> spreading<br />
material, <strong>the</strong> larger <strong>the</strong> possible spreading width.<br />
The speed and position of <strong>the</strong> casting shovels should be varied to<br />
establish <strong>the</strong> optimum settings for <strong>the</strong> various spreading materials.<br />
15
3 <strong>Operating</strong> <strong>the</strong> <strong>MiniVario</strong> ®<br />
3.9 Setting spreading zone<br />
16<br />
You can set <strong>the</strong> zone within which <strong>the</strong> spreading material is to be<br />
spread. This allows you to spread <strong>the</strong> material on one side for example<br />
when <strong>the</strong> carrier vehicle is following <strong>the</strong> driving line.<br />
Spread spreading material in left-hand direction of travel<br />
(when mounted at <strong>the</strong> rear):<br />
turn spindle (arrow) clockwise.<br />
Spread spreading material in right-hand direction of travel<br />
(when mounted at <strong>the</strong> rear):<br />
turn spindle (arrow) anti-clockwise.<br />
3.10 Empty indicator<br />
The empty indicator shows you when <strong>the</strong> spreading material in <strong>the</strong><br />
hopper falls below a specific fill level:<br />
The following message flashes on <strong>the</strong> display for approx. 5 seconds:<br />
Hopper empty, 8 warning signals sound and <strong>the</strong> red LED flashes on <strong>the</strong><br />
empty indicator.<br />
To switch off <strong>the</strong> empty indicator:<br />
Close <strong>the</strong> slide or switch off <strong>the</strong> spreader.
4 Settings and displays<br />
The control element can be used to make <strong>the</strong> following settings:<br />
Language<br />
Empty indicator selection<br />
EHR signal<br />
EHR cycle<br />
Empty indicator adjustment<br />
Spreader type<br />
Number of spreaders<br />
4.1 Making settings<br />
Switch off <strong>the</strong> machine.<br />
Press and hold down both buttons<br />
at <strong>the</strong> same time while pressing<br />
<strong>the</strong> On button for approx. 3<br />
seconds.<br />
The language selection is<br />
displayed.<br />
Press <strong>the</strong> toggle switch to select <strong>the</strong><br />
desired menu item.<br />
4.2 Language<br />
Press <strong>the</strong> button to set <strong>the</strong> language.<br />
Press toggle switch: setting saved, next<br />
menu item<br />
or<br />
press main switch: setting saved and<br />
machine switched off.<br />
Language 0<br />
English<br />
Language 0<br />
English<br />
17
4 Settings and displays<br />
4.3 Selecting <strong>the</strong> empty indicator<br />
18<br />
Press <strong>the</strong> button to select <strong>the</strong> empty<br />
indicator.<br />
Via spreading disc resistance (1),<br />
via mixer motor (2) with soft mixer,<br />
via external empty indicator (3) - not<br />
programmed<br />
or<br />
empty indicator switched off (0).<br />
Press toggle switch: setting saved, next<br />
menu item<br />
or<br />
press main switch: setting saved and<br />
machine switched off.<br />
Empty ind. 1<br />
One disc<br />
4.4 Setting signal for electronic lifting gear control (EHR)<br />
When <strong>the</strong> spreader is equipped with <strong>the</strong> headline manager accessory,<br />
<strong>the</strong> hydraulic signal of <strong>the</strong> tractor can be detected. The signal is emitted<br />
when lifting or lowering.<br />
The spreader is set at <strong>the</strong> factory for <strong>the</strong> signal when lifting.<br />
If <strong>the</strong> tractor emits <strong>the</strong> hydraulic signal when lowering, you can adjust <strong>the</strong><br />
spreader.<br />
Press <strong>the</strong> button to set <strong>the</strong> EHR signal.<br />
EHR signal for lifting:<br />
High active is displayed.<br />
EHR signal for lowering:<br />
Low active is displayed.<br />
Press toggle switch: setting saved, next<br />
menu item<br />
or<br />
press main switch: setting saved and<br />
machine switched off.<br />
EHR signal 0<br />
High active
4 Settings and displays<br />
4.5 Adjusting <strong>the</strong> empty indicator<br />
Depending on requirements and spreading material, <strong>the</strong> empty indicator<br />
can be set to respond earlier or later.<br />
The value for <strong>the</strong> empty indicator to switch on (if <strong>the</strong> spreading material<br />
falls below a certain fill level) can be adjusted from -50 to +50.<br />
Note:<br />
Depending on <strong>the</strong> spreading material or material humidity, <strong>the</strong> remainder<br />
level may vary somewhat.<br />
Press <strong>the</strong> button to set <strong>the</strong> respective<br />
value.<br />
Factory setting is 0.<br />
With + values, <strong>the</strong> empty indicator<br />
responds at a higher fill level.<br />
With - values, <strong>the</strong> empty indicator responds<br />
at a lower fill level.<br />
Press toggle switch: setting saved, next<br />
menu item<br />
or<br />
press main switch: setting saved and<br />
machine switched off.<br />
Setting 0<br />
Empty ind. On<br />
19
4 Settings and displays<br />
4.6 Displaying <strong>the</strong> spreader type<br />
20<br />
Control is provided for various spreaders.<br />
The Polaro ® is programmed at <strong>the</strong> factory as this program is valid for <strong>the</strong><br />
<strong>MiniVario</strong> ®<br />
Press toggle switch: setting saved, next<br />
menu item<br />
or<br />
press main switch: setting saved and<br />
machine switched off.<br />
4.7 Headland manager (optional accessory)<br />
If <strong>the</strong> headline manager is connected, an * is<br />
displayed at <strong>the</strong> end of <strong>the</strong> first line.<br />
Spread. type 0<br />
POLARO<br />
Speed 200*<br />
Slide 29<br />
With <strong>the</strong> headline manager, <strong>the</strong> slide is automatically opened when<br />
lowering <strong>the</strong> hydraulic and automatically closed when lifting.<br />
The slide can be manually opened and closed from <strong>the</strong> control panel.<br />
The signal can be detected from a 7-pin plug or a sensor signal.
4 Settings and displays<br />
7-pin plug<br />
1. Connect <strong>the</strong> connecting cable of <strong>the</strong> control panel to <strong>the</strong> 7-pin signal<br />
plug of <strong>the</strong> carrier vehicle.<br />
2. Set <strong>the</strong> EHR signal of <strong>the</strong> carrier vehicle depending on whe<strong>the</strong>r <strong>the</strong><br />
tractor emits <strong>the</strong> hydraulic signal when lifting or lowering.<br />
Sensor signal<br />
1. Mount <strong>the</strong> sensor in <strong>the</strong> joint area of <strong>the</strong> drift arm.<br />
2. Mount <strong>the</strong> magnetic sensor to <strong>the</strong> draft arm.<br />
3. Set position of sensor and magnetic sensor.<br />
Maximum spacing 10 mm.<br />
Hydraulics at bottom:<br />
sensor not in range of magnetic sensor.<br />
Hydraulics at top:<br />
sensor just in range of magnetic sensor.<br />
Hydraulics at top:<br />
sensor must be in range of magnetic sensor.<br />
When raising <strong>the</strong> hydraulics, <strong>the</strong> sensor must not exit <strong>the</strong><br />
magnetic sensor range because o<strong>the</strong>rwise <strong>the</strong> slide will<br />
opened again.<br />
21
4 Settings and displays<br />
4.8 Controls<br />
22<br />
Voltage check<br />
To check <strong>the</strong> operating voltage (in V), <strong>the</strong> spreader must be on.<br />
Press <strong>the</strong> toggle switch for 5 seconds.<br />
The operating voltage is displayed for 8<br />
seconds.<br />
Voltage 14.0 V<br />
Performance check<br />
The motor is set at <strong>the</strong> factory. No changes are permitted,<br />
since o<strong>the</strong>rwise <strong>the</strong> drive and control parameters no longer match.<br />
To check <strong>the</strong> performance data, <strong>the</strong> spreader must be on.<br />
Press <strong>the</strong> button for min. 5 seconds.<br />
The following information is displayed as<br />
long as <strong>the</strong> button is pressed:<br />
Line 1: current drive motor, power<br />
consumption in watts and <strong>the</strong> exact speed.<br />
Line 2: R value for factory-internal data,<br />
<strong>the</strong> motor voltage in volts, <strong>the</strong> current<br />
consumption of <strong>the</strong> motor in amps.<br />
TLP 23.4 W 201<br />
91R 3.4V 6.9A
4 Settings and displays<br />
4.9 Spreading width and turning procedure<br />
Turning<br />
1. Put <strong>the</strong> spreader in <strong>the</strong> carton or put <strong>the</strong> carton over <strong>the</strong> spreader to<br />
catch <strong>the</strong> spreading material.<br />
2. Due to <strong>the</strong> pull, <strong>the</strong> speed of <strong>the</strong> spreading disc used in practice must<br />
be set.<br />
3. Weigh out <strong>the</strong> ejected spreading material at various slide positions<br />
until <strong>the</strong> suitable slide position is determined.<br />
Determining <strong>the</strong> spreading width<br />
1. Spread on a firm surface.<br />
2. Weigh spreading material or sweep up a swath lateral to <strong>the</strong> direction<br />
of travel and access <strong>the</strong> side distribution.<br />
Formulas<br />
g/min x 600<br />
Speed (km/h) x spreading width (m)<br />
g/min x 600<br />
Output/m 2 (kg) x spreading width (m)<br />
= output (g/m 2 )<br />
= speed (km/h)<br />
Speed (km/h) x output /m 2 (g) x spreading width (m)<br />
600<br />
= g/min<br />
23
5 Maintenance and cleaning<br />
5.1 Maintenance<br />
24<br />
1<br />
1<br />
Dosing device/slide<br />
The dosing device and slide should be inspected and cleaned at regular<br />
intervals depending on use and <strong>the</strong> spreading material used.<br />
If using very fine spreading material in particular, <strong>the</strong> slide unit may clog.<br />
Risk of injury!<br />
Always wear goggles and gloves when using compressed<br />
air for cleaning purposes.<br />
2<br />
1. Remove mixer plug.<br />
2. Remove knurled screws 1 on <strong>the</strong> left and right.<br />
3. Remove <strong>the</strong> hopper 2.<br />
4. Unscrew knurled screws 3 and take off cover plate 4.<br />
5. Remove nuts 5.<br />
6. Dismantle <strong>the</strong> hopper platform 6 and pull <strong>the</strong> dosage slide out 7 from<br />
<strong>the</strong> top.<br />
7. Clean <strong>the</strong> slide unit with a broom or compressed air.<br />
8. Fit parts in reverse order.<br />
Standard lubricant can be applied to <strong>the</strong> bottom edge<br />
to assist with hopper installation.
5 Maintenance and cleaning<br />
Drive motor<br />
The spreading disc's drive motor should be cleaned and greased at<br />
<strong>the</strong> end of <strong>the</strong> season to extend <strong>the</strong> motor's service life. Carry out this<br />
maintenance work correctly o<strong>the</strong>rwise <strong>the</strong> manufacturer's warranty may<br />
be invalidated.<br />
Motor viewed from below<br />
1. Remove mixer plug.<br />
2. Loosen screw 1 on spreading disc 2 and pull spreading disc 2 up<br />
and off.<br />
3. Remove plastic washer (thick).<br />
4. Remove screws 3 from below and remove drive motor 4 with<br />
spacer and two guide rails 5.<br />
5. Take plastic washer (thin) off motor shaft.<br />
6. Clean motor shaft and contact surface of plastic washer and<br />
apply thin coat of standard copper paste.<br />
7. Fit parts in reverse order.<br />
5.2 Cleaning<br />
The hopper can be almost fully emptied by means of <strong>the</strong> residual<br />
discharge.<br />
1. Unscrew hopper.<br />
2. Clean spreader and hopper with a broom.<br />
25
6 Appendix<br />
6.1 EC declaration of conformity<br />
26<br />
CE<br />
EC Declaration of conformity<br />
In accordance with EC Directives 73/23/EEC and 89/336/EEC<br />
We,<br />
LEHNER <strong>GmbH</strong><br />
Häuslesäcker 5-9<br />
D-89198 Westerstetten<br />
Tel: (+49) 07348/9596-0<br />
Fax: (+49) 07348/9596-40<br />
www.lehner.eu<br />
info@lehner.eu<br />
declare that <strong>the</strong><br />
<strong>MiniVario</strong>®<br />
to which this declaration refers complies with <strong>the</strong> relevant health and<br />
safety requirements of EC Directives 9368/EEC and 89/336/EEC and <strong>the</strong><br />
requirements of <strong>the</strong> relevant EC Directives.<br />
Westerstetten, 20.10.03<br />
Helmut <strong>Lehner</strong><br />
Managing Director<br />
© This declaration (including extracts hereof) may only be printed with <strong>the</strong> consent of<br />
LEHNER <strong>GmbH</strong>
6 Appendix<br />
6.2 Identification<br />
The serial number of <strong>the</strong> spreader is located on <strong>the</strong> back of <strong>the</strong><br />
framework.<br />
Note <strong>the</strong> serial number in <strong>the</strong>se operating instructions so that it is readily<br />
available for inquiries.<br />
The hardware and software versions<br />
are briefly displayed when <strong>the</strong> control<br />
panel is connected.<br />
Note <strong>the</strong> software version in <strong>the</strong>se<br />
operating instructions so that it is<br />
readily available for inquiries.<br />
LEHNER <strong>GmbH</strong><br />
LAS3 V2.1<br />
27
6 Appendix<br />
6.3 Distribution box reference list<br />
Legend<br />
Steuerkabel Control cable Zuleitung Bedienteil Control panel<br />
supply line<br />
28<br />
gelb yellow grau grey<br />
Verteilerdose Junction box Batteriekabel Battery cable rot red blau blue<br />
Motor Streuteller Spreading disc<br />
motor<br />
weiss white rosa pink<br />
Motor Rührwerk Mixer motor braun brown schwarz black<br />
Schiebermotor Slide motor grün green violett violet
6 Appendix<br />
6.4 Troubleshooting<br />
Troubleshooting LEHNER <strong>MiniVario</strong>® Status: 01/2009<br />
The following information should help you resolve minor problems yourself. You are welcome to call us as needed. We are glad to help.<br />
Problem Cause Resolution<br />
The control panel crackles Loose contact on <strong>the</strong> power supply Check contacts and fuses<br />
No display + and - were switched, fuse is defective Check connections and fuses<br />
Spreading disc does not reach set speed Excess load, motor bearing not running smoothly Check motor for ease of movement<br />
Slide jams Spreading material or dirt has got jammed in <strong>the</strong> slide Check slide for foreign bodies and clean<br />
On <strong>the</strong> display: Disc blocking Spreading disc does not turn; switched off after 10 attempts Check spreading disc<br />
Possibly start spreader again<br />
On <strong>the</strong> display: Agitator stationary Agitator does not turn; switched off after 10 attempts Check agitator<br />
Material may be compacted Possibly start spreader again<br />
Agitator motor cable not plugged in Plug in agitator motor cable<br />
On <strong>the</strong> display: Slide not open Slide could not go into position when opening Check slide for contamination or perform reference<br />
run; see Slide reference run,<br />
Cable not plugged in, motor defective<br />
On <strong>the</strong> display: Slide not closed Slide could not go into position when closing Check slide mechanics for foreign body, or perform<br />
run; see Slide reference run<br />
On <strong>the</strong> display: Agitator blocking Agitator motor has excess power consumption Empty hopper<br />
The version is displayed again and again. Fuse oxidised, loose contact Check contacts and fuses<br />
Slide not opening, Mechanical damage to slide mechanics Check slide motor and mechanics<br />
no error message displayed<br />
On <strong>the</strong> display: Connecting spr. Control panel plug not connected to spreader Check plug connections and lines<br />
or line damage Restart machine<br />
Empty indicator does not respond Empty indicator is set too low Adjust empty indicator, see page 21<br />
Headline manager closes <strong>the</strong> slide when draining Signal incorrectly applied Change signal. See EHR signal<br />
<strong>the</strong> hydraulics and opens when lifting<br />
Headline manager does not always close Distance to magnetic sensor too great Check distance, max. 10 mm.<br />
29
6 Appendix<br />
6.5 Parts list<br />
30
6 Appendix<br />
6.5 Parts list<br />
Designation Quantity Material Size<br />
1 Sealing cap 1 Plastic<br />
2 Reinforcement plate 1 VA<br />
3 Load relief roof 1 VA<br />
4 Hopper 1 Plastic 70/105/170 ltr.<br />
5 Counter bearing for agitator 1 Plastic<br />
6 Extra hopper bracket 1 VA<br />
7 Discharge cover 1 Plastic<br />
8 Control panel 1<br />
9 Upper part of bracket 1 Steel<br />
10 Lower part of bracket 1 Steel<br />
11 Plug with cable for mixer motor 1<br />
12 Mixer motor 1<br />
13 Agitator bearing with lubricating nipple 1 Plastic<br />
14 Agitator 1 Steel<br />
15 Agitator 1 VA 70/105/170 ltr.<br />
16 Battery cable with bracket 1<br />
31
6 Appendix<br />
6.5 Parts list<br />
32
6 Appendix<br />
6.5 Parts list<br />
Designation Quantity Material Size<br />
1 Hopper seal 1 Rubber<br />
2 Hopper platform 1 Plastic 150X150X15<br />
3 Dosage slide, top 1 VA 150X150X2<br />
4 Slide 1 VA<br />
5 Slide guide 2 VA 2.5 mm<br />
6 Dosage slide at bottom 1 Plastic 150X150X2<br />
7 Gaiter 1 Plastic<br />
8 Slide guide 2 Plastic<br />
9 Star grip nut 2 Plastic / VA M 6<br />
10 Cover plate with seal 1 VA/rubber<br />
11 Hopper bracket 1 VA 70/105/170 ltr.<br />
12 Spreading disc 1 VA<br />
13 Casting shovel 8 VA<br />
14 Washer 1 Plastic 40X12X1.2<br />
15 Motor support (movable) 1 VA<br />
16 Motor support guide rail 2 Plastic<br />
17 Spacer 1 VA 4 mm<br />
18 Sealing disc for motor 1 Plastic<br />
19 Drive motor 1<br />
20 Front plate 1 VA<br />
21 Frame 1 VA<br />
22 Star-knob screw 4 Plastic / VA M 8<br />
23 Chain motor 1<br />
24 Distributor box 1<br />
25 Cable protection sleeve 1 Rubber<br />
26 Motion spindle 1 Plastic / VA<br />
27 Control cable with plug 1 6m/11m<br />
28 Deflector plate 1 VA<br />
33