Installation Instructions Electronic Speedometer dia 48 mm with ...
Installation Instructions Electronic Speedometer dia 48 mm with ...
Installation Instructions Electronic Speedometer dia 48 mm with ...

Create successful ePaper yourself
Turn your PDF publications into a flip-book with our unique Google optimized e-Paper software.
<strong>Installation</strong> <strong>Instructions</strong><br />
<strong>Electronic</strong> <strong>Speedometer</strong> <strong>dia</strong> <strong>48</strong> <strong>mm</strong> <strong>with</strong> stepper motor<br />
Dear Customer,<br />
you’ve made a good selection buying this new MMB ® device. The product should be installed by a<br />
person specialising in the installation of such devices.<br />
1. Safety <strong>Instructions</strong><br />
To install the electric cables, use existing cable ducts and looms, but do not run the cables parallel to<br />
ignition cables or parallel to cables leading to powerful consumers. Secure the cables <strong>with</strong> cable<br />
binders or adhesive tape. When you install the electric cables please also note:<br />
- Do not run the cables over moving parts.<br />
- Ensure that the cables are not exposed to any tensile, compressive or shear forces.<br />
- Use only cable stripper to strip the cables, adjust the cable stripper so that the individual strands<br />
are not damaged or cut off.<br />
- Crimped connections should be made only by using a cable crimping pliers.<br />
- Insulate exposed leads in such a way that short circuits cannot occur.<br />
Caution: Risk of short circuits through faulty junctions or damaged cables. Please check all cables and<br />
connections for short circuits after you have finished the installation. Short circuits in the electrical<br />
system can cause cable fires, battery explosions and damages to other electronic systems. Incorrect<br />
connections can lead to short circuits.<br />
Use suitable tools for building in the gauge and note the safety instruction of the tool manufacturers. If<br />
you use a reed sensor <strong>with</strong> magnets, note the safety instructions of the glue manufacturer when<br />
installing the magnets.<br />
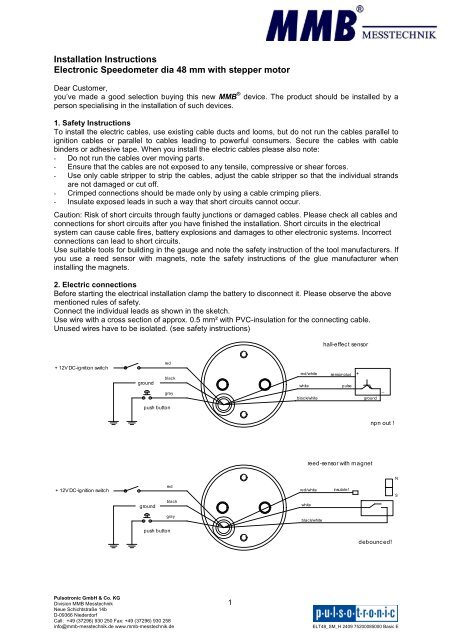
2. Electric connections<br />
Before starting the electrical installation clamp the battery to disconnect it. Please observe the above<br />
mentioned rules of safety.<br />
Connect the individual leads as shown in the sketch.<br />
Use wire <strong>with</strong> a cross section of approx. 0.5 <strong>mm</strong>² <strong>with</strong> PVC-insulation for the connecting cable.<br />
Unused wires have to be isolated. (see safety instructions)<br />
hall-effect sensor<br />
+ 12V DC-ignition switch<br />
ground<br />
red<br />
black<br />
red/white<br />
white<br />
sensor-plus<br />
pulse<br />
+<br />
gray<br />
black/white<br />
ground<br />
push button<br />
npn out !<br />
reed-sensor <strong>with</strong> magnet<br />
N<br />
+ 12V DC-ignition switch<br />
ground<br />
red<br />
black<br />
red/white<br />
white<br />
insulate!<br />
S<br />
gray<br />
black/white<br />
push button<br />
debounc ed!<br />
Pulsotronic GmbH & Co. KG<br />
Division MMB Messtechnik<br />
Neue Schichtstraße 14b<br />
D-09366 Niederdorf<br />
Call: +49 (37296) 930 250 Fax: +49 (37296) 930 258<br />
info@<strong>mm</strong>b-messtechnik.de www.<strong>mm</strong>b-messtechnik.de<br />
1<br />
ELT<strong>48</strong>_SM_H 2409 75200085000 Basic E
3. Mounting of the speedometer<br />
The speedometer can be mounted into an instrument panel<br />
(a recess of D=<strong>48</strong>.5 + 0.5 <strong>mm</strong> in the instrument panel is required).<br />
It can also be mounted on the handlebar <strong>with</strong> a clamp. Brackets and handlebar clamps are available<br />
as accessories.<br />
4. Speed sensor<br />
4.1 Debounced reed sensor <strong>with</strong> magnets<br />
Available as accessories.<br />
Stick 3 magnets in an angle of 120°C!<br />
120°<br />
120°<br />
sensor always righted !!!<br />
sensor never horizontal!!!<br />
120°<br />
Install the sensor and the magnets according to the sketch. The mentioned dimensions refer to the<br />
reed sensor of MMB ®.<br />
Use the enclosed cable fixers to fix the sensor.<br />
Caution: Inside the sensor is a small glass tube, avoid mechanical stress like tension on the sensor<br />
when installing it.<br />
If the sensor is used on the rear wheel, the sensor cable should be shielded.<br />
We do not assume any liabilities for damages or indirect damages!<br />
Stick 2 magnets in an angle of 180° or 3 magnets in an angle of 120° in the near of the hub (to<br />
minimize the centrifugal force) on a plane, clean and greaseless surface.<br />
Please use appropriate glue. As additional security an elastic silicone film should be laid around the<br />
magnets.<br />
If you have lost a magnet, the speedometer will indicate the wrong speed (too little)!<br />
Caution: Risk of a speed fine!<br />
Pulsotronic GmbH & Co. KG<br />
Division MMB Messtechnik<br />
Neue Schichtstraße 14b<br />
D-09366 Niederdorf<br />
Call: +49 (37296) 930 250 Fax: +49 (37296) 930 258<br />
info@<strong>mm</strong>b-messtechnik.de www.<strong>mm</strong>b-messtechnik.de<br />
2<br />
ELT<strong>48</strong>_SM_H 2409 75200085000 Basic E
4.2 Hall effect sensor<br />
requirements of the hall sensor<br />
• must have a npn-output<br />
• operating voltage approx. U = 12 V dc<br />
4.3 Calculation of the Pulses-per-Kilometer (N)<br />
For calculation of the pulses-per-kilometer the following specifications are required:<br />
• rolling circumference of the wheel (where the magnets are situated)<br />
• number of pulses per wheel rotation<br />
Use the following formula:<br />
For a km/h scale:<br />
N= 1000 [meters] x number of pulses per wheel rotation<br />
rolling circumference [meters]<br />
For a mph scale:<br />
1 Mile = 1609 meters<br />
N= 1609 [meters] x number of pulses per wheel rotation<br />
rolling circumference [meters]<br />
Insert the calculated pulses-per-kilometer (or pulses per mile) in the speedometer to calibrate it. (see<br />
“Calibration mode” in the instruction)<br />
4.3.1 Calculation of pulses-per-kilometer for Harley Davidson ® <strong>with</strong> OEM speed sensor<br />
required specifications<br />
• rolling circumference of the rear wheel<br />
• number of teeth of the secondary transmission (rear wheel pulley / trans pulley)<br />
• number of teeth of one of the gears on the mainshaft<br />
Calculation (for speedometer <strong>with</strong> km/h scale)<br />
N = 1000 m x S x Z or N = 1000 m x I<br />
U<br />
U<br />
U: rolling circumference [in m]<br />
S: secondary transmission= teeth of sprocket wheel / teeth of (gearbox output-) pinion<br />
Z: number of teeth of one of the gears<br />
I: number of sensor pulses per rear wheel rotation<br />
N: Pulses per Kilometer<br />
Example for Harley Davidson ® <strong>with</strong> 883 ccm Evolution V-Twin Motor<br />
all 2003 Sportster models<br />
XHL Sportster 883<br />
XHL Sportster 883 Hugger<br />
XL Sportster 883<br />
XL 53C Sportster Custom 53<br />
rear tire: 130 / 90 B16<br />
rolling circumference u= 1933 <strong>mm</strong> = 1.933 m<br />
secondary transmission:<br />
number of teeth sprocket wheel / pinion z1/z2 = 61/27<br />
number of teeth of the 5th gear on the mainshaft: z5 = 42<br />
Pulsotronic GmbH & Co. KG<br />
Division MMB Messtechnik<br />
Neue Schichtstraße 14b<br />
D-09366 Niederdorf<br />
Call: +49 (37296) 930 250 Fax: +49 (37296) 930 258<br />
info@<strong>mm</strong>b-messtechnik.de www.<strong>mm</strong>b-messtechnik.de<br />
3<br />
ELT<strong>48</strong>_SM_H 2409 75200085000 Basic E
Calculation for speedometer <strong>with</strong> km/h scale:<br />
N = (1000 m / 1.933 m) x (61/27) x 42 = 49089 [Pulses per Kilometer]<br />
Calculation for speedometer <strong>with</strong> mile scale:<br />
N = (1609 m / 1.933 m) x (61/27) x 42 = 78984 [Pulses per Mile]<br />
1 Mile = 1609 meters<br />
5. Accessories (not included)<br />
You find suitable accessories like:<br />
Sensors<br />
Magnets<br />
Glue<br />
Push buttons<br />
Brackets and clamps<br />
in our Webshop.<br />
Pulsotronic GmbH & Co. KG<br />
Division MMB Messtechnik<br />
Neue Schichtstraße 14b<br />
D-09366 Niederdorf<br />
Call: +49 (37296) 930 250 Fax: +49 (37296) 930 258<br />
info@<strong>mm</strong>b-messtechnik.de www.<strong>mm</strong>b-messtechnik.de<br />
4<br />
ELT<strong>48</strong>_SM_H 2409 75200085000 Basic E
<strong>Electronic</strong> <strong>Speedometer</strong> <strong>dia</strong> <strong>48</strong> <strong>mm</strong> Calibration and Operation <strong>Instructions</strong><br />
1. General information<br />
The speedometer is calibrated and operated by a push button.<br />
The push button can be pushed shortly (< 1 second) or long (approx. 1 second).<br />
2. Calibration mode<br />
The calibration can be accomplished in two ways:<br />
- “PULS” – Mode: By input of a known pulse-per-kilometer (or pulse-per-mile, if the speedometer<br />
has a mph-scale)<br />
- “Auto”– Mode: Automatic calibration when driving on a road <strong>with</strong> the exact distance of 1 kilometer<br />
(if you have a kilometer scale) or 1 mile (if you have a mile scale) clearly defined.<br />
Please note, that the Pulse-per-kilometer/mile must have a minimum value of 1000.<br />
To get into the calibration mode, please push the button while turning on the ignition.<br />
push the button<br />
while switching on ignition<br />
short<br />
short<br />
short<br />
short<br />
etc.<br />
long<br />
(for saving)<br />
2.1 Manual calibration<br />
self test<br />
push the button<br />
while switching on ignition<br />
short<br />
long<br />
short<br />
short<br />
long<br />
short<br />
short<br />
long<br />
etc.<br />
long<br />
self test<br />
long<br />
(for saving)<br />
If you entered a wrong value unintentionally, you can cancel the calibration anytime by turning of the<br />
ignition.<br />
Pulsotronic GmbH & Co. KG<br />
Division MMB Messtechnik<br />
Neue Schichtstraße 14b<br />
D-09366 Niederdorf<br />
Call: +49 (37296) 930 250 Fax: +49 (37296) 930 258<br />
info@<strong>mm</strong>b-messtechnik.de www.<strong>mm</strong>b-messtechnik.de<br />
5<br />
ELT<strong>48</strong>_SM_H 2409 75200085000 Basic E
2.2 Automatic calibration<br />
It is also possible to calibrate the speedometer automatically by driving on a road <strong>with</strong> the exact<br />
distance of 1 mile (if you have a mile scale) or 1 kilometer (if you have a kilometer scale) clearly<br />
defined.<br />
Please note during the automatic calibration, there is indication of speed!<br />
push the button<br />
while switching on ignition<br />
short<br />
short<br />
long<br />
short<br />
drive 1 km (kph scale)<br />
or drive 1 mile (mph scale)<br />
short<br />
short<br />
self test<br />
long<br />
(for saving)<br />
3. Operating of the <strong>Speedometer</strong><br />
When turning on the ignition, the speedometer checks his functions itself (full-scale deflection of the<br />
pointer). During the upward movement of the pointer all segments of the LCD flash at the same time,<br />
during the downward movement the serial number of the speedometer is indicated.<br />
After the self test the display shows the chosen menu.<br />
3.1 Display functions<br />
total dista nc e trip distanc e driving time<br />
short<br />
short<br />
etc.<br />
long<br />
long<br />
Pulsotronic GmbH & Co. KG<br />
Division MMB Messtechnik<br />
Neue Schichtstraße 14b<br />
D-09366 Niederdorf<br />
Call: +49 (37296) 930 250 Fax: +49 (37296) 930 258<br />
info@<strong>mm</strong>b-messtechnik.de www.<strong>mm</strong>b-messtechnik.de<br />
6<br />
ELT<strong>48</strong>_SM_H 2409 75200085000 Basic E
Total distance GW<br />
- 0…99999 km (or miles)<br />
- can not be reset<br />
Trip distance<br />
0.0…9999.9 km (or miles)<br />
can be reset by pushing the button long (reset will be saved after driving approx. 100 metres)<br />
Driving time<br />
0:00….23:59 h<br />
can be reset by pushing the button long, or will be reset automatically when turning off ignition<br />
4. Technical Data<br />
rated voltage:<br />
12VDC, the negative pole of the battery has to be grounded<br />
voltage range:<br />
10.8 V – 15 V<br />
max. current consumption: < 100 mA during driving (depends on display color)<br />
operating temperature -20 - +85 °C<br />
<strong>dia</strong>meter of the instrument: <strong>48</strong> <strong>mm</strong><br />
instrument height:<br />
58 <strong>mm</strong><br />
Impulse range<br />
1000 Impulses / Kilometer – 99999 Impulses / Kilometer or<br />
1000 Impulses / Mile – 99999 Impulses / Mile<br />
data back-up<br />
<strong>with</strong>out current at least 10 years<br />
5. Warranty notice<br />
Our products are manufactured <strong>with</strong> utmost care and they are in accordance <strong>with</strong> the relevant DIN-<br />
Standards (German Industrial Standards).<br />
Pulsotronic GmbH & Co. KG is not liable for damages arising from improper handling.<br />
In case of necessity, please contact our service and we are always ready to help you.<br />
Telephone: +49 (0) 37296 930 250<br />
Fax: +49 (0) 37296 930 258<br />
Email: info@<strong>mm</strong>b-messtechnik.de<br />
Your team at Pulsotronic GmbH & Co. KG, MMB-Messtechnik, Germany<br />
Pulsotronic GmbH & Co. KG<br />
Division MMB Messtechnik<br />
Neue Schichtstraße 14b<br />
D-09366 Niederdorf<br />
Call: +49 (37296) 930 250 Fax: +49 (37296) 930 258<br />
info@<strong>mm</strong>b-messtechnik.de www.<strong>mm</strong>b-messtechnik.de<br />
7<br />
ELT<strong>48</strong>_SM_H 2409 75200085000 Basic E
Necessary Information in case of warranty:<br />
Name: ...............................................................................<br />
Address: ...............................................................................<br />
Tel.: ...............................................................................<br />
Fax: ........................................................................<br />
Email: ................................................................................<br />
Serial no. of speedometer:<br />
Description of defect:<br />
Used speed sensor:<br />
Motorcycle:<br />
Model:<br />
Model year:<br />
Pulsotronic GmbH & Co. KG<br />
Division MMB Messtechnik<br />
Neue Schichtstraße 14b<br />
D-09366 Niederdorf<br />
Call: +49 (37296) 930 250 Fax: +49 (37296) 930 258<br />
info@<strong>mm</strong>b-messtechnik.de www.<strong>mm</strong>b-messtechnik.de<br />
8<br />
ELT<strong>48</strong>_SM_H 2409 75200085000 Basic E