
Create successful ePaper yourself
Turn your PDF publications into a flip-book with our unique Google optimized e-Paper software.
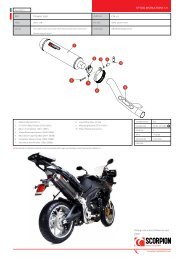
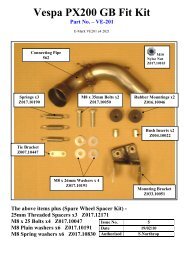
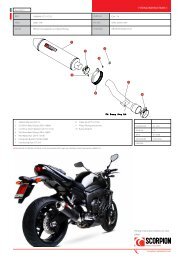
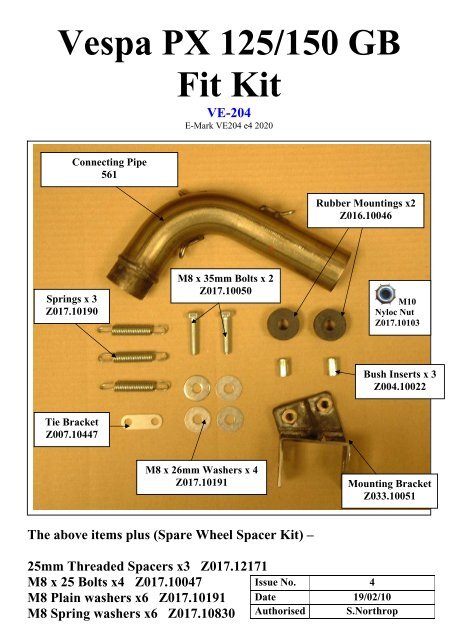
<strong>Vespa</strong> <strong>PX</strong> <strong>125</strong>/<strong>150</strong> GB<br />
Springs x 3<br />
Z017.10190<br />
Tie Bracket<br />
Z007.10447<br />
Connecting Pipe<br />
561<br />
Fit Kit<br />
VE-204<br />
E-Mark VE204 e4 2020<br />
M8 x 35mm Bolts x 2<br />
Z017.10050<br />
M8 x 26mm Washers x 4<br />
Z017.10191<br />
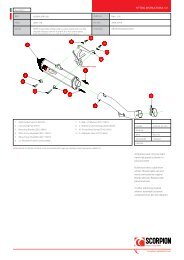
The above items plus (Spare Wheel Spacer Kit) –<br />
Rubber Mountings x2<br />
Z016.10046<br />
25mm Threaded Spacers x3 Z017.12171<br />
M8 x 25 Bolts x4 Z017.10047<br />
M8 Plain washers x6 Z017.10191<br />
M8 Spring washers x6 Z017.10830<br />
Issue No. 4<br />
M10<br />
Nyloc Nut<br />
Z017.10103<br />
Date 19/02/10<br />
Authorised S.Northrop<br />
Bush Inserts x 3<br />
Z004.10022<br />
Mounting Bracket<br />
Z033.10051
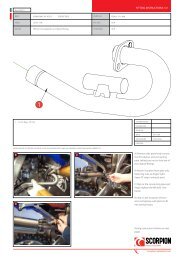
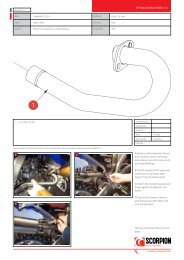
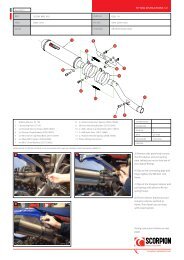
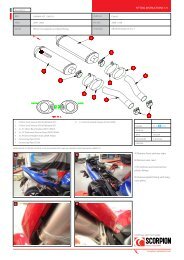
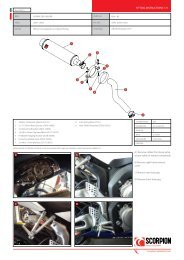
<strong>Vespa</strong> <strong>PX</strong><strong>125</strong>/<strong>150</strong>, <strong>PX</strong>200 & T5. GB & WW Fitting Instructions<br />
Part No’s. VE204, VE201 & VE207<br />
1.Remove original system by first<br />
removing the sidepanel & spare wheel.<br />
Let down the rear tyre so you can<br />
remove the bolt from the main exhaust<br />
bracket. Bolt Scorpion frontpipe to the<br />
cylinder head (finger tight only).<br />
3. Place the new Scorpion system onto<br />
the frontpipe and using the nuts &<br />
washers fix it to the main bracket.<br />
5. The whole system will naturally want<br />
to pull into the rear wheel, so tighten the<br />
main mounting bracket bolt until you<br />
can position the silencer 15mm away<br />
from the rear tyre under tension.<br />
7. Replace the spare wheel using items<br />
11-14 (on the fitting guide) & ensure<br />
there is sufficient clearance between the<br />
Scorpion system and the spare wheel<br />
(GB only, not Wide Wheel version)<br />
Issue No:- 2 Date:- 14/06/05 Authorised:-<br />
2. Put new main bracket on with the<br />
original bolt and the new Nyloc nut<br />
(supplied) - (finger tight only).<br />
4. Fit the spring (s) supplied to the<br />
frontpipe and the main system. The<br />
tensioned length of the fitted spring(s)<br />
should be approx. 70mm.<br />
6. Once you are happy the Scorpion<br />
exhaust is correctly positioned, tighten<br />
the whole system starting at the main<br />
bracket, then the frontpipe. Check to<br />
ensure that you still have at least 15mm<br />
clearance between the silencer and the<br />
rear tyre.