owner's manual for the cadence okki nokki record cleaner
owner's manual for the cadence okki nokki record cleaner
owner's manual for the cadence okki nokki record cleaner

Create successful ePaper yourself
Turn your PDF publications into a flip-book with our unique Google optimized e-Paper software.
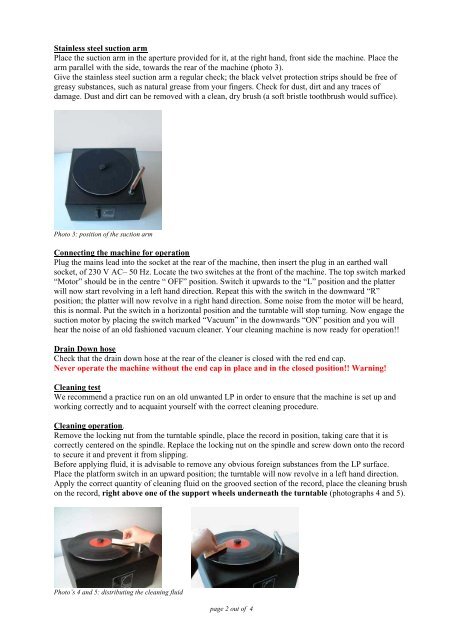
Stainless steel suction arm<br />
Place <strong>the</strong> suction arm in <strong>the</strong> aperture provided <strong>for</strong> it, at <strong>the</strong> right hand, front side <strong>the</strong> machine. Place <strong>the</strong><br />
arm parallel with <strong>the</strong> side, towards <strong>the</strong> rear of <strong>the</strong> machine (photo 3).<br />
Give <strong>the</strong> stainless steel suction arm a regular check; <strong>the</strong> black velvet protection strips should be free of<br />
greasy substances, such as natural grease from your fingers. Check <strong>for</strong> dust, dirt and any traces of<br />
damage. Dust and dirt can be removed with a clean, dry brush (a soft bristle toothbrush would suffice).<br />
Photo 3: position of <strong>the</strong> suction arm<br />
Connecting <strong>the</strong> machine <strong>for</strong> operation<br />
Plug <strong>the</strong> mains lead into <strong>the</strong> socket at <strong>the</strong> rear of <strong>the</strong> machine, <strong>the</strong>n insert <strong>the</strong> plug in an ear<strong>the</strong>d wall<br />
socket, of 230 V AC– 50 Hz. Locate <strong>the</strong> two switches at <strong>the</strong> front of <strong>the</strong> machine. The top switch marked<br />
“Motor” should be in <strong>the</strong> centre “ OFF” position. Switch it upwards to <strong>the</strong> “L” position and <strong>the</strong> platter<br />
will now start revolving in a left hand direction. Repeat this with <strong>the</strong> switch in <strong>the</strong> downward “R”<br />
position; <strong>the</strong> platter will now revolve in a right hand direction. Some noise from <strong>the</strong> motor will be heard,<br />
this is normal. Put <strong>the</strong> switch in a horizontal position and <strong>the</strong> turntable will stop turning. Now engage <strong>the</strong><br />
suction motor by placing <strong>the</strong> switch marked “Vacuum” in <strong>the</strong> downwards “ON” position and you will<br />
hear <strong>the</strong> noise of an old fashioned vacuum <strong>cleaner</strong>. Your cleaning machine is now ready <strong>for</strong> operation!!<br />
Drain Down hose<br />
Check that <strong>the</strong> drain down hose at <strong>the</strong> rear of <strong>the</strong> <strong>cleaner</strong> is closed with <strong>the</strong> red end cap.<br />
Never operate <strong>the</strong> machine without <strong>the</strong> end cap in place and in <strong>the</strong> closed position!! Warning!<br />
Cleaning test<br />
We recommend a practice run on an old unwanted LP in order to ensure that <strong>the</strong> machine is set up and<br />
working correctly and to acquaint yourself with <strong>the</strong> correct cleaning procedure.<br />
Cleaning operation.<br />
Remove <strong>the</strong> locking nut from <strong>the</strong> turntable spindle, place <strong>the</strong> <strong>record</strong> in position, taking care that it is<br />
correctly centered on <strong>the</strong> spindle. Replace <strong>the</strong> locking nut on <strong>the</strong> spindle and screw down onto <strong>the</strong> <strong>record</strong><br />
to secure it and prevent it from slipping.<br />
Be<strong>for</strong>e applying fluid, it is advisable to remove any obvious <strong>for</strong>eign substances from <strong>the</strong> LP surface.<br />
Place <strong>the</strong> plat<strong>for</strong>m switch in an upward position; <strong>the</strong> turntable will now revolve in a left hand direction.<br />
Apply <strong>the</strong> correct quantity of cleaning fluid on <strong>the</strong> grooved section of <strong>the</strong> <strong>record</strong>, place <strong>the</strong> cleaning brush<br />
on <strong>the</strong> <strong>record</strong>, right above one of <strong>the</strong> support wheels underneath <strong>the</strong> turntable (photographs 4 and 5).<br />
Photo’s 4 and 5: distributing <strong>the</strong> cleaning fluid<br />
page 2 out of 4