Manual - Niles Audio
Manual - Niles Audio
Manual - Niles Audio
You also want an ePaper? Increase the reach of your titles
YUMPU automatically turns print PDFs into web optimized ePapers that Google loves.
INSTALLATION<br />
MOUNTING THE BRACKET (IF ATTACHING THE<br />
LOUDSPEAKER TO A WALL, CEILING, BEAM, OR<br />
OTHER SOLID STRUCTURE)<br />
1. Loosen the bracket knobs and remove the bracket from the loudspeaker.<br />
2. Hold the bracket up to the mounting surface. The loudspeaker can be mounted either<br />
horizontally or vertically. Hold the bracket so that the loudspeaker wire fits through the<br />
large, circular wire hole in the center of the bracket. Align the bracket so it is square<br />
with the surroundings (use a level for accuracy).<br />
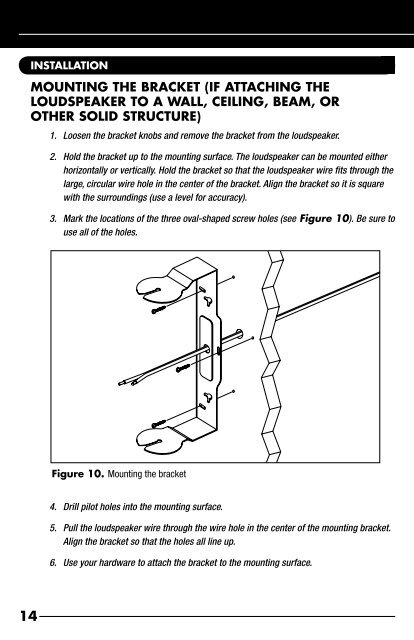
3. Mark the locations of the three oval-shaped screw holes (see Figure 10). Be sure to<br />
use all of the holes.<br />
Figure 10. Mounting the bracket<br />
4. Drill pilot holes into the mounting surface.<br />
5. Pull the loudspeaker wire through the wire hole in the center of the mounting bracket.<br />
Align the bracket so that the holes all line up.<br />
6. Use your hardware to attach the bracket to the mounting surface.<br />
14


