Manual - Niles Audio
Manual - Niles Audio
Manual - Niles Audio

You also want an ePaper? Increase the reach of your titles
YUMPU automatically turns print PDFs into web optimized ePapers that Google loves.
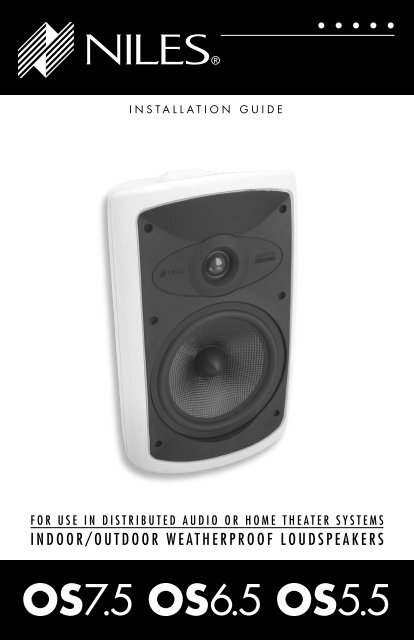
I N S T A L L A T I O N G U I D E<br />
F O R U S E I N D I S T R I B U T E D A U D I O O R H O M E T H E A T E R S Y S T E M S<br />
I N D O O R / O U T D O O R W E A T H E R P R O O F L O U D S P E A K E R S<br />
OS7.5 OS6.5 OS5.5
CONGRATULATIONS!<br />
Thank you for choosing <strong>Niles</strong> OS Indoor/Outdoor Loudspeakers. With proper installation and<br />
operation, you’ll enjoy years of trouble-free use.<br />
<strong>Niles</strong> manufactures the industry’s most complete line of custom installation components and<br />
accessories for audio/video systems. To see the complete <strong>Niles</strong> product assortment, visit us on the<br />
Internet at: www.nilesaudio.com<br />
TABLE OF CONTENTS<br />
Introduction 1<br />
Features and Benefits 2<br />
Parts Guide 4<br />
Installation Considerations 6<br />
Painting the Loudspeaker 11<br />
Installation 14<br />
Operation 17<br />
Specifications 18<br />
Notes 19
INTRODUCTION<br />
<strong>Niles</strong> once again raises the bar. With our first OS Indoor/Outdoor models, we revealed a radical<br />
new understanding of loudspeaker capabilities. <strong>Niles</strong> original OS Indoor/Outdoor Loudspeakers are<br />
constantly praised for their ability to deliver exemplary reliability and outstanding sound quality.<br />
These attributes have made <strong>Niles</strong> OS Indoor/Outdoor Loudspeakers the bestselling loudspeakers in<br />
their class.<br />
The goal of our new OS Indoor/Outdoor line-up is to raise this bar with refined appearance<br />
and superior sonic performance, once again establishing a benchmark by which all others are<br />
judged. The new <strong>Niles</strong> OS Indoor/Outdoor Loudspeakers owe much of their performance and<br />
sound quality advantage to design elements pioneered in the award-winning <strong>Niles</strong> DS Directed<br />
Soundfield TM Loudspeakers. Their engineering advances come from our integrated approach to<br />
driver and cabinet design. By integrating the woofer basket into the baffle of the cabinet, we are<br />
able to increase the woofer cone-area to cabinet-width ratio, thus enabling OS Indoor/Outdoor<br />
Loudspeakers to provide levels of bass performance that substantially exceed their physical<br />
size. Deeper and more powerful bass isn’t the only refinement in the new OS Indoor/Outdoor<br />
line-up. A new and modern style enables OS Indoor/Outdoor Loudspeakers to blend seamlessly<br />
with architectural elements, both indoors and out. After the installation is complete, you will be<br />
astonished by the experience of hearing such clean and powerful sound coming from such<br />
elegant-appearing loudspeakers.<br />
NILES AUDIO CORPORATION – 1-800-BUY-HIFI – 305-238-4373<br />
1
FEATURES AND BENEFITS<br />
PATENT-PENDING INTEGRATED<br />
WOOFER/BAFFLE ASSEMBLY<br />
Increases the woofer cone-area to cabinet-width ratio for enhanced bass output<br />
CARBON-WEAVE POLYPROPYLENE WOOFER CONE<br />
Reduces breakup and lowers distortion<br />
BUTYL-RUBBER WOOFER CONE SURROUND<br />
Damps resonance and provides exceptional durability<br />
DISPERSION STABILIZER<br />
Distributes midrange tones for clear off-axis sound<br />
TRI-LAMINATE TETERON DOME TWEETER<br />
One-inch fluid-cooled tweeter provides ultra-wide dispersion for clear, detailed, and extended<br />
high-frequencies<br />
WEATHERPROOF ENGINEERING<br />
Enables OS loudspeakers to handle extreme hot, cold, and moist environments, exceeding the<br />
military’s strict anti-corrosion specification MIL-STD-883D<br />
ADVANCED MATERIAL SCIENCE<br />
Elevates appearance and longevity of the cabinet and grille, plus enhances the performance of the<br />
woofers, tweeters, and crossovers<br />
ARCHITECTURALLY-FRIENDLY DESIGN<br />
Delivers stellar acoustical performance, yet tucks discreetly away into corners and under eaves<br />
LOW-DIFFRACTION GRILLE AND FRONT BAFFLE<br />
Ensures that the sound waves emanating from the woofer and tweeter are not reflected by the<br />
surrounding parts of the loudspeaker for precise imaging and acoustical accuracy<br />
2
RIGID, ACOUSTICALLY-INERT CABINET<br />
Prevents transmission of unwanted vibrations for clean and dynamic bass response<br />
ALL-WEATHER VERSATILITY<br />
Reduces installation limitations to provide great sound from the beaches of Miami to the harsh<br />
winters of Minneapolis<br />
HOME THEATER APPLICABILITY<br />
Enables OS loudspeakers to be used as left, center, right, or surround loudspeakers in home<br />
theater systems<br />
INTEGRATED MOUNTING BRACKET AND SHELF STAND<br />
Provide a variety of secure, quick and easy mounting solutions<br />
TAPERED SHAPE<br />
Facilitates mounting in corners and under eaves<br />
INVERTED GOLD-PLATED 5-WAY BINDING POSTS<br />
Repel moisture and ensure positive connections in virtually any conditions over long periods of time<br />
NILES AUDIO CORPORATION – 1-800-BUY-HIFI – 305-238-4373 3
PARTS GUIDE<br />
e<br />
d<br />
a<br />
b<br />
c<br />
d<br />
b<br />
d<br />
g<br />
g<br />
f<br />
Figure 1. OS .5 Parts Guide<br />
a. Mounting Bracket<br />
b. Nail Hole<br />
c. Wire Hole<br />
d. Screw Hole<br />
e. Bracket Knob<br />
f. Grille<br />
g. Cabinet<br />
h. Shelf Stand<br />
h<br />
e<br />
4
i<br />
j<br />
Figure 2. OS .5 Parts Guide (continued)<br />
i. Binding Posts<br />
j. Threaded Insert (1/4"-20 Thread size)<br />
NOTE: Bracket and Shelf Stand are used depending upon installation requirements.<br />
See INSTALLATION on page 14.<br />
NILES AUDIO CORPORATION – 1-800-BUY-HIFI – 305-238-4373 5
INSTALLATION CONSIDERATIONS<br />
TOOLS AND MATERIALS REQUIRED<br />
• Electric drill with 1/4- and 1/2-inch drill bits, and a 1-inch flat drill bit for drilling<br />
through studs)<br />
• Three screws or bolts suitable for the mounting surface<br />
• The proper screwdriver for the mounting hardware<br />
• Safety cable (optional)<br />
• Cable ties<br />
• Wire stripper<br />
• Pencil<br />
• Level<br />
• Rubber gloves and protective eyewear<br />
WIRING<br />
The OS loudspeakers connect to your receiver or amplifier using 2-conductor loudspeaker wire<br />
(see Figure 3 on the next page). For most applications, we recommend using 16- or 18-gauge<br />
wire. For wiring runs longer than 80 feet (24.38 meters), we recommend 14-gauge wire. The<br />
binding posts on OS loudspeakers accommodate up to 12-gauge wire directly. Larger sizes can be<br />
accommodated using spade, banana, or pin connectors.<br />
TECH TIP<br />
Wire size is expressed by its AWG (American<br />
Wire Gauge) number – the lower the number,<br />
the larger the wire. For example, 12 AWG is<br />
physically larger than 14 AWG.<br />
When you run wire inside walls, outdoors or in marine installations, special jacketing or conduit is<br />
required for a trouble-free installation and conformation to the local and national building codes. If<br />
you are not sure of the correct wire jacket or type of conduit to use, consult a professional audio/<br />
video installer, building contractor, or the local building and inspection department.<br />
6<br />
INCORPORATING A VOLUME CONTROL<br />
It’s possible to control the volume of the sound at the loudspeaker location. Plan to wire the system<br />
so that each pair of loudspeakers has its own volume control. <strong>Niles</strong> makes a wide range of indoor<br />
and outdoor volume controls with and without muting capabilities. Consult your local <strong>Niles</strong> dealer<br />
for more information. Volume controls are connected in line with the loudspeaker, so you must<br />
connect the wire from the amplifier to the volume control and then from the volume control to the<br />
loudspeaker (see Figure 4 on the next page).
Figure 3. Wiring directly from a<br />
receiver or amplifie<br />
Figure 4. Incorporating a<br />
volume control<br />
RECOMMENDED AMPLIFIER POWER<br />
For optimum performance, we recommend amplifiers with the following power ratings:<br />
• For the OS 5.5 loudspeaker, 5 to 100 per channel<br />
• For the OS 6.5 loudspeaker, 5 to 125 per channel<br />
• For the OS 7.5 loudspeaker, 5 to 150 per channel<br />
Ironically, most loudspeakers are not damaged by large amplifiers but by small amplifiers. If you are<br />
playing at high volume, a small amplifier will run out of power very quickly. When an amplifier runs<br />
out of power it creates damaging “clipping” distortion. A large amplifier will play at the same volume<br />
without distorting. See OPERATION on page 17 for more information about clipping distortion.<br />
PLACING LOUDSPEAKERS FOR THE BEST SOUND QUALITY<br />
An OS loudspeaker’s dispersion pattern is very broad. This allows good sound quality over an<br />
extremely large listening area. However, if a single pair is positioned to provide coverage of a very<br />
large room or patio, you will have “hot spots” of loud sound when you are near the loudspeakers.<br />
The best way to avoid hot spots for a large space is to use several pairs of loudspeakers evenly<br />
spaced throughout the room. A good rule of thumb is to install a pair of loudspeakers for every 200<br />
to 400 square feet (18.58 to 37.16 square meters) of listening area. Your local <strong>Niles</strong> dealer is a<br />
good source for advice on loudspeaker placement for your particular installation.<br />
(CONTINUED ON NEXT PAGE)<br />
NILES AUDIO CORPORATION – 1-800-BUY-HIFI – 305-238-4373<br />
7
PLACING LOUDSPEAKERS FOR THE BEST SOUND QUALITY<br />
(CONTINUED)<br />
When using more than one pair, it is usually best to alternate a left channel and then a right channel,<br />
so that you have the best possible stereo coverage possible.<br />
The position of the loudspeakers and their surroundings play a very important role in how a stereo<br />
image is created. You should experiment to find the very best position for your loudspeakers. Here<br />
are some guidelines to make the process quick and easy.<br />
Speaker<br />
Placement<br />
Zone<br />
10' 5' 10'<br />
Speaker<br />
Placement<br />
Zone<br />
8<br />
Figure 5. Illustration depicts the optimum placement zone<br />
for a listening distance of 10 feet (3.04 meters).<br />
Make sure you are not blocking or reflecting the sound off of furniture or other objects. You should<br />
have a direct line of sight with the front of the loudspeaker. To determine the best position, measure<br />
the distance between the ideal listening position and the wall you plan to mount the loudspeakers<br />
on. Try to place the loudspeakers so that they are at least one-half the listening distance apart (this<br />
maintains a large, pleasant stereo “image”) and less than the entire listening distance (this avoids a<br />
“hole-in-the-middle” effect). For example; if you are ten feet back from the wall, the loudspeakers<br />
should be between 5 and 10 feet (1.5 and 3.04 meters) apart (see Figure 5).<br />
If possible, mount the loudspeakers between 8 and 12 feet (2.43 and 3.65 meters) high. The less<br />
the downward angle of the loudspeaker, the further the sound will carry. If the sound is carrying into<br />
areas where you do not want sound, try pointing the loudspeakers more downward; this will reduce<br />
the amount of sound further away from the loudspeaker.
You can control the loudspeaker’s bass output by placement. This is called the boundary effect. You<br />
will get more bass response by mounting the loudspeaker directly to a wall or other flat surface (any<br />
boundary close to the loudspeaker will reinforce the bass frequencies). You can increase the bass<br />
output even more by mounting the loudspeaker in a corner or under an eave (see Figure 6) This<br />
type of placement gives the loudspeaker two boundaries, thus reinforcing the bass sounds even<br />
more. Of course, if you wish to hear less bass, try moving the loudspeaker away from the boundary<br />
(see Figure 7).<br />
Figure 6. Placement for more bass output<br />
Figure 7. Placement<br />
for less bass output<br />
MOUNTING METHODS<br />
The OS loudspeakers can be mounted either horizontally or vertically. The bracket knobs will keep<br />
the loudspeaker angled correctly in any position once they are tightened. You can choose from three<br />
mounting methods to attach the loudspeaker to the wall, ceiling, or other mounting surface.<br />
1. If the loudspeaker is never going to be exposed to sudden accidental impacts, wind,<br />
waves, or earthquakes, you can simply hang it on a nail using the nail hole(s) on the<br />
bracket (see Figure 8 on the next page).<br />
2. The safest and most secure way to mount the loudspeaker is by screwing it to the<br />
mounting surface using your own hardware (suitable for the surface you are mounting<br />
to) and the bracket supplied with the loudspeaker (see Figure 8).<br />
3. There is a threaded brass insert (1/4" – 20) on the back of the OS loudspeakers<br />
for attaching a custom bracket (see Figure 8). This allows you to position the<br />
loudspeaker at unusual angles or varying distances from the mounting surface.<br />
(CONTINUED ON NEXT PAGE)<br />
NILES AUDIO CORPORATION – 1-800-BUY-HIFI – 305-238-4373<br />
9
MOUNTING METHODS (CONTINUED)<br />
Nail Mounting Screw Mounting Custom Bracket Mounting<br />
SAFETY FIRST!<br />
Figure 8. The OS loudspeakers can be mounted three ways<br />
Be careful to use hardware that is designed for the surface you are mounting to. The OS 5.5<br />
loudspeaker with the bracket weighs 6 pounds (2.72 Kg) . The OS 6.5 loudspeaker with the<br />
bracket weighs 9 pounds (4.08 Kg). The OS 7.5 loudspeaker with the bracket weighs 11 pounds<br />
(4.9 Kg). We recommend using attachment methods capable of supporting ten times the weight of<br />
the loudspeaker and bracket.<br />
Some local building codes require the use of an additional safety cable to mount loudspeakers on a<br />
wall. If so, the 1/4"-20 threaded insert on the rear of the enclosure can be utilized for securing the<br />
safety cable to the enclosure. Construction of the safety cable and attachment of the cable to the<br />
wall need to meet the local building codes.<br />
If you are not sure of a safe way to mount the loudspeakers or are unsure of your local building<br />
codes, consult a professional installer or a building contractor for the proper installation techniques<br />
and requirements.<br />
You will maximize the useful life of the loudspeaker by placing the loudspeaker so that it receives<br />
less exposure to the elements. Look for the best overall compromise between sound quality,<br />
convenience, and exposure. Do not compromise safety.<br />
10
PAINTING THE LOUDSPEAKER<br />
The enclosure, the brackets, and the grilles of the loudspeaker can all be painted to match the<br />
surroundings. Because we want you to preserve the acoustic qualities of the grille, please paint the<br />
grille according to the grille painting instructions. Make sure you pick a paint that is appropriate for<br />
the mounting location. There are interior and exterior paint types, and even paint for marine uses. If<br />
you are not sure what paint to use, consult a paint store professional or a painter.<br />
TOOLS REQUIRED<br />
• Spray can of primer paint<br />
• The correct paint for the environment/use (oil- or water-based paint is fine)<br />
• Paint brush or applicator (if the paint is not in a spray can)<br />
• Awl (for removing the grille)<br />
• Masking tape<br />
• Two paint masks (supplied)<br />
• A damp cloth and a dry cloth<br />
PREPARING TO PAINT<br />
1. Separate the parts of the loudspeaker. You should remove the brackets and the<br />
bracket knobs. Remove the grille by hooking it with the tip of an awl and pulling it<br />
away from the cabinet (see Figure 9 on the next page).<br />
2. Wipe off the sides of the cabinet, the bracket, bracket knobs, and grille with a damp<br />
cloth. Do not touch or rub the loudspeakers on the front baffle. Make sure everything<br />
is dry before masking.<br />
3. Mask off the binding posts and the brass threaded inserts on the back panel with<br />
masking tape.<br />
(CONTINUED ON NEXT PAGE)<br />
NILES AUDIO CORPORATION – 1-800-BUY-HIFI – 305-238-4373 11
PREPARING TO PAINT (CONTINUED)<br />
Figure 9. Removing the grille using an awl<br />
4. Mask off the threaded inserts on the top and bottom with masking tape.<br />
5. Protect the front of the loudspeakers by inserting the supplied paint masks in place of<br />
the grilles.<br />
PAINTING THE CABINET, BRACKET KNOBS, AND BRACKET<br />
1. Apply two thin coats of a sandable spray primer to the cabinet and knobs. The bracket<br />
doesn’t require a coat of primer.<br />
2. Allow the primer to dry completely.<br />
3. Apply the finish color.<br />
4. Allow the paint to dry completely.<br />
5. Carefully remove the masking material.<br />
6. Do not reattach the loudspeaker to the bracket until the bracket is mounted. Try to<br />
keep all handling of the freshly-painted parts to a minimum.<br />
12
PAINTING THE GRILLE<br />
The grille is important to the sound of the loudspeaker. Do not fill the holes of the grille with paint.<br />
The grille is constructed of aluminum with a perfectly-even powder coat overall. This powder coat<br />
is an ideal primer.<br />
If you are using a spray paint, use two thin coats without any primer. If you are using a compressor<br />
and a spray gun, use the finest, most diffuse setting. Practice on paper if you are not experienced<br />
in painting with spray paint.<br />
If you are using an applicator or brush and a can of paint, thin the paint first. Thick paint will tend<br />
to clog the grille holes. To ensure a uniform appearance, paint the front and back of the grille.<br />
REPLACING THE GRILLE<br />
After the grille dries, carefully fit the grille into its recess so that it is barely in place. Starting with<br />
one corner, go around the loudspeaker, pushing in the grille a little bit each time, and making sure<br />
not to bend the grille out of shape. You will feel a positive “snap” when it is in place.<br />
NILES AUDIO CORPORATION – 1-800-BUY-HIFI – 305-238-4373<br />
13
INSTALLATION<br />
MOUNTING THE BRACKET (IF ATTACHING THE<br />
LOUDSPEAKER TO A WALL, CEILING, BEAM, OR<br />
OTHER SOLID STRUCTURE)<br />
1. Loosen the bracket knobs and remove the bracket from the loudspeaker.<br />
2. Hold the bracket up to the mounting surface. The loudspeaker can be mounted either<br />
horizontally or vertically. Hold the bracket so that the loudspeaker wire fits through the<br />
large, circular wire hole in the center of the bracket. Align the bracket so it is square<br />
with the surroundings (use a level for accuracy).<br />
3. Mark the locations of the three oval-shaped screw holes (see Figure 10). Be sure to<br />
use all of the holes.<br />
Figure 10. Mounting the bracket<br />
4. Drill pilot holes into the mounting surface.<br />
5. Pull the loudspeaker wire through the wire hole in the center of the mounting bracket.<br />
Align the bracket so that the holes all line up.<br />
6. Use your hardware to attach the bracket to the mounting surface.<br />
14
ATTACHING THE FOOT (IF USING THE LOUDSPEAKER IN<br />
FREE-STANDING MODE)<br />
1. Loosen the bracket knobs and remove the bracket from the loudspeaker.<br />
2. Tighten the top knob so it does not vibrate.<br />
3. Remove the bottom knob by unscrewing it from the cabinet.<br />
4. Place the supplied shelf stand on the loudspeaker with the two shorter feet towards<br />
the front of the loudspeaker (see Figure 11). Make sure the ridges on the shelf<br />
stand engage the ridges on the cabinet.<br />
5. Tighten the bottom knob so that the shelf stand does not move.<br />
Figure 11. Mounting the shelf<br />
stand on the OS loudspeaker<br />
CONNECTING THE LOUDSPEAKER<br />
Bottom of Speaker<br />
1. Separate the two conductors of the loudspeaker wire so that at least 2 inches of each<br />
conductor are free.<br />
2. Strip away 1/2 inch of insulation from the end of each conductor of the<br />
loudspeaker wire.<br />
3. If you have any connectors (gold pins or bananas) which you prefer to use, affix them<br />
to the stripped wire ends now. Only gold-plated connectors should be used outside, as<br />
they will not tarnish or corrode.<br />
(CONTINUED ON NEXT PAGE)<br />
NILES AUDIO CORPORATION – 1-800-BUY-HIFI – 305-238-4373<br />
15
16<br />
CONNECTING THE LOUDSPEAKER (CONTINUED)<br />
4. If using the bracket to attach to a solid surface, slide the loudspeaker onto the bracket.<br />
Do not tighten the knobs completely. Angle the loudspeaker so that the rear terminals<br />
are accessible. If using the shelf stand, position the loudspeaker on the stand and<br />
place it on the shelf or table where you want it.<br />
5. Connect one stripped wire end to the black terminal and one to the red terminal, using<br />
correct polarity.<br />
NOTE: OBSERVE CORRECT POLARITY: POSITIVE (+) GOES TO THE RED POST AND NEGATIVE<br />
(–) GOES TO THE BLACK POST. IF YOU ARE UNSURE OF WIRE POLARITY, SEE CHECKING<br />
LOUDSPEAKER PHASE BELOW.<br />
6. If required, attach the safety cable to the loudspeaker enclosure. See SAFETY<br />
FIRST on page 10 for details.<br />
7. Verify that the loudspeakers are in-phase, as described in CHECKING<br />
LOUDSPEAKER PHASE below.<br />
8. Angle the loudspeaker for the best sound possible.<br />
9. Tighten the bracket knobs by hand only.<br />
NOTE: DO NOT USE ANY TOOLS FOR TIGHTENING. DOING SO MAY STRIP THE INSERT THREADS.<br />
10. Check that the entire installation is safe and secure.<br />
CHECKING LOUDSPEAKER PHASE<br />
Loudspeaker wire has two conductors. On both your loudspeaker and amplifier, one conductor<br />
is attached to the negative (–) terminals, while the other is attached to the positive (+) terminals.<br />
Usually, the wire is marked for your convenience, but the marking can be done in the following<br />
different ways:<br />
• Stripe on one wire<br />
• Ribbed area you can feel on one conductor<br />
• Different colors of metal wire on each conductor<br />
• Fabric strand or string wound into one of the conductors<br />
Of course, there are some wires that appear completely identical. So be careful, or you might make<br />
a connection mistake. If you do, one loudspeaker will be playing “out-of-phase” with the other<br />
loudspeaker. A pair of out-of-phase loudspeakers works against each other, and the sound of the<br />
two playing together will be lacking in bass and sound “phasey.” If you suspect the sound is not<br />
right, and you cannot see any markings on the wire, try this simple test:
1. Stand halfway between the loudspeakers.<br />
2. Play some music with the amplifier or receiver set to Mono.<br />
3. Listen to the richness of the bass and the loudness of the sound.<br />
4. Turn off the amplifier and reverse the connections on one amplifier channel only.<br />
5. Repeat the listening test with the same volume control setting. When the sound<br />
has a richer bass and is slightly louder, the loudspeakers are working together or<br />
“in-phase.”<br />
OPERATION<br />
LISTENING AT HIGHER VOLUMES<br />
Outdoors there are no walls to reflect and contain the sound. It requires more power to achieve a<br />
reasonable volume of sound outside than it does indoors. You also frequently find yourself very far<br />
from the loudspeakers. It is possible to turn the volume so high that the amplifier runs out of power.<br />
This creates “clipping” distortion.<br />
Clipping distortion makes treble sound very harsh and unmusical. When you hear harsh sounding<br />
treble from any good loudspeaker indoors or outdoors, turn the volume down immediately! Those<br />
harsh sounds are masking some much more powerful ultra-high-frequency sound spikes which<br />
will quickly damage any fine loudspeaker.<br />
CLEANING<br />
Clean the OS loudspeakers with a dampened soft cloth or paper towel. If the loudspeaker is<br />
mounted high up on a wall or ceiling, use a broom to gently brush it off. Hosing off the loudspeaker<br />
is not recommended, as the tweeter is a precise mechanism which might be damaged by a<br />
high-pressure stream of water.<br />
NILES AUDIO CORPORATION – 1-800-BUY-HIFI – 305-238-4373<br />
17
SPECIFICATIONS<br />
OS 7.5 Loudspeaker<br />
Driver Complement<br />
• 7" carbon-weave<br />
polypropylene woofer<br />
• 1" Teteron dome tweeter<br />
with fluid cooling<br />
Recommended<br />
Amplifier Power<br />
5 to 150 watts per channel<br />
Nominal Impedance<br />
8 ohm<br />
Frequency Response<br />
60 Hz to 23 kHz, +/- 3 dB<br />
Sensitivity<br />
91 dB with 2.83 V pink noise<br />
input, measured at 1 meter<br />
on axis<br />
Wiring Requirements<br />
We recommend using 16- to<br />
18-gauge speaker wire for<br />
runs up to 80 feet (24.38<br />
meters) and 14-gauge<br />
speaker wire for runs up to<br />
200 feet (60.96 meters). The<br />
connectors will accommodate<br />
12- to 22-gauge wire.<br />
Dimensions (Loudspeaker<br />
with U-Bracket)<br />
8-3/16" x 13-5/16" x 9-3/16"<br />
(20.8cm x 33.8cm x 23.3cm)<br />
Weight (Loudspeaker and<br />
Bracket)<br />
23 lb per pair (10.4 kg)<br />
OS 6.5 Loudspeaker<br />
Driver Complement<br />
• 6" carbon-weave<br />
polypropylene woofer<br />
• 1" Teteron dome tweeter<br />
with fluid cooling<br />
Recommended<br />
Amplifier Power<br />
5 to 125 watts per channel<br />
Nominal Impedance<br />
8 ohm<br />
Frequency Response<br />
70 Hz to 23 kHz, +/- 3 dB<br />
Sensitivity<br />
90 dB with 2.83 V pink noise<br />
input, measured at 1 meter<br />
on axis<br />
Wiring Requirements<br />
We recommend using 16- to<br />
18-gauge speaker wire for<br />
runs up to 80 feet (24.38<br />
meters) and 14-gauge<br />
speaker wire for runs up to<br />
200 feet (60.96 meters). The<br />
connectors will accommodate<br />
12- to 22-gauge wire.<br />
Dimensions (Loudspeaker<br />
with U-Bracket)<br />
7-7/16" x 12" x 7-3/4"<br />
(18.9cm x 30.5cm x 19.7cm)<br />
Weight (Loudspeaker and<br />
Bracket)<br />
18 lb per pair (8.2 kg)<br />
OS 5.5 Loudspeaker<br />
Driver Complement<br />
• 5" carbon-weave<br />
polypropylene woofer<br />
• 1" Teteron dome tweeter<br />
with fluid cooling<br />
Recommended<br />
Amplifier Power<br />
5 to 100 watts per channel<br />
Nominal Impedance<br />
8 ohm<br />
Frequency Response<br />
95 Hz to 23 kHz, +/- 3 dB<br />
Sensitivity<br />
90 dB with 2.83 V pink noise<br />
input, measured at 1 meter<br />
on axis<br />
Wiring Requirements<br />
We recommend using 16- to<br />
18-gauge speaker wire for<br />
runs up to 80 feet (24.38<br />
meters) and 14-gauge<br />
speaker wire for runs up to<br />
200 feet (60.96 meters). The<br />
connectors will accommodate<br />
12- to 22-gauge wire.<br />
Dimensions (Loudspeaker<br />
with U-Bracket)<br />
6-1/4" x 9-7/8" x 6-3/4"<br />
(15.9cm x 25.1cm x 17.1cm)<br />
Weight (Loudspeaker and<br />
Bracket)<br />
12 lb per pair (5.4 kg)<br />
18
NOTES<br />
NILES AUDIO CORPORATION – 1-800-BUY-HIFI – 305-238-4373<br />
19
20<br />
NOTES
NOTES<br />
NILES AUDIO CORPORATION – 1-800-BUY-HIFI – 305-238-4373<br />
21
B L E N D I N G H I G H F I D E L I T Y A N D A R C H I T E C T U R E ®<br />
N i l e s A u d i o C o r p o r a t i o n<br />
1 2 3 3 1 S . W . 1 3 0 S t r e e t M i a m i , F l o r i d a 3 3 1 8 6<br />
D e s i g n e d a n d E n g i n e e r e d i n U S A<br />
1 - 8 0 0 - B U Y - H I F I – 3 0 5 - 2 3 8 - 4 3 7 3 – w w w . n i l e s a u d i o . c o m<br />
©2008 <strong>Niles</strong> <strong>Audio</strong> Corporation. All rights reser ved. <strong>Niles</strong>, the <strong>Niles</strong> logos and Blending High Fidelity and<br />
Architecture are registered trademarks of <strong>Niles</strong> <strong>Audio</strong> Corporation.<br />
All other trademarks are the property of their respective owners. D S 0 0 4 2 6 C