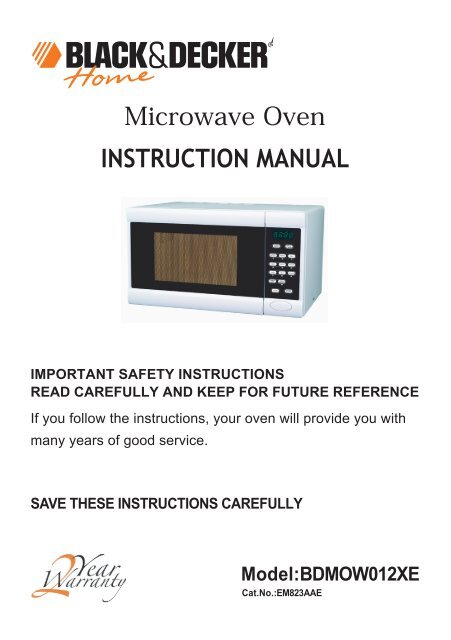
INSTRUCTION MANUAL Microwave Oven - Black & Decker
INSTRUCTION MANUAL Microwave Oven - Black & Decker
INSTRUCTION MANUAL Microwave Oven - Black & Decker

Create successful ePaper yourself
Turn your PDF publications into a flip-book with our unique Google optimized e-Paper software.
<strong>Microwave</strong> <strong>Oven</strong><br />
<strong>INSTRUCTION</strong> <strong>MANUAL</strong><br />
IMPORTANT SAFETY <strong>INSTRUCTION</strong>S<br />
READ CAREFULLY AND KEEP FOR FUTURE REFERENCE<br />
If you follow the instructions, your oven will provide you with<br />
many years of good service.<br />
SAVE THESE <strong>INSTRUCTION</strong>S CAREFULLY<br />
Model:BDMOW012XE<br />
Cat.No.:EM823AAE
PRECAUTIONS TO AVOID POSSIBLE EXPOSURE<br />
TO EXCESSIVE MICROWAVE ENERGY<br />
(a) Do not attempt to operate this oven with the door open since this can<br />
result in harmful exposure to microwave energy. It is important not to<br />
break or tamper with the safety interlocks.<br />
(b) Do not place any object between the oven front face and the door or allow<br />
soil or cleaner residue to accumulate on sealing surfaces.<br />
(c) WARNING: If the door or door seals are damaged, the oven must not<br />
be operated until it has been repaired by a competent person.<br />
ADDENDUM<br />
If the apparatus is not maintained in a good state of cleanliness, its surface could<br />
be degraded and affect the lifespan of the apparatus and lead to a dangerous<br />
situation.<br />
Additional safety instructions for Australia and New Zealand<br />
a) Young children and the infirm.This appliance is not intended for use by young children<br />
or infirm persons without supervision. Young children should be supervised to ensure<br />
they do not play with this appliance.<br />
b) Replacement of the supply cord. If the supply cord is damaged, it must be<br />
replaced by the manufacturer or an authorised <strong>Black</strong> & <strong>Decker</strong> Service Centre in order<br />
to avoid a hazard.<br />
Specifications<br />
Model:<br />
Rated Voltage:<br />
Rated Input Power(<strong>Microwave</strong>):<br />
Rated Output Power(<strong>Microwave</strong>):<br />
<strong>Oven</strong> Capacity:<br />
Turntable Diameter:<br />
External Dimensions(LxWxH):<br />
Net Weight:<br />
BDMOW012XE<br />
230V~50Hz<br />
1250W<br />
800W<br />
23L<br />
270mm<br />
485 395 287mm<br />
Approx. 13.2 kg<br />
2
IMPORTANT SAFETY <strong>INSTRUCTION</strong>S<br />
WARNING<br />
To reduce the risk of fire, electric shock, injury to persons<br />
or exposure to excessive microwave oven energy when<br />
using your appliance, follow basic precautions, including<br />
the following:<br />
1. Warning: Liquids and other foods must<br />
not be heated in sealed containers since<br />
they are liable to explode.<br />
2. Warning: It is hazardous for anyone other<br />
than a competent person to remove a<br />
cover which gives protection against<br />
exposure to microwave energy.<br />
3. Warning: Only allow children to use the<br />
oven without supervision when adequate<br />
instructions have been given so that the<br />
child is able to use the oven in a safe way<br />
and understand the hazards of improper<br />
use.<br />
4. Warning: When the appliance is operated<br />
in the combination mode, children should<br />
only use the oven under adult supervision<br />
due to the temperatures generated.<br />
(only for grill series)<br />
5. Only use utensils suitable for use in<br />
microvave ovens.<br />
6. The oven should be cleaned regularly and<br />
any food deposits should be removed.<br />
7. Read and follow the specific:"PRECAU-<br />
TIONS TO AVOID POSSIBLE EXPOSURE<br />
TO EXCESSIVE MICROWAVE ENERGY".<br />
8. When heating food in plastic or paper<br />
containers, keep an eye on the oven due<br />
to the possibility of ignition.<br />
9. If smoke is observed, switch off or unplug<br />
the appliance and leep the door closed<br />
in order to stifle any flames.<br />
10. Do not overcook food.<br />
11. Do not use the oven cavity for storage<br />
purposes. Do not store items,<br />
such as bread, cookies, etc. inside the<br />
oven.<br />
12. Remove wire twist-ties and metal handles<br />
from paper or plastic containers/bags<br />
before placing them in the oven.<br />
13. Install or locate this oven only in<br />
accordance with the installation<br />
instructions provided.<br />
14. Eggs in the shell and whole hard-boiled<br />
eggs should not be heated in microwave<br />
ovens since they may explode, even<br />
after microwave heating has ended.<br />
15. Use this appliance only for its intended<br />
uses as described in manual. Do not<br />
use corrosive chemicals or vapors<br />
in this appliance. This oven is especialy<br />
designed to heat. It is not designed for<br />
industrial or laboratory use.<br />
16. If the supply cord is damaged, it must<br />
be replaced by the manufacture, its<br />
service agent or similarly qualified<br />
persons in order to avoid a hazard.<br />
17. Do not store or use this appliance<br />
outdoors.<br />
18. Do not use this oven near water, in a<br />
wet basement or near a swimming<br />
pool.<br />
19. The temperature of accessible surfaces<br />
may be high when the appliance is<br />
operating. Keep cord away from heated<br />
surface, and do not cover any events<br />
on the oven.<br />
20. Do not let cord hang over edge of table<br />
or counter.<br />
21. Failure to maintain the oven in a clean<br />
condition could lead to deterioration of<br />
the surface that could adversely affect<br />
the life of the appliance and possibly<br />
result in a hazardous situation.<br />
22. The contents of feeding bottles and<br />
baby food jars shall be stirred or shaken<br />
and the temperature checked before<br />
consumption, in order to avoid burns.<br />
23. <strong>Microwave</strong> heating of beverages can<br />
result in delayed eruptive boiling,<br />
therefore take care when handling the<br />
container.<br />
3
To Reduce the Risk of Injury to Persons<br />
Grounding Installation<br />
DANGER<br />
Electric Shock Hazard<br />
Touching some of the internal<br />
components can cause serious<br />
personal injury or death. Do not<br />
disassemble this appliance.<br />
WARNING<br />
Electric Shock Hazard<br />
Improper use of the grounding<br />
can result in electric shock. Do<br />
not plug into an outlet until<br />
appliance is properly installed<br />
and grounded.<br />
CLEANING<br />
Be sure to disconnect the<br />
oven from the power supply.<br />
1. Clean the inside of the oven after using<br />
with a slightly damp cloth.<br />
2. Clean the accessories in the usual way<br />
in soapy water.<br />
3. The door frame and seal and<br />
neighbouring parts must be cleaned<br />
carefully with a damp cloth when they<br />
are dirty.<br />
This appliance must be grounded. In the event of<br />
an electrical short circuit, grounding reduces the<br />
risk of electric shock by providing an escape wire<br />
for the electric current. This appliance is equipped<br />
with a cord having a grounding wire with a<br />
grounding plug. The plug must be plugged into an<br />
outlet that is properly installed and grounded.<br />
Consult a qualified electrician or serviceman if the<br />
grounding instructions are not completely<br />
understood or if doubt exists as to whether the<br />
appliance is properly grounded. If it is necessary<br />
to use an extension cord , use only a 3-wire<br />
extension cord.<br />
1. A short power-supply cord is provided to<br />
reduce the risks resulting from becoming<br />
entangled in or tripping over a longer cord.<br />
2. If a long cord set or extension cord is used:<br />
1)The marked electrical rating of the cord set<br />
or extension cord should be at least as great<br />
as the electrical rating of the appliance.<br />
2)The extension cord must be a groundingtype<br />
3-wire cord.<br />
3)The long cord should be arranged so that it<br />
will not drape over the counter top or tabletop<br />
where it can be pulled on by children or tripped<br />
over unintentionally.<br />
4
UTENSILS<br />
CAUTION<br />
Personal Injury Hazard<br />
It is hazardous for anyone<br />
other than a compentent person<br />
to carry out any service or repair<br />
operation that involves the removal<br />
of a cover which gives protection<br />
against exposure to microwave<br />
energy.<br />
See the instructions on "Materials you can use in<br />
microwave oven or to be avoided in microwave oven."<br />
There may be certain non-metallic utensils that are not<br />
safe to use for microwaving. If in doubt, you can test the<br />
utensil in question following the procedure below.<br />
Utensil Test:<br />
1. Fill a microwave-safe container with 1 cup of cold<br />
water (250ml) along with the utensil in question.<br />
2. Cook on maximum power for 1 minute.<br />
3. Carefully feel the utensil. If the empty utensil is<br />
warm, do not use it for microwave cooking.<br />
4. Do not exceed 1 minute cooking time.<br />
Materials you can use in microwave oven<br />
Utensils Remarks<br />
Aluminum foil<br />
Browning dish<br />
Dinnerware<br />
Glass jars<br />
Glassware<br />
<strong>Oven</strong> cooking<br />
bags<br />
Paper plates<br />
and cups<br />
Paper towels<br />
Parchment<br />
paper<br />
Plastic<br />
Plastic wrap<br />
Thermometers<br />
Wax paper<br />
Shielding only. Small smooth pieces can be used to cover thin parts of<br />
meat or poultry to prevent overcooking. Arcing can occur if foil is too<br />
close to oven walls. The foil should be at least 1 inch (2.5cm) away from<br />
oven walls.<br />
Follow manufacturer’s instructions. The bottom of browning dish must be<br />
at least 3/16 inch (5mm) above the turntable. Incorrect usage may cause<br />
the turntable to break.<br />
<strong>Microwave</strong>-safe only. Follow manufacturer's instructions. Do not use<br />
cracked or chipped dishes.<br />
Always remove lid. Use only to heat food until just warm. Most glass jars<br />
are not heat resistant and may break.<br />
Heat-resistant oven glassware only. Make sure there is no metallic trim.<br />
Do not use cracked or chipped dishes.<br />
Follow manufacturer’s instructions. Do not close with metal tie. Make<br />
slits to allow steam to escape.<br />
Use for short–term cooking/warming only. Do not leave oven unattended<br />
while cooking.<br />
Use to cover food for reheating and absorbing fat. Use with supervision<br />
for a short-term cooking only.<br />
Use as a cover to prevent splattering or a wrap for steaming.<br />
<strong>Microwave</strong>-safe only. Follow the manufacturer’s instructions. Should be<br />
labeled "<strong>Microwave</strong> Safe". Some plastic containers soften, as the food<br />
inside gets hot. "Boiling bags" and tightly closed plastic bags should be<br />
slit, pierced or vented as directed by package.<br />
<strong>Microwave</strong>-safe only. Use to cover food during cooking to retain<br />
moisture. Do not allow plastic wrap to touch food.<br />
<strong>Microwave</strong>-safe only (meat and candy thermometers).<br />
Use as a cover to prevent splattering and retain moisture.<br />
5
Materials to be avoided in microwave oven<br />
Utensils Remarks<br />
Aluminum tray<br />
Food carton with<br />
metal handle<br />
Metal or metaltrimmed<br />
utensils<br />
Metal twist ties<br />
Paper bags<br />
Plastic foam<br />
Wood<br />
May cause arcing. Transfer food into microwave-safe dish.<br />
May cause arcing. Transfer food into microwave-safe dish.<br />
Metal shields the food from microwave energy. Metal trim may<br />
cause arcing.<br />
May cause arcing and could cause a fire in the oven.<br />
May cause a fire in the oven.<br />
Plastic foam may melt or contaminate the liquid inside when exposed<br />
to high temperature.<br />
Wood will dry out when used in the microwave oven and may split<br />
or crack.<br />
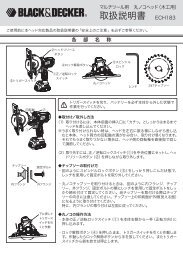
SETTING UP YOUR OVEN<br />
Names of <strong>Oven</strong> Parts and Accessories<br />
Remove the oven and all materials from the carton and oven cavity.<br />
Your oven comes with the following accessories:<br />
Glass tray 1<br />
Turntable ring assembly 1<br />
Instruction Manual 1<br />
F<br />
A<br />
E<br />
D<br />
C<br />
B<br />
G<br />
A) Control panel<br />
B) Turntable shaft<br />
C) Turntable ring assembly<br />
D) Glass tray<br />
E) Observation window<br />
F) Door assembly<br />
G) Safety interlock system<br />
Shut off oven power if the door is opened during operation.<br />
6
Turntable Installation<br />
Hub (underside)<br />
Glass tray<br />
Turntable shaft<br />
a. Never place the glass tray upside down. The glass<br />
tray should never be restricted.<br />
b. Both glass tray and turntable ring assembly must<br />
always be used during cooking.<br />
c. All food and containers of food are always placed<br />
on the glass tray for cooking.<br />
d. If glass tray or turntable ring assembly cracks or<br />
breaks, contact your nearest authorized service<br />
center.<br />
Turntable ring assembly<br />
Countertop Installation<br />
Remove all packing material and accessories.<br />
Examine the oven for any damage such as<br />
dents or broken door. Do not install if oven is<br />
damaged.<br />
Installation<br />
1. Select a level surface that provide<br />
enough open space for the intake<br />
and/or outlet vents.<br />
3.0 inch(7.5cm)<br />
3.0 inch(7.5cm)<br />
12 inch(30cm)<br />
OPEN<br />
A minimum clearance of 3.0 inches<br />
(7.5cm) is required between the oven and<br />
any adjacent walls. One side must be open.<br />
(1) Leave a minimum clearance of 12<br />
inches (30cm) above the oven.<br />
(2) Do not remove the legs from the<br />
bottom of the oven.<br />
Cabinet: Remove any protective film found<br />
on the mircowave oven cabinet surface.<br />
Do not remove the light brown Mica cover<br />
that is attached to the oven cavity to<br />
protect the magnetron.<br />
(3) Blocking the intake and/or outlet openings<br />
can damage the oven.<br />
(4) Place the oven as far away from<br />
radios and TV as possible.<br />
Operation of microwave oven may<br />
cause interference to your radio or TV<br />
reception.<br />
2. Plug your oven into a standard household<br />
outlet. Be sure the voltage and the<br />
frequency is the same as the voltage<br />
and the frequency on the rating label.<br />
WARNING: Do not install oven over a<br />
range cooktop or other heat-producing<br />
appliance. If installed near or over a heat<br />
source, the oven could be damaged and<br />
the warranty would be void.<br />
7
Operation Instructions<br />
1. Clock Setting<br />
When the microwave oven is electrified, the oven will display "0:00".<br />
The input time should be within 0:00--23:59;<br />
Example: To set 8:00 .<br />
(1) Press the "CLOCK/PRE-SET" button, and the hour figures will flash.<br />
(2) Press the number buttons of "8","0","0" in order.<br />
(3) Press "CLOCK/PRE-SET" to finish clock setting, and the time will light.<br />
Note: In the process of clock setting, if "STOP" is pressed or if there is no<br />
operation within 1 minute, the oven will go back to the previous status automatically.<br />
2. Delay Start<br />
Example: to start a cooking at 12:12.<br />
(1) Set the clock first. (Consult the instruction of clock setting.)<br />
(2) Set the cooking program wanted(defrost should not be set here);<br />
(3) Press "CLOCK/PRE-SET" to display the current clock, and the hour figures will flash;<br />
(4) Press "1", "2", '1", '2" in order;<br />
(5) Press "START/SPEED COOK" to confirm the setting. The unit will turn back<br />
to the clock state.<br />
(6) Cooks begin when the time arrives.<br />
Note: (1) If the setting is not within the range of 0:00–23:59, the setting will be invalid;<br />
(2) In the process of setting, if "STOP" is pressed or there is no operation<br />
within 1 minute, the unit will go back to the previous state automatically;<br />
(3) The clock must be set before the delay start cooking. If the pre-set cooking has<br />
not been programmed and only time to start cooking is set, the whole set will be<br />
regarded as an alarm clock setting and 5 beeps will be sound when the pre-set<br />
time is reached.<br />
3. <strong>Microwave</strong> Cooking<br />
Select different microwave power level and set cooking time as you wish. There are five<br />
power levels available for choosing. Refer to Chart 1. The maximum microwave cooking<br />
time is 99 minutes and 99 seconds. Keep on pressing "POWER LEVEL" to choose the<br />
power wished.<br />
<strong>Microwave</strong> Power Chart<br />
Press"POWER LEVEL" <strong>Microwave</strong> Power Display<br />
Once<br />
100% P100<br />
Twice<br />
80%<br />
P 80<br />
3 times<br />
4 times<br />
5 times<br />
50%<br />
30%<br />
10%<br />
P 50<br />
P 30<br />
P 10<br />
8
Example: Choose 50% power for cooking 10 minutes.<br />
(1) Press "POWER LEVEL" thrice.<br />
(2) Press the numeral buttons of "1", "0", "0", "0" in order;<br />
(3) Press "START/SPEED COOK" to start cooking, the time will count down,<br />
and ":" will flash.<br />
4. Speedy Cooking:<br />
When the unit is in waiting state, the press on "START/SPEED COOK" can start cooking<br />
at 30 seconds with 100% microwave power. Each additional press will increase the cooking<br />
time by 30 seconds until the accrued time reaches 1 minute 30 seconds or less. By then,<br />
each press will increase cooking time by 1 minute, the maximum cooking time is 12 minutes.<br />
Example: Set 3 minutes speedy cooking:<br />
(1) Press "START/SPEED COOK" once to start cooking, and the oven will display "0:30".<br />
(2) And the cooking time will count down.<br />
(3) Press " START/SPEED COOK" again for 4 times, the cooking time will be 3<br />
minutes.<br />
5. Defrost By Weight<br />
Example: Defrost beef of 500g:<br />
(1) Press "DEFROST BY WEIGHT", and the oven will display "dEF1".<br />
(2) Press "5", "0", "0" in order, and the range of defrosting weight is100g-2000g.<br />
(3) Press "START/SPEED COOK" to start defrosting, and the cooking<br />
time will count down.<br />
6. Speedy Defrost<br />
Example: Defrost beef of 500g<br />
(1) Press "SPEED DEFROST", and the oven will display "dEF2".<br />
(2) Press "5" "0" "0" in order, and the range of defrosting weight is 100g-1200g.<br />
(3) Press "START/SPEED COOK" to start defrosting, and the cooking<br />
time will count down.<br />
7. Auto Menu Cooking<br />
The numeral pads 1—9 are matching with nine different subjects respectively;<br />
Pad<br />
1<br />
2<br />
Display Cook Pad Display Cook Pad Display Cook<br />
A-1<br />
A-2<br />
Auto<br />
Reheat<br />
Vegetable<br />
4<br />
5<br />
A-4<br />
A-5<br />
Meat<br />
Pasta<br />
7<br />
8<br />
A-7<br />
A-8<br />
Pizza<br />
Soup<br />
3<br />
A-3<br />
Fish<br />
6<br />
A-6<br />
Potato<br />
9<br />
A-9<br />
Porridge<br />
Example: Cook vegetable of 350g:<br />
(1) Press "VEGETABLE" button.<br />
(2) Press "VEGETABLE" twice to choose weight, and the oven will display "350".<br />
(3) Press "START/SPEED COOK" to start cooking,and the cooking time will<br />
count down.<br />
9
Refer to chart 2 for the automatic menu procedure:<br />
Chart 2:<br />
Menu Weight(g) Order Display<br />
A-1<br />
Auto Reheat<br />
A-2<br />
Vegetable<br />
A-3<br />
Fish<br />
A-4<br />
Meat<br />
A-5<br />
Pasta<br />
A-6<br />
Potato<br />
A-7<br />
Pizza<br />
A-8<br />
Soup<br />
A-9<br />
Porridge<br />
150<br />
250<br />
350<br />
400<br />
150<br />
350<br />
500<br />
150<br />
250<br />
350<br />
400<br />
450<br />
150<br />
300<br />
450<br />
600<br />
50(with cold water 450g)<br />
100(with cold water 800g)<br />
150(with cold water 1200g)<br />
1(approximately 200g)<br />
2(approximately 400g)<br />
3(approximately 600g)<br />
1(approximately 80g)<br />
2(approximately 160g)<br />
3(approximately 250g)<br />
500<br />
750<br />
1000<br />
550<br />
1100<br />
1<br />
2<br />
3<br />
4<br />
1<br />
2<br />
3<br />
1<br />
2<br />
3<br />
4<br />
5<br />
1<br />
2<br />
3<br />
4<br />
1<br />
2<br />
3<br />
1<br />
2<br />
3<br />
1<br />
2<br />
3<br />
1<br />
2<br />
3<br />
1<br />
2<br />
150<br />
250<br />
350<br />
400<br />
150<br />
350<br />
500<br />
150<br />
250<br />
350<br />
400<br />
450<br />
150<br />
300<br />
450<br />
600<br />
50<br />
100<br />
150<br />
1<br />
2<br />
3<br />
1<br />
2<br />
3<br />
500<br />
750<br />
1000<br />
550<br />
1100<br />
10
8. Inquiring Function<br />
(1) In one stage cooking state, press "POWER LEVEL", the current microwave power will be<br />
displayed for 3 seconds. After three seconds, the oven will turn back to the former state;<br />
(2) In pre-set state, press "CLOCK/PRE-SET" to inquire the time for delay start cooking. The<br />
pre-set time will flash for 2-3 seconds, then the oven will turn back to the clock display.<br />
(3) In cooking state, press "CLOCK/PRE-SET" to inquire the current time. The<br />
current time will flash for 2-3 seconds. Then turn back to the former state.<br />
9. Multi-section cooking<br />
At most 2 sections can be set for cooking. In multi-section cooking, if one section is<br />
defrosting, then defrosting shall be placed in the first section.<br />
Note: Auto cooking can not work in the multi-section cooking.<br />
Example: If you want to cook the food with 100% microwave power for 10 minutes+ 80%<br />
microwave power for 15 minutes. Do it as following:<br />
1) Press "POWER LEVEL" once to choose 100% microwave power;<br />
2) Press number keys "1","0","0","0" in order to adjust the cooking time;<br />
3) Press "POWER LEVEL" twice to choose 80% microwave power;<br />
4) Press number keys "1","5","0","0" in order to adjust the cooking time;<br />
5) Press "START/SPEED COOK " to start cooking.<br />
10. Lock-out Function for Children<br />
Lock: In waiting state, press "STOP" for 3 seconds, there will be a long beep<br />
denoting entering the children-lock state and the oven will display " ".<br />
Lock quitting: In locked state, press "STOP" for 3 seconds, there will be a long<br />
beep denoting that the lock is released, and the oven will turn back to the nornal state.<br />
11. Cooking End Reminding Function<br />
When cooking ends, there will be 5 beeps which is reminding the completion of cooking.<br />
12. Display Specification<br />
(1) In waiting state, the oven will display clock and " : " will flash.<br />
(2) In function setting state, the oven will display the related setting.<br />
(3) In the operation and suspending state, the oven will display the residual cooking time.<br />
11
Trouble shooting<br />
It is forbidden to run the unit without any food inside.<br />
It is very dangerous.<br />
This appliance has a 2 year replacement guarantee offered by<br />
BLACK & DECKER AUSTRALIA and BLACK & DECKER NEW ZEALAND<br />
Please refer to the enclosed guarantee card.<br />
12