using the tosai motor sharpener - McClain's Printmaking Supplies
using the tosai motor sharpener - McClain's Printmaking Supplies
using the tosai motor sharpener - McClain's Printmaking Supplies

Create successful ePaper yourself
Turn your PDF publications into a flip-book with our unique Google optimized e-Paper software.
USING THE TOSAI MOTOR SHARPENER<br />
by Richard Steiner<br />
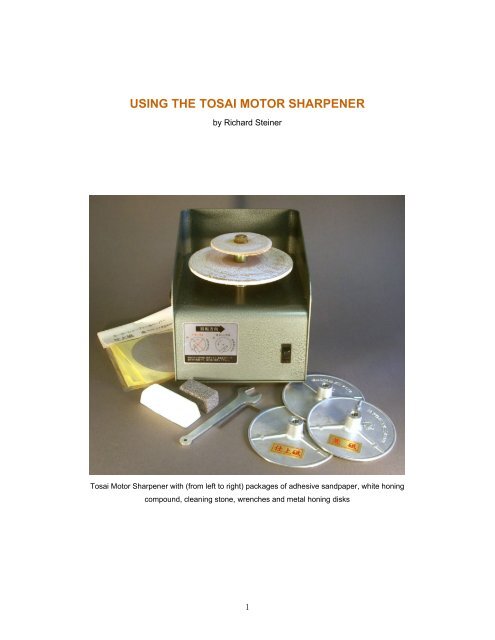
Tosai Motor Sharpener with (from left to right) packages of adhesive sandpaper, white honing<br />
compound, cleaning stone, wrenches and metal honing disks<br />
1
USING THE TOSAI MOTOR SHARPENER<br />
By Richard Steiner<br />
Safety considerations<br />
1. Always wear safety glasses while <strong>using</strong> <strong>the</strong> Motor Sharpener.<br />
2. Do not operate <strong>the</strong> Motor Sharpener continuously for more than<br />
thirty minutes to avoid overheating <strong>the</strong> <strong>motor</strong>.<br />
2. Turning <strong>the</strong> Motor Sharpener on makes <strong>the</strong> wheels spin in a<br />
counter-clockwise direction. Always hold tools with <strong>the</strong>ir cutting<br />
edge pointing in <strong>the</strong> direction of <strong>the</strong> spin (to <strong>the</strong> right). A knife with<br />
its blade held against <strong>the</strong> spin can fly out of your hand and injure<br />
you or someone else.<br />
Top view of sharpening wheel<br />
Direction<br />
of rotation<br />
Tool cutting edge<br />
2
Preparing <strong>the</strong> lea<strong>the</strong>r wheel<br />
Turn on <strong>the</strong> <strong>motor</strong>. On <strong>the</strong> spinning lea<strong>the</strong>r wheels, apply a thin<br />
and even layer of white honing compound by moving <strong>the</strong><br />
compound stick back and forth across <strong>the</strong> surface of <strong>the</strong> lea<strong>the</strong>r.<br />
Do not press down so hard that <strong>the</strong> wheel’s spin slows down.<br />
Likewise, too light a touch will leave no compound on <strong>the</strong> lea<strong>the</strong>r at<br />
all. Be sure you have safety glasses on because little bits of <strong>the</strong><br />
compound may fly off.<br />
Sharpening technique on <strong>the</strong> lea<strong>the</strong>r wheel<br />
To hone <strong>the</strong> basic knife (hangi to or<br />
sho to) or chisel (aisuki or hira to),<br />
hold <strong>the</strong> bevel side of <strong>the</strong> tool flat<br />
against <strong>the</strong> spinning lea<strong>the</strong>r. (The<br />
bevel of every knife is always laid<br />
parallel to <strong>the</strong> wheel’s surface, never<br />
perpendicular.) Do not hold <strong>the</strong> knife<br />
The knife is held beveled side down<br />
in just one location on <strong>the</strong> wheel;<br />
instead, move it back and forth across <strong>the</strong> surface of <strong>the</strong> lea<strong>the</strong>r.<br />
Do not press hard enough to make <strong>the</strong> <strong>motor</strong> slow down. Do this<br />
for only a very few seconds. Lift <strong>the</strong> knife up and <strong>the</strong>n lightly and<br />
gently place <strong>the</strong> back of <strong>the</strong> cutting edge parallel against <strong>the</strong><br />
spinning wheel once or twice to remove <strong>the</strong> tiny burr of metal that<br />
forms while sharpening.<br />
The curved U-gouges (komasuki or maru to) are more or less<br />
honed in <strong>the</strong> same way. Hold <strong>the</strong> bevel perfectly parallel to <strong>the</strong><br />
surface of <strong>the</strong> wheel. Move it back and forth across <strong>the</strong> surface of<br />
<strong>the</strong> wheel and at <strong>the</strong> same time rotate <strong>the</strong> u-gouge from corner to<br />
3
corner of <strong>the</strong> cutting edge. Be sure to use <strong>the</strong> whole surface of <strong>the</strong><br />
wheel. The burr is removed by holding<br />
<strong>the</strong> inside surface of <strong>the</strong> U-gouge parallel<br />
against <strong>the</strong> edge of <strong>the</strong> wheel for just a<br />
second or two. For smaller U-gouges,<br />
use <strong>the</strong> angled edge of <strong>the</strong> smaller,<br />
upper wheel (see photo). With <strong>the</strong> very<br />
smallest U-gouges, a tightly rolled piece<br />
of sandpaper also works well.<br />
The V-gouge (sankaku to) is <strong>the</strong> hardest to hone. Hold <strong>the</strong> left side<br />
of <strong>the</strong> blade and <strong>the</strong> right side of <strong>the</strong> blade for exactly <strong>the</strong> same<br />
amount of time against <strong>the</strong> wheel, say three seconds each side.<br />
O<strong>the</strong>rwise one side of <strong>the</strong> blade will wear down too far compared to<br />
<strong>the</strong> o<strong>the</strong>r side and <strong>the</strong> V-gouge will become asymmetrical. If this<br />
happens, <strong>the</strong> V-gouge will be useless. A V-gouge (or any knife) that<br />
is not honed properly can be returned to <strong>the</strong> maker or taken to a<br />
professional knife <strong>sharpener</strong>, though you may be without it for a<br />
long period. (You can also return any tool you purchase from<br />
<strong>McClain's</strong> to <strong>the</strong>m and request that it be returned to <strong>the</strong><br />
manufacturer in Japan for sharpening.) The only o<strong>the</strong>r option is to<br />
just keep sharpening it until you have figured it out. You may go thru<br />
several V-knives before this occurs. No matter. In <strong>the</strong> end, you will<br />
know how to sharpen it very well. Remove <strong>the</strong> burr by holding <strong>the</strong><br />
inner part of <strong>the</strong> V parallel against <strong>the</strong> edge of <strong>the</strong> upper, smaller<br />
lea<strong>the</strong>r wheel very briefly.<br />
4
Refreshing <strong>the</strong> lea<strong>the</strong>r wheel<br />
After honing two or three knives, you will notice that <strong>the</strong> surface of<br />
<strong>the</strong> lea<strong>the</strong>r has become black. This is iron from <strong>the</strong> back of <strong>the</strong><br />
knife. Also, <strong>the</strong> white compound has probably worn away. This<br />
black metal must be removed from <strong>the</strong> wheel before ano<strong>the</strong>r layer<br />
of compound can be applied. This is <strong>the</strong> job of <strong>the</strong> black lava rock.<br />
Use it to erase <strong>the</strong> metal off <strong>the</strong> lea<strong>the</strong>r by holding one of its broad,<br />
flat sides against <strong>the</strong> wheel while it turns. Alternately, press against<br />
<strong>the</strong> wheel with any of <strong>the</strong> long or short edges of <strong>the</strong> stone. But<br />
never use <strong>the</strong> pointed corners, since <strong>the</strong>y will drill groves into <strong>the</strong><br />
lea<strong>the</strong>r, which you do not want.<br />
Fur<strong>the</strong>r suggestions<br />
Never use water on this machine. Do not hone any knife for a long<br />
time, or it will get hot and lose its temper. If you frequently hone<br />
your knives (and you want to get into <strong>the</strong> habit of doing this),<br />
bringing <strong>the</strong>m back to maximum sharpness will require 5 seconds<br />
or less on this <strong>sharpener</strong>. Also, taking frequent breaks to hone <strong>the</strong><br />
knives will give your eyes, shoulders, arms and hand muscles a<br />
needed rest from carving.<br />
Repairing a tool edge<br />
If you break a knife's cutting edge, that edge needs to be removed<br />
and a new edge created. This is <strong>the</strong> job of <strong>the</strong> three sandpaper<br />
faced metal sharpening disks.<br />
Place one adhesive disk of coarse, medium<br />
and fine grit sandpaper on each of <strong>the</strong> three<br />
metal disks. You can mark <strong>the</strong> disks if you<br />
5
like, but feeling <strong>the</strong> sandpaper will also tell you which is which.<br />
Remove <strong>the</strong> nut on top of <strong>the</strong> smaller lea<strong>the</strong>r wheel with <strong>the</strong><br />
wrench included with <strong>the</strong> <strong>sharpener</strong>. Screw <strong>the</strong> coarse wheel onto<br />
<strong>the</strong> center bolt firmly.<br />
Put a glass of water on <strong>the</strong> table next to <strong>the</strong> <strong>sharpener</strong> and dip <strong>the</strong><br />
knife into it frequently while sharpening so that <strong>the</strong> knife will not get<br />
too hot. Put on a pair of safety goggles. Turn <strong>the</strong> machine on.<br />
Holding <strong>the</strong> knife in both hands perfectly upright, perpendicular to<br />
<strong>the</strong> inner surface of <strong>the</strong> spinning wheel (not over <strong>the</strong> outer edge,<br />
which is spinning much faster than <strong>the</strong> inner part), lower it onto <strong>the</strong><br />
sandpaper and press down gentle and slowly. Sparks will fly. What<br />
you want to do is remove <strong>the</strong> broken cutting edge of <strong>the</strong> blade.<br />
This will take almost no time at all, less than 5 seconds. However,<br />
stop and dip <strong>the</strong> knife into <strong>the</strong> water several times so it does not<br />
get too hot.<br />
Then hold <strong>the</strong> now reduced or shortened beveled side of <strong>the</strong> knife<br />
at <strong>the</strong> proper angle to <strong>the</strong> sandpaper and press it gently but firmly<br />
to <strong>the</strong> sandpaper’s surface to make a new, sloping bevel. Watch<br />
carefully that you do not change <strong>the</strong> angle of this cutting edge to<br />
<strong>the</strong> knife blade. Usually, 40 degrees is what you want, although 35<br />
degrees may be better. The angle is a matter of personal<br />
preference. (Just remember that <strong>the</strong> sharper <strong>the</strong> angle, <strong>the</strong> more<br />
chance <strong>the</strong>re will be for <strong>the</strong> tip of <strong>the</strong> cutting edge of <strong>the</strong> blade to<br />
snap off or <strong>the</strong> blade to chip.) Move <strong>the</strong> knife evenly back and forth<br />
across <strong>the</strong> sandpaper disk. Dip <strong>the</strong> knife into water frequently. In<br />
<strong>the</strong> case of <strong>the</strong> U-gouges, rotate <strong>the</strong> blade from corner to corner,<br />
<strong>the</strong> same as when honing <strong>the</strong>m on <strong>the</strong> lea<strong>the</strong>r wheel. Be very<br />
6
careful not to dish <strong>the</strong> center of <strong>the</strong> U-gouge by sharpening <strong>the</strong><br />
center more than <strong>the</strong> outer sides. Frequently dip <strong>the</strong> U-gouge into<br />
water as you work.<br />
Take <strong>the</strong> coarse grit disk off and put on <strong>the</strong> middle grit disk.<br />
Continue to smooth <strong>the</strong> metal of <strong>the</strong> beveled side of <strong>the</strong> blade’s<br />
cutting edge. Try now to get a sharp edge. Not more than 5 or 7<br />
seconds is needed here. Dip <strong>the</strong> tool into <strong>the</strong> water often.<br />
Put <strong>the</strong> fine grit sandpaper disk on and finish putting a sharp edge<br />
to <strong>the</strong> blade. Remove <strong>the</strong> disk, replace <strong>the</strong> nut, and hone <strong>the</strong> knife<br />
on <strong>the</strong> lea<strong>the</strong>r wheel as usual.<br />
Tips<br />
To test whe<strong>the</strong>r <strong>the</strong> edge of any knife is really as sharp as possible,<br />
hold <strong>the</strong> knife in one hand with <strong>the</strong> blade hovering over <strong>the</strong> thumb<br />
nail of <strong>the</strong> o<strong>the</strong>r hand at a 45-degree angle. Gentle try to slide <strong>the</strong><br />
blade across <strong>the</strong> thumbnail. If it slides ra<strong>the</strong>r easily, as a butter<br />
knife would, it is not sharp. But if it catches into <strong>the</strong> nail, it is sharp.<br />
Frequently hone your tools while you carve, especially <strong>the</strong> ones<br />
you are <strong>using</strong> <strong>the</strong> most. Taking a sharpening break every 15<br />
minutes will rest your arms, hands and eyes, and keep <strong>the</strong> knife at<br />
its optimum sharpness, requiring shorter sharpening sessions.<br />
Keep <strong>the</strong> <strong>motor</strong> <strong>sharpener</strong> unplugged and covered when not in use.<br />
You will probably never need to replace <strong>the</strong> lava stone. The lea<strong>the</strong>r<br />
wheels may need replacing once in 5 years. The white compound<br />
will wear away quickly, perhaps in a year. Order a new one before<br />
<strong>the</strong> old one is gone as it may take some time to fill your order.<br />
7
With <strong>the</strong> <strong>motor</strong> <strong>sharpener</strong> you also get spare sandpaper sheets.<br />
When one is worn out, peel it off <strong>the</strong> aluminum wheel and lay on a<br />
new one. The coarse sandpaper, #120 grit, is 荒 砥 (ara-togi in<br />
Japanese); <strong>the</strong> middle grit, #240, is 中 砥 (chu-togi), and <strong>the</strong> fine<br />
grit, #400, is 仕 上 砥 (shiage-togi).<br />
There is also a small L-shaped Allen wrench. Very rarely <strong>the</strong> post<br />
on which <strong>the</strong> wheels sit will become loose from <strong>the</strong> drive<br />
connected to <strong>the</strong> <strong>motor</strong> below. This wrench is to tighten <strong>the</strong> sixsided<br />
nut on <strong>the</strong> side of <strong>the</strong> post below <strong>the</strong> larger lea<strong>the</strong>r wheel.<br />
With this model of <strong>sharpener</strong>, <strong>the</strong> <strong>motor</strong> can run continuously for<br />
up to thirty minutes. But no one would ever run <strong>the</strong> unit that long.<br />
The whole purpose of owning this <strong>sharpener</strong> is to get <strong>the</strong> job done<br />
in only seconds, so turn it off as soon as you are finished and <strong>the</strong><br />
<strong>motor</strong> will last much longer.<br />
I have used water stones for many years; I am also familiar with<br />
<strong>the</strong> various <strong>motor</strong>ized grit stones that spin vertically on a horizontal<br />
drive bar, lined up side by side – <strong>the</strong> most common type of<br />
sharpening machine. From talking with professional knife<br />
<strong>sharpener</strong>s, I have learned that <strong>the</strong> spinning, vertical wheels are<br />
not what we really want. They tend to re-bevel <strong>the</strong> knives while<br />
honing <strong>the</strong>m, thus making <strong>the</strong> blade shorter, thinner and weaker.<br />
They are also harmful if you touch <strong>the</strong>m accidentally. The lea<strong>the</strong>r<br />
wheels are absolutely safe, even for young people. Horizontal<br />
honing is far better for <strong>the</strong> knife than vertical honing.<br />
This <strong>motor</strong> <strong>sharpener</strong> is quiet, light, safe and inexpensive. It has a<br />
long life and it is very easy to use. With its small footprint, it fits<br />
8
easily into any studio. Take good care of your Tosai Motor<br />
Sharpener and it will last into <strong>the</strong> next generation of printmakers,<br />
who will thank you every time <strong>the</strong>y hone <strong>the</strong>ir knives.<br />
Replacement compound, wheels and sandpaper can be ordered in <strong>the</strong> USA<br />
from McClain’s <strong>Printmaking</strong> <strong>Supplies</strong> at 800-832-4264 or www.imcclains.com.<br />
9