


You also want an ePaper? Increase the reach of your titles
YUMPU automatically turns print PDFs into web optimized ePapers that Google loves.
O <strong>Scale</strong><br />
<strong>Trains</strong><br />
MAGAZINE<br />
May/June 2008 u Issue #<strong>38</strong><br />
Celebrating<br />
the art of<br />
1:48 modeling<br />
US $6 .95 • Can $8 .95<br />
Display until June 30, 2008
NEW! PULLMAN 8-1-2 SLEEPERS IN ABS<br />
Golden Gate Depot is producing 8-1-2 Sleepers in ABS Plastic, in a limited road names. Available in<br />
Pullman, PRR, NYC TTG and Unlettered Pullman Green. Arriving in 2008 for $129.95 per Car.<br />
NYC 20th Century Limited 19<strong>38</strong><br />
Available in Fall 2008 for $599.95 (RESERVE PRICE) per 4 Car Set<br />
54’ STEEL REEFERS<br />
REA Green<br />
Also:<br />
REA ORIG<br />
ACL<br />
GN<br />
B&O<br />
Pull-Green<br />
NYC<br />
SF<br />
A LEVEL OF DETAIL UNMATCHED<br />
Set A:<br />
RPO/Baggage 5018<br />
Diner 681<br />
4-4-2 Imperial Highlands<br />
Observation Manhattan Is.<br />
Set B:<br />
Dorm/Club Century Club<br />
17-Roomette City of Albany<br />
10-5 Cascade Dawn<br />
13-Double Bedroom Cuyahoga County<br />
Set C:<br />
Diner 682<br />
17-Roomette City of Chicago<br />
10-5 Cascade Glory<br />
4-4-2 Imperial Falls<br />
HW DINER / OBSERVATION<br />
In all the roads to go with your GGD Cars.<br />
Coming 2008/2009. Sold in Sets.<br />
GGD Aluminum Sets<br />
- NYC ESE: 6 Car Set, 2 Car Add On ($549.95 / $279.95) May 2008<br />
- Santa Fe 1937 Super Chief: 6 Car Set, 2 Car Add On ($549.95 / $279.95) June 2008<br />
- Southern Pacific Daylight: 5 Car, 5 Articulated Add On ($549.95 / $549.95) Late 2008<br />
- PRR Fleet of Mod. 2 Tone Tuscan: 5 Car Set, 2 Car Add On ($549.95 / $279.95) Late 2008<br />
PRR Post War Tuscan: 5 Car Set, 2 Car Add On ($549.95 / $279.95) Late 2008<br />
<strong>Scale</strong> Trucks - <strong>Scale</strong> Underbody - <strong>Scale</strong> Interior Details - Overhead Lighting - 054 Track or Larger<br />
LITTLE PEOPLE<br />
(1930S-1950S)<br />
40 Seated $29.95<br />
HIGHLY DETAILED<br />
+ $5 S&H (1-4 PACKS)<br />
100 TON CONCRETE<br />
COALING TOWER<br />
Coming 2009<br />
Reserve Today<br />
$249.95 MSRP<br />
231 MARKET PLACE, SUITE 223 SAN RAMON, CA 94583 www.goldengatedepot.com / FAX: (408) 904-5849
Celebrating<br />
the art of<br />
1:48 modeling<br />
Issue #<strong>38</strong><br />
May/June 2008<br />
Ted Byrne<br />
Carey Hinch<br />
Neville Rossiter<br />
Vol. 7 - No.3<br />
Editor-in-Chief/Publisher<br />
Joe Giannovario<br />
jag@oscalemag.com<br />
Art Director<br />
Jaini Giannovario<br />
jaini@oscalemag.com<br />
Managing Editor<br />
Mike Cougill<br />
editor@oscalemag.com<br />
Advertising Manager<br />
Jeb Kriigel<br />
jeb@oscalemag.com<br />
Customer<br />
Service<br />
Spike Beagle<br />
Complaints<br />
L’il Bear<br />
Contributors<br />
Gene Clements<br />
Hobo D. Hirailer<br />
Roger C. Parker<br />
Subscription Rates: 6 issues<br />
US - Periodical Class Delivery<br />
US - First Class Delivery (1 year only)<br />
Canada/Mexico<br />
Overseas<br />
US$35<br />
US$45<br />
uS$55<br />
uS$80<br />
Visa, MC, AMEX & Discover accepted. Call 610-363-7117 during<br />
Eastern time business hours. Dealers contact Kalmbach<br />
Publishing, 800-558-1544 ext 818 or email tss@kalmbach.com<br />
Advertisers call for info.<br />
www.oscalemag.com • ©2008 All Rights Reserved<br />
Printed in the U.S.A.<br />
O <strong>Scale</strong> <strong>Trains</strong> <strong>Magazine</strong>, ISSN 1536-9528, USPS 24457, is<br />
published bi-monthly in January, March, May, July, September<br />
and November by OST <strong>Magazine</strong>, PO Box 289, Exton<br />
PA 19341-0289. Subscription rates: US Periodical Mail,<br />
$35 per year, US First Class Mail, $45 per year; Canada or<br />
Mexico, $55 per year; Overseas, $80 per year. Postage paid<br />
at West Chester, Pa., and additional mailing offices. POST-<br />
MASTER send address changes to O <strong>Scale</strong> <strong>Trains</strong> <strong>Magazine</strong>,<br />
PO Box 289, Exton PA 19341-0289.<br />
Contributors: O <strong>Scale</strong> <strong>Trains</strong> welcomes your feature articles,<br />
photos, and drawings. Such material should be sent to the above<br />
address for possible publication. If we accept, you will be notified<br />
immediately. For more information concerning article preparation<br />
guidelines, please send an SASE to the above address and<br />
request our “Guide For Authors” or visit our website at: www.<br />
oscalemag.com.<br />
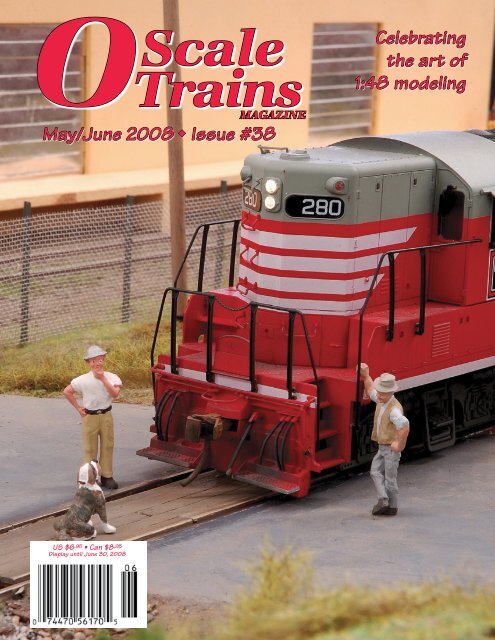
Cover: Stop for the dog – and now what? The crew of # 280<br />
ponders what to do about a very stubborn pooch protecting “his”<br />
crossing. The scene is from the AG-7/11’s CB&Q modular O <strong>Scale</strong><br />
layout from Germany featured in this issue.<br />
Centerspread: Mixed #618 waits for a train order on the AG-7/11’s<br />
CB&Q modular O <strong>Scale</strong> layout from Germany.<br />
O <strong>Scale</strong><br />
<strong>Trains</strong><br />
Features<br />
4 Everywhere West!<br />
A Modular CB&Q Layout from Germany described by Bernd Jogwich.<br />
10 Scratchbuilding Grandmas and Grandpa’s House<br />
Ray Grosser describes how his wife, Renee, built this great structure.<br />
15 Tricks ’n Tips: Replacement Diesel Drive Components<br />
Brian Scace details new sprockets for older Weaver Diesel drives.<br />
17 Toivo’s Garage<br />
A neat structure cobbled up by Charles Purin from a Clever Bros. kit.<br />
21 Fine Tuning Golden Gate Depot’s B&O Pullman<br />
Stock out of the box wasn’t good enough for Ed Bommer.<br />
29 Modern Loads for the Weaver Flatcar<br />
What’s being loaded on flatcars today? Gene Clements has the answer.<br />
42 Pieces of the Puzzle — Part 2<br />
Mike Cougill continues his discussion of layout design philosophy.<br />
45 Custom Backgrounds for Layouts<br />
You asked; we deliver. Andy Romano describes how he made his<br />
backdrops on the Ironbound RR.<br />
52 Sweeper/Track Cleaner<br />
A nifty piece of MoW equipment designed and built by Gerald Brothers.<br />
62 2008 Chicago March Meet Contest Winners<br />
64 2008 O <strong>Scale</strong> National Preview<br />
Departments<br />
9 The Art of Finescale – Mike Cougill<br />
19 Traction Action – Roger Parker<br />
25 Confessions of a HiRailer – Hobo D. Hirailer<br />
27 The Modern Image – Gene Clements<br />
31 Modeler’ Showcase<br />
33 The Workshop – Neville Rossiter<br />
39 Reader Feedback<br />
55 Product News & Reviews<br />
68 Buy-Sell-Trade Ads<br />
68 Events Listing<br />
69 Advertiser Index<br />
70 Observations – Joe Giannovario<br />
MAGAZINE<br />
May/June ’08 - O <strong>Scale</strong> <strong>Trains</strong> •
Everywhere West!<br />
A Modular<br />
CB&Q<br />
Layout from Germany<br />
Bernd Jogwich<br />
1<br />
Our model railroad club was founded in 1964 by members of the former German<br />
Model Railroader’s Association (D.M.V.) of the GDR. Our latest project, an O<br />
<strong>Scale</strong> modular layout, was modeled after a U.S. prototype: the Chicago Burlington<br />
& Quincy. After many years of operating in TT-scale, we looked for new ideas for<br />
the future. We are more interested in older trains and equipment, especially from<br />
the late 1960s. After several months of brainstorming, an O <strong>Scale</strong> layout became<br />
the clear choice in a pool of four projects, so we went for it.<br />
• O <strong>Scale</strong> <strong>Trains</strong> - May/June ’08<br />
GP<strong>38</strong> #712 passes under a busy highway towing a long freight.<br />
Safety first always – on switching too!<br />
2<br />
After extensive research and planning,<br />
we began to construct the five main<br />
segments of the layout. All the modules<br />
were built by the members from blockboard.<br />
Our layout dimensions are 11.5<br />
m x 4.9 m or in English measurements<br />
37’ 9” x 16’ 1” (Figure 1).<br />
Most of the track and switches came<br />
from AtlasO. For noise insulation we laid<br />
cork strips under the track. All switches<br />
are powered with a servo and controlled<br />
by DCC-switch-decoders from MB-<br />
Tronik.<br />
The substructure of the scenery was<br />
shaped from paper maché. For detailing<br />
we use Woodland Scenics’ turf and foliage,<br />
plus material from HEKI along with<br />
real materials like sawdust. All of the<br />
buildings were scratchbuilt by the members,<br />
except for the tower and café which<br />
are commercially produced buildings.<br />
The core section of the layout forms<br />
the junction at Serena, Illinois, which<br />
is equipped with two industrial sidings.<br />
Later we’ll set up a four-track staging and<br />
five curved-track sections. We require<br />
a continuous loop to connect the junc-
Figure 1<br />
Arrows indicate<br />
photo locations.<br />
3<br />
An SW 1200 is pushing<br />
several cars to the fruit<br />
dispatch company.<br />
Is there any problem?<br />
No; only an inspection on the<br />
light Pacific.<br />
4<br />
May/June ’08 - O <strong>Scale</strong> <strong>Trains</strong> •
5<br />
tion’s exit to the marshalling yard.<br />
In December 2004 we tested the layout for the first time in<br />
trial operations. We were visiting with the model railroading<br />
club in Koethen for six days and had extensive experiences<br />
with the layout’s operations. We learned you can deliberate<br />
and plan for the best but in the first startup, all things didn’t<br />
work out. Some weak spots were recognized and repaired.<br />
After finalizing the curved modular segments in the summer<br />
of 2006, it was now possible to start planned operations<br />
for the first time. To provide interesting operations for public<br />
display, it goes without saying that numerous trains are necessary.<br />
At the present, we own several locomotives and over<br />
120 cars.<br />
At first we controlled the trains using straight DC operation.<br />
We have since converted to DCC, thereby making it<br />
possible to install sound decoders in the engines, which we<br />
did in April 2005. It’s just a beautiful effect and enriches the<br />
models immensely.<br />
In the future, we face the task of building an extension of<br />
the track on the left side. Hopefully, the extension will be<br />
complete in late autumn this year. You can visit our website:<br />
[www.ag7-11.de], or contact us via e-mail:<br />
vorstand@ag7-11.de<br />
u<br />
The Towers’ staff watches a Steam<br />
Special hurry along.<br />
6<br />
Extra train No. 618<br />
crosses the street.<br />
7<br />
Switching activities<br />
on Main Street.<br />
• O <strong>Scale</strong> <strong>Trains</strong> - May/June ’08
8<br />
GP<strong>38</strong> #712 coming out of<br />
the tunnel.<br />
9<br />
Much of the scenery<br />
material is natural in<br />
this realistic landscape.<br />
RSD # 1665 crosses a<br />
scratchbuilt bridge.<br />
10<br />
May/June ’08 - O <strong>Scale</strong> <strong>Trains</strong> •
P&D 31280 Hobby Shop Groesbeck,<br />
Fraser, MI 48026<br />
586-296-6116<br />
Open Mon-Fri 10-8,<br />
Sat 10-6, Sun 12-5<br />
Fax: 586-296-5642<br />
www.pdhobbyshop.com<br />
Power or Repower Kits for Red Caboose GPs<br />
PDP2201K-Repower kit, Red Caboose GP9, P&D brass EMD Blomberg trucks<br />
PDP2201K-Repower Kit, Red Caboose GP9 with P&D brass<br />
Blomberg trucks...$225.00 + s&h<br />
PDP2200K-Repower Kit, Red Caboose GP9 with plastic Blomberg<br />
trucks...$160.00 + s&h<br />
The P&D TWIN<br />
TOWER DRIVE for the Red<br />
Caboose GP body kit is<br />
functionally equivalent<br />
to the P&D power units<br />
already available for the<br />
P&D F units, GPs, RSDs,<br />
and the Weaver FAs, FBs,<br />
RS-3s and GP-<strong>38</strong>s.<br />
The Red Caboose<br />
power kits provide only<br />
the necessary power<br />
related parts to supplement<br />
the Red Caboose GP<br />
body kit. These power kits<br />
fully utilize the underframe<br />
(platform), deck, air tanks,<br />
fuel tanks, motor mounts<br />
and screws that are furnished<br />
in the Red Caboose<br />
body kit.<br />
These P&D Twin Tower<br />
Drive kits can also be used<br />
to repower existing Red<br />
Caboose GPs. Two kits are<br />
offered: #PDP2200K has<br />
plastic Blomberg trucks,<br />
while #PDP2201K features<br />
the P&D brass Blomberg<br />
trucks, which are truly<br />
some of the finest trucks<br />
on the market. Each kit<br />
also includes a powerful<br />
Pittman motor and all the<br />
necessary parts to complete<br />
the installation.<br />
Detailed instructions are<br />
included.
The Art of Finescale<br />
Michael Cougill<br />
Modeling Roads<br />
Streets, boulevards, thoroughfares, country lanes, goat<br />
paths, whatever you care to call them; roads are an undeniable<br />
part of the landscape. Yet, too often modelers overlook these<br />
essential elements. True, we’re modeling railroads, not highways.<br />
However, when one element of a scene lacks the same<br />
level of detail as the rest, it can stick out like a sore thumb,<br />
calling undue attention to itself.<br />
There are a variety of ways to model roads and streets.<br />
Cardstock was a staple in the old days. Today, many prefer<br />
sheet styrene. Plaster and water putty are also long-time favorites.<br />
Woodland Scenics has a road system that I’m not familiar<br />
with, but it might be worth a look. My personal preference is<br />
to use plaster or pre-mixed spackling compound. I actually prefer<br />
the pre-mixed spackling, since it isn’t as messy as pouring<br />
a soupy plaster mix and watching it go everywhere. To make a<br />
street, I figure on 12 scale feet for the width of each lane. This<br />
would make a two-lane road 24’ wide, which is actually kind<br />
of narrow really. You could add a few feet to either side for onstreet<br />
parking or a shoulder, if you have the space.<br />
Construction begins with tacking some formwork, made<br />
from 3/16” sq. pieces of stripwood, in place. These forms control<br />
the thickness of the spackling compound, acting as screeds<br />
for a wide putty or drywall taping knife used to smooth out the<br />
surface. The process couldn’t be simpler; just plop some of the<br />
pre-mixed compound onto the area and screed it off with the<br />
taping knife. A little water on the knife blade will help keep<br />
the surface smooth. If a few bumps and voids show up, I don’t<br />
worry too much about them; they’ll just become a pot hole or<br />
repair patch.<br />
For most types of street surfaces, the joint compound will<br />
be fine as is. But this is O <strong>Scale</strong>, where texture plays a larger<br />
role than in other scales. I wanted to see if I could duplicate<br />
the type of road surface where highway crews lay down a layer<br />
of liquid asphalt and follow it with a thin layer of pea gravel.<br />
This makes a huge mess for a few days until heat and tire friction<br />
melt it together into a solid mass. The finished road surface<br />
has a smooth texture with the small gravel stones clearly<br />
visible but firmly imbedded in the road. I think this is called a<br />
macadam surface, but I’m not sure of that.<br />
As an experiment one night, I sprinkled some fine sand<br />
onto a section of Mill Street I had just put down a couple of<br />
hours earlier. The spackling was firm, but still very moist and<br />
workable. My finger would leave an imprint when testing for<br />
firmness. I took a dowel rod and began to gently work the<br />
sand into the damp surface, using the dowel like a rolling pin.<br />
It worked! The rolling and pressing action worked the sand<br />
particles into the plaster, and worked up a bit of plaster cream<br />
at the same time. I managed to stop while I was ahead for<br />
once, and let things dry overnight. The next morning, the road<br />
had set up nicely and while it didn’t look like I had hoped, the<br />
results were promising anyway. I let it dry for at least a week<br />
or until there was no hint of moisture left, and then colored<br />
the road with acrylic craft paints to resemble a concrete surface.<br />
The imbedded sand gave a nice pitted effect, looking like<br />
spalled concrete. Not bad.<br />
I’m still working on the macadam effect. If I can get consistent<br />
results and the appearance I’m after, I’ll pass the techniques<br />
along for all of you. Meanwhile, the streets and roads on the<br />
I&W are starting to look as nice as the rest of the scenery.<br />
Look for bonus material on this subject under “Mike’s Projects”<br />
at the OST blog: [www.oscalemag.com]<br />
Best regards,<br />
Mike<br />
u<br />
May/June ’08 - O <strong>Scale</strong> <strong>Trains</strong> •
Scratchbuilding<br />
Grandma’s<br />
and<br />
Grandpa’s<br />
House<br />
Ray and Renee Grosser<br />
General<br />
Renee has been scratchbuilding structures in HO since 1992.<br />
After we started modeling in O <strong>Scale</strong>, she decided to build some<br />
of her hometown buildings for our new layout. She has fallen<br />
in love with O <strong>Scale</strong> and plans to keep building in this new and<br />
exciting nostalgia trip.<br />
Designing a Building<br />
Building with styrene is not difficult, but it does take some<br />
time to work out the construction details. The first thing that<br />
needs to happen is a design for the building you want needs<br />
to be put on paper. You do not need to be an architect to draw<br />
some basic lines on a sheet of paper. We usually take photos of<br />
each of the four sides and all four corners of a building, and a<br />
few close-up shots of any special details. Basic measurements,<br />
such as width and length, are taken or paced off to get an estimate.<br />
Height or elevation is easily figured by measuring a window<br />
or door. We also have a roofing estimator (a piece of clear<br />
plastic with the different roof pitches on it, available at lumber<br />
yards where shingles are sold). You line up the roof line with the<br />
line on the estimator to get the pitch, and transfer it to the drawing.<br />
You can use it on the actual building or on a photo of the<br />
building.<br />
Renee uses some quarter-inch grid paper to draw the outline<br />
of the building, then places the window and door castings to<br />
1<br />
locate their openings (Photo 1). Once you have a design it is<br />
easy to transfer the measurements to the styrene, and cutting out<br />
the walls may be done in various ways. Renee uses an Olfa P-<br />
cutter 450 with a tungsten blade. These are available at Lowe’s,<br />
Home Depot, and others.<br />
She cuts out the basic structure from plain 1/16-inch thick<br />
styrene sheets available from architectural or plastic supply companies.<br />
Larger models require more basic stock than is normally<br />
available in hobby shops (Photo 2). The clapboard siding is from<br />
2<br />
Evergreen <strong>Scale</strong> Models found in many hobby shops. The windows<br />
and doors are from Grandt Line and others.<br />
Assembling The Main Structure<br />
Once all the walls are cut out, Renee assembles the basic<br />
structure with CA glue. (Styrene glue may also be used, but we<br />
have found that over time the styrene glue will cause some warping,<br />
so she uses CA almost exclusively.)<br />
When all the walls are assembled, the clapboard or other siding<br />
material is installed with the window and door openings cut<br />
in (Photo 3). After gluing on the siding to the sub-structure, the<br />
openings for the windows and doors are made by first drilling<br />
a hole in one or more locations within the window opening to<br />
10 • O <strong>Scale</strong> <strong>Trains</strong> - May/June ’08
3<br />
6<br />
remove the bulk of the material, then finishing it up with files.<br />
She has a variety of flat files with different cutting capabilities,<br />
such as the diamond coated files that are available from Micro-<br />
Mark. Roughing out the opening with a file in styrene is easier<br />
than it sounds. You can creep up to the line for the opening and<br />
test fit the casting often. This makes for nice fitting doors and<br />
windows (Photo 4). Multiple window units may be made up on<br />
the bench and transferred to the model in one piece as shown in<br />
Photo 5. Installation of the windows and doors are done one at<br />
a time. Photo 6 shows the openings in the clapboard siding on<br />
the end of the building and openings ready for windows along<br />
the side. To finish the siding, corner boards made of scale 1x5<br />
boards are installed, and the siding is butted to them as it was on<br />
the original house.<br />
4<br />
7<br />
8<br />
5<br />
Adding the turn backs or cornice returns on the roof comes<br />
next (Photo 7). Normally, the siding would be butted up to this<br />
detail, but Renee decided that trying to cut the clapboard sheets<br />
around them was more trouble than the end result was worth; so<br />
she just put the returns on top of the siding and they look fine.<br />
Painting and finishing<br />
Painting the entire structure is next. Since the windows and<br />
doors were all painted the same as the siding, the assembly was<br />
completed and the model was spray painted with Floquil Reefer<br />
White. This paint dries to a semi-flat finish and it is perfect for the<br />
slightly weathered finish of a house that shows some flatness.<br />
When the paint is dry, the bottom of the clapboard siding is<br />
masked and the foundation is painted Floquil Concrete or Aged<br />
Concrete, depending on the tastes of the modeler and the finish<br />
desired (Photo 8). This house had concrete masonry unit<br />
May/June ’08 - O <strong>Scale</strong> <strong>Trains</strong> • 11
foundation walls, but the stucco covered the joints. Renee used<br />
a 0.020” thick sheet to represent this foundation wall. This also<br />
allowed a starter row for the clapboard siding.<br />
Roofing<br />
Asphalt shingle roofing is next. We used the laser cut sandpaper<br />
shingles made by Mullet River Models. They are $14.00 per<br />
sheet, and the end result is worth the expense. They are by far<br />
the best looking shingles we have ever used on any model. They<br />
are made of wet-n-dry garnet paper and the tabs are right on the<br />
money dimensionally.<br />
Renee glues a course of shingles to a piece of black construction<br />
paper from Wal-Mart, using wood glue. Once all the<br />
courses are in place and the glue cures, it is an easy task to cut<br />
the whole sheet the size and shape needed and transfer it to the<br />
building, attaching it with Elmer’s stainable glue (Photo 9). You<br />
may not think that this type of glue would hold to plastic, but it<br />
does. This keeps the roof from warping and the finished product<br />
is very realistic. These shingles are also easily weathered with<br />
chalks and coated with a clear lacquer dull-coat which seals the<br />
chalks.<br />
Storm/Screen Window Frames<br />
Modeling in quarter-inch scale allows for a lot of detail,<br />
which translates to a lot of work. Renee decided to model the<br />
outline of the screen (summer) or storm window (winter) with a<br />
scale 1 x 1-1/2 inch styrene strip painted black rather than replicate<br />
either (Photo 10). If screens were modeled, it would be difficult<br />
to see the window treatment on the inside of the structure.<br />
If the storm windows are modeled, it would have entailed a great<br />
deal more effort, since the glazing would have to be behind the<br />
9<br />
10<br />
wood frames to look correct. The effect is quite appealing with<br />
the black trim against the white window casings. The screen door<br />
was done using a fine mesh painted black.<br />
Railings<br />
The railings for the front and rear porch steps are 0.042”<br />
x 0.015” brass flat bar for the upper and lower railings, with<br />
0.019” brass wire used for the pickets. Holes were drilled in the<br />
upper and lower rails at 4-inch centers (Well as close as possible<br />
using a hand-held power drill and a .021 [#75] drill bit), and the<br />
wire was soldered to each rail. After sanding them smooth, the<br />
assembled railings were painted black and installed on the steps<br />
(See the lead photo). The railings on the rear porch are plastic<br />
from Grandt Line.<br />
Stucco Foundation Walls<br />
This is something that Renee invented herself. She found that<br />
mixing Durham’s Rock Hard Water Putty with some acrylic craft<br />
paint of the same color as the stucco on the real building made<br />
for a realistic stucco texture on the model. (Check the craft center<br />
at Wal-Mart and other places for these paints.) We have found<br />
a variety of stucco colors from a concrete grey to a red. Mix the<br />
acrylic paint and Durham’s water putty approximately 50/50.<br />
If you add water the mixture bubbles up and is ruined when<br />
applied to the styrene walls of the foundation. Dab the mixture<br />
on with a flat brush and when the wall is coated evenly, let it dry<br />
for a day or so. Any light spots can be touched up or weathered.<br />
Base<br />
Renee makes a base from steel sheet that we bought at<br />
Lowe’s. This allows the model to be moved easily and placed on<br />
display at a train show or in our house. We cut the sheet steel to<br />
the basic shape of the sidewalk pattern with a small amount of<br />
grass area between the walk and the foundation. Once it is cut<br />
to shape, she glues the foundation onto the base with Elmer’s<br />
stainable tan carpenter glue. This glue dries clear and is easily<br />
painted. When it is cured, she applies actual dirt sifted from the<br />
yard of the real house, and plants grass over the dirt. This way,<br />
the grass does appear to have been planted in real soil just like<br />
the real house in Minnesota.<br />
Finishing Up<br />
To finish up the house, Renee plants some shrubs and flowers.<br />
She has also added some memories of her own. She remembers<br />
when grandma invited her upstairs to look out the window over<br />
the back porch at some robins that were nesting in the corner<br />
near the railing. She also placed a figure of her niece and her cat<br />
in the door of the front porch. The curtains are made using a variety<br />
of patterns cut out of catalogs and some lace that is readily<br />
available at Wal-Mart.<br />
The gutters were made from an HO <strong>Scale</strong> 8-inch industrial<br />
gutters kit by Micro Engineering #80-163. Some brass channel<br />
would also work for this detail.<br />
The down spouts are made of<br />
1/16 inch square brass tubing.<br />
These houses and buildings<br />
are easy to build but they take<br />
time. Yes, there are many modelers<br />
today who do not want to<br />
set time aside to do this kind of<br />
work, but this is a simple, yet<br />
effective way of modeling specific<br />
buildings and a great deal<br />
of pleasure comes from the<br />
finished model. It is something<br />
that you will have personal<br />
affection for.<br />
Happy modeling. u<br />
12 • O <strong>Scale</strong> <strong>Trains</strong> - May/June ’08
On30 Baldwin 2-4-4 Forney<br />
Locomotive of Choice Choices abound with the Spectrum® On30<br />
DCC SOUND ON BOARD <br />
(sound, speed, direction, and lighting control)<br />
MSRP: $435.00 each<br />
OUTSIDE FRAME<br />
SANDY RIVER & RANGELY LAKE #12<br />
Item No. 25494<br />
OUTSIDE FRAME<br />
PAINTED, UNLETTERED<br />
Item No. 25498<br />
DCC sound decoder features include:<br />
• authentic sound effects, including whistles,<br />
bells, chuffs, and air pumps<br />
• additional sounds include dynamo, injectors,<br />
coupler clank, water stop and more<br />
• three whistles to choose from in each model<br />
• whistle can be played in real time to create<br />
authentic signals<br />
• high quality 16-bit digital sound<br />
• advanced motor control features including<br />
load compensation and silent drive to provide<br />
smooth, quiet operation<br />
INSIDE FRAME<br />
SANDY RIVER & RANGELY LAKE #11<br />
Item No. 25495<br />
INSIDE FRAME<br />
PAINTED, UNLETTERED<br />
Item No. 25499<br />
Baldwin 2-4-4 Forney. Offered as inside- and<br />
outside-frame versions, our Forney locomotives<br />
are available DCC-equipped or with<br />
Tsunami ® DCC sound technology, using<br />
sounds taken from real locomotives. With<br />
DCC Sound On Board , modelers can add a<br />
new level of realism to their railroads with a<br />
broad palette of prototypical sound effects<br />
and DCC functions. Plus, both sound and<br />
non-sound models feature dual-mode<br />
decoders that work on both DC and DCC<br />
layouts automatically.<br />
So no matter which Forney you choose, you’ll<br />
have chosen wisely. Visit your local hobby<br />
retailer to learn more about the Spectrum ®<br />
On30 Forney and Bachmann’s complete line of<br />
model railroading products.<br />
Locomotive features:<br />
• die-cast frame, boiler, and cab<br />
• vestibule cab with operating doors and interior detail<br />
• 5 pole, skew-wound motor<br />
• operating LED headlight<br />
• separately applied detail parts<br />
Also available<br />
DCC ON BOARD <br />
(speed, direction, and lighting control only)<br />
MSRP: $275.00 each<br />
• supports all recognized programming methods OUTSIDE FRAME SANDY RIVER & RANGELY LAKE Item No. 25476<br />
INSIDE FRAME SANDY RIVER & RANGELY LAKE Item No. 25477<br />
OUTSIDE FRAME PAINTED UNLETTERED Item No. 25478<br />
INSIDE FRAME PAINTED UNLETTERED Item No. 25479<br />
Bachmann Industries, Inc. • 1400 East Erie Avenue • Philadelphia, PA 19124 • www.bachmanntrains.com<br />
<br />
May/June ’08 - O <strong>Scale</strong> <strong>Trains</strong> • 13
From PA Heritage<br />
O <strong>Scale</strong> Birney Drive Units<br />
• Shown above: a complete interior structure for the<br />
Corgi Birney with lights and reversing headlights. Includes<br />
the 2-rail power truck. $125.<br />
• 2-rail power truck for the Corgi Birney. Requires some<br />
floor removal which is not visible in the car. 8' wheelbase<br />
with scale or hirail wheels. Our hirail wheels operate on<br />
code 100 or higher. $90<br />
• Not shown: Black Beetle power unit available in wheel<br />
base from 23.75 MM to 40 MM.(15/16" to 1 9/16"). $65<br />
Pa Heritage Models Ltd.<br />
715 Ridgeway Road, Birdsboro, PA 19508<br />
www.paheritagemodels.com<br />
O <strong>Scale</strong><br />
<strong>Trains</strong><br />
PO Box 289,<br />
Exton PA 19341-0289.<br />
voice: 610-363-7117 • fax 610-363-7357<br />
Subscription Rates: 6 issues<br />
US - Periodical Class Delivery uS$35<br />
US - First Class Delivery (1 year only) US$45<br />
Canada/Mexico<br />
uS$55<br />
Overseas<br />
uS$80<br />
• Office hours are Mon. - Thurs. 10:00 am to 5:00<br />
pm. Leave a message and somone will call you<br />
back. Closed Fri. thru Sun.<br />
• Back issues available are: 18, 19, 20, 21& 23<br />
@$5.95 ea.; 24, 26, 27, 30, 31, 32, 35 36 & 37 @$6.95<br />
ea. Include $4.60 postage for every 4 copies.<br />
• Subscriptions which start with the current<br />
issue already on the street will be charged<br />
$2 extra for postage. Subscriptions and back<br />
issues can be ordered at our website. Check our<br />
website for free downloadable PDFs of early<br />
issues.<br />
• OST is published in January, March, May, July,<br />
September & November. Issues usually arrive<br />
by the second week of the issue month. If your<br />
issue is not delivered by the end of the month,<br />
call and we will replace it.<br />
• Your subscription expiration date is now<br />
printed on the mailing label.<br />
O-SCALE!!<br />
Simply the finest laser<br />
cut kits you can buy!<br />
HIGHLY DETAILED<br />
DURANGO’S<br />
75-TON<br />
COALING TOWER<br />
$260<br />
COMING SOON:<br />
dURANGO’S<br />
sAND tOWER<br />
MOVABLE CHUTE<br />
Ragg’s...To Riches?<br />
(570) 376-2025<br />
www.raggstoriches.biz<br />
14 • O <strong>Scale</strong> <strong>Trains</strong> - May/June ’08
Replacement Diesel Drive<br />
Components<br />
Brian Scace<br />
I’m a firm believer in one all-truism when it comes to locomotives.<br />
Whether you’re running conventional cab-control or<br />
command control, an O <strong>Scale</strong> locomotive drive should have<br />
impeccable mechanical and electrical performance properties<br />
before any electronics are added. In spite of the current<br />
wisdom of the ready-to-run marketplace, electronics such<br />
as DCC are not a satisfactory patch for the less-than-stellar<br />
mechanical performance inherent in the current design of<br />
Diesel drive-trains.<br />
This brings me to the time-honored horizontal doublereduction<br />
drive we fondly remember, specifically the Weaver<br />
chain-drive. For those who may not know, this drive appears<br />
in quite a few different Diesel models, such as the older<br />
Weaver plastic offerings, P&D’s beautiful F-unit line and a<br />
drive made for the Red Caboose Geep, and the various Alco<br />
and Baldwin switchers imported by Carworks. However, nice<br />
as they are in stock form, the starting performance still leaves<br />
room for improvement, hence this little piece of wisdom.<br />
Recently, I picked up a Carworks Alco S2 from a gent who<br />
turned me on to Sterling Instrument. These folks make sprocket<br />
drives for instrumentation and small mechanical devices;<br />
they’re not a hobby manufacturer at all. In their line are a variety<br />
of sprockets just perfect for tweaking up the Weaver chain<br />
drives. In the photo, you’ll see my application. Look at the difference<br />
between the little stock 12-tooth lower sprocket and<br />
that big beautiful Sterling acetal resin 18-tooth sprocket (Part<br />
#A 6M 7-121806). These have a 0.1227 pitch and a shaft diameter<br />
of 0.188”. I just popped off the stock 12-tooth sprocket at<br />
the bottom of the tower and pressed on a 18-tooth sprocket.<br />
Simple. Make sure you line up the upper and lower sprockets<br />
nicely and shave the hub-face of the new one back a bit to<br />
clear the tube/half-shaft arrangement in the truck. Add three<br />
bars worth of Sterling’s plastic chain (Part #A 6M 7-12, it snaps<br />
right in place on the Weaver chain and is a matched replacement),<br />
and re-assemble the drive. I’ve done this conversion<br />
on Weaver, Carworks, and various P&D Diesels, and find the<br />
resulting switching/starting performance on par with any of<br />
the custom drives I own. The hour spent swapping sprockets<br />
yields wonderful low-end performance. The Alco High-Hoods<br />
on my railroad can now slowly push a car, knuckle-to-knuckle,<br />
without even opening up the couplers! It’s what O <strong>Scale</strong> is<br />
all about.<br />
Sterling has sprockets ranging from 10-20 teeth with shaft<br />
diameters of 0.125”, 0.188”, and 0.250”, all matching in pitch<br />
to the Weaver chain, so the options for re-gearing to suit<br />
are myriad. The cost of my project was a tad over a buck a<br />
sprocket, and an additional pittance for the chain (about $8.50<br />
per foot). They have a web-based catalogue and ordering site.<br />
A quick check on your part might also discover that the All-<br />
Nation, Electric Shop, and NJ/CB chain drives might use either<br />
the same components or something else in Sterling’s arsenal.<br />
The play-value possibilities are just endless. Sterling’s address<br />
is: Sterling Instrument/Stock Drive Products, 2101 Jerico Tpke.,<br />
Box 5416, New Hyde Park, NY 11040 Phone: 516-328-3300<br />
[www.sdp-si.com]<br />
u<br />
M<br />
ullet River<br />
odel Works<br />
118 Huson Ct. • Plymouth, WI 53073<br />
Phone 920-892-8159<br />
WWW.mulletrivermodelworks.com<br />
O <strong>Scale</strong> Caboose Models<br />
See your dealer or our web site for more photos<br />
> Laser cut plywood body with working windows<br />
> Full interior with roof ribs and purlins<br />
> Separate doors can be modeled in the open position<br />
> Working windows<br />
> Etched brass underframes<br />
403001 Soo Line Caboose with single window cupola $120.00<br />
403002 SOO Line Caboose with two side window cupola $120.00<br />
403003 DSS&A Caboose $120.00<br />
403004 C&NW Caboose with no end windows $120.00<br />
403005 C&NW Caboose with end windows $120.00<br />
403006 C&NW Caboose with all wood underframe $120.00<br />
403007 Big Four Caboose $120.00<br />
403008 Milwaukee Road Caboose with tall cupola $120.00<br />
403009 CB&Q 28' Caboose $120.00<br />
403010 CB&Q 30' Caboose $120.00<br />
403011 SOO Line 34' Caboose $120.00<br />
403012 Central of Georgia Caboose with tong and groove side $120.00<br />
403013 Yosemite Valley Caboose $120.00<br />
403014 Central of Georgia Caboose with plywood side $120.00<br />
403015 Colorado & Southern Caboose standard gage $120.00<br />
403016 C&NW Bay Window Caboose tong and groove side $120.00<br />
403017 C&O-Pere Marquette Caboose $120.00<br />
May/June ’08 - O <strong>Scale</strong> <strong>Trains</strong> • 15
Rail-Related Industries from B.T.S. !<br />
Cabin Creek<br />
Coal Tipple<br />
The Cabin Creek Coal Tipple is a freelanced<br />
composite of several different tipples located in West<br />
Virginia and Pennsylvania. Three tracks are serviced<br />
here. The tipple kit is laser cut and engineered for<br />
easy construction. Detail castings and bulkheads are<br />
included. Overall size is about 2’ x 4’ as shown.<br />
#18105-L $ 549.95<br />
McCabe Planing Shed<br />
The McCabe Lumber Co. Planing Shed should be called<br />
a planing mill complex since it is more than just a simple<br />
shed. The planing complex consists of the transfer shed,<br />
two planing buildings, boiler house, water tank, and loads<br />
of details, and is a key part of the Slatyfork Sawmill<br />
Complex. The Planing Shed can also be used as a standalone<br />
manufacturing industry such as a box factory.<br />
Slatyfork Sawmill<br />
Slatyfork is a double bandsaw mill that can handle the load! This Master<br />
Creations’ kit consists of laser-cut basswood, plywood, and detail castings.<br />
Interior walls and floors are included. And the standard features of B.T.S.<br />
kits are there... positionable doors and window sashes, slot and tab<br />
construction, brass door knobs, and well-engineered construction providing<br />
fast and easy assembly. The footprint is about a scale 115’ x 65’.<br />
#18300 $ 850.00<br />
This kit consists of laser-cut basswood, plywood, and cardstock,<br />
tarpaper roofing, brass, urethane, and white-metal detail castings, and<br />
loads of character. The tabbed, well-engineered construction provides<br />
fast and easy assembly. The footprint is about 70’ x 90’.<br />
#18225 $449.95<br />
Elliott and Sons Supply<br />
While it is a freelanced structure, the Elliott & Sons Supply was based upon a tomato<br />
packing house in Florida. The kit features laser-cut basswood, cardstock and plywood;<br />
tabbed, easy construction; loads of Detail Castings; laser-cut, self-sticking shingles &<br />
sashes; laser-etched nail holes; optional skylights; and a scale 40’ x 60’ Footprint.<br />
#18106 $ 229.95<br />
www.btsrr.com<br />
P O Box 856<br />
Elkins, WV 26241<br />
Shipping - $5.00/order in the US<br />
Phone: 304-637-4510<br />
All <strong>Scale</strong> Catalog - $5.00<br />
Fax: 304-637-4506 Celebrating over 29 Years of Service since 1979
TOIVO’S GARAGE:<br />
Kitbashing Clever Models Quonset Hut Kit<br />
Charles C. Purin<br />
I finally attended my first Midwest O Meet this past spring<br />
and I’m glad I did. In addition to seeing all sorts of O <strong>Scale</strong><br />
goodies beyond my budget, I got to meet many of the “faceless”<br />
O <strong>Scale</strong> acquaintances that I’ve made through the years<br />
and a few new ones too, including the Clever Models’ clever<br />
brothers!<br />
I’ve always enjoyed scratchbuilding structures, especially<br />
those written up by Frank Ellison and E. L. Moore from years<br />
ago. Now that I’m retired, I finally have time to build a few.<br />
When I saw Clever Models’ display of their laser-printed cardstock<br />
kits and textures, I was amazed. What a boon to the<br />
scratchbuilder!<br />
I decided to try one of their kits before utilizing their texture<br />
sheets on a scratchbuilt model. I chose the Quonset hut<br />
kit and when it arrived, I was hooked. What a nice model it<br />
turned out to be. The kit was just fine the way it came but for<br />
my liking, it needed a few modifications.<br />
On a fishing trip to Northern Wisconsin, I saw many old<br />
Quonset huts, false-front buildings and the idea for Toivo’s<br />
Garage was born. I’ve spent many years in Michigan’s Upper<br />
Peninsula where the name Toivo rolls off the tongue with ease<br />
as does the “Yooper” pronunciation of garage as “grotch.”<br />
Toy-vos Grotch has a nice ring to it, eh?<br />
For this model, I made a false-front to display the name and<br />
offer support for the Quonset roof behind it. I also included a<br />
double-door with an overhanging roof or some sort of a raindeflector<br />
for prospective customers.<br />
I also felt that the cardstock in the kit was a bit wimpy<br />
and needed strengthening. So I rubber-cemented all the kit’s<br />
sheets to a filing folder backing before going any further. This<br />
resulted in a big mess; but a soft rag easily removed the excess<br />
goop oozing out around the edges. After a few sheets, the rest<br />
came out just fine. I carefully cut out all cardstock window<br />
glass and replaced it with clear styrene. The file folder backing<br />
made it much easier. To save time and trouble, on my model I<br />
decided to use Grandt Line’s #3722 Attic Windows. I used the<br />
four-pane windows for the gable windows on the sides of the<br />
building and two of the two-paned windows in the false-front<br />
(Photo 1).<br />
I now offer some advice from “lessons learned.” Glaze your<br />
windows while the front wall can still be laid flat. Also, prepare<br />
and position whatever sign or lettering you choose, leaving<br />
clearance for the overhanging roof or rain-deflector. This is<br />
much easier than doing it after assembling the building.<br />
Even with a cardstock backing, the interior stiffeners<br />
weren’t very strong and didn’t offer much support for the<br />
roof. I also realized that if one were to look in the windows<br />
or decided to light the interior, they’d block the view. I substituted<br />
four laminated arches as you’re going to have a big<br />
double door on one side to bring in vehicles and equipment<br />
and you’ll need support<br />
2<br />
on either side of it. I carefully<br />
cut two master arches<br />
from artist’s illustration<br />
board to use as templates<br />
for the other 12. I made<br />
the arches by laminating<br />
three individual ones<br />
together with Goo, giving<br />
me four strong arches to<br />
work with (Photo 2).<br />
Next make a big<br />
1<br />
May/June ’08 - O <strong>Scale</strong> <strong>Trains</strong> • 17
Repairs - Sales - Installations<br />
Standard & Narrow Gauges<br />
Now carrying the Micro-<strong>Scale</strong> line of<br />
craftsman grade building kits<br />
•Figures •Scratchbuilding Supplies<br />
•DCC & Sound •Tools •Details<br />
•M V Products Lenses •Turnout Throws<br />
Shows In MA, MD, NY, OH, PA , RI<br />
Call Ahead - Orders can be delivered to all show locations<br />
Contact us for further info<br />
Special & Mail Orders - Credit Cards<br />
Craftsman Grade Products & Services<br />
C r u s a d e r<br />
R A I L S E R V I C E S<br />
5920 Houghton St., Phila. Pa. 19128<br />
215-482-7530 crusaderrail@verizon.net<br />
B R U M M Y ’ S<br />
PREMIUM GROUND<br />
RUBBER BALLAST<br />
<strong>Scale</strong> or Hi-Rail Size:<br />
Limestone White, Gray New<br />
Earth Colors! (All sizes) Dry Dirt,<br />
Rich Dirt (Darker), Sand Box<br />
Beige (Brighter) Coal - All Sizes.<br />
WE NOW TAKE VISA, M/C, and AMEX<br />
Phone: 330-825-3673<br />
Fax: 330-825-0214<br />
200 23rd St. NW • Barberton, OH 44203<br />
email: Dbrumagin4@netscape.net<br />
East Gary<br />
Car Co.<br />
Dept OST<br />
<strong>38</strong>28 St. Joseph Ct<br />
Lake Station IN 46405<br />
They’re Back!<br />
Former Indianapolis Car Company sides<br />
are now available from new tooling.<br />
Parts #100 & #200<br />
$3.00 each<br />
Orders under $50 please add $4.50 for postage and<br />
handling. SASE for updated list.<br />
18 • O <strong>Scale</strong> <strong>Trains</strong> - May/June ’08<br />
double door (instead of the one big<br />
door supplied with the kit) on one side,<br />
through which vehicles can drive into<br />
the garage. I scratchbuilt these doors<br />
from scrap cardboard and added a frame<br />
around them. This enabled me to have<br />
a pick-up truck or tractor sticking out of<br />
the doors. I made copies of the big door<br />
on thick paper so I could cut out enough<br />
to cover the front and back as I left my<br />
doors open. For the sake of symmetry,<br />
we’ll lengthen the sides of the building<br />
and center the big double-door to please<br />
the eye. Without centering the big doors<br />
and lengthening the building accordingly,<br />
it just doesn’t look right. Because<br />
I lengthened the building for the double<br />
doors, I added a third gabled window to<br />
the side opposite the doors. I ended up<br />
adding about two inches to the overall<br />
length of my model, giving it a 7” x 11”<br />
footprint.<br />
I glued one arch to the back wall, and<br />
saved the other two arches for the center<br />
of the building (Photo 3). I made an illustration<br />
board floor to replace the one<br />
that came with the model and glued the<br />
front and back walls to it.<br />
3<br />
Gluing the roof to the arches was a<br />
little tricky. The center arch was difficult<br />
to work with but the rest of the assembly<br />
was fairly easy. For my false-front, I<br />
decided on the symmetrical shape you<br />
see in the photos. By all means, use your<br />
modeler’s license for whatever shape<br />
turns you on.<br />
The arch behind the false-front will<br />
determine window and door spacing. I<br />
began with a piece of illustration board<br />
and traced my arch template on it front<br />
and back. This helps to determine the<br />
door and window spacing. Layout your<br />
false-front; determine your door and<br />
window locations, and cut them out<br />
with a sharp razor knife to accommodate<br />
the Grandt Line windows and your<br />
scratchbuilt door. Clever Models offers a<br />
nice selection of peel and stick textures,<br />
and I chose a distressed red siding for<br />
my new wall. Layout and cut the openings<br />
on your siding before you affix it<br />
to the illustration board or you’ll be an<br />
extremely unhappy camper! The windows<br />
need to fit snugly in the openings.<br />
The window trim will hide the edges of<br />
the siding if it doesn’t come out perfect.<br />
In a like manner, the door trim and corner<br />
trim will do the same. For my trim<br />
and double doors, I use the gray side of<br />
cereal box cardboard.<br />
For the rear wall of the building, I<br />
simply used the curved wall provided<br />
with the kit, cutting out the window and<br />
door panes before gluing it to a piece of<br />
illustration board (Photo 4). How much<br />
interior detail you plan to use will determine<br />
the color of the illustration board<br />
4<br />
you choose. I used the “white side” to<br />
facilitate layout work and a dark color<br />
for the interior side as I don’t plan to do<br />
any interior detailing other than soft illumination.<br />
The remainder of the project is adding<br />
details to the scene. This, of course,<br />
is up to you. I put a bench with a couple<br />
of kibitzers on it against the front wall,<br />
some drums for trash, and am waiting<br />
for a couple of Texaco gas pumps to<br />
come. Later I’ll add advertising signs<br />
and maybe a hand-lettered sign for “Ma<br />
Toivo’s Pastries!” I was pleased with the<br />
results. I was anxious to show the model<br />
to a friend who promptly talked me<br />
out of it. I ended up with no Quonset<br />
hut and a grain elevator model in need<br />
of repair! But, it was a fun project and<br />
I’ve already done a different one with<br />
an entirely<br />
scratchbuilt<br />
building.<br />
But, that’s<br />
another<br />
story! u
Traction Action<br />
Roger C. Parker<br />
Information and Inspiration for Boston Traction Modelers<br />
In preparation for an upcoming feature on one of Boston’s<br />
most interesting subway stations, I gathered together several of<br />
my favorite books and spent some time reacquainting myself<br />
with them. It struck me that several were quite valuable from a<br />
broader perspective.<br />
Streetcar Lines of the Hub<br />
One of the best, from the point of view of operations, is Bradley<br />
H. Clarke’s Streetcar Lines of the<br />
Hub: The 1940s-Heyday of Electric<br />
Transit in Boston. Published by the<br />
Boston Street Railway Association in<br />
2003, this is a exhaustively detailed<br />
large format book printed on quality<br />
paper.<br />
One of the best aspects of Streetcar<br />
Lines of the Hub is its 37 highly<br />
detailed maps showing carbarns and<br />
terminals. Boston was a city of loops.<br />
At numerous locations, these loops<br />
permitted single-ended streetcars to<br />
exchange passengers at various elevated<br />
railway stations, or—underground—at a few key subway<br />
stations. At the other terminals, of course, the streetcars would<br />
leave the public right-of-way and loop on an adjacent private<br />
property.<br />
Streetcar Lines of the Hub is organized in terms of routes<br />
serving various sections of the city. Operating details and sharp<br />
black and white rolling stock and right-of-way photographs are<br />
balanced by personal anecdotes of the men who ran the streetcars.<br />
Other anecdotes are by street fans; the book contains some<br />
truly great father/son stories that emphasize the lifelong bonds<br />
that railfan outings can create.<br />
My favorite sections is Chapter 5, “The Central Subway and Its<br />
Branches.” This chapter contains a wealth of detail about building,<br />
expanding, and operating the pioneering subway. Numerous<br />
vintage photographs bring life to the story.<br />
If you’re a traction modeler looking for terminal ideas, or interested<br />
in adding a subway module to add operational flexibility to<br />
your layout, you’ll want Streetcar Lines of the Hub, and its many<br />
maps.<br />
Boston Trolleys in Color<br />
If, on the other hand, you’re primarily interested in scratchbuilding<br />
rolling stock or structures, you’ll want William D. Volkmer’s<br />
two-volume Boston Trolleys in Color, published by Morning<br />
Sun books. You’ll probably want both Volume 1: The North Side<br />
and Volume 2: The South Side.<br />
Both large format books are filled with color photographs showing<br />
the diversity of rolling stock and right-of-way structures, and<br />
adjacent buildings. Photographs cover operation in all seasons, and<br />
there are several two-page spreads showing important junctions or<br />
stations. Elevated and subway lines are also present, although this<br />
is primarily a streetcar and urban landscape book.<br />
Buy these volumes for rolling<br />
stock and structure painting ideas, as<br />
well as to get signage ideas for the<br />
buildings lining your streets.<br />
Boston Traction Topics from Arcadia<br />
Arcadia Publishing offers several<br />
excellent and fairly-priced smallerformat<br />
books, each containing hundreds<br />
of photographs which focus on<br />
specific lines.<br />
My favorite is Frank Cheney and<br />
Anthony M. Sammarco’s Trolleys<br />
Under the Hub. Trolleys Under the<br />
Hub is an excellent companion to<br />
Streetcar Lines of the Hub. There are<br />
numerous construction photographs that show the engineering<br />
necessary at several stations, as well as photographs illustrating<br />
the street congestion that precipitated the construction of<br />
Boston’s subway.<br />
My favorite part of the book was the description of how the<br />
outside third rail Boston Elevated cars shared the Park Street subway<br />
station with streetcars for several<br />
years while the heavy rail subway<br />
was being completed.<br />
Other Arcadia books on Boston<br />
traction topics include: Boston’s Red<br />
Line: Bridging the Charles From Alewife<br />
to Briantree, Boston’s Blue Line<br />
(which extends to Logan Airport), and<br />
When Boston Rode the El (currently<br />
out of print at Arcadia).<br />
Other volumes for Boston modelers<br />
(and their grandchildren)<br />
Richard C. Barrett’s Boston’s<br />
Depots & Terminals: A History of<br />
Downtown Boston’s Railroad Stations<br />
provides a great context for traction modelers. The book contains<br />
details of South Station that I haven’t encountered elsewhere, and<br />
(continued on next page)<br />
May/June ’08 - O <strong>Scale</strong> <strong>Trains</strong> • 19
there are photographs of some beautiful, long-gone, smaller stations,<br />
like those that were replaced by Boston’s Back Bay station.<br />
Finally, in order to develop the next generation of traction<br />
modelers, I strongly recommend Joe McKendry’s Beneath The<br />
Streets Of Boston: Building America’s First Subway. This is a thoroughly<br />
enjoyable, relatively inexpensive, large format book that<br />
just cries out for reading aloud to your grandchildren.<br />
Beneath the Streets of Boston consists of captions and large<br />
scale drawings, many based on historical photographs, illustrating<br />
the cross sections and construction of various stations and other<br />
facilities. It’s a book that stirs the imagination and “Gramps” will<br />
find himself rereading it every time he visits the grandchildren. A<br />
thoroughly fascinating book.<br />
Websites<br />
Boston Street Railway Association: www.TheBSRA.org<br />
Arcadia Publishing: www.arcadiapublishing.com<br />
Out of print books: www.alibris.com<br />
u<br />
Roscoe’s Model<br />
Structures<br />
www.roscoesmodelstructures.com<br />
Realistic Cast Hydrocal<br />
Building Kits<br />
Features:<br />
• Decal Signage<br />
• Laser Cut Plywood or Resin Cast Doors & Windows<br />
• Details from Sodders, Westport Model, Grandt Line<br />
& Evan Designs<br />
• Free Shipping in Continental U.S.<br />
Kit shown is “Roscoe’s Ribs”; Cat# TW-41 — $54.95<br />
See our website for other kits or<br />
call us at 414-852-4977<br />
Babbitt Railway Supply Co.<br />
Limited Run Brass Steam Locomotive Kits (Pacific 4-6-2 shown).<br />
Also available: 4-4-0, 4-4-2, 4-6-0, 4-6-2, 4-8-2, 2-6-0. Kits complete<br />
with full instructions and pictures. Also, restoration, repair and all<br />
parts available. Send $1.00 for catalog.<br />
Babbitt Railway Supply Co.<br />
715 Barger • Mayfield • KY 42066<br />
270-247-0303 • boyceyates@bellsouth.net<br />
Nos. 16001-18500 O SCALE/PROTO 48 • Kit #124/124-P … $49.95<br />
•Based on 1917 prototype built<br />
by Mt. Vernon Car Co.<br />
•Double sheath with Dreadnought ends<br />
•Steel underframe<br />
•Andrews trucks<br />
•Kit includes couplers and decals<br />
Also available –<br />
SACRAMENTO NORTHERN<br />
Boxcar Nos. 2301-2350<br />
Kit #125/125-P … $49.95<br />
Coming soon – SP Sugar Beet Gondola<br />
20 • O <strong>Scale</strong> <strong>Trains</strong> - May/June ’08
Fine Tuning the Golden Gate Depot<br />
B&O Pullman<br />
Edward F. Bommer<br />
1<br />
Golden Gate’s 12-1 B&O Pullman St. Angele, fresh out of the box. The prototype St. Angele was a Plan 3410 car built early in 1924. Originally Pullman green, it had<br />
blue and gray paint by 1951.<br />
Highly detailed passenger cars in O <strong>Scale</strong> have nearly always<br />
been limited to custom built models. In the 1930s, kits consisting<br />
of milled wood, stamped metal or pressed cardstock sides,<br />
and cast soft metal parts were introduced. More rare from that<br />
time were a few heavy, expensive cast aluminum cars.<br />
The next development in O <strong>Scale</strong> passenger car kits came<br />
in the 1980s, when Ralph Brown introduced a line of cast urethane<br />
heavy-weight cars under the American Standard name.<br />
These kits offered much better detailing. In their time, these<br />
cars became the gold standard for well-detailed, heavy-weight<br />
passenger car kits. Imported brass passenger cars became<br />
available too. They were expensive, delicate and heavy.<br />
The long-awaited, moderately-priced, ABS plastic O <strong>Scale</strong><br />
12 section 1 drawing room Pullman cars from Golden Gate<br />
Depot arrived last October. They come finished in several railroad<br />
liveries as well as Pullman green. Golden Gate Depot’s<br />
12-1 Pullman is the first sleeper done in ABS plastic. These<br />
Plan 3410 Pullmans were among the largest group of cars<br />
operated, numbering nearly 4,000 units. Photo 1 shows Pullman<br />
St. Angele in B&O blue and gray right out of the box.<br />
The prototype St. Angele was built early in 1924. Originally<br />
Pullman green, it had blue and gray paint by 1951. The B&O<br />
owned 61 of these 12-1 cars following Pullman’s re-structuring<br />
of the late 1940s. Four other 12-1 cars from Pullman’s pool<br />
were also assigned to B&O use, including the Amsterdam.<br />
Shown in Photo 2.<br />
The B&O’s blue and gray passenger paint job is not easy to<br />
do well, yet it has been done nicely on models in other scales.<br />
This car has some quality control problems. The alignment<br />
of the gray band over the doors is poor and the striping is too<br />
wide. However, the colors Golden Gate used are good. The<br />
Band O Blue is very close to Floquil’s B&O Blue and the Gray<br />
is reasonably matched by Floquil’s Primer which is a bit too<br />
light. The slightly darker D&H Gray would be closer. While<br />
Floquil paint is a close match, the car has a satin finish. Touchup<br />
work will need some Gloss Coat to help it blend in.<br />
The road name and car lettering use accurate fonts. Car<br />
names Golden Gate selected for their B&O Pullmans include:<br />
St. Angele, McCluney, McElrath and McHarg. All are accurate<br />
for B&O 12-1 standard Pullmans with air conditioning.<br />
The car rolls effortlessly on sprung, Pullman type 2411 bottom-equalized<br />
trucks; whereas many of the prototype 12-1 cars<br />
rode on type 242 top-equalized trucks. The Pullman 242 truck<br />
has not been available in O <strong>Scale</strong> since Lobaugh’s cast bronze<br />
offering of the early 1940s. The car’s doors are made so they<br />
can be pushed open, with a torsion spring inside to shut them.<br />
The doors are short, with a rather high vestibule drop-plate.<br />
There is a significant gap between the drop-plate and door<br />
bottom (Photo 3).<br />
An American Standard cast urethane 12-1 built from a 1980s kit. It is finished<br />
as Pullman’s Plan 3410-B Amsterdam, with top-equalizer trucks. This car was<br />
among the last heavy-weights built new in 1930.<br />
In spite of its flaws, the 12-1 Pullman is a good car for the<br />
price. With a little work here and there it can become a better<br />
one.<br />
To begin, first remove the car steps. Then remove the two<br />
screws that hold the car end to the floor. Gently pull down to<br />
lift off the car end. I took off Golden Gate’s diaphragms and<br />
installed a set from Keil Line, then added floor plates to them<br />
after I finished with the other work. The floor plates were made<br />
On the left, an early 1940s Walthers combine with the Golden Gate Pullman.<br />
Notice that shiny, silver prism window?<br />
2<br />
3<br />
May/June ’08 - O <strong>Scale</strong> <strong>Trains</strong> • 21
from an aluminum soft drink can, following the dimensions<br />
given in Fig. 1. Bend the floor plate 90 degrees along the dotted<br />
line and cement the short edge to the inside of the dia-<br />
an X-Acto blade, smooth the snapped-off area along the car<br />
end’s inner wall. Cut a tiny notch 3/32” wide to match the<br />
lowered floor line on the car end’s inner corner posts. Smooth<br />
the saw cuts along the floor plate’s top edges. This done, fit a<br />
0.080” thick styrene filler into the floor plate. It is 3/4” wide<br />
and 15/32” deep. Chamfer the bottom sides and end. Test fit<br />
it in the car end floor pocket. It should be snug and level with<br />
the top edges.<br />
Next, make a new vestibule floor sheet with 0.030” styrene.<br />
The outline and dimensions for it are shown in Fig. 2.<br />
Test fit the filler piece and the floor sheet before cementing<br />
them together and into the car end. Photo 5 shows how the<br />
two pieces fit together. In Photo 6 the new floor is installed on<br />
the vestibule, with the 0.080” filler on the bottom. The floor<br />
is made so that the outer ends will extend a little beyond the<br />
doors, like prototype drop-plates. This part provides a fullwidth,<br />
flat vestibule floor.<br />
Fig. 1- Diaphragm floor plate, made from an aluminum soft drink can.<br />
Bend 90 degrees along dotted line. Cement short edge to inside of<br />
diaphragm striker plate. Paint to match vestibule floor. Diagram is not to<br />
scale. Use dimensions given.<br />
phragm striker plate. Paint to match vestibule floor.<br />
Take off the doors by pulling out the long brass hinge pin.<br />
Do not to lose the torsion springs, and note that they are right<br />
and left-handed. Now for some corrective surgery which will<br />
lower the vestibule drop-plate floor. Remove the existing dropplate<br />
detail from the car end casting by scoring the drop-plate<br />
edges along the car end, top and bottom. Then, score a line<br />
that is 3/32” down from the top edge of the drop-plate on each<br />
side of the center pocket. Carefully cut along this line with a<br />
razor saw. Bend and snap off the drop plate (Photo 4). With<br />
4<br />
Fig 2- Vestibule floor sheet. This diagram is not to scale. Follow<br />
dimensions given.<br />
The floor is made so that the outer ends will extend a little beyond the<br />
doors, like prototype drop-plates. The 0.080” thick car end filler piece is<br />
on top here. This part provides a full-width, flat vestibule floor.<br />
5<br />
6<br />
Original drop-plates<br />
trimmed off and car end<br />
notched. The new floor<br />
will be level with the end<br />
opening.<br />
New vestibule floor and filler piece in place.<br />
This should make the surface of the new floor close to that<br />
at the car end opening. Coupler mounting holes should now<br />
be drilled, using the car end casting as a pattern. You may<br />
wish to pre-paint the new vestibule floor and the exposed area<br />
underneath where the steps mount so it will match your car.<br />
Rather than re-mounting the steps with the screws, I chose<br />
to cement them in place. Scrape the paint off the top edge and<br />
back of the steps, as well as the area on the drop-plate and car<br />
22 • O <strong>Scale</strong> <strong>Trains</strong> - May/June ’08
end where the steps fit to ensure a good bond.<br />
Next, install some angled door headers on the underside of<br />
the car roof. They are 1/16” on the outer side and about 3/32”<br />
on the inner side, because of the roof angle. They fit between<br />
the car body and car end and are painted the same color as<br />
7<br />
8<br />
Relocated grab iron details on car body and end. Check that both top and<br />
bottom details are in line with and opposite each other.<br />
9<br />
Door header strips cemented to the car roof. Always scrape off the paint<br />
before cementing on a new part.<br />
the car side (Photo 7). Because the door will now be about<br />
1/16” lower, carefully trim 1/16” from the bottom of the door’s<br />
lower hinge and cement that on top of the top door hinge. Test<br />
fit to be sure the door will go in without binding.<br />
Re-install the car end. Measure the gap between the bottom<br />
of the car door and the top of the drop-plate. Cut and cement<br />
a piece of styrene to the door bottom to close this gap. You<br />
may need to use a bit of filler for the seam. Sand it smooth and<br />
touch up with matching paint. It helps to take the doors off the<br />
car to do this. For the doors to open and close there should be<br />
about 1/64” of clearance between the door bottom and top of<br />
the drop-plate. Take care when re-installing the torsion springs,<br />
so their ends lie flat against the door and the vestibule wall.<br />
Remember, the springs are right and left-handed.<br />
To fit longer, finer, handrails and grab irons pull off the<br />
original handrails and carefully slice off the lower handrail<br />
detail on the car ends and carbody. Cement these parts so the<br />
new holes are in line with the vestibule floor (Photo 8). Plug<br />
the original holes, touch up the paint and drill new ones for<br />
whatever diameter of brass wire you use. In O <strong>Scale</strong>, 0.022”<br />
is about 3/4”; 0.025” is 7/8” and 0.028” is about 1” diameter.<br />
Fit the new handrails and grab irons in place, and paint to suit<br />
your car’s livery.<br />
For an optical illusion that seemed to help the wide B&O<br />
striping look a bit thinner, I painted the header strip over the<br />
Pullman’s windows gray, just as the B&O did. The gray band<br />
and striping over the doors was corrected and extended to<br />
include the car corner posts as the B&O did. Champ decals for<br />
“Watch Your Step” were added, as well as a 1/32” black decal<br />
A Walthers office car from 1956 and the modified Golden Gate Pullman.<br />
10<br />
The ‘tuned’ and modified B&O Pullman so far. Yes, the other end still needs to<br />
be done!<br />
stripe for the “Dutch door” seam (Photo 9). Because I had<br />
to disassemble the car to repair a staved-in window, I added<br />
shades made from ribbon. This helped take away that empty<br />
hulk look of the car (Photo 10).<br />
The shiny silver prisms in the rest room windows didn’t look<br />
right. Real ones were leaded glass with dark, almost black outlines.<br />
The silvery prisms are overlays that are easily snapped<br />
off. New prisms were printed on transparency film, which was<br />
hazed over by rubbing with fine sandpaper on the back side,<br />
then installed. Three prisms were added for windows where<br />
they were missing (Photo 11, next page).<br />
There is more that could be done on this Pullman concern-<br />
May/June ’08 - O <strong>Scale</strong> <strong>Trains</strong> • 23
11<br />
The American Standard sleeper and modified GGD Pullman together. Perfect?<br />
No. American Standard doors are a little too narrow and long. The GGD doors<br />
are a bit wide. Even prototype passenger cars had some differences.<br />
12<br />
The American Standard sleeper and modified GGD Pullman together. Perfect?<br />
No. American Standard doors are a little too narrow and long. The GGD doors<br />
are a bit wide. Even prototype passenger cars had some differences.<br />
ing the drip rails on the roof; adding end details such as steam<br />
lines, air hoses, uncoupling rods, safety chains and end gates<br />
to further enhance it. But does this B&O Golden Gate Pullman<br />
now look better? Yes, indeed! (Photo 12)<br />
u<br />
Beaver Creek Station<br />
laser cut wood, the industries finest plaster castings,<br />
reasonably easy assembly...<br />
overall footprint is 6 1/2” x 10”<br />
#6040 O scale $89.95<br />
www.bantamodelworks.com<br />
421 Hopkins Road<br />
Dummerston, VT<br />
05301<br />
800-653-8214<br />
24 • O <strong>Scale</strong> <strong>Trains</strong> - May/June ’08
In Living Color...<br />
As a maturing modeler, this Hobo remembers when the first<br />
television sets came out. They had a small screen that featured<br />
black and white images with a lot of snow depending on your<br />
signal strength, the antenna you were using, and electrical interference.<br />
When color televisions were introduced they came<br />
with what the manufacturers called ‘living color,’ which offered<br />
degrees of the colors of the rainbow-violets, indigoes, blues,<br />
greens, yellows, oranges, and reds. NBC’s famous peacock with<br />
its colorful tail soon became an icon. The contrast between black<br />
and white sets and the new color televisions was incredible and<br />
well received. Color does make the difference and this rule also<br />
applies to model railroading.<br />
We tend to model certain time periods. For example, for<br />
those who choose the eras of the ‘30s, ‘40s and ‘50s (glory days<br />
of steam), the colors represented from those times differ greatly<br />
from those of modern times. The bright eye-catching colors of<br />
today certainly are out of place with model railroads of times<br />
gone by. Most of today’s color schemes just don’t fit into the realistic<br />
modeling colors of the past. Almost every building during<br />
the steam era was weathered either by the elements of time, or<br />
the smoke and fall-out from the industrial revolution. Coal was<br />
king. And in addition to being used for locomotive fuel, it was<br />
used for heating in homes and factories. Coal meant soot and lots<br />
of it. This was the time of the great American industrial revolution<br />
and smoke was everywhere. The result and colors by default<br />
were dark and drab. This was pre-EPA and there were no rules<br />
and regulations concerning smoke, ash, and soot. That caused<br />
a universal weathering to almost every standing structure of the<br />
time. When modelers consider painting and weathering buildings<br />
of this time period, they must take into account the reality of the<br />
time. For realistic modeling some suggestions and guidelines are<br />
in order to get it right.<br />
Start with the basic four colors: flat black, flat gray, flat white<br />
and rust. These are great primer colors for realistic modeling of<br />
structures. These colors are what I have found to be the foundation<br />
of realistic model painting. Every master modeler has their<br />
time tested approach. I suggest that all projects need to start<br />
with these basic colors. You will be amazed that using flat black<br />
as a primer will add to the depth of the final color coat. In the<br />
same regard, using flat white as a primer will give a very different<br />
depth to the same final color. Experimentation will provide lots of<br />
combinations and quite acceptable results. That is the rewarding<br />
aspect of giving attention to color detail.<br />
After applying the color primers, the next stage would be the<br />
choice of color for the final top coats. Grays abounded everywhere<br />
back in those days. Trim was limited to ‘weathered’ white<br />
with a few shades of green and brown. Many buildings of the<br />
time were lucky to get an original coat of paint. Times were<br />
tough and colors, as well as futures, were not bright. Most money<br />
was used for food and not paint. Pretty color was considered a<br />
luxury. Life in the Great Depression was indeed depressing, and<br />
was reflected in the lack of colors used during that time.<br />
Wood siding abounded everywhere since wood was a plentiful<br />
and economical material. Whether board and batten or<br />
clapboard, the siding always showed signs of holding up against<br />
the elements. Many wood structures standing at the time were<br />
built in the previous century and although they were structurally<br />
sound, they usually displayed dark colors with lots of browns,<br />
grays, and blacks. Weathered wood was very prevalent during<br />
steam times. Faded red brick buildings were always common in<br />
the towns and villages. Again, they were subjected to smoke and<br />
soot and, of course, Mother Nature.<br />
Color photographs of the time period are quite rare, but<br />
those available uphold these observations. Old original movies<br />
of that time show the same color schemes of rust and brown<br />
brick color, cement tans and grays, and the faded and weathered<br />
wood tones. Hollywood movies of the time captured the mood<br />
and color tones in many of the classic films of the past. Even<br />
modern films featuring themes of that period are helpful in that<br />
producers attempt to paint the scenes as realistically as possible.<br />
After studying the buildings and architecture in the films, it soon<br />
becomes apparent that “brand new” and “shiny” are words that<br />
were not part of the vocabulary of the past. Instead, dust, grime,<br />
and dirt are very much a part of this era and as we consider serious<br />
realistic modeling, we need to remember them.<br />
Let’s get back to the painting. After you have applied the<br />
undercoat and top coat colors, the final step would be to use<br />
modeling washes to achieve the look that we have been discussing.<br />
This hobo notes that even though alcohol was outlawed during<br />
Prohibition, it will play a very important role in achieving the<br />
desired result. Start with about a quarter cup of rubbing alcohol<br />
in a small container with a lid. Add a couple of drops of India ink<br />
or flat black acrylic paint to the liquid until the alcohol has just a<br />
little color. This is the light wash. Now, do the same with some<br />
other basic colors like tan, brown, gray, and white and you will<br />
have a set of light color washes.<br />
The next step Hobo suggests is that you go back and repeat<br />
the alcohol with the added color mixtures. This time add twice as<br />
much color to the mixtures and this will produce a darker wash.<br />
This will be the medium wash.<br />
Applying the washes can be done with a brush or a common<br />
spray bottle. Apply several light washes and wait until the coat<br />
is dry before adding another application. Use different combinations<br />
of color washes. Use some light and some medium. Apply<br />
colors at random. Nature weathers at random. As the washes<br />
dry you will notice that the structure’s appearance is greatly<br />
enhanced and looks very realistic for this time period.<br />
Congratulations! You now have produced some living color<br />
that will certainly make your model railroad come alive. u<br />
May/June ’08 - O <strong>Scale</strong> <strong>Trains</strong> • 25
Are You<br />
Expired?<br />
Your subscription<br />
expiration is now<br />
printed on your<br />
mailing label!<br />
Kit-bashed Grain Elevator<br />
www.modelbuildingservices.com<br />
Model Building<br />
Services<br />
Models built by Stu Gralnik<br />
264 Marret Rd • Lexington MA 02421<br />
Ph: 781-860-0554<br />
stu@modelbuildingservices.com<br />
Assembled buildings<br />
from any manufacturer’s kit.<br />
Kitbashed, painted and<br />
detailed...<br />
“Just Like Real!”<br />
26 • O <strong>Scale</strong> <strong>Trains</strong> - May/June ’08
1<br />
3<br />
Railroad Flatcars<br />
Flatcars are an important part of the current railcar fleet. As<br />
freight cars have evolved to meet the needs of customers and<br />
the transport of various commodities, so have changes occurred<br />
to the flatcar. This basic car (a rectangular wooden floor mounted<br />
on a steel frame, complete with couplers, trucks and a brake<br />
system) has been stretched, depressed in the center, had side<br />
posts and rails added; also had end bulkheads and multiple<br />
platforms added; been enclosed, as well as other modifications<br />
that do not currently come to mind.<br />
Photo 1 shows train M-BIRTUL1-05A at Palos, AL with two<br />
BNSF 60 ft. flats, each loaded with a Komatsu HM400 articulated<br />
Dump Truck. Typically, flatcars are used to move loads of<br />
this type, as well as materials and vehicles that cannot be transported<br />
in other types of railcars.<br />
Photos 2 - 3 show more of the details of these two cars. Take<br />
notice of the chains and come-a-longs used on each vehicle to<br />
anchor it to a tie-down channel that runs the length of the car.<br />
Cribbing and blocking have been installed fore and aft of the<br />
vehicles wheels to prevent undesired movement, and when<br />
required, blocking will be placed to prevent lateral movement.<br />
After these loads were secured and inspected to insure they<br />
meet all Federal and Rail System guidelines, they are ready to<br />
be moved with the addition of the last detail: authorization and<br />
paperwork.<br />
If you look carefully at the photos, you will notice that the<br />
vehicle’s wheels extend beyond the sides of the flatcars. As a<br />
2<br />
result, these two flats are classified as oversize loads or High-<br />
Wides. On the BNSF system a High-Wide shipment requires<br />
the train crews to have paperwork detailing the size and<br />
dimensions of the shipment as well as the authorized route of<br />
movement. A High-Wide clearance will have detailed information<br />
and instructions for the train crew regarding areas of<br />
close clearance, required actions, and specified routing for the<br />
load and the proper placement restrictions, which will usually<br />
require these loads to ride at the head-end of the train so the<br />
crew can monitor them while in transit.<br />
To complete the story of these two High-Wide loads, they<br />
were received in interchange at Birmingham off the Norfolk<br />
Southern Railroad from the East coast. The cars were then<br />
moved by the BNSF to a location outside of the Tulsa, OK area<br />
where they were delivered to the customer for unloading. Once<br />
unloaded, the flats were returned to their respective Fleet Pools<br />
for their next assignment.<br />
In adapting this prototype practice to the arena of modeling,<br />
we’re taking a somewhat different approach. If you will look<br />
elsewhere in this issue, you will find the article “Modern Loads<br />
for the Weaver Flatcar” (page 29). This article developed around<br />
the theme of this column; while the loads and tie-down methods<br />
are different, the concept remains the same.<br />
As O <strong>Scale</strong> modelers we have a variety of flatcars to choose<br />
from. There are the old AHM 40 ft. flats, the Weaver, Lionel<br />
and MTH 50 ft. flats, as well as kit built cars from Lykens Valley<br />
and Quality Craft, Brass models from Pecos River and others;<br />
and let’s not forget the 89 ft. flats from AtlasO. The possibility of<br />
loads for these cars is the modeler’s option, as a look through<br />
the eBay listings for 1:48 and 1:50 diecast vehicles will reveal.<br />
Scratchbuilt loads are another possibility, as well as pipe loads<br />
of 75 or 80 ft. sections for the 89 ft. flatcars.<br />
The next time you are out and see a train passing by with<br />
loaded flatcars, take note of these loads and how they are<br />
continued on next page<br />
May/June ’08 - O <strong>Scale</strong> <strong>Trains</strong> • 27
secured to the flat. Even better, take photos<br />
to aid you in modeling the details that<br />
you may not remember. Articles concerning<br />
this subject matter have been printed<br />
in many publications over the years, covering<br />
the various eras of railroading; so do<br />
a little research when you have the time.<br />
Last, but not least, we’re trying something<br />
new at OST. We’re making a path<br />
to put you, the reader, in touch with<br />
the author to pass along comments, ask<br />
questions, exchange ideas and see and<br />
read information that didn’t make the<br />
articles. Since you have read this column,<br />
now you will be able to go to the OST<br />
Web site at [www.oscalemag.com], then<br />
scroll down and click on the OST Blogs.<br />
On the right side of the Blogs page, click<br />
on Categories and then go to Gene’s Projects.<br />
You should then find the heading<br />
“Modern Loads for the Weaver flatcar”.<br />
Feel free to post your thoughts, ideas, or<br />
questions, as it would be my pleasure to<br />
respond.<br />
So, until next time,”Roll’em”. u<br />
BF&M<br />
Baldwin Forge & Machine<br />
Box 5, Baldwin MD 21013<br />
How can we help you? Custom machine<br />
work, 3-R to 2-R conversions for steam,<br />
diesel or electric. Driver castings<br />
machined. General repairs to O <strong>Scale</strong> locomotives.<br />
Call Joe, evenings 7 to 9 PM.<br />
410-592-5275 or rrjjf@aol.com<br />
Lackawanna “Phoebe Snow”<br />
Double-Sheathed Boxcar<br />
3-Rail (8314) 2-Rail (9314)<br />
$47.95* $51.95*<br />
Special<br />
Runs<br />
Exclusive<br />
Philadelphia Quartz<br />
70 Ton Hopper<br />
3-Rail (8377)<br />
$51.95*<br />
2-Rail (9377)<br />
$54.95*<br />
Show off your railroad with a wireless video<br />
camera. Capture the Engineer’s view of<br />
your railroad and share the pictures with<br />
the railroad<br />
community. A<br />
Complete line of<br />
wireless camera<br />
and receivers start<br />
at $66.95<br />
Now Available!<br />
Field parts for your interlocking<br />
tower: pipe carriers, crank stands and<br />
cranks. Visit our web site for details.<br />
*Shipping:$6.95 for<br />
1 or 2 cars<br />
$7.95 for 3 or 4 cars<br />
Additional Atlas O Special Runs Coming Soon:<br />
Oppenheimer Sausage 36’ Reefer<br />
Boston & Maine Trainman Box Car<br />
PayPal<br />
am-hobbies.com<br />
Peter Peerbolte Onion Sets<br />
40’ Reefer<br />
3-Rail (8191) 2-Rail (9191)<br />
$59.95* $62.95*<br />
6 Delmar Ridge Drive • Wellsboro, PA 16901<br />
(570) 723-1824<br />
All items above are<br />
available in two road<br />
numbers<br />
amhobbies2@hotmail.com<br />
The Irish<br />
Tracklayer<br />
2682 W. Palo Alto Ave<br />
Fresno CA 93771<br />
www.irishtracklayer.com<br />
28 • O <strong>Scale</strong> <strong>Trains</strong> - May/June ’08
Modern Loads for<br />
the Weaver Flatcar<br />
Gene Clements<br />
I’m sure there are O <strong>Scale</strong> modelers out there like myself,<br />
who have been operating empty Weaver flatcars on their layouts.<br />
Well, empties don’t produce revenue for the carrier and<br />
a flatcar with a custom load is much more interesting.<br />
Let’s begin this project by taking your Weaver flatcar and<br />
completing it to the standards for your layout. In my case this<br />
was the installation of Kadee® #805 Couplers, Intermountain<br />
33 inch metal wheelsets, and Microscale’s ACI & Lube plates.<br />
Don’t forget to install the handbrake in the lowered position<br />
(Photo 1).<br />
1<br />
for a dusting of the cars. Brian Scace had a good article on<br />
weathering flatcar decks in OST #34, page59, that you might<br />
check out for further tips.<br />
Step 3 would be the selection of the loads for your flatcar.<br />
I used two versions of the 1:50 scale John Deere tractors by<br />
Athearn and two versions of the 1:48 scale, Military Hummers<br />
by Classic Armor, all of which were purchased at my local<br />
Wal-Mart (Photo 2).<br />
2<br />
Step 2 is to weather the car, either lightly or heavily; it’s<br />
your option. I varied the weathering on each of my cars using<br />
gray and oxide primers, as well as flat black aerosol spray<br />
paints. The spray job was either reflected off a piece of cardboard<br />
or directly sprayed from a distance that would allow<br />
Now the hard work begins. Make a light pencil line on the<br />
floor of the car from end to end and side to side showing the<br />
centerline and middle of the car. Now we need to measure<br />
the length and width of the vehicle’s wheelbase to determine<br />
the placement of the blocking and chocks (Photo 3). Once we<br />
have the dimensions in hand, do a little math to calculate how<br />
to space the loads equally. Once your spacing is determined,<br />
draw a light pencil line down the length of the cars, marking<br />
the outside point of the vehicle’s wheels. Now do the same for<br />
the width of the flatcar for the placement of each vehicle.<br />
Step 4 is the fabrication and attachment of wheel blocks<br />
and chocking. I made all my chocking and blocks from scrap<br />
May/June ’08 - O <strong>Scale</strong> <strong>Trains</strong> • 29
3<br />
6<br />
balsawood that was on hand. This is done on the prototype<br />
by using any size lumber available from 2x4s up to custom<br />
cut 12x12s. With your blocking and wheel chocks ready, CA<br />
these to the flatcar deck in the appropriate locations (Photo 4).<br />
4<br />
small brass wire bent in a “U” shape and attached with CA to<br />
secure the ends of each cable. A final paint detail is to paint<br />
the cable clamps silver to simulate new clamps, or a rust color<br />
to simulate old clamps (Photo 7).<br />
7<br />
I went for the look that these cars were in assigned service to<br />
each manufacturer. Once the vehicles were driven off the flatcars,<br />
they are returned to the same manufacturer for reloading.<br />
Prior to moving on to Step 5 you may want to do a little<br />
extra weathering to hide your pencil marks.<br />
Step 5 is the mounting and tie-down of your vehicles.<br />
Builders in <strong>Scale</strong> chain can be used (I’m still looking for<br />
mine), or a heavy gauge black sewing thread will simulate<br />
steel cables. I found it easier to mount the center vehicles first<br />
(Photo 5), complete the tie-downs, then move on to the vehicles<br />
on the ends. I used an X pattern for the tie-down cables<br />
on the front and rear axle of each vehicle to eliminate lateral<br />
motion (Photo 6). I also tried different methods of securing the<br />
cables to the car’s deck. I began by using the car’s side stake<br />
pockets and changed to using brass wire bent in a “U” shape,<br />
attached to holes drilled in the car deck that simulate anchor<br />
brackets welded or mounted to the deck of the car.<br />
Step 6 is the final details and touchup. Cable clamps are<br />
5<br />
You should now have a completed car ready for revenue<br />
service. But first, a few things to consider: You could add<br />
scrap chocking and tie-down cables, as this is common debris<br />
found on flatcars. The weight of these cars now exceeds the<br />
recommended minimum and placing the load along the centerline<br />
of the car is critical for proper balance. Stay realistic;<br />
don’t overload your flatcar with a load heavier than the car is<br />
designed to carry. The heavier and more unstable the load,<br />
the more it will need to be secured.<br />
Loads were added to each of these three flatcars at a cost<br />
of less than twenty dollars each. The time involved completing<br />
a single car was two evenings or more if you start with a new<br />
car out of the box. For skill level, a little experience working<br />
with modeling tools will help. Your satisfaction will be very<br />
high, knowing that you have a custom loaded flatcar that you<br />
created yourself.<br />
While writing this article, the idea hit me to create an<br />
empty pool flat complete with old cribbing, chock blocks and<br />
cables or chains returning to manufacturer to be reloaded. I’ll<br />
throw this idea out to the guys in the train crew lobby and see<br />
what they think. Until the next time, “Have Fun.” u<br />
30 • O <strong>Scale</strong> <strong>Trains</strong> - May/June ’08
Roger Bernier of Plainville, Connecticut, sent this photo of a reefer he built using paper car sides from the<br />
January 1949 issue of Model Railroader. Roger says he has a large supply of older back issues and he goes<br />
through them periodically looking for new cars to build. This car has a basic body made of basswood with metal<br />
fittings from Bowser and Athearn trucks.<br />
NEW from SILFLOR ® ,<br />
Buffalo Grass Tufts... These new tufts have young<br />
seasonal tone grasses growing at the base with last years<br />
longer dead and dry growth sprouting from the center.<br />
Tufts are mounted on an invisible base using the secret<br />
SILFLOR ® process that causes the tuft to stand up and<br />
feather outward. Tufts may be placed individually or<br />
peeled off in random clusters.<br />
Bob Dupont of San Mateo, California, sent this photo of a wheel and tie car that he scratchbuilt for his Tall Pine<br />
Timber Company. The car is standard gauge. We featured Bob’s layout in OST #15.<br />
175 Sheffield Dr, #100, Delmont PA 15626 • 724-468-3106<br />
Order On-Line: www.scenicexpress.com<br />
May/June ’08 - O <strong>Scale</strong> <strong>Trains</strong> • 31
UNION PACIFIC HERITAGE SERIES<br />
MSRP: $229.95<br />
In July 2005, Union Pacific Railroad announced that they would be decorating six special locomotives to<br />
honor the people and the companies of the major railroads that had merged with UP. Each locomotive<br />
number signifies the year that the railroad became a part of the Union Pacific system. All new for 2008.<br />
See your Williams dealer to purchase one today!<br />
LOCO SPECS:<br />
• 6 wheel power trucks with traction tires<br />
• Powered by dual motors<br />
• Flywheel coasting action<br />
• All metal gears<br />
• Electronic 6-AMP reverse board<br />
• True Blast II digital horn & bell<br />
• Durable ABS plastic shell<br />
• Die-cast trucks, truck sides & pilots<br />
• Die-cast operating couplers<br />
• Dual Lights<br />
• Sturdy stamped metal handrails<br />
MICRO-PRINTED WARNING SIGNS<br />
UNION PACIFIC -<br />
BUILDING AMERICA<br />
Item No. 21816<br />
MISSOURI PACIFIC -<br />
HERITAGE LOCO<br />
Item No. 21810<br />
WESTERN PACIFIC -<br />
HERITAGE LOCO<br />
Item No. 21811<br />
M-K-T “THE KATY” -<br />
HERITAGE LOCO<br />
Item No. 21812<br />
RIO GRANDE-<br />
HERITAGE LOCO<br />
Item No. 21813<br />
CHICAGO & NORTH WESTERN -<br />
HERITAGE LOCO<br />
Item No. 21814<br />
SOUTHERN PACIFIC -<br />
HERITAGE LOCO<br />
Item No. 21815<br />
Products bearing: Chicago and North Western, Denver & Rio Grande, Missouri-Kansas-Texas, Missouri Pacific, Pacific Fruit Express, Southern Pacific, Texas & Pacific,<br />
Union Pacific, Western Pacific, associated abbreviations, marks, and slogans are made under trademark license from Union Pacific Railroad Company.<br />
Bachmann Industries, Inc. • 1400 East Erie Avenue, Philadelphia, PA • www.bachmanntrains.com<br />
32 • O <strong>Scale</strong> <strong>Trains</strong> - May/June ’08
Brick Pillars.<br />
Making brick pillars is easy using my<br />
method. First decide what size pillar you<br />
need and select a piece of styrene that<br />
matches that size. Then bend plastic<br />
brick-sheet around the piece of styrene,<br />
one side at a time, until the glue dries. I<br />
use German “Faller” glue but any styrene<br />
glue is acceptable. The brick sheet I use<br />
is either Model Builder Supply (Canadian)<br />
or Slaters Plastikard (British). Both are very<br />
good and accept styrene glue easily. u<br />
Clamp the newly bent side.<br />
Plastic brick sheeting.<br />
Check frequently<br />
to make sure the<br />
column is square.<br />
Use as many clamps as needed.<br />
Finished pillar.<br />
Glue one side, then scribe the next side<br />
before bending.<br />
http://RailsUnlimited.ribbonrail.com/<br />
email: railsunl@sbcglobal.net<br />
“We take time to give you full service”<br />
Unique O <strong>Scale</strong> models • Urethane cars; 40’ & 50’ boxcars, reefers,<br />
stock cars, milk cars, pickle car & circus cars.<br />
Full Service O <strong>Scale</strong> Dealer • Kits, DCC & Sound Supplies<br />
Books: new & out of print • Darkroom Services • Railroad Photos<br />
Model Railroad Sales & Service<br />
Ted Schnepf<br />
126 Will Scarlet<br />
Elgin Il 60120-9524 847-697-5353 or 847-697-5366<br />
Stevenson Preservation Lines<br />
O Gauge Kits and Parts from past<br />
Master Modelers<br />
Catalog 2005 Price: $3.00<br />
Baldwin Model Locomotive Works<br />
Lobaugh<br />
Adams & Sons<br />
Lenoir<br />
Kansas City Kit<br />
Hines Lines<br />
Alexander<br />
Pearce Tool Co.<br />
Bob Stevenson, 2326 230th St. Ames, IA 50014<br />
May/June ’08 - O <strong>Scale</strong> <strong>Trains</strong> • 33
Custom Building, Repair & Painting Services Available Buy-Sell-Trade, Consignments-Appraisals, eBay Sales<br />
Website: www.alleghenyscale.com • Email: oscale@alleghenyscale.com<br />
470 Schooley’s Mountain Road, Suite 8-117, Hackettstown, New Jersey 07840 • Voice - (908) 684-2070 • Fax - (908) 684-8911<br />
Steam<br />
USH AT&SF 2-10-4 UP New, Late Run........................................................................$1,595<br />
OMI B&O S-1 2-10-2 UP New, OMI O147, Road Pilot, Overfire Jets.......................$1,350<br />
OMI B&O S-1 2-10-2 CP L/N, OMI O147, Road Pilot, Overfire Jets........................$1,150<br />
OMI C&O H8 2-6-6-6 Allegheny UP New, OMI O116, Late Version, #s 1645-1659$1,795<br />
Max Gray D&RGW L-131 2-8-8-2 UP New.................................................................$1,795<br />
Westside NYC J1e Hudson 4-6-4 UP Mint, Never Assembled ....................................$1,495<br />
Westside NYC J3a Hudson 4-6-4 UP New, As Built Version.......................................$1,495<br />
USH NYC L2a Mohawk 4-8-2 UP New........................................................................$1,095<br />
USH NYC L4b Mohawk 4-8-2 UP Mint, Never Assembled........................................$1,095<br />
Max Gray N&W Y6b 2-8-8-2 CP EX ............................................................................$1,550<br />
Weaver PRR A5s 0-4-0 FP New, Late Version, 1 of 12....................................................$695<br />
Gem PRR B6sb 0-6-0 CP V/G, Early Version ..................................................................$395<br />
PSC PRR B6sb 0-6-0 UP Mint, 2 Window Cab Version, PSC 15525..........................$1,295<br />
Key PRR H8sc 2-8-0 FP L/N, Test Run .........................................................................$2,395<br />
Key PRR H9s 2-8-0 FP New, Professionally Weathered...............................................$2,495<br />
Key PRR H10s 2-8-0 FP L/N, Test Run.........................................................................$2,495<br />
CLW PRR H10s 2-8-0 Kit UP New, Unbuilt Kit, Brass Drivers.....................................$495<br />
OMI PRR HH1 2-8-8-2 CP New, Test Run, 1 of 10......................................................$2,595<br />
USH PRR I1sa 2-10-0 UP Mint, Late Run, New Correct Driver Tires........................$1,495<br />
Westside PRR J1a 2-10-4 UP New .................................................................................$1,695<br />
USH PRR L1s 2-8-2 UP Mint, Late Run .......................................................................$1,195<br />
USH PRR L1s 2-8-2 CP L/N, Custom Modernized Front End....................................$1,295<br />
WSM PRR M1 4-8-2 UP L/N, No Backhead Detail, PSC Detail Kit.............................$975<br />
Max Gray PRR M1a 4-8-2 UP New, 210p75 Tender, Late Run...................................$1,195<br />
USH PRR M1a 4-8-2 UP New, 210p75 Tender.............................................................$1,195<br />
OMI PRR M1b 4-8-2 UP Mint, 210p75 Tender w/Antenna.........................................$2,495<br />
OMI PRR M1b 4-8-2 FP Mint, 210p75 Tender w/Antenna, No. 6753........................$2,595<br />
Max Gray PRR N1s 2-10-2 CP New, McCafferty Paint and Weathering....................$1,695<br />
WSM PRR Q2 4-4-6-4 UP New, KTM Japan ...............................................................$2,195<br />
Sunnyside PRR T1 4-4-4-4 FP Mint, Never Assembled, Modified Version................$4,895<br />
OMI RDG T1 4-8-4 UP Mint, W/Decals, OMI 0150....................................................$1,695<br />
USH UP 2-8-0 UP New, Late Run.....................................................................................$795<br />
Sunset UP Early Challenger 4-6-6-4 CP EX, Cockerham Drive, Road No. 3939.......$2,395<br />
Key UP FEF-3 4-8-4 FP L/N, Early Excursion, No. 8444, 1 of 10 ..............................$2,395<br />
Key UP FEF-3 4-8-4 FP EX, Gray w/Silver Stripes, Oil Tender, No Box...................$1,625<br />
Sunset UP 9000 Class 4-12-2 UP New...........................................................................$1,350<br />
USH USRA 0-8-0 Switcher UP New................................................................................$650<br />
Diesel<br />
OMI ALCO DL-600A UP New, OMI 0210 .....................................................................$695<br />
OMI ALCO FA-1 UP New, OMI 0356, w/o Dynamic Brakes (2 Available) .................$695<br />
OMI ALCO FB-1 UP New, OMI 0358, w/o Dynamic Brakes........................................$695<br />
OMI ALCO FA-2 UP New, OMI 0396, w/ Dynamic Brakes (2 Available)....................$695<br />
OMI ALCO RS-11 High Hood UP New, OMI 0206, w/ Dynamic Brakes....................$695<br />
OMI Baldwin AS-616 UP New, OMI 0<strong>38</strong>5......................................................................$750<br />
Oriental B&O EMD NW-2 Phase IV UP EX, Samhongsa..............................................$595<br />
OMI EMD E-7A UP New, OMI 0245, Small Number Boards.......................................$695<br />
OMI EMD E-8/9A UP New, OMI 0249, w/o Dynamic Brakes......................................$695<br />
OMI EMD F3A Phase II UP New, OMI 0289..................................................................$595<br />
OMI EMD F3A Phase III UP New, OMI 0290 ................................................................$595<br />
OMI EMD F3B Phase II/III UP New, OMI 0291 (2 Available) ......................................$595<br />
OMI EMD F3/F7A UP New, OMI 0292, F3 Phase IV - F7 Phase I/II (4 Avail.)...........$595<br />
OMI EMD F3/F7B UP New, OMI 0293, F3 Phase IV - F7 Phase I/II (4 Avail.)...........$595<br />
Oriental EMD GP-7 Standard Version UP New, Samhongsa .........................................$795<br />
Oriental EMD GP-7 Phase II UP New, Samhongsa ........................................................$795<br />
Diesel - cont’d.<br />
Oriental EMD GP-7 Passenger Version UP New, Roof Air Tanks, Samhongsa.............$795<br />
Oriental EMD GP-9 Standard Version UP New, Samhongsa ..........................................$795<br />
Oriental EMD GP-9 Passenger Version UP New, Roof Air Tanks, Samhongsa.............$795<br />
Oriental EMD GP-20 High Hood UP New, Samhongsa..................................................$795<br />
OMI EMD SD-7 UP New, OMI 0270...............................................................................$795<br />
OMI EMD SD-9 Phase I UP New, OMI 0306, w/Dynamic Brakes ...............................$795<br />
Oriental EMD SW-1 Switcher UP New, Samhongsa, Phase II and Phase III Available $695<br />
Sunset FM Trainmaster Phase IB UP Mint, Samhongsa..................................................$850<br />
OMI NKP Baldwin AS-16 CP New, OMI 0<strong>38</strong>9, Road No. 322, w/Fuel Tank...............$750<br />
OMI PRR ALCO DL-600B High Hood UP L/N, w/Antennas .......................................$795<br />
Key PRR EMD F7 A-B Units FP L/N, 1st run, Brunswick Freight, Samhongsa........$1,795<br />
OMI PRR P5a Electric - Box Cab UP Mint, OMI No. 0219, Last Run.......................$1,195<br />
OMI PRR P5a Electric - Modified UP New, OMI No. 0237........................................$1,095<br />
OMI UP ALCO U-50-C UP New, OMI 0201................................................................$1,195<br />
OMI UP ALCO C-855-A UP New, OMI 0203 .............................................................$1,295<br />
OMI UP ALCO C-855-B UP New, OMI 0204..............................................................$1,295<br />
OMI UP ALCO PA-1 UP New, OMI 0322, w/Dynamic Brakes (2 Available)..............$850<br />
OMI UP Veranda Gas Turbine UP New, OMI 0218, Round Tender............................$1,895<br />
Car Works CA&E, IT, and Indiana RR Cars UP New, Several Models Available ......... Call<br />
Rolling Stock<br />
Sunset 3rd PRR P70 Coach FP New, w/Air, Different Road Nos. (5 Available)............$250<br />
PSC PRR Parlor Car “Queen Mary” UP New, PSC No. 15665 ......................................$475<br />
PSC PRR 8-1-2 Heavyweight Sleeper UP New, PSC No. 15855-1, w/Air, Plan 3979A$425<br />
PSC PRR 12-1 Heavyweight Sleeper UP New, PSC No. 15397-1, w/Air, Plan 3410...$425<br />
PSC PRR 14 Sec. Hvywt Sleeper UP New, PSC No. 15399-1, w/Air, Plan 3958.........$425<br />
PSC Pullman Troop Sleeper/Kitchen Cars UP New, PSC # 16331 & 16333 Avail. ......$295<br />
Car Works Bucyrus Revolving Shovel UP New, Steam Powered, Straight Boom.........$595<br />
OMI B&M Wood Caboose UP New, OMI No. 0078, Vertical Brake Staff....................$295<br />
OMI B&O I-12 Bay Window Caboose CP EX, OMI No. 0019, Modern Version.........$200<br />
PSC NYC 30 Ft. Wood Caboose UP Mint, PSC No. 15437............................................$295<br />
Kohs N&W C2 Steel Cab FP Mint, Blue w/Safety Stripes, 1 of 10 Kohs No. C2-5.....$595<br />
Div. Point N&W CF Class Wood Caboose FP New, Late Version (2 Available)............$425<br />
CNJB PRR N5b Cabin Car w/Antenna UP New..............................................................$325<br />
OMI WM NE Steel Caboose UP New, OMI No. 0720....................................................$295<br />
PSC 40' Steel Reefer UP New, PSC Nos. 15517, 11597..................................................$185<br />
PSC 50' Composite Box Car UP New, PSC No. 15559, 1-1/2 Doors, Ajax Brake........$185<br />
PSC 50' Steel Box Car UP New, PSC No. 15463.............................................................$175<br />
PSC 70 Ton Covered Hopper UP New, PSC No. 15547, 8 Hatches, Closed Side .........$195<br />
PSC AAR 40' Steel Box Car UP New, PSC Nos. 15281, 15283.....................................$175<br />
PSC 50' Steel Box Car UP New, PSC No. 15641, Double Doors, Murphy Roof ..........$175<br />
PSC ACF 70 Ton Covered Hopper UP New, PSC No. 15049, 10 Roof Hatches...........$175<br />
PSC ACF 10,000 Gal. Tank Car UP New, PSC No. 15523..............................................$185<br />
PSC Composite Twin Hopper UP New, PSC No. 15009, 1942 Design..........................$175<br />
PSC PFE R-30-21 40' Steel Reefer UP New, PSC No. 16259, AB Brakes, Trucks.......$195<br />
Pac. Ltd. PRR H22 Quad Hopper UP Mint, PLTD No. PL-1950, 1 of 60......................$325<br />
KMW PRR Gla Twin Hopper UP Mint, S-Series w/ <strong>Scale</strong> Couplers, AB Brakes.........$325<br />
KTM USA PRR K-8 42' Stock Car UP Mint, KTM USA No. 234, Rare......................$425<br />
KTM USA UP 50'6 Steel Gondola UP Mint, KTM USA No. 404, Drop Ends, Rare...$325<br />
PSC USRA 55 Ton Twin Hopper UP Mint, PSC No. 15007...........................................$170<br />
KMW PRR Gla, H21, H25 Hoppers, & GS Gons UP Mint, Different Versions Available Call<br />
34 • O <strong>Scale</strong> <strong>Trains</strong> - May/June ’08
Buy⁄Sell⁄Trade<br />
Gem PRR B6 0-6-0, C/P or N/P, OB............................................. $575.00<br />
WSM PRR J1a, 2-10-4, C/P, OB................................................ $1,650.00<br />
WSM PRR M1, 4-8-2, C/P, Nice, OB......................................... $1,150.00<br />
Weaver Brass WP GS64 4-8-4, F/P, LN, OB................................ $795.00<br />
USH C&O 2-8-4, C/P, Runs good, OB....................................... $1,275.00<br />
USH PRR M1a, 4-8-2, C/P, OB.................................................. $1,275.00<br />
OM N&W J1, 4-8-4, War baby, New......................................... $1,995.00<br />
MG B&O 2-8-8-4, C/P, NOB...................................................... $1,995.00<br />
OM N&W Y3 2-8-8-2, N/P OB................................................... $1,895.00<br />
SS PRR I1 2-10-0, long tender, N/P, OB, new........................... $1,150.00<br />
MG PRR J 2-10-4, C/P, Icken gearsm NOB.............................. $1,895.00<br />
USH NYC H10, 2-8-2, Mint, N/P, OB........................................ $1,275.00<br />
USH NKP S-2, C/P, OB .............................................................. $1,250.00<br />
Gem PRR A5 0-4-0, C/P, NOB....................................................... $475.00<br />
OM #0543 UP SD60M, C/P. Lights, strobe, OB........................ $1,175.00<br />
OM SD70M Demo, F/P, LN, OB................................................ $1,675.00<br />
OM N&W C630 High Hood FM trucks, New OB.................... $1,195.00<br />
MG PRR G5 4-6-0, C/P, NOB....................................................... $950.00<br />
Jim Hackworth<br />
MODEL TRAINS<br />
(and Subsidiary JH Consulting)<br />
2631 Edgevale Road, Columbus OH 43221-1113<br />
Phone: 614-4514517 Fax: 6144514557<br />
Email: jhmtrains@msn.com • Web: www.jhmtrains.com<br />
• • • All Offers Cordially Considered • • •<br />
Consignments<br />
Joe Fischer(??) PRR R50b Express Reefer.................................. $200.00<br />
OM PRR PAPB Set, Late Run, F/P, New.................................. $2,875.00<br />
MG PRR N5 Caboose, N/P, OB..................................................... $250.00<br />
CB 2-bay ACF Centerflow C/P Chessie, OB................................ $275.00<br />
PRB 100T Cement Hopper, F/P SBD, New.................................. $295.00<br />
PRB 2-Dome GATX Tank Car, New............................................. $295.00<br />
OM ATSF Erie Built “B” Unit, F/P, New..................................... $899.00<br />
Weaver PRR N5c Caboose, LN, N/P, OB..................................... $350.00<br />
<strong>Scale</strong> Mod Ind Roundhouse kit..................................................... $195.00<br />
PRB 40’ Airslide F/P BN, New, OB............................................... $249.00<br />
PRB 60’ Greenville Boxcar F/P GT New...................................... $295.00<br />
OM 89’ TTX flat, C/P TTX Yellow, LN, OB................................. $275.00<br />
OM #0026 Tri-Level Auto Rack, Ptd, not Ltd, OB LN............... $495.00<br />
PRB Sealand Gunderson D. Stack, set, LN, OB....................... $1,395.00<br />
PRB 62’ Boxcar, F/P MP/UP, LN OB............................................ $295.00<br />
PRB BN Gunderson D. Stack, set, LN, OB............................... $1,395.00<br />
MG PRR N8 Caboose, N/P, NOB.................................................. $250.00<br />
Alco PRR N6a, C/P or N/P, each................................................... $225.00<br />
Layaway Available<br />
LSASE for Complete List<br />
Shipping 6% - $6.95 Min., $15.00 Max<br />
Ohio Residents Add 6.75% Sales Tax<br />
Estates⁄Liquidations<br />
Collection Reductions<br />
May/June ’08 - O <strong>Scale</strong> <strong>Trains</strong> • 35
BK ENTERPRISES<br />
All rail turnouts, crossings, curved<br />
turnouts, dual gauge, custom-built.<br />
TROUT CREEK<br />
ENGINEERING<br />
On3 wood freight car kits with<br />
plastic and metal fittings.<br />
CLASSIC MINIATURES<br />
Wood and cardstock structures with<br />
plastic and metal fittings.<br />
TRU-SCALE MODELS<br />
Wood milled roadbed O & On3<br />
For more info please send SSAE with 3<br />
stamps. Specify scale.<br />
Tru-<strong>Scale</strong> Models, Inc.<br />
12874 County Rd 314B<br />
Buena Vista, CO 81211-9102<br />
719-395-8076<br />
bktruscale@aol.com<br />
www.troutcreekeng.com<br />
<strong>38</strong> • O <strong>Scale</strong> <strong>Trains</strong> - May/June ’08<br />
VALLEY<br />
MODEL TRAINS<br />
PO BOX 1251, Wappingers Falls, N.Y. 12590<br />
Credit Card Orders Welcome<br />
Order/Info(845)297-<strong>38</strong>66 Fax(845)298-7746<br />
Laser-Art Structures O Laser Cut kits<br />
462<br />
Kit includes appropriate<br />
signs and coal bin.<br />
401<br />
A comfortable,<br />
convenient<br />
cottage home<br />
of six rooms,<br />
with Tower<br />
462 Flagstop Station O... 5" x 6" x 4" ............39.98 36.00<br />
401 Tower House O.. 10" x 7" x 12" .........179.99 161.98<br />
The prototype<br />
480<br />
for the kit was<br />
built at Clark’s,<br />
near Campbell<br />
Hall, NY on the<br />
New York,<br />
Ontario &<br />
Western RR.<br />
480 The Creamery O.....12" x 7" x 5".......199.98 179.98<br />
Crow River Products O....Crafstman kits<br />
Includes additional<br />
walls to increase<br />
the size of the<br />
main building.<br />
(Tree not<br />
included)<br />
305B<br />
305B Barrett and Sharp.16"x16" approx .....265.00 225.00<br />
315<br />
Bar Mills Models O.. Laser Wood Kits with details<br />
934 944<br />
934 Saulena's Tavern O.... 5 3/4" x 11" net 99.98<br />
944 Majestic Hardwar & Feed O 9” x 12”net 169.98<br />
Rusty Stumps.. HO Limited Edition Kits<br />
K4502<br />
O56<br />
The Fall Creek Freight Depot<br />
is a laser cut craftsman kit.<br />
22' x 46' Footprint 5-1/2x11-1/2<br />
K4503<br />
K4502 Backwoods Water Tower O .............net 79.95<br />
K4503 Fall Creek Freight Depot O... ..........net 69.95<br />
Downtown Deco.... O Limited Edition Hydrocal Kits<br />
The two buildings, Johnny Stechino's &<br />
Big Ed's, have a bit of something for everyone.<br />
Vehicle and figures not included<br />
This kit consists of CRP 305 Sylvester<br />
Supply Co. and the 305D Barrett &<br />
Sharp Diorama Kit.<br />
Includes 307<br />
Stainless Steel<br />
Industrial<br />
Smoke Stack<br />
and an<br />
Eyebrow<br />
Monitor for<br />
roof detail<br />
This kit makes an eye-popping diorama<br />
Twin Drum Hoisting<br />
Winch O… The hoisting<br />
unit is based on a unit<br />
built by American Hoist<br />
& Derrick. Although not<br />
an exact replica of the<br />
unit it's best features<br />
are included in this<br />
unpainted model kit.<br />
Sale 62.60<br />
Electric Winch / Car<br />
Puller O - 12.00<br />
40<br />
40 Johnny Stechino's & Big Ed's O ......89.95 81.00<br />
Add $6.00 S&H in 48 States • Others pay actual<br />
postage cost • N.Y. residents add 8.25% sales tax.<br />
(prices are subject to change w/o notice)<br />
www.valleymodeltrains.com<br />
Now order online! valleymodeltrains.com Visit our website to see hundreds of HO and O <strong>Scale</strong> Craftsman Kits valleymodeltrains.com Now order online!<br />
The Public Delivery Track<br />
Locomotives - 2 rail<br />
Atlas..GP-15's, RSD-15's, RS-3's..$169-$229<br />
RS-1..Rutland, CNJ, NH, RI, LIRR, WT..$249-$309<br />
SD-35..WM, N&W, SOU, CNJ, B&O..$249-$309<br />
GP-35's..Dash 8's..a few early ones left..$249-$329<br />
C424/425/628..L&N, CN, EL, PRR, SCL..$339-$415<br />
SD-40's, GP-60's, GP-9's..$379-$419P, $199-$215D<br />
SW's..RR, LV, Rdg, CNJ, NYC, Erie..$249-$299<br />
MTH..K-4..$599 CNJ P-47..$650. others available<br />
Sunset..PRR GE 44t..$299. SP MT-4..$1124<br />
Weaver..RSD-12, U25B, VO1000..$199-$249<br />
VO-1000..B&O, CNJ, Rdg, WP, MILW, NKP..$199-$249<br />
Shaft drive RS-3's, FA/FB's, GP-<strong>38</strong>...$99-$150<br />
Passenger and Head End<br />
Golden Gate..Head end 3 car sets..$359<br />
12-1 Sleepers..SP green or gray, SF, N&W, GN..$99<br />
Reserve Now for PRR, Pullman gr or ttg, Erie, DLW<br />
Coachs..SP, Erie, Rdg, B&O, RG, CN, C&O..PRR, PRSL..$99<br />
80' Alum streamilners..SF, NYC..6 pk/$499, 2 pk/$249<br />
SP 5 car alum set, or Articulated diner set..$525 ea<br />
Weaver..B-60 Baggage..$75. RPO...$80<br />
PRR, NYC, NH, Erie, UP, SF, CNJ, Reading, others<br />
Box Cars - 2 rail<br />
Pecos River..SF, WAB, NYC, WM, NKP, SP..$35-$45<br />
Atlas..40' Wood..B&M, B&O, C&O, CNJ, D&H, NYC, NW<br />
PRR, P&R, RDG, SP, UP, WAG, WM, more..$45-$55<br />
40' Steel..Erie, NH, PRR, NYC, CNW, GN, more..$47-$55<br />
40' Trainman or 1970's refurbushed..15 roads..$32-$37<br />
X-29's..PRR, MEC, Erie, RDG, CNJ, more..$50-$62<br />
HyCubes..60'..SF, WP, SP, MP, NW, CR..$60-$75<br />
50'..MILW, DH, NYC, BAR, MKT, SAL, SF, LN, NH..$49-$55<br />
53'..Aloha, Purina, B&M, IC, CNW, FEC..more..$35-$47<br />
60'..C&O, MKT, B&O, EL, RG, Sou, NW, WM..$40-$55<br />
Weaver..40', 50', steelside..30+ roads.. $20-$40<br />
Refrigerator Cars - 2 rail<br />
Weaver/Crown..B&M, BN, CV, CN, NYC, REA,<br />
Dubuque, Nrn Refrig, WIF, PRR..25+ roads..$20-$40<br />
57' Mech..PFE, BN, WFE, Trop..10+ roads..$35-$55<br />
Atlas..36' & 40' wood..Erie, NYC, CNW, SF, PFE,<br />
Meats, beers, foods..25+ billboards..$45-$79<br />
40' steel..IC, NYC, ART, DLW, FGE, more..$45-$55<br />
40' plug door..NH, PRR, WM, WP, BAR, REA<br />
FGE, CNJ, NP, ATSF, NYC, SSW, ART, more..$32-$37<br />
53' express..REA, WP, MP, SOO, RG..$69<br />
K-line..PFE, MDT, CNW, 15+ billboards..$35-$40<br />
Covered Hoppers - 2 rail<br />
Weaver PS-2 and AC-2..BN, CBQ, CNW, CP, PRR,<br />
D&M, DLW, B&M, C&O, EL, L&N, NH, NYC, ++..$20-$40<br />
50' Centerflow or Grain..CR, CP, LV, NYC, PRR, RI,<br />
EnJay, Dupont, ADM, Amoco, Arco, UP, more..$20-$40<br />
Atlas..3 bay..UP, CBQ, BN, Jack Frost..$37<br />
ACF..Erie, DLW, GN, SP, WM, UP, SF, SSW..$55<br />
Airslide..LV, D&H, UP, SP, LV, Erie, SF, RG..$40-$50<br />
Hopper Cars - 2 rail<br />
Atlas..3 bay..WM, SOU, BN, NH, Rdg, RG..$32-$37<br />
Ore cars..CN, UP, DMIR..$27; H21..PRR, VGN..$50-$58<br />
New Panel side..$52 USRA 2 bay..$45-$52<br />
Weaver..2 bay, 3 bay, and 4 bay..20+ roads..$20-$40<br />
Tank Cars - 2 rail<br />
Weaver...40' & 50', new & old, 20+ roads...$30-$45<br />
Atlas..33K..CNTX, ACFX, GLNX,, Sub Propane..$49<br />
17K..ACF 50' or Trinity 40' corn syrup..$55-$65<br />
8K..Bakelite, Wolfs head, Phila Qtz, 10 more..$50-$55<br />
11K..SHPX, UTLX, Hooker, Solvay, Spencer, 10+ roads..$55<br />
Flat Cars, Stock Cars<br />
Atlas..Double stacks..$125-$169. Front runners..$47<br />
Containers..40/45'..$25. Wvr 20'..$14/pr K-line..$10<br />
40' Stock cars..CNW, RG, B&O, GN, MKT, more..$37<br />
Wvr..flats..LV, Erie, BN, SF, CR, TTX, more..$20-$40<br />
Gondolas - 2 rail<br />
Atlas..40' composite..PRR, NYC, C&O, SP..$52<br />
50'..B&O, CNJ, GN, NW, NYC, PRR, Rdg, UP, LV..$37<br />
Wvr..CNJ, C&O, LV, RI, SF, UP, Rdg, NW, SOU..$25<br />
Cabeese - 2 rail, 3 rail scale<br />
Wvr..CR, Rdg, D&H, Erie, PRR, Monon, more..$$25-$47<br />
K-line..B&O, EL, NYC, SOU, SF, UP, more..$48<br />
MTH..PRR, EL, NYC, C&O, SP, CP, NH, more..$45-$60<br />
Atlas..RFP, Rut, RG, NH, SF, 15+ roads..$37-$70<br />
www.stores.ebay/publicdelliverytrack<br />
e-mail us at pdtrains@earthlink.net<br />
PO Box 1035 • Drexel Hill, PA 19026<br />
610-259-4945 • VISA•MC•DISC•AMEX
Agrees With Our Changes<br />
I completely concur with the decisions you have made about<br />
this magazine and its contents. You have found a balance and<br />
serve a real need in the O <strong>Scale</strong> community. I was very pleased<br />
to see a whole page of great traction models and applaud your<br />
decision to retain the excellent Roger Parker columns. Your philosophy<br />
of presenting excellence in modeling makes the magazine<br />
have real substance and value. That I believe is the secret of<br />
your success. Thank you for another fine magazine. I particularly<br />
enjoyed the article about making a model of a box-cab and the<br />
effort the author made to turn it into a fine running engine. This<br />
is a guy after my own heart, he could have simply installed two<br />
ready-made Q-Car trucks but he wanted the trucks to be equalized.<br />
An excellent article with good photos and good expository<br />
writing. Tell him next time to use Q-Car’s brass pulleys and<br />
spring drives. Much easier than those sprockets and chains. I<br />
know I have quite a few of each. Great cover. Again.<br />
Gerald Brothers (via e-mail)<br />
Mike replies: Thanks Gerald. We try for a great magazine with<br />
every issue.<br />
About that Empress<br />
Weaver’s CP “Empress” 4-6-4 needs a bit of tinkering to<br />
improve its pulling power. I found that the coil spring on the lead<br />
truck kingpin was strong enough to push the front drivers above<br />
the rails. I removed both the spring & its pin. The lead truck is<br />
mounted in a 3-Rail manner, with both a rear yoke and a front<br />
swinging yoke. These can be adjusted or one removed as desired<br />
to increase vertical movement.<br />
In addition to removing the lead truck spring, I took a largediameter<br />
plastic pill container and filled it with #9 lead shot.<br />
Some lead wool stuffed into the smokebox positioned the weight<br />
just in front of the gearbox over the #1 driver. (Modelers with<br />
the necessary equipment could cast a heavier, solid cylindrical<br />
weight.) My weight might not be exactly balanced, but it definitely<br />
improved the loco’s pulling power.<br />
To add to your streamlined PRR K4 review, O <strong>Scale</strong> brass<br />
models (I think perhaps in 2-Rail in addition to 3-Rail) of<br />
#3768 were made by Weaver during the 1990s painted DGLE.<br />
Unpainted 2-Rail brass models were imported by ALCO Models<br />
during the 1980s. I’m not familiar with the Weaver Model, but<br />
the ALCO model’s drivers were closer to scale than those of the<br />
MTH Premier Line K4s.<br />
J. W. “Woody” Mathews (via email)<br />
(For those of you who aren’t Slobbering Pennsy Fans, DGLE<br />
stands for Dark Green Locomotive Enamel. - Ed.)<br />
Likes Puzzles<br />
“Pieces of the Puzzle” by Mike Cougill was a great article<br />
and food for thought on layout design. His blending of a prototype<br />
into model form and the ideas behind his decisions are<br />
well thought out. The only problem is waiting two months for<br />
Part Two. Keep the traction. Anything that rides on two rails is of<br />
interest to this wide-gauger.<br />
Richard Cooke, Marquette, MI (via e-mail)<br />
He does too.<br />
Congrats on your P48 series in OST! “Puzzle Piece #1” really<br />
hit home with me. I have always been a fan of shortline railroads<br />
(the former North Stratford RR) and switch engines, specifically<br />
44-ton and 70-ton units.<br />
Your series has inspired me to start work (again!) on my 2’x<br />
8’ P48 switching layout. The trackplan is a variation of the Pine<br />
Ridge layout on Carl Arendt’s website. I took a short cut and used<br />
Old Pullman turnouts without the ties and laid them to P48 using<br />
my scratchbuilt gauges. I’m looking forward to the rest of your<br />
series and will try to provide photos of my layout as I progress.<br />
Matt Hogan, West Chester, PA (via e-mail)<br />
Mike replies: Thanks for the comments, guys. There are a few<br />
big picture ideas I’m trying to convey with the series, which I’ll<br />
touch on in the final installment.<br />
More, more Proto48<br />
I very much want to see more on Proto48 in O <strong>Scale</strong><br />
<strong>Trains</strong>! The main reason I subscribe to your magazine is to learn<br />
more about it, and the latest products and developments. When<br />
I get a new OST in the mail, I go straight to your column on<br />
finescale modeling. We see modeling and detailing of rolling<br />
stock get better all the time. Prototype-scale wheels, flanges,<br />
rails, ties, and track gauge are an inevitable further step in that<br />
advancement. I never cease to be amazed at how realistic P48<br />
rolling stock and railways look in photographs with realistic<br />
scenery. I appreciate your pioneering efforts in this further development<br />
of 1/48th-scale. Keep up the good work!<br />
William R. White, Newton, Iowa (via e-mail)<br />
A 3-Railer Speaks<br />
One recent comment regarding O <strong>Scale</strong> <strong>Trains</strong>’ coverage was<br />
about the contrast between 2-Rail <strong>Scale</strong> O modelers and Hi-<br />
Rail or 3-Rail <strong>Scale</strong> modelers. The words used to characterize<br />
Hi-Rail by the letter’s author were “toy trains.” While most of us<br />
involved as 3-Rail O Gauge hobbyists do enjoy toy trains, their<br />
history, and the involvement of kids and grandkids in the hobby,<br />
there are a lot of us just as (deadly?) serious about our railroad<br />
modeling as the devotee of 2-Rail <strong>Scale</strong> O railroading. The scale<br />
size of our trains, scenery, structures, and interest in operations<br />
based on our prototype are just as serious for hobbyists like me<br />
as for most of the 2-Rail fraternity, and we value the same things<br />
in a magazine. We have much more in common with the tradition-bound<br />
2-Railer than he (mostly he) may believe—including<br />
being tradition-bound ourselves! Thanks for including us in your<br />
excellent publication.<br />
A subscriber from near day one to O <strong>Scale</strong> <strong>Trains</strong>.<br />
Don Thieman, Washougal, Washington (via e-mail)<br />
Mike replies: We received several comments similar to Don’s.<br />
I regret that many of you were offended by Mr. Kelly’s comments.<br />
We don’t publish such letters to stir up controversy, but only to<br />
reflect a variety of viewpoints. Mr. Kelly’s comments about toy<br />
trains does not reflect the position of OST; only his own bias. I<br />
agree: bickering about whose approach to O <strong>Scale</strong> modeling is<br />
best, constitutes a complete waste of everyone’s time and talents.<br />
It adds nothing of value to the hobby. As Managing Editor I’m<br />
taking a stand: Divisive comments about another’s preferences<br />
and approach to modeling will no longer have a home in OST.<br />
Constructive criticism that adds to our knowledge base as modelers<br />
is always welcome. Name calling and snide remarks are not.<br />
With regard to 2-Rail, 3-Rail and Finescale, it seems to me<br />
that each benefits the others. 3-Rail brings products to market<br />
that wouldn’t see the light of day otherwise. With an increasing<br />
demand for prototype fidelity among 3-Railers, 2-Rail and<br />
P48 benefit by having cars that are faithfully dimensioned and<br />
detailed; forming a solid foundation for additional detailing.<br />
The practice of P48 encourages a closer look at the prototype,<br />
which benefits all by widening the knowledge base for modelers<br />
and manufacturers alike, thereby making it more likely, that<br />
we’ll all see better quality rolling stock with a greater variety of<br />
car types to choose from. In the meantime folks, let’s just all relax<br />
and enjoy the hobby.<br />
continued on next page.<br />
May/June ’08 - O <strong>Scale</strong> <strong>Trains</strong> • 39
A Useful Tip<br />
Here’s a tip - I’ve been able to work on a lot of scenery this winter and have been<br />
using scenic cement and matte medium sprayed out of bottles to hold things in place.<br />
It seems no matter how well I cleaned the spray/pump nozzle, within two or three used<br />
it would either clog or lock up. I’ve found it I take the whole nozzle assembly and put<br />
it in a bucket of water upside down and then pump it full of clear water and leave it in<br />
there it does not clog up. When I go to use it next time I simply turn it up and pump the<br />
sprayer until the wate is gone and then use it. Hope this helps others.<br />
Thanks for a great magazine!<br />
Very truly yours,<br />
Phil Rowe<br />
Errata!<br />
We printed the<br />
wrong photo<br />
in OST #36<br />
for Neville<br />
Rossiter’s<br />
Cab Control<br />
article. This is<br />
the photo of<br />
the interlock<br />
module.<br />
Deichman’s Depot<br />
ATLAS O <strong>Scale</strong> 2-Rail<br />
3513-1 WM SD-40 Cab #7445 $407.75<br />
3518-1 Conrail Saving Bond SD-40<br />
Gold Cab #6300 407.75<br />
0459-1 D&H RS-3 Cab #4110 195.45<br />
0464-1 Reading RS-3 Cab #488 195.45<br />
7374 WM GATX Airslide Hopper 50.95<br />
7363 Chessie Airslide Hopper 49.25<br />
7462 Reading USRA Box 45.00<br />
7487 RF&P Steel Re-built Box 49.25<br />
7519 Bend Mill Works 53' Evans Box 55.20<br />
7521 MN&S53' Evans Box 55.20<br />
7631 Chessie Caboose 63.70<br />
7635 RF&P Caboose 63.70<br />
7660 N&W Caboose 62.00<br />
7767 NS 55T Fishbelly Hopper 46.70<br />
7780 PCMOW H21a Hopper 55.20<br />
7781 Virginia H21a Hopper 55.20<br />
7974 Southern 89' Flat Car 63.70<br />
Misc. Forty Foot Trailers 28.00<br />
9019 Southern Star 36' Reefer 53.50<br />
9103 Merchants Biscuit 40' Reefer 53.50<br />
9403 NH 50' PS-1 Box 55.20<br />
9774 B&OX-29 Box 55.20<br />
Deichman’s Depot<br />
110 Ivyside Dr, York PA 17402<br />
Ph: 717-755-1108 • Fax: 717-840-9650<br />
deichmansdepot@comcast.net<br />
www.deichmansdepot.com<br />
40 • O <strong>Scale</strong> <strong>Trains</strong> - May/June ’08
O <strong>Scale</strong> Mag Ad - 7.4 x 4.9, 07/12 - full color, v3.1.<br />
Have It (Sounds) Your Way!<br />
There is a QSI Sound Module for Every “O” <strong>Scale</strong>r.<br />
Choose One That’s Right For You!<br />
✔ Conventional DC<br />
Power Pack + Quantum Module = Horn/Bell/Motor Loco Sounds<br />
✔ Conventional DC and Quantum Engineer<br />
Power Pack + Quantum Module + Quantum Engineer = 33 Controllable<br />
Loco & Sound Ops<br />
✔ DCC: All Major Systems<br />
DCC Systems + Quantum Module = 33 Controllable Loco & Sound Ops<br />
✔ Conventional AC: “O” Gauge 3 Rail<br />
Power Pack + Quantum Module = Horn/Bell/ Motor Loco Sounds<br />
✔ AC Command Control: TMCC, DCS, 3 Rail<br />
Command System + Quantum Module = 33 Controllable Loco/Sound Ops<br />
(DC Control) Quantum Engineer<br />
<br />
Solutions<br />
Please contact us for more information about all these new exciting sound options! 800-671-0641. Introductory offer $159.95 list.<br />
Distributed Exclusively by QSI Solutions<br />
QSI Solutions c/o American Hobby Distributors, 57 River Road, Suite 1023, Essex Junction, VT 05452<br />
Toll-free (800) 671-0641 Fax 802-878-5550 e-mail info@qsisolutions.com Copyright © 2007 by QSI Solutions. All Rights Reserved.<br />
May/June ’08 - O <strong>Scale</strong> <strong>Trains</strong> • 41
Pieces of the Puzzle<br />
Part 2<br />
Mike Cougill<br />
In Part 1 we looked at the thinking process behind the Indiana<br />
& Whitewater. I compared the choices made to pieces of<br />
a puzzle that when put together makes up the picture of your<br />
layout. Continuing that theme in this article, we talk about how<br />
those choices are fleshed out into a narrow shelf layout.<br />
Puzzle Piece #4: Layout height.<br />
How high to build one’s layout is as personal a decision as<br />
what to model in the first place, in that there is no one size fits<br />
all answer. If you host a regular crew for operating sessions,<br />
the debate gets complicated since any height chosen will be<br />
too high or too low for somebody. Planning a multi-level or<br />
mushroom design? Then life gets even more complicated.<br />
Clearly though, current trends in the hobby as a whole, point<br />
to building higher, around 45”- 56”+, being popular now. I’m<br />
not here to set off the layout-height-debate brushfire. The<br />
obvious conclusion to all the haggling and handwringing is<br />
simple: it’s your layout. Build things to your comfort zone and<br />
let visitors and guests accommodate themselves as needed.<br />
I set the base height of the lowest track at 56” off the floor.<br />
All other tracks are a 1/2” higher at 56.5”. This puts trains<br />
about ten inches below my standing eye level; close enough<br />
to clearly see the action, line up switch points and do other<br />
chores. Any higher for me and working cars on the rearmost<br />
tracks would be difficult. During construction of the track, I<br />
used a couple of homemade platforms to stand on for a more<br />
comfortable reach, and using one during operation will make<br />
uncoupling cars easier on the farthest track from the front<br />
edge. While it might seem excessively high, this height helps<br />
recreate memories from childhood of watching a PRR local<br />
switch the industries in my hometown. The spur tracks ran<br />
along both sides of a street next to my house, and I could see<br />
everything going on up close and personal. I could be a part<br />
of the action without getting in the way. Having a similar vantage<br />
point for the layout is very satisfying.<br />
A higher layout also allows for storage opportunities<br />
underneath. I put my workbench under one end of the layout<br />
to save space (OST #34). Bookcases, storage shelves or other<br />
configurations can be tucked away down under too. I really<br />
can’t stand seeing a bunch of clutter underneath the layout,<br />
so I built a knee wall to support the benchwork. Set back<br />
from the front edge of the layout eight inches, sheathed with<br />
some beadboard paneling and painted to match the fascia, it<br />
eliminates legs completely and gives a finished appearance<br />
to things (Photo 1). Some forward-thinking modelers actually<br />
plan access room for under-the-layout maintenance when<br />
designing such things. I left a couple of reach in holes for a<br />
pair of wall outlets, trimming them out to match the rest of the<br />
woodwork in the room (Photo 2). I’m not too worried about<br />
maintenance access since I use above ground switch throws<br />
and linkages. Everything critical is either on top or easily<br />
reached from below (Photos 3-4).<br />
Puzzle Piece #5: Narrow Benchwork.<br />
Another clear trend in layout design is narrow width<br />
benchwork. Depending on what you’re modeling, a narrow<br />
shelf has many advantages over deeper benchwork. Not convinced?<br />
How deep do you think the scene in Photo 5 is? From<br />
1<br />
42 • O <strong>Scale</strong> <strong>Trains</strong> - May/June ’08
2<br />
5<br />
3<br />
4<br />
layout into a given space. However, when planned for deliberately,<br />
this size can be used to great effect.<br />
My benchwork is only 24” wide for the most part. There’s<br />
nothing sacred about this dimension, it just happens to be a<br />
width I prefer. In O <strong>Scale</strong>, this depth represents 96 scale feet.<br />
Not a lot is it? However, this lets me focus on the right-o-way,<br />
putting the trains up close where I can enjoy them. Initially I<br />
was dismayed at how much room the track alone was going<br />
to take out of this depth. I guess I was still thinking in HO<br />
dimensions. Space got tight near the shingle plant, with only<br />
enough room for a shallow building flat between the track and<br />
the back wall. But that’s a compromise I willingly accepted.<br />
Remember the design criteria of following a train up close.<br />
Having everything easily reached was of greater importance to<br />
me than deep scenes or full depth buildings. If I’d modeled a<br />
stretch of rural single track, I might have gone even narrower,<br />
say down to 16”, as I did near the entrance to the staging cassette.<br />
Focusing on the track and immediate surroundings also<br />
let me detail the scenery to a high degree. I model trees to<br />
full-scale heights, some nearly 24” tall. This looks very realistic<br />
and gives a sense of scale to the buildings, trains and other<br />
elements in the scene (Photo 6).<br />
I didn’t waste any time wondering whether L-girder or conventional<br />
grid style was the better choice, though grid style<br />
does work better for narrower sections. The objective was<br />
6<br />
the center of the track to the backdrop it’s only 14”. Where<br />
appropriate, a narrow shelf puts you right up to the action,<br />
and the scenery need not suffer from the lack of depth. I<br />
would suggest that in designing a new layout, we seriously<br />
consider a different approach.<br />
Each modeling scale has its own distinct advantage over<br />
the others. For O <strong>Scale</strong> it’s the size. Our models are big<br />
enough to appreciate the detailing. This size factor is often<br />
considered a disadvantage in that you can’t stuff as much<br />
a strong, stable platform to build on, not how it was done. I<br />
made my benchwork out of 3/4” birch plywood, ripping the<br />
sheets into four inch wide strips with my table saw. The birch<br />
May/June ’08 - O <strong>Scale</strong> <strong>Trains</strong> • 43
ply is a joy to work with, being straighter and more stable than<br />
the traditional 1x pine. Overall it might even be less expensive<br />
too. I built three 2’ x 8’ boxes to cover the 24’ length of the<br />
layout. I assembled them with glue and drywall screws, using<br />
a driver bit in my drill. Cross pieces are 16” on center and<br />
support a 3/4” thick subroadbed with a doubled layer of 1/2”<br />
Celotex insulation board on top.<br />
In the corner where the branch leaves the old main and<br />
crosses Canal Road, I curved the fascia panel for a nice seamless<br />
look. The fascia is made of 1/4” luan plywood painted a<br />
deep maroon that sets off the winter grasses and colors of the<br />
scenery. At each end of the layout I extended the fascia all<br />
the way up to the ceiling where it meets the lighting valance.<br />
These extensions are like the wings in a theater, which help<br />
to frame the scene and disguise the transition from the modeled<br />
portion of the layout to the staging area. You can see<br />
this in Photo 7. These pieces will be painted to match the sky<br />
color on the inside and the fascia on the outside. This style of<br />
benchwork lends itself to a linear design quite naturally, and<br />
leaves the rest of the room open for ease of movement and<br />
other uses. I made no concessions to portability or moving.<br />
We’re in our retirement home, so I didn’t worry about it. If circumstances<br />
change, well it’s a model railroad, not a priceless<br />
work of art.<br />
Of course, benchwork depth is greatly determined by the<br />
scene you’re trying to represent. A yard or roundhouse area<br />
will obviously require more depth. Many modelers build a<br />
free form type of benchwork where the depth varies according<br />
to the scene being modeled or the number of tracks<br />
required. L-girder construction is a good choice for such<br />
benchwork and opens up many design options.<br />
Layout design, height, and the depth of the benchwork<br />
all work together to create an enjoyable experience of model<br />
railroading.<br />
Now that we have this long shelf to run on, we’ll consider<br />
how scenery can maximize our enjoyment of things. Shelf<br />
layouts ask a lot from the scenery and Part 3 will look at those<br />
considerations.<br />
u<br />
7<br />
Precision Turntables for the Discerning Modeler<br />
FEATURING PRO-DEX TM INFRA-RED POSITIONING & DYNAMIC BRAKING<br />
Now it’s easy & exciting to operate<br />
prototypically: 1. Select direction<br />
2. Push run button 3. Watch bridge<br />
advance to any of 48 positions, then<br />
slow & lock on desired track when<br />
you release button!<br />
AAA PRECISION<br />
TURNTABLES<br />
PO Box 64, Plantsville, CT 06479, USA<br />
1-800-569-1423 • www.AAATurntables.com<br />
44 • O <strong>Scale</strong> <strong>Trains</strong> - May/June ’08<br />
• Heavy-duty museum-quality construction<br />
• Realistic operation!<br />
• Painted and ready to run<br />
• Manufactured in all scales from Z to G<br />
and all bridge sizes on a per order basis<br />
• Mfg in U.S.A. by skilled machinists using<br />
CNC precision parts. Hand assembled & tested<br />
• Call for specs or visit our website
Steam Era Structures Company<br />
Unique buildings for any railroad era.<br />
A. Woudin Sash & Door Company<br />
1:48 Kit#9107-O<br />
A craftsman kit featuring sheet brick, stone, and roofing<br />
on cold press board with Grandt Line windows/doors and<br />
Berkshire Valley details. Based on an existing clapboard<br />
building covered with pressed tin brick and stone panels.<br />
This kit is perfect for any light manufacturing operation.<br />
Finished model is 8.75" x 15" x 11". Price: $175 plus $15<br />
s&h. Send check or money order.<br />
7136 Paddison Road, Cincinnati, OH 45230<br />
website: www.steamerastructures.citymax.com<br />
SEVEN MORE Reasons WHY OUR<br />
FIGURES ARE<br />
SPECIAL!<br />
Realistic Figures Bring Your Layout to Life<br />
Send $1.50 for our full color catalog featuring the nearly 400 PEWTER Figures AND Accessories<br />
we produce in O Gauge All Made and Hand Painted in the USA with Pride. $7.95 S&H per order.<br />
VISA & MC orders call 1 800 316-2493. For Information:302 455-0195. FAX orders: 302 455-0197<br />
Painted / Unptd<br />
1479 3 Drunken men .............. _19.99 /11.25_<br />
1480 Railroad freight agent ....... _ 5.99 / 4.00_<br />
1481 Brakeman with flag ........... _5.99 / 4.00_<br />
1482 Young woman jogging....... _5.99 / 4.00_<br />
1483 Woman fixing shoe ........... _5.99 / 4.00_<br />
People make<br />
the difference!<br />
Visit us at www.arttista.com for color photos 105 Woodring Lane Newark DE 19702<br />
May/June ’08 - O <strong>Scale</strong> <strong>Trains</strong> • 45
CUSTOM BACKGROUNDS FOR TRAIN LAYOUTS<br />
Andy Romano<br />
After the article featuring my Ironbound RR ran in OST #33,<br />
I received several requests for information about the layout’s<br />
backgrounds. Having spent a significant amount of time on<br />
this particular phase of modeling, I learned a few things. First,<br />
backgrounds require a different set of skills from model and<br />
layout building, and secondly, it’s more art than craft. But<br />
armed with good advice, a modeler with a modicum of artistic<br />
ability should be able to create an impressive background<br />
for his pike. Failing that, find someone who has the ability and<br />
refer ‘em to this article.<br />
General Principles<br />
Why do many layout backgrounds look unrealistic or<br />
not seem to match the layout’s foreground? They generally<br />
overlook an important principle: In real life, the farther away<br />
from the viewer’s eye an object is, the more its color will be<br />
affected by the atmosphere. Daytime atmosphere will generally<br />
shift colors towards the blue end of the spectrum; so that<br />
even a bright white structure will be grayed-down by distance.<br />
But bluish-gray colors can be a bit cold and even unpleasant.<br />
I take some artist’s prerogative by pushing my colors more<br />
toward the neutral tans. This is essentially a matter of taste,<br />
and the color temperature of the lighting in your layout room.<br />
Never, ever use raw, un-tinted colors. (Unless it’s supposed to<br />
be a bright neon sign!) Using bright, vivid, colors is the surest<br />
way to create toy-like backgrounds.<br />
If you are not sure how to gray-down (the correct term is<br />
shade) a color, the easiest way is to add some of its opposite<br />
or complementary color. For example, in painting, if you want<br />
to gray-down red, you would add a small amount of green<br />
until you get the shade you want. To gray down green, you<br />
add some red. Same is true for blue/orange, yellow/purple and<br />
all the colors between. [A color wheel, a tool used by artists<br />
and available at any art supply store, is very helpful in deter-<br />
Photo #1 Station: This scene is a bit tricky because it’s a corner situation. So the most distant background, which includes the large structure<br />
toward the left side and various other components visible on the right, is a large print made in sections, mounted on foam-core, and<br />
literally semi-curved (several flat facets angled to give the impression of a curve) around the corner. The Woolworth building on the far left is<br />
a commercial kit cut about in half depth-wise and mounted against the background. The station itself is a shallow Berkshire Valley drugstore<br />
kit which has a track running behind it as well as in front of it, where you can see the RDC. The newsstand, lamps and other railroady objects<br />
act as a middle-ground helping to tie the back and foregrounds together. The stone retaining wall in the foreground is also a print mounted on<br />
foam-core which is in turn mounted to a wooden sub-structure. The depth of what you see in this scene is perhaps 18” to the deepest part of<br />
the corner but much shallower on either side. There are additional tracks running in the foreground which are out of the picture, below the<br />
retaining wall.<br />
46 • O <strong>Scale</strong> <strong>Trains</strong> - May/June ’08
mining what colors are opposite each other – Ed.] Shading a<br />
color can also be done by adding a small amount of black,<br />
but often black paints and inks aren’t truly neutral and may<br />
turn green or even an ugly shade of purple when mixed with<br />
lighter colors. Tinting means adding white to a hue, which<br />
comes in handy when trying to make your scenes fade into<br />
the distant haze. The same principles work when adjusting<br />
your color photos using a computer photo-manipulation application.<br />
Keep in mind that in the real world, distant objects do<br />
not appear as sharp as close objects. The atmosphere dulls<br />
sharp edges and even adds some shimmer to them. The hotter<br />
the day, and the lower the elevation, the more noticeable the<br />
effect is.<br />
The first step in creating your background may be the most<br />
time-consuming part of the process: finding photos of scenes<br />
you think will look right on your layout. Ideally, they will be<br />
photos of the actual area you want to model. Let’s toss this<br />
idea around a little before going on to the how-to stuff.<br />
Research<br />
This can be done over a long period of time and between<br />
other projects. Start collecting photos of the areas your<br />
railroad runs through. Some sources are calendars, books,<br />
geographical magazines, slide and print collections, and anywhere<br />
else you find large numbers of good-quality photos.<br />
Don’t worry, you don’t have to destroy the books; images can<br />
be scanned without removing them from books.<br />
Get down to the particulars: what kind of scenes or structures<br />
are on your layout? Say you have a station scene that’s<br />
three feet wide. You’ll need a photo of whatever kind of<br />
background that station area would have had in the era you<br />
Photo #2 Warehouse: The sky and clouds image is a large print mounted on foam-core and acts as the field against which the rest of the<br />
pieces are mounted. The sprawling refinery-type complex with its large central tank is a commercially available background print (the only<br />
section which was not created on my computer) mounted on foam-core and carefully cut out. This is mounted about 1/2” from the sky<br />
background. The Gilroy Dist. Warehouse is a “flat” type O <strong>Scale</strong> kit which is a mere few inches deep. The trick here was to “grey down” the<br />
refinery photo because it’s a little too vivid and purplish right off the shelf. I used a series of thinned-down white sprays and even rub-on tinting<br />
powders to accomplish this. There are several parallel tracks in the foreground as well as a fully-dimensional junk yard which has the American<br />
type crane working in it. Piles of crushed cars, fences and such help to layer the scene as well. But what you see in this picture is no more than<br />
10” deep. The stormy sky helps to give the scene character.<br />
May/June ’08 - O <strong>Scale</strong> <strong>Trains</strong> • 47
are modeling. If you can’t find the actual scene find one that’s<br />
similar that can be modified. This scene of the Ironbound’s<br />
East Newark station in Photo 1 is a bit tricky because it’s a<br />
corner situation. The most distant background, which includes<br />
the large structure toward the left side and various other components<br />
visible on the right, is a large print made in sections,<br />
mounted on foam-core (a stable, lightweight sheet stock),<br />
and literally semi-curved (several flat facets angled to give the<br />
impression of a curve) around the corner. The Woolworth<br />
building on the far left is a commercial kit cut in half depthwise<br />
and mounted against the background. The station itself is<br />
a shallow Berkshire Valley drugstore kit which has a track run-<br />
Photo #3 Factories: Here, the sky and distant buildings are on a mural mounted on a large sheet of foam-core. The old coaling tower is<br />
a photo print mounted on foam-core, completely cut out like a silhouette, and mounted about 1/2” forward of the mural. The large factory<br />
structure on the left, theoretically closer to the foreground than the tower, is a flat about 4” deep. The large structure on the right is about 3/4<br />
full-depth with the rear quarter cut off and mounted at an angle against the background. The oil tanks are modified to be about two-thirds the<br />
full depth of the kits. All objects forward of these are full depth. They all blend together, with the more distant objects fading more and more<br />
toward a warm grey and sky color, to convey a feeling of a large factory area in somewhat polluted city air. What you see in this photo is a<br />
mere 10” or so deep.<br />
48 • O <strong>Scale</strong> <strong>Trains</strong> - May/June ’08
ning behind it as well as in front of it, where you can see the<br />
RDC. The newsstand, lamps and other railroady objects act<br />
as a middle-ground, helping to tie the back and foregrounds<br />
together. The stone retaining wall in the foreground is also<br />
a print mounted on foam-core which is in turn mounted to<br />
a wooden sub-structure. The depth of what you see in this<br />
scene is perhaps 18” to the deepest part of the corner but<br />
much shallower on either side. There are additional tracks<br />
running in the foreground which are out of the picture, below<br />
the retaining wall.<br />
Maybe you have an industrial area and want a large refinery<br />
that will compliment the foreground structures. A good<br />
photo of a refinery complex is far more believable than<br />
anything you can build in three dimensions. The sprawling<br />
refinery-type complex with its large central tank in Photo 2<br />
is a commercially available background print, the only section<br />
which was not created on my computer. The Gilroy Dist.<br />
Warehouse is a flat type O <strong>Scale</strong> kit just a few inches deep.<br />
The trick here was to gray down the refinery photo because<br />
it’s a little too vivid and purplish right off the shelf. I used a<br />
series of thinned-down white sprays and even rub-on tinting<br />
powders to accomplish this. The sky and clouds is a large<br />
print, again mounted on foam-core, and acts as the field<br />
against which the rest of the pieces are mounted. The same<br />
thing applies to forest areas, mountains, cityscapes, highways<br />
and riverside scenes. Trust these to a photographic background<br />
and suddenly they become expansive, highly detailed<br />
and totally believable within the context of a layout scene.<br />
And remember, they needn’t be totally flat.<br />
Size<br />
Obviously, a background should extend the full length of<br />
your layout, including any center baffles if you have a peninsula<br />
or an island layout. But just how tall does a background<br />
need to be? In general, the larger or lower your layout is, the<br />
taller your backgrounds will need to be in order to give the<br />
impression of real distance on your pike. For example, an O<br />
<strong>Scale</strong> layout roughly at eye-level can get away with a background<br />
12” to 16” high and still look right (provided there are<br />
no structures or hills higher than that) and especially if there is<br />
a soffit or other top frame over your layout. Whereas, a layout<br />
Photo #4 Train Meet: Again the background is a mural, treated a bit more like art in this section, mounted on foam-core. The CNJ Train Master<br />
and passenger train crossing the bascule bridge is a print mounted on foam-core, cut out like a silhouette, and mounted about 1/2” forward of<br />
the background itself. Double-sided sticky-foam is used to mount the pieces. The foreground caboose and boxcar are real O <strong>Scale</strong> models of<br />
course, running on track which is only an inch or two forward of the Train Master scene, with some grass, poles and other “railroady” objects between<br />
the two to help blend the visual elements. The deck girder bridge only has the forward side in full dimension; the rear is a flat print. Again<br />
the foreground color is more vivid with the color becoming less vivid in the distance. This scene is only about 8 inches deep.<br />
May/June ’08 - O <strong>Scale</strong> <strong>Trains</strong> • 49
that’s waist-high will need a background that reaches at least<br />
to your eye-level to be effective; even better if it tops out at or<br />
above your head. This may result in backgrounds 24” or more<br />
in height! Believe me, producing background murals 12” high<br />
is a heck of a lot more practical - perhaps I should say easier<br />
and less expensive than 24” backgrounds. The backgrounds<br />
on the Ironbound RR run from about 12” to a maximum of<br />
24” depending upon the height of the structures in the foreground.<br />
Perspective<br />
This is a tricky aspect in creating an effective background,<br />
one which cannot be stressed too strongly.<br />
If your layout is at or near eye-level, your background<br />
should also appear to be at eye-level. In other words, you<br />
don’t want to be looking at an eye-level scene in the foreground<br />
of your layout and have the background suddenly<br />
appear to be a looking-down or looking-up view. This is jarring<br />
to the eye and looks extremely unrealistic because it is!<br />
The real world does not exhibit more than one perspective for<br />
any given pair of eyes at any given point-of-view.<br />
So when you gather your photos for reference, try to find<br />
images which reflect the same or very nearly the same angle<br />
of view, or else you will end up with a poor marriage between<br />
foreground and background elements.<br />
Other elements of perspective are size and horizontal<br />
angle. A background tree which is supposed to be a quarter<br />
mile away ought not to appear as tall or large as a tree in or<br />
near your foreground. This may seem obvious but I am surprised<br />
at the backgrounds I see which seem to defy the physics<br />
of optics! In this same regard, one may selectively make<br />
use of smaller scale items in near-background scenes. For<br />
example, I have a scene where a large trestle crosses a river.<br />
As the layout is not very deep at this point, I was able to use<br />
an HO <strong>Scale</strong> tugboat, placing it near the background. When<br />
viewed at eye-level it appears to be quite a distance behind<br />
the trestle, even though it’s almost underneath it.<br />
S <strong>Scale</strong> structures, vehicles and figures can be placed in the<br />
background, as long as there are no tracks or other O <strong>Scale</strong><br />
elements right up against them. These are especially effective<br />
when modeling mountain scenes where the structures<br />
are intended to be distant from the viewer. Let’s face it; any<br />
mountain we can build, no matter how high, is just a small<br />
hill in O <strong>Scale</strong>. Even a ten-foot high O <strong>Scale</strong> mountain represents<br />
a paltry 480 scale feet. And how many of you build<br />
ten-foot-high-mountains? I live up almost exactly at 5,000<br />
feet. That would be more than 100 actual feet in O <strong>Scale</strong>. But,<br />
by carefully blending your foreground foothills with the right<br />
background images, you can create a believable scene showing<br />
your O <strong>Scale</strong> Espee Daylight streamliner cruising past Mt.<br />
Shasta.<br />
Theme and Era<br />
After establishing the height of your background, you will<br />
have to map the image content. This is of course dictated by<br />
the theme of your railroad. Obviously someone modeling a<br />
timber harvesting operation will want a background very different<br />
from a modeler trying to recreate the steel mill environment<br />
of, say, the P&LE, and certainly different from the Florida<br />
coast passenger lines. Be true to your theme. Visitors to your<br />
layout may not say anything to you but they have a knack for<br />
spotting things like Santa Fe Warbonnet F-units running past<br />
the rolling green hills of Pennsylvania or New York State. The<br />
Ironbound RR runs through the crowded urban and industrial<br />
areas in and around Newark, NJ and the background reflects<br />
this 100%.<br />
You will also need to decide what era your background<br />
should suggest. Rocky Mountain, deep woods or desert lines<br />
can get away with images from a broad time span. Except for<br />
details of human manufacture, they don’t change that much<br />
over time; whereas, someone modeling a certain city, station<br />
area or seaport will have to try and find images that match<br />
his layout’s era. Otherwise you will have modern structures<br />
behind turn-of-the-century trains, or 2007 Chevies running on<br />
the streets of a 1950’s scene.<br />
Assembling the Pieces<br />
Once I have gathered enough of the right stuff photo-wise,<br />
I scan the photos at approximately 240 dots per inch or dpi.<br />
More than that and the file sizes become too unwieldy as you<br />
add them all together. Smaller size photos may require higher<br />
dpi scanning to compensate. After images are scanned, I digitally<br />
combine them (using a computer image-manipulation<br />
software such as Adobe Photoshop) to make a long, linear<br />
montage or a series of edge-matching files.<br />
Now the elements of the montage get blended together<br />
into a believable scene. This is where an art background really<br />
comes in handy, as by the time I am done it’s really more art<br />
than photo. I usually have to add and subtract elements of the<br />
different photos, correct size and color mismatches, and even<br />
correct perspective.<br />
Some sections of the backdrop may also have photos that<br />
are scaled and cut out cookie-cutter style, and then mounted<br />
right onto the backdrop, sticking out about 1/2” so as to lend<br />
more dimension to the background. In Photo 3 the factories,<br />
the sky and distant buildings are on a mural mounted on a<br />
large sheet of foam-core. The old coaling tower is a photo<br />
print mounted on foam-core, cut out like a silhouette, and<br />
mounted about 1/2” forward of the mural. The large factory<br />
structure on the left, theoretically closer to the foreground<br />
than the tower, is a flat about four inches deep. The large<br />
structure on the right is about 3/4 full-depth with the rear<br />
quarter cut off and mounted at an angle against the background.<br />
The oil tanks are modified to be about two-thirds<br />
the full depth of the kits. All objects forward of these are full<br />
depth. They all blend together, with the more distant objects<br />
fading more and more toward a warm gray and sky color, to<br />
convey a feeling of a large factory area in somewhat polluted<br />
city air. What you see in this photo is a mere 10 inches or so<br />
deep. As elements of the photos recede from the foreground<br />
they are ghosted out so they appear to fade into the lovely<br />
Jersey haze.<br />
Printing<br />
When all the photos are blended to my satisfaction, they<br />
are printed out on a large-format printer. They can just as easily<br />
be printed on a regular letter-size printer by tiling the files<br />
to 8” x 10” and then mounting them and hiding the seams as<br />
50 • O <strong>Scale</strong> <strong>Trains</strong> - May/June ’08
est you can. When viewed from a few feet away, the seams<br />
won’t show if you are crafty with your mounting. It’s also a lot<br />
easier to mount letter-size prints than larger prints. The best<br />
way to mount prints is with a waxer, which allows you to use<br />
a slip-sheet between the print and the foam-core, thereby<br />
allowing you to make minor adjustments to the positioning of<br />
each print before it is burnished down. But most of us don’t<br />
have access to large-format waxers, so we use spray adhesive.<br />
Mounting<br />
All sorts of materials have been used over the years to create<br />
backgrounds for layouts. These range from a roll of heavy<br />
paper, linoleum or vinyl sheeting to curvable hardboard or<br />
other sheet stock. Flexibility is important so that backgrounds<br />
can be curved, thereby avoiding deep, dark corners! Some<br />
modelers even paint their backgrounds directly onto the wall<br />
behind their layout. I do not recommend this unless you are a<br />
DaVinci.<br />
Since my backgrounds are printed in sections on mediumweight<br />
matte paper about 17” x 22”, I decided to mount each<br />
piece on 1/4” foam-core sheet stock which is quite stable<br />
and has the added virtue of being very lightweight. These are<br />
available from discount art supply outfits in packs of about a<br />
dozen large sheets which I cut down to the size I want. They<br />
are mounted to the walls by pins and in some cases by double-sided<br />
foam tape. The foam-core sections are butted sideby-side.<br />
Seams can be hidden by just slightly overlapping the<br />
background prints – about 1/8” will do the job nicely. Mount<br />
the prints to the foam-core with 1/8” overhang on one edge.<br />
After mounting, the prints are sprayed with a fixative to make<br />
them more moisture-and-fade-resistant.<br />
Your background may be installed, but the job’s not done.<br />
The bottom edge that meets the back of the layout must be<br />
well-camouflaged. This can be done with bushes, fences,<br />
walls, structures, slight rises in the terrain and so forth. Try<br />
to place as many appropriate objects as possible between<br />
the track and the background. They will all add up to a wellblended<br />
and believable scene. In Photo 4 the CNJ TrainMaster<br />
and passenger train crossing the bascule bridge is a print<br />
mounted on foam-core, about 1/2” forward of the background<br />
itself. Double-sided foam tape is used to mount the pieces.<br />
The foreground caboose and boxcar are real O <strong>Scale</strong> models,<br />
running on track which is only an inch or two forward of the<br />
TrainMaster scene, with some grass, poles and other objects<br />
between the two to help blend the visual elements. The deck<br />
girder bridge only has the forward side in full dimensions; the<br />
rear is a flat print. This scene is only about 8 inches deep.<br />
Sure, it’s a bit challenging to create authentic-looking backgrounds<br />
that fit your particular layout, but no doubt about it;<br />
it’s worth the effort. A layout without a background is a layout<br />
set in the middle of nowhere. Now step back and watch your<br />
trains run through a series of believable scenes which will add<br />
considerably to the enjoyment of your layout.<br />
u<br />
These highly detailed hydrocal kits feature<br />
full color graphics, laser cut doors and<br />
windows and complete finishing instructions.<br />
Fairly simple construction as most of the<br />
amazing detail has been cast right in place.<br />
Add a flat $10.00 S & H no matter how many<br />
kits you order. Satisfaction guaranteed.<br />
DOWNTOWN DECO<br />
5323 Fiddler Court ◆ Florence, MT 59833<br />
Rocky<br />
Flats<br />
Depot<br />
$69.95<br />
Angels Flight<br />
Hotel DD41<br />
Limited Edition<br />
$89.95<br />
Randy’s<br />
Burgers<br />
DD44<br />
$59.95<br />
Brick<br />
Sidewalks<br />
$24.95<br />
Trackside<br />
Tavern<br />
$79.95<br />
406/273-0942 ◆ E-mail: downtowndeco@montana.com ◆ Web site: www.downtowndeco.com<br />
u<br />
]<br />
t<br />
TWIN WHISTLE SIGN & KIT CO.<br />
Buy Direct!<br />
31 Turnberry Drive, Arden, NC 28704 (828) 684-6785<br />
Footprint: 10” x 4.5”<br />
Buy Directly from our e-store!<br />
WWW.TWINWHISTLE.COM<br />
ASSEMBLED<br />
BUILDINGS ARE<br />
AVAILABLE!<br />
The Classic!<br />
Kit: $54.95<br />
• Pre-Cut Basswood Body<br />
• Complete Instructions<br />
• Assorted Castings<br />
• Wide Selection of<br />
Graphics<br />
• Grandt Lines Doors &<br />
Windows<br />
• Scribed Interior Flooring<br />
e-mail:<br />
twinwhistle@hotmail.com<br />
May/June ’08 - O <strong>Scale</strong> <strong>Trains</strong> • 51
Sweeper / Track Cleaner<br />
Gerald Brothers<br />
Many excellent track cleaning cars are<br />
presently on the market, but we trolley modelers<br />
may have to make our own. Here are<br />
some ideas for converting a snow sweeper<br />
into a useable track cleaner.<br />
First I obtained two rollers from Aztec<br />
Manufacturing Co. and had a local machine<br />
shop core them at 1/8”. The owner of Aztec,<br />
John Claudino, was very encouraging and<br />
informed me that these rollers needed to be<br />
mounted at a 1-1/2 degree angle. They come<br />
in two styles; one is called a Cratex Roller<br />
and is abrasive, the other is called a Sidewinder<br />
and is canvas covered. The canvas is<br />
washable and replaceable, while the abrasive<br />
one is easily cleaned. Check with Aztec for<br />
details.<br />
Drawings and photos of sweepers are easily obtained.<br />
Trolley Talk Volume III is an excellent source. Sweepers came<br />
in several variations depending on the builder. You, as the<br />
modeler, will have to establish many of your own measurements<br />
along with window and door treatments. I departed<br />
from the prototype in order to provide a robust frame and<br />
closely mounted set of rollers. The rollers are allowed to<br />
drop out of their mounting when the car is picked up so that<br />
they can be easily swapped out or cleaned and remounted.<br />
The accompanying drawings show the measurements I used<br />
(unmarked measurements will depend on the other measurements<br />
you choose), but you should consider these only as a<br />
starting point. For instance, the width is going to be determined<br />
by how you wish to mount the wheels, what drive you<br />
will use, and the mounting of the rollers. Length is also under<br />
the same constraints. How close you mount the rollers to the<br />
drive wheels depends on the minimum radius of your railway.<br />
Door width and height will depend on how you model these<br />
items. I used Grandt Line windows on the sides and cut the<br />
end windows to closely match. I used a 4’ wide door and a 2-<br />
1/2’ small door. The walls are 6 -1/2’ high and 20-1/2’ long. All<br />
nominal dimensions such as these are in scale feet and inches.<br />
Frame and Chassis<br />
Once you have settled on your basic measurements (see<br />
Fig. 1), start by making the chassis from one piece of 1/8” thick<br />
basswood and frame it with pieces of 3/32” x 3/16” brass I<br />
beam. The prototype chassis is usually angled to match the<br />
angle of the brooms, but I chose to make mine symmetrical<br />
to present a nice appearance and match the cabin structure. I<br />
made the front and back I beams by cutting a slot at the points<br />
where I wished to bend them, then bent the beam to the<br />
required angle, and filed it for a proper fit. I soldered the ends<br />
together which results in a sturdy frame on which to mount<br />
the wheels, motor, cabin, etc. I placed the pedestals just far<br />
enough apart to allow the wheel assemblies to be held firmly<br />
without binding (Photo 1). You need to be careful to get these<br />
pedestals squarely aligned. I attached the pedestals with small<br />
wood screws. This allows me to unscrew one side in order<br />
to place the wheel assemblies into or remove them from the<br />
Photo 1<br />
Fig. 1<br />
pedestals (which you will need to do for painting) with a very<br />
small jeweler’s screwdriver. Just loosen the screws, don’t take<br />
them all the way out.<br />
For the drive unit, I chose two of Northwest Shortline’s newest<br />
ball-bearing gear boxes: #750-6, 14:1, 1/8” axle. These have<br />
slotted drive shafts that can be coupled together with a simple<br />
bit of brass tubing having an inside diameter of slightly more<br />
than 1/8”. With the pedestals spaced at a distance of 6’ 6”, the<br />
two short ends of the shafts are just about perfect and one<br />
long end will be used to hold the plastic gear. When you order<br />
these gearboxes, you need to specify what size (diameter,<br />
width and insulated or not) of wheel you want them to put on<br />
these gear boxes. I use 36” wheels, 0.135” thick, uninsulated.<br />
The plastic gear from Grandt Line will just fit on the drive shaft<br />
of one of the gearboxes. Determine the position of this gear<br />
and then cut a hole just above it large enough to pass the plas-<br />
52 • O <strong>Scale</strong> <strong>Trains</strong> - May/June ’08
tic chain through and large enough so that you can maneuver<br />
the chain into place later. The motor I used is quite large with<br />
a heavy flywheel; so I mounted it to balance its weight over<br />
the wheel assembly. The plastic gear on the motor will have to<br />
be shimmed with a small piece of brass tubing, 1/8” diameter,<br />
0.014” wall thickness. Glue this in place with CA, being careful<br />
to keep it away from the motor bearing. Make a cradle for the<br />
motor out of thin brass plate. Bend it to shape and line it with<br />
double-sided foam tape. This will hold the motor quite securely<br />
and dampen sound and vibration. Now place one piece of<br />
the same tape on the bottom of the cradle but don’t remove<br />
the cover from the tape just yet. Position the motor for proper<br />
alignment of the drive and slide very thin pieces of wood<br />
under it until the chain is fairly snug but turns freely and it does<br />
not bind the wheel assemblies. (These assemblies will move<br />
just a little in the wheel bearings.) Glue the wood in place but<br />
don’t mount the motor until after you have painted the chassis.<br />
Carbody<br />
The sides are made of a sandwich of plain (inner) and<br />
scribed (outer) panels (Fig. 2). Make the plain panel by cutting<br />
to the desired length and height, and then mark the location<br />
of the window openings and door placement. These openings<br />
will be cut out after placing the scribed panels.<br />
Make cuts in the scribed outer panels for the windows (Fig.<br />
2). Place one piece of scale 2x6 basswood along the top of the<br />
plain inner panel. Glue the scribed outer panels on top of the<br />
inner panel using heavy weights until dry. Place two pieces of<br />
stripwood at the bottom of the door openings, then line the<br />
opening edges with small quarter-round stripwood. Now cut<br />
Upper Brace (2)<br />
End Piece (6)<br />
Fig. 2<br />
Fig. 3<br />
Lower Brace (2)<br />
out the window openings in the plain inner panel.<br />
The roof is made from a slab of basswood cut approximately<br />
to length and width. You will need to sand it to the final<br />
measurements after the sides and ends are mounted. Shaping<br />
the roof is fairly easy. Start with a chunk of wood of the<br />
right thickness and use a small wood plane to cut to the rough<br />
shape and then sand with a large sanding block. Finish with<br />
finer sandpaper later after you have finished making the cabin.<br />
To make the carbody, first you need four braces as shown<br />
in Fig. 3. Place two of the braces on the roof (one at each end)<br />
with two scale 4x4 longitudinal beams between them. The side<br />
walls are glued to these, making sure that they are square with<br />
the roof. If you do one wall first with a large square and let it<br />
dry sufficiently, then place the other wall and put the other two<br />
braces in place, this will get the cabin quite square and straight.<br />
Six end panel pieces are needed. Make these a bit longer<br />
than they need to be so as to provide a bit of wiggle room and<br />
sand them to length later. Lay these out on one piece of plain<br />
wood (with the grain running vertically for more strength); first<br />
cut out the window openings; then separate the end pieces.<br />
Cut pieces of scribed outer panels to the approximate height<br />
and carefully fit these to the end panels and glue. Now glue<br />
each of the end panels to the upper braces and the sides forming<br />
the enclosed end of the carbody. Insert the lower braces<br />
and glue in place so that they are flush with the sides. Repeat<br />
at the other end. When dry, the bottoms of the ends can be<br />
sanded to length.<br />
Next cut and glue lengths of scale 1x2 for the ledges on the<br />
windows. Cut and glue three pieces of scale 3x4 wood to the<br />
tops of the windows against the roof. Now outline the windows<br />
with pieces of wood sized to fit. Put two sizeable beams<br />
along the bottoms of the sides, remembering that this will be<br />
handled quite a bit and will be used to mount the cabin to the<br />
chassis. Now make sure the cabin fits on the chassis. Finish the<br />
roof to fit at this time.<br />
The drawings and photos I have show that a link and pin<br />
type of coupling was used. For modeling purposes, I needed a<br />
good stout coupling so I used a device that many traction lines<br />
used, a coupler with a hole in it that was temporarily pinned<br />
to the regular coupler in order to provide the swing necessary<br />
to get around really sharp radius curves. Simply cut the slotted<br />
end off a regular Kadee® coupler and drill a mounting hole in<br />
the short neck that is left. Now make two mounting devices as<br />
shown in Fig. 4 with the measurements adjusted to mount the<br />
coupler at the proper height. Two screws will hold this device<br />
to the car and the two braces will be mounted into holes in<br />
the chassis. The “pin” to hold the coupler can be a very small<br />
screw (0-80) with a hex head for appearance.<br />
Make the roller cradles as shown in Fig.5 slotted to fit the<br />
roller axles. The axles are brass rod and washers sized for a<br />
snug fit. Mount this to the chassis at a 1-1/2 degree angle using<br />
two very small screws and epoxy cement for a strong attachment.<br />
Check for clearance of the screw heads and rollers. You<br />
may have to use countersunk flat-head screws.<br />
Attach the cabin to the chassis using countersunk 2-56 flathead<br />
machine screws. Check for fit. Make two scribed wood<br />
platforms, one for each end. Attach the platforms with epoxy,<br />
sand to fit when dry.<br />
continued on next page<br />
May/June ’08 - O <strong>Scale</strong> <strong>Trains</strong> • 53
Fig. 4<br />
Several nut-bolt-washer castings will give the chassis a finished<br />
look. Paint and finish the cabin and chassis. I made a roofwalk<br />
from scale 2x10 boards with 2x3 cross braces (sanded to fit the<br />
roof contour). Finish this with a centered trolley pole base and two<br />
hold down hooks. Not shown are grabirons up one side next to<br />
the front door that form a ladder for roof access.<br />
I wire my cars for DCC. The decoder I selected is a 1.8 amp<br />
device which should be plenty for this critter. It fits nicely against<br />
the motor cradle using double sided foam tape (Photo 2).<br />
Finally mount all the lights, retrievers, gongs, etc (Photo 3).<br />
Finish the motor mounting and test for proper operation. Add<br />
weight as you deem proper. If it comes off the track occasionally,<br />
well, so did the real sweepers.<br />
u<br />
Fig. 5<br />
Materials List<br />
Aztec Manufacturing Co.<br />
TS 1126A-2 Cratex Roller<br />
TS 1126B-2 Sidewinder Canvas Covered Roller<br />
North West Short Line<br />
#750-6 (series) 14:1, 1/8” axle ball-bearing gearbox (specify wheel<br />
size)<br />
#29401-9 DC motor, 28.5mm dia. x 40mm length, 8,300 rpm<br />
#404-6 flywheel, 2.4mm bore, 25mm OD x 11mm (1” by 7/16”)<br />
Current Line Models<br />
McGuire Sweeper Sideframe Set<br />
C-61 Headlight<br />
C-110 Retriever<br />
Photo 2<br />
Photo 3<br />
Grandt Line<br />
#7006 Delrin chain<br />
and 8 tooth sprocket<br />
#3722 Attic Window<br />
Q- Car Company<br />
B-120 Trolley Pole<br />
CS024 Trolley Pole<br />
Base, large<br />
B-150 Trolley Pole<br />
Hook, high inside loop<br />
Lenz<br />
LE 1835 Decoder<br />
Samtec<br />
BDL-136-T-F Plug<br />
SDL-136-TT-19 Socket<br />
Sumpter<br />
Valley<br />
Depot<br />
135 NW Greeley Avenue,<br />
Bend OR 97701<br />
● Specializing in O <strong>Scale</strong> 2-rail<br />
model trains since 1985<br />
● We buy or consign brass model<br />
collections<br />
● Model reservations gladly<br />
accepted<br />
● Prompt, courteous service<br />
Special Shapes<br />
B-6-3 Brass Beam<br />
Various brass bars &<br />
rods<br />
Check our website for latest<br />
O <strong>Scale</strong> Listings<br />
www.sumptervalley.com<br />
trainman@callatg.com<br />
Tel: 541/<strong>38</strong>2-3413<br />
Fax:541/<strong>38</strong>9-7237<br />
Hours:<br />
Mon. thru Fri 8:30 AM - 5PM<br />
and sometimes on Saturdays<br />
54 • O <strong>Scale</strong> <strong>Trains</strong> - May/June ’08
NEWS: LASERkit O <strong>Scale</strong> Structures (see text for MSRP)<br />
American Model Builders, Inc., 8229 Brentwood Industrial<br />
Drive, St. Louis, MO 63144<br />
314-646-8588 • www.laserkit.com<br />
Kit #484 Elevated Warehouse: MSRP $79.95 – This kit is<br />
the latest addition to LASERkit’s O <strong>Scale</strong> Lineside Structures<br />
series. The Elevated Warehouse, offers modelers a multipurpose<br />
facility that will fit just about anywhere on their<br />
layout. Used by itself, the structure could be a small freight<br />
house for a railroad, a warehouse for a local merchant, or a<br />
distribution center for a trucking company. It could also be<br />
part of a larger industry sitting along side a grain elevator<br />
or as an annex to a factory. This kit features 100% laser-cut<br />
parts with tab and slot constructed walls, and roof with peel<br />
and stick doors, windows, and trim. The elevated building<br />
rests on top of six cast resin brick piers and is finished<br />
off with an interior floor, rolled roofing, and a white metal<br />
smokejack. Also included is a detailed loading dock, access<br />
ladder, truck bumper, and stairway that can be placed at different<br />
locations on the structure. The assembled warehouse<br />
measures 9.75” long x 4.75” wide x 4.5” high with the dock<br />
adding another 2” in length or width depending on where<br />
it’s located.<br />
Kit #489 Loft Barn: MSRP $42.95 – Although not considered<br />
a great architectural design, the American barn is one<br />
of the most beloved icons of our culture. In particular, the<br />
loft style barn was common all across the US with an upper<br />
story suitable for storing hay while the lower level provided<br />
storage space for feed, seed, and planting and harvesting<br />
equipment. The overhanging loft provided protection for<br />
parking a small tractor or plow beneath. LASERKIT’s first<br />
barn release for the O <strong>Scale</strong> market is designed not only for<br />
the model railroader short on real estate, but also for those<br />
folks new to the craftsman kit market who will find this utilitarian<br />
structure very easy to build and a great introduction<br />
to the LASERKIT product line. This easy to assemble lasercut<br />
wood model uses tab and slot, and peel and stick construction,<br />
which will give any modeler the ability to have a<br />
painted and assembled barn in as little as two evenings. The<br />
structure features a second story interior floor, panel roofing<br />
sheets, and sliding style doors that may be modeled in any<br />
position. Best of all, the 6” tall Loft Barn has only a 6” long x<br />
4.25” wide footprint making it ideal for any size layout.<br />
NEWS: DCC Options from MRC; MSRP: see text.<br />
Model Rectifier Corp. 80 Newfield Ave, Edison, NJ 08837<br />
732-225-6360 • www.modelrectifier.com<br />
MRC has announced new DCC sound decoders suitable<br />
for O <strong>Scale</strong>. These are:<br />
• # 0001817 Universal G Alco/SD60/SD70/F — Four<br />
different prime mover sounds and 33 horn sounds. Five<br />
amp capacity: $99.98<br />
• #0001818 Universal G SD45/MP15 — Two different<br />
prime mover sounds. Five amp capacity: $99.98<br />
• #0001819 Universal G — Sixteen steam sounds with<br />
33 whistles. Five amp capacity: $99.98<br />
All MRC sound decoders include speakers and a choice<br />
of horns (for diesel decoders), whistles (for steam decoders)<br />
and bells. All have 28 NMRA function capability. The MRC<br />
sound decoders are dual function, meaning they can run<br />
on DC as well as DCC.<br />
MRC also announced a new DC power pack with their<br />
Blackbox DCC function (see OST #33) activator built-in. The<br />
TECH 6 (P/N 0001200) only has a current capacity of 1.5A<br />
which may be useful for some O <strong>Scale</strong>.<br />
NEWS: East Gary Car Company Acquires Ashland Car Works<br />
East Gary Car Company, <strong>38</strong>28 St Joseph Ct, Lake Station IN<br />
46405<br />
East Gary Car Company has purchased the Ashland Car<br />
Works. EGCo will make parts available soon and will consider<br />
releasing some of ACW’s kits. Andy Sunderlin, East<br />
Gary’s chief-cook and bottle-washer, would like to know<br />
which kits people would like to see reissued. Drop him a<br />
line at the address above.<br />
May/June ’08 - O <strong>Scale</strong> <strong>Trains</strong> • 55
NEWS: New Books on CD in PDF format, MSRP: $16.95 plus<br />
$4.85 S&H (US), International Priority Mail to Canada and<br />
Mexico is $9; $11 for all other countries.<br />
Highlands Station, LLC, 4255 S. Buckley Rd, #137, Aurora, CO<br />
80013-2951,<br />
303-829-4449 • www.HighlandsStationLLC.com<br />
Highlands Station, LLC, has just released two new CD<br />
books – Trackside on the Pennsylvania: Vols. 1 and 2 by<br />
Jeff Scherb. Both CD books contain Jeff’s CAD drawings of<br />
Pennsylvania Railroad Standard Plans. Volume 1 has drawings<br />
of Structures (16 pages), Bridges & Culverts (10 pages),<br />
Signals (21 pages) and Signs (28 pages). Volume 2 focuses<br />
exclusively on Structures, with 19 pages of Signal & Switch<br />
Buildings, 11 pages of Passenger Stations, 12 pages of Combination<br />
Stations, 25 pages of Yard and Shop Buildings,<br />
and 13 pages of Freight Houses & LCL Service.<br />
Each CD is a re-release of the 96-page printed version<br />
of these books, but since the drawings are now available<br />
in PDF form, the user is able to print out the drawings in<br />
the scale desired. These CDs will also be valuable tools for<br />
scratchbuilders and freelancers, regardless of road modeled.<br />
All drawings and chapters are hyperlinked for easy access.<br />
Each CD also has a brief Printing Guide to assist modelers<br />
in resizing the drawings for their scale of choice. A sample<br />
page is available for download on the Highlands Station<br />
website.<br />
Prototype Photos of Warren Calloway; Retail $20.00<br />
each plus $4.85 S&H per order (US). S&H via International<br />
Priority Mail to Canada and Mexico is $9; $11 for all other<br />
countries.<br />
Highlands Station, LLC, has entered into an agreement<br />
with Warren Calloway, former Editor, and a current Contributing<br />
Editor, of Diesel Era magazine to distribute his<br />
extensive collection of prototype locomotive, rolling stock,<br />
and train photos on photo CDs. Warren has been scanning<br />
his extensive collection of slides and negatives to save them<br />
in JPG form. At present, over a hundred CD collections<br />
are available, and more will be added as his time permits.<br />
Unless otherwise indicated, each CD contains about 100<br />
JPEG images with a typical resolution of 1024 x 700 pixels.<br />
For a complete list of available CDs, please visit the Highlands<br />
Station website.<br />
NEWS: 1:50 and 1:43 vehicles<br />
Diecast Direct, Inc., 3005 Old Lawrenceburg Road, Frankfort,<br />
Kentucky 40601-9351<br />
502-227-8697 • www.diecastdirect.com<br />
Athearn 1:50 ’31 Model A Ford Vehicles; MSRP: $24.95<br />
Diecast Direct is now offering the Athearn 1931 Model<br />
A Ford vehicles for immediate delivery. Body styles available<br />
are a coupe, sedan, and pickup truck. The vehicles<br />
are die-cast in 1:50 scale and feature separately molded<br />
interiors, clear window glazing, and rubber tires. Each<br />
body style is offered in a variety of colors. Diecast Direct<br />
carries the complete line of Athearn 1:50 vehicles.<br />
First Response Replicas ’41 Ford Police Cars; MSRP: $14.95<br />
Diecast Direct is now offering First Response Replica<br />
1941 Ford police cars for immediate delivery. These vehicles<br />
are die-cast in 1:43 scale. Each one is painted and<br />
detailed for a specific state. There are also several railroad<br />
superintendent cars. In all, there are 49 offerings.<br />
(Comment: Both of these vehicles are quite nice and<br />
will work well on steam and early Diesel era railroads. I<br />
prefer the 1:50 models over the 1:43 strictly on the basis<br />
of the relative size error. The 1:50 models are much closer<br />
to U.S. O <strong>Scale</strong>. I checked out the wheelbase on both cars<br />
and they both scale out perfectly. They look proportionately<br />
correct in all aspects. Side-by-side, the 1941 Ford<br />
overwhelms the 1931 Ford so I would not use them in the<br />
same scene. - Joe Giannovario)<br />
56 • O <strong>Scale</strong> <strong>Trains</strong> - May/June ’08
Product Review: AtlasO Trainman Series 50’-6” AC&F<br />
Boxcars. MSRP: $42.95 (2-Rail)<br />
AtlasO, LLC 378 Florence Ave. Hillside, NJ 07205<br />
908-687-9590 • www.atlastrainman.com<br />
Reviewed by Mike Cougill<br />
History<br />
By the late 1960s and early ‘70s, the nation’s railroads faced<br />
a looming shortage of general service or XM boxcars. The<br />
steam-era fleet of forty-foot cars was reaching the end of their<br />
useful lives. While some were being rebuilt into 50-foot cars,<br />
many more were destined for the scrapper’s torch. Against this<br />
background, freight car manufacturers began a building blitz<br />
of new cars based on the virtually standard dimension of 50’-<br />
6” interior length. Companies like Pullman Standard, Southern<br />
Iron and Equipment Co., American Car & Foundry and others<br />
produced cars of a similar design, utilizing single-sheathed steel<br />
construction with exterior posts (X-post), cushioned underframes<br />
and non-terminating ends as opposed to the Dreadnaught<br />
ends of earlier designs. Commonly called “Railbox”<br />
cars, due to their predominance in Railbox’s striking yellow<br />
paint scheme, these new cars became the Diesel era’s version<br />
of the once common forty-footers.<br />
Fidelity and Compatibility<br />
As part of their Trainman Line of rolling stock, AtlasO has<br />
given modern-era modelers a much needed car in the form of<br />
an American Car & Foundry X-post boxcar. Upon opening the<br />
box, you’ll find a well detailed, accurately dimensioned, readyto-run<br />
car.<br />
Comparing the model to photos of the prototype reveals that<br />
all of the details are there, and for a car aimed at the entry level<br />
market, they are well done. The carbody detailing is crisp and<br />
features the correct diagonal panel roof plus working freight<br />
doors. The non-terminating ends have freestanding end ladders,<br />
brake platforms, grabirons, tack boards and brakewheel (a<br />
nice feature that I’ll return to later), while the side grabirons are<br />
molded on. The underframe features cast-on brake components<br />
and piping with a wood grained floor. The wood floor is incorrect<br />
for this car as the prototypes had a nailable steel floor.<br />
Since I model in P48, I don’t even own an NMRA Standards<br />
Gage for 1-1/4” track; therefore I can’t confirm that wheels<br />
were properly gauged, but I suspect that they are. The axle end<br />
caps on the roller bearing trucks rotate with the wheels. The<br />
AtlasO couplers were at the right height and no problems were<br />
encountered in coupling up to my Kadee® equipped cars.<br />
One of my initial impressions was that the car sat too high<br />
on the trucks. However, after looking at my prototype photos, I<br />
changed my mind. What I saw on the model was the lack of a<br />
centersill around the bolsters to accommodate the truck swing<br />
on tight radius curves. This left a visual gap, giving the impression<br />
of sitting too high.<br />
The finish of the paint is excellent with clean color separations<br />
at the carline. One item that is quite distracting is the<br />
shiny finish on the wheels. Perhaps AtlasO will find<br />
a way to chemically blacken the wheels. Most modelers<br />
will paint and weather them anyway; so maybe<br />
it’s a moot point. The lettering is opaque, crisp and<br />
legible, even down to the smallest print in the lube<br />
stencil. A close examination of the dimensional data<br />
showed some variation in the dimensions between<br />
the model and the prototype. The biggest discrepancy<br />
occurred in the interior height. The prototype<br />
was labeled at 10’-7”, while the model read 11’-0”.<br />
The overall height as measured from the railhead<br />
was 14”-4” on the prototype and 14’-8” on the model. None<br />
of these are really noticeable unless you’re measuring like I<br />
did. Since we are just talking a matter of scale inches, I really<br />
don’t consider these discrepancies to be a major issue. Further<br />
checks with my scale rule indicated that the carbody is quite<br />
accurate. A quality I rate as excellent.<br />
Finessing for Finescale<br />
I’m always pleased when I find a well detailed, accurate<br />
modern car model that will provide a good foundation for a<br />
finescale makeover, and this new Trainman car fits that description<br />
to a tee. With accurate dimensions, correct diagonal panel<br />
roof, and modest price, these models are ripe for kitbashing<br />
and sweetening up some of the details. Whether you work in<br />
P48 or Standard O, a little extra work will turn a good car into a<br />
great one. Here’s what I plan to do:<br />
I’ll replace the molded on grabirons with freestanding ones<br />
made of 0.15” wire. I’ll also replace the stirrup steps, making<br />
new ones from brass. I previously mentioned that all of the end<br />
details are separately applied. This makes them easy to remove<br />
without damaging the carbody. I’ll replace the end ladders with<br />
scratchbuilt ones of 0.15” wire and 1/32” brass angle. I’ll reuse<br />
the brakewheel since it’s a nice casting, but will replace the<br />
housing and chain. The brake platforms aren’t bad and since<br />
these are often quite fragile on a model, I might leave them as<br />
is. If I do replace them, I’ll use some HO <strong>Scale</strong> Plano roofwalk<br />
material or scratchbuild the platforms out of small mesh screening<br />
and brass strip.<br />
The underframe is well done, but I’ll likely build a new one<br />
from scratch. Why? Mostly to fill in the missing portions of the<br />
centersill left out to accommodate the truck swing, and to correct<br />
the flooring material. There are some I beams that run the<br />
length of the underframe that are visible on the car ends that<br />
don’t show on the model. These cars also had visible brake<br />
rodding below the centersill. P48 modelers sweat these types<br />
of details as a matter of routine. Doing so is a huge part of our<br />
enjoyment of the hobby.<br />
Of course, I’ll certainly<br />
look for a way to convert<br />
the trucks to P48 standards.<br />
Summary<br />
To wrap things up, I<br />
think this is an excellent<br />
car overall. AtlasO has<br />
done a good job attending<br />
to the basic details<br />
that make for an accurate<br />
model. I give them high<br />
marks for this, and I’ll<br />
certainly be adding a few<br />
more of these boxcars to<br />
the roster.<br />
May/June ’08 - O <strong>Scale</strong> <strong>Trains</strong> • 57
AtlasO Master Series Airslide Covered Hopper: MSRP $ 59.95<br />
(2-Rail)<br />
AtlasO, LLC 378 Florence Ave. Hillside, NJ 07205<br />
908-687-9590 • www.atlas.com<br />
Reviewed by Mike Cougill<br />
I’m not a rolling stock expert. Many of you know far more<br />
about freight cars than I’ll ever learn. Fortunately, I know a<br />
couple of you who still respond to my e-mail inquiries and<br />
mercifully share the expertise that I sorely lack for these<br />
reviews. Thanks again to Warner Clark; I can sound like I<br />
might actually know something.<br />
Covered hopper cars were designed to carry a variety of<br />
ladings that needed to be kept dry in transit. Among them<br />
were unprocessed food products such as flour and raw<br />
sugar. The problem these commodities had was they would<br />
pack down tightly in transit, thereby making the unloading<br />
process very frustrating for the receiving customer. Since<br />
frustrating often equaled expensive, in terms of time and<br />
labor costs, car companies looked for ways to speed things<br />
along using commonly available technology that customers<br />
might already have on hand. Thus the Airslide® hopper was<br />
born.<br />
Produced by General American Transportation Corporation<br />
in the early 1950s, an Airslide® hopper car consisted<br />
of two trench style compartments on either side of the centersill.<br />
At the bottom of these compartments were U-shaped<br />
steel chutes covered by a 1/4” thick, silicone impregnated<br />
fabric membrane. Low pressure compressed air could be<br />
pumped into these chutes via the car’s external<br />
piping, which aerated the contents, allowing the<br />
material to flow more easily to the unloading<br />
gates at the center of the car.<br />
Fidelity and Compatibility<br />
AtlasO has produced a nice rendition of a<br />
40 foot, 70 ton, 2600 cubic foot Airslide® Covered<br />
hopper car as part of their Master Series<br />
of freight cars. Our 2-Rail sample checked out<br />
in most respects having an excellent paint finish,<br />
sharp lettering and fine detailing overall. As<br />
noted in my boxcar review in this issue, I don’t own an<br />
NMRA Standards Gage because I model to P48 track<br />
standards. (I have the feeling I’ll be picking one up though.)<br />
Therefore, I can’t confirm whether the wheels are correctly<br />
gauged; however, they are free rolling and the Bettendorf<br />
trucks are well done. The couplers did check out at the<br />
proper height and as noted previously, no problems were<br />
encountered with my Kadee® equipped cars.<br />
Dimensionally, the car is very accurate, matching the<br />
prototype’s length of 42’ 6” over the strike faces of the couplers;<br />
an overall height above the rails of 14’ 6” compared<br />
to 14’ 5-9/16” prototype, and 10’ 8” overall width. The truck<br />
centers sounded the only off-note being six inches too wide<br />
at 30’ compared to the prototype’s 29’ 6”. Topside you’ll find<br />
six operating loading hatches and a see-through roofwalk<br />
which, while nicely done, seems a bit thick for my tastes.<br />
The detailing of the carbody on this model is excellent.<br />
The grabirons are especially well done, having a fine crosssection,<br />
yet they’re robust. On my car the brake cylinder<br />
was mounted in a crooked manner. (This might have been a<br />
fluke.) It’s a clearly visible part and having it out of alignment<br />
is distracting once you notice it. It’s also hard as nails to get<br />
at too. The underside is well done and features the chutes<br />
and unloading gates, the brake rodding, and the piping for<br />
pressurizing the load compartments.<br />
Finescale refinements<br />
In truth, there isn’t much I would consider<br />
changing on this model beyond a<br />
set of P48 wheels or replacement trucks.<br />
The bolster area on ready-to-run models<br />
such as this often suffers the most in<br />
order to accommodate the truck swing<br />
for short radius curves. On hopper cars<br />
this area is quite visible and I would consider<br />
filling in some of the missing pieces<br />
here. The car ends need an air hose and<br />
there seems to be an absent mounting<br />
bracket for the outboard end of the air<br />
reservoir. I’d look at replacing the thick<br />
roofwalk and giving the car a weathering<br />
job to tone things down, especially the bright finish of<br />
the wheel faces. Overall it’s an excellent model of a special<br />
service car that would fit well on any Transition-Era or earlyto-mid<br />
Diesel-era layout. For their attention to detail and<br />
fidelity to prototype dimensions, AtlasO gets high marks<br />
again.<br />
58 • O <strong>Scale</strong> <strong>Trains</strong> - May/June ’08
REVIEW: Sunset/3rd Rail SP AM-2 4-6-6-2; MSRP: $1800<br />
Sunset/3rd Rail, 37 S Fourth St, Campbell, CA 95008<br />
408-866-5764 • www.3rdrail.com<br />
Reviewed by Joe Giannovario<br />
The Prototype<br />
The Southern Pacific built a group of 12 compound 2-6-6-2s<br />
for passenger service in 1911. These were built as cab-forwards,<br />
i.e., the cab was placed at the front of the locomotive, because<br />
of problems with smoke asphyxiating the engine crews in long<br />
tunnels and numerous snowsheds. Since most SP locos were oilburners,<br />
there were no great technological barriers to building a<br />
locomotive in this configuration. Indeed, the SP is noted for its<br />
many cab-forwards. The early 2-6-6-2s were classed MM-2s and<br />
numbered 4200-4211.<br />
The two-wheel lead truck turned out to be problematic. It experienced<br />
excessive flange wear and tended to derail at passenger<br />
speeds. It also allowed the cab to swing out farther than normal,<br />
causing problems in snowsheds and tunnels. So, the SP extended<br />
the frame and installed a four wheel lead truck. As built, the original<br />
MM-2 locomotives were equipped with semi-cylindrical Class<br />
98-SC tenders. These tenders were later enlarged to Class 120-SC,<br />
capable of holding 12,000 gallons of water and 3,817 gallons of oil.<br />
In 1929, engines #4200, #4205, and #4209 were shopped at<br />
Sacramento and rebuilt as simple expansion engines and were<br />
reclassified AM-2. Besides new cylinders, the locomotives were<br />
also equipped with superheaters and Worthington 4-B feedwater<br />
heaters located on the engineer’s side. The rest were rebuilt during<br />
1935 and 1936. In 19<strong>38</strong> all of the AM-2s were renumbered to the<br />
3900 series to make room on the roster for newer 4-8-8-2 AC-8s<br />
and AC-10s. The AM-2s were scrapped between 1946 and 1948.<br />
The Model<br />
Sunset provided us with a pre-production model of the pre-war<br />
version of the AM-2 with the boiler tube pilot. The model is made<br />
of formed, stamped, and etched brass parts with lost-wax castings<br />
for details. It is painted and lettered for number 3900, which puts it<br />
post-19<strong>38</strong> but pre-1941. The assembly and finishing are excellent.<br />
The tender is the semi-cylindrical whaleback type. The locomotive<br />
connects to the tender with a typical drawbar, plus a plug<br />
for lighting. I was able to close-couple the engine and tender with<br />
no clearance problems. The locomotive is equipped with a sound<br />
cam on one axle and the tender frame is pre-drilled for a speaker.<br />
The tender also came with a Kadee® coupler pre-installed.<br />
The handrails on the rear deck of the locomotive are quite<br />
delicate and can easily be damaged, so take care in handling the<br />
locomotive in this area. The model includes working class lights,<br />
working rear markers and an operating headlight and backup light.<br />
Fidelity<br />
Finding plans or dimensions was a challenge as I do not have<br />
any SP references in my library. I did find several photos online<br />
and was able to scale some dimensions from these. I also found<br />
an S <strong>Scale</strong> drawing of an SP 2-8-8-2 cab forward in the November<br />
1970 MR which I used for some dimensions such as the cab and<br />
tender.<br />
For those dimensions that I could find in references or measure<br />
directly from plans, the model was dead-on. For those dimensions<br />
that I estimated from photos, the model was well within my<br />
personal tolerance (two to three scale inches). I concluded that the<br />
model is dimensionally accurate.<br />
Compatibility<br />
I checked all of the wheels and drivers with an NMRA O <strong>Scale</strong><br />
Standards Gage. A couple of the driver pairs were tight but not<br />
enough to cause any operational problems. The model runs on<br />
plain-vanilla DC and is compatible with any other locomotive that<br />
runs on the same.<br />
Performance<br />
Running light, the model started moving at one volt drawing<br />
about 600 mA. There was a stutter in the drive which turned out<br />
to be an errant brake shoe causing an intermittent short. Once<br />
restored to its proper location, the locomotive ran like a dream.<br />
The best slow speed performance was at 1.75 volts, 600mA at a<br />
speed of 4.8 smph. Unlike most brass models, this one ran equally<br />
well in forward and reverse.<br />
I ran the AM-2 through the tightest curves on the OST layout,<br />
40” at one end and close to 36” at the other. It made it through the<br />
40” curve without difficulty, but the 36” curve posed a problem.<br />
The boiler swung over far enough so that the exhaust pipe from<br />
the rear cylinders to the smokebox touched the top of the last<br />
driver causing a short circuit. The cure for this would be to relieve<br />
the exhaust pipe where it touches the driver. Another possible fix<br />
would be to wrap the exhaust pipe to insulate it. However, I don’t<br />
consider this a serious problem.<br />
I coupled up the AM-2 to my test train of 10 mixed brass, plastic,<br />
and die-cast freight cars and sent it out onto the main track.<br />
Under load at five volts the loco drew 800mA on level track and<br />
1200 mA on a 3+% grade. At this voltage level all of the lights on<br />
the model were lit and it was running at 18.7 smph. I stopped the<br />
train mid-grade and restarted it. The AM-2 walked away with the<br />
load as if it were on level track.<br />
This is one of the best running locomotives I have seen, ever,<br />
and one of the quietest. While running the test train I noticed a<br />
thumping noise coming from the train. At<br />
first, I thought I was the locomotive. Then,<br />
I realized it was coming from the rear<br />
of the train. My caboose has gunk built<br />
up on one wheel which was hitting the<br />
underframe.<br />
Conclusion<br />
The AM-2 is an ugly-duckling with a<br />
face that only a mother or an SP modeler<br />
could love. However, this model is so well<br />
done that I’d be tempted to buy one were<br />
I less fiscally disciplined. The Sunset AM-2<br />
is a well-made model that exhibits excellent<br />
performance and should be in every<br />
SP fan’s steam collection.<br />
May/June ’08 - O <strong>Scale</strong> <strong>Trains</strong> • 59
REVIEW: Special Anniversary Billboard Reefer 4-Pack*; MSRP<br />
2‐Rail: $259.90 (2-Rail)<br />
AtlasO, LLC 378 Florence Ave. Hillside, NJ 07205<br />
908-687-9590 • www.atlas.com<br />
Reviewed by Jim Hill<br />
A Bit of History<br />
Billboard reefers have a long and colorful history in American<br />
railroading, and have been a favorite of modelers from the very<br />
beginning of the hobby. Although the classic wood-bodied billboard<br />
reefers have long since disappeared from today’s railroads,<br />
they remain a staple in the model world to this day. In the past<br />
several years, AtlasO has produced more than 200 different wood<br />
refrigerator cars in O <strong>Scale</strong>, colorfully painted and lettered for<br />
numerous private owners, both real and fanciful.<br />
The story of these cars has been told many times, but the short<br />
version is that billboard reefers began to appear in the late 1800’s<br />
and were seen far more frequently when URTX started building<br />
them in large numbers and leasing them to private owners in the<br />
1920s. The billboard era began its decline in July, 1934, when<br />
Interstate Commerce Commission regulation #201 came into<br />
effect, providing that no new cars intended for interchange service<br />
could be painted with the lessee’s name in lettering larger than 12”<br />
and that existing billboard cars could not be used in interchange<br />
at all after January 1937. By the beginning of World War II virtually<br />
all these highly visible cars had been painted back into the original<br />
owner’s standard colors, although many of the cars remained in<br />
service until the 1960s in their more modest paint schemes.<br />
The AtlasO car I reviewed is lettered for Krey’s, a meat packing<br />
company that dates back to 1882 and was located at the corner<br />
of North Florissant and Bremen avenues in St. Louis, MO and was<br />
absorbed by another corporation long ago. The car number, QREX<br />
877, indicates that the car was leased to Krey’s by the Quaker<br />
City Refrigerator Line. QREX itself came under the banner of the<br />
General American Transportation Corp after 1928. These 36‐foot<br />
wood ice-refrigerated cars were frequently used by packing plants,<br />
and came to be known simply as “Meat Reefers”, used primarily to<br />
transport meat in bulk from slaughter houses to regional processors<br />
who prepared the products for delivery to local markets.<br />
I wasn’t able to find a photograph of a prototype Krey’s car, but<br />
the general dimensions of the model compare closely to published<br />
drawings of similar cars. Atlas has stated that its reefers are based<br />
on prototype photos and cars built by the General American Car<br />
Company for the Cudahy Packing Co. in 1925 and, a few years<br />
back, Atlas published a “Wood Reefer Collector’s Guide” which<br />
should include a photograph of most of the cars they’ve produced.<br />
The Model<br />
The AtlasO Krey’s reefer has been released with three numbers,<br />
877 through 879, and was first produced by Atlas in 2003. My<br />
friend and fellow O <strong>Scale</strong>r John Whipple has credentials as a<br />
mechanical engineer, so I enlisted his aid in checking the more<br />
critical measurements on the car. The metal Bettendorf trucks,<br />
with 33” wheelsets, meet all the NMRA dimensional standards as<br />
to tread width, gauge and flange depth and their rolling quality is<br />
excellent. The die-cast knuckle couplers are quite close to optimal<br />
height. On the minus side, I’ve found the Atlas knuckle couplers to<br />
be more fragile than Kadees®, which might be a problem if you do<br />
a lot of switching or plan to run long trains.<br />
The model measures a scale 36’ 9” over the carbody ends,<br />
which just happens to be the exact same length as the ubiquitous<br />
All-Nation refrigerator cars most O <strong>Scale</strong>rs are familiar with. The<br />
carbody is a scale 8’ 9” wide, while a comparable All-Nation car is<br />
slightly wider at 9’ 3”.<br />
I happen to have a couple of the Walthers “Grand Union” QREX<br />
wood reefers, and they measure out at 9’ 3”. Despite the slight difference<br />
in width of these models (which may well be accurate for<br />
the particular reefers involved), the AtlasO car looks perfectly at<br />
home together in a string of reefers of several makes.<br />
NMRA Recommended Practice RP‐20.1 suggests that these cars<br />
should weigh 14 ounces, and the Krey’s reefer comes close at 15.3<br />
ounces.<br />
Having passed technical inspection, what really sets the AtlasO<br />
car apart from the crowd is the level of detail and the quality of the<br />
paint job. The underbody brake detail is well done, the doors and<br />
hatches can be opened (with working latches), and the grab irons,<br />
brake staff and brakewheel are all of appropriate scale dimensions.<br />
Yes, the hinges on the roof hatches are a bit thick, but that’s<br />
undoubtedly a concession to durability. The metal grab irons are<br />
appropriately thin, as are the coupler lift bars and the latches that<br />
secure the roof hatch covers.<br />
But I’ve<br />
saved the best<br />
for last, as the<br />
five-color paint<br />
job can only be<br />
described as<br />
stunning. The<br />
tiny lettering<br />
used for the<br />
dimensional<br />
data is crisply<br />
done, as is the<br />
thin black outline<br />
surrounding<br />
the “Krey’s” lettering.<br />
Even the<br />
almost microscopic<br />
lettering<br />
on the underbody<br />
brake gear<br />
is clearly<br />
readable.<br />
It would take a very complex decal set, a steady hand and a<br />
lot of patience to even come close to the quality of the lettering<br />
Atlas produces.<br />
All in all, a very well done piece of rolling stock, flawlessly<br />
painted and ready to run.<br />
[*Editor’s note: The Krey reefer is only available as part of<br />
the Special Anniversary 4-Pack (P/N 7797) which includes<br />
the following billboard reefers: Decker, Eagle Beer, Krey’s,<br />
and Selecto.]<br />
60 • O <strong>Scale</strong> <strong>Trains</strong> - May/June ’08
REVIEW: “Gold” Series Alco C630; 2-Rail MSRP: $459.95;<br />
Unpowered MSRP: $229.95<br />
AtlasO, LLC, 378 Florence Avenue, Hillside, NJ 07205<br />
908-687-9590 • www.atlasO.com<br />
Reviewed By Gene Clements<br />
For those readers who may recall, in the Nov./Dec. 2006<br />
issue (# 29), Brian Scace reviewed the AtlasO Silver Series,<br />
Alco Century 628. Unlike Brian, I have spent my railroad career<br />
around or on EMD and GE locomotives. In order to do justice to<br />
the manufacturer, the model and the prototype, I had to dig into<br />
the reference library and videotapes to research this locomotive.<br />
The Prototype<br />
Built by Alco (American Locomotive Company) as the Century<br />
Series 3000 HP version, these locomotives were produced<br />
from July 1965 until October 1967 in the U.S. and continued in<br />
Canada until July 1969. The designation 630 stands for 1960s<br />
production, 3000 HP. With approximately 126 units sold to<br />
American and Canadian lines, the 630 was Alco’s heavyweight<br />
entry into the horsepower battle with GE and EMD during this<br />
time period. Similar to, but distinguishable from the 628 by the<br />
large aftercooler housing behind the cab, the 630 was a higher<br />
rated horsepower unit due in part to its AC-DC alternator-rectifier<br />
transmission.<br />
The Model<br />
Originally released by AtlasO in 2006 as the Silver Series<br />
(2-Rail DC & 3-Rail TMCC), this model is a 2007 Gold Series<br />
release, 2-Rail version with QSI Sound and DC/DCC capabilities.<br />
My model came painted and lettered for the Pennsylvania<br />
R.R. and my research revealed that Atlas did their homework.<br />
The paint and lettering meet the standards that we have come<br />
to expect from Atlas and are correct for the era of this engine’s<br />
working life. The locomotive is also available in Canadian<br />
National, Conrail, Reading, Union Pacific, Alco-Demonstrator<br />
and undecorated. The carbody comes complete with windshield<br />
wipers, lift rings, grab irons, cab crew and other details.<br />
It also has pilot footboards, which would date the engine as<br />
pre-late ‘70s when footboards disappeared from the pilots.<br />
My first impression upon opening the box was: “What a<br />
monster.” This is a large locomotive even in model form. This<br />
engine came in the new shipping arrangement, mounted in a<br />
cradle inside the Styrofoam carton. I ended up removing the<br />
Styrofoam from its box in order to break one corner of the<br />
container so I could slip the engine and cradle out because of<br />
the very snug fit. Once you remove the 4 screws that hold the<br />
engine to the cradle, save all these<br />
pieces in the event you ever need<br />
to ship the engine.<br />
At approximately 68 scale feet<br />
over the coupler faces and standing<br />
14 scale feet over the top of<br />
the rail, this brute weighs in at 6<br />
actual pounds. The three axles on<br />
each truck are powered by a vertical<br />
can motor and gear drive; a<br />
design that has become standard.<br />
In testing this engine to date, it has<br />
handled everything I’ve coupled to<br />
it, including M.U. consists and various<br />
heavy freight trains. Rated by<br />
AtlasO at 40.5” minimum radius,<br />
the engine handled the nos. 6 and<br />
8 turnouts and all curves on my layout down to the 48” radius.<br />
When following the DCC Startup guide, I ended up making<br />
a trip to the DCC programming track in order to activate the<br />
short address of 003. (I use an NCE System.) While there I took<br />
care of a few other tasks. So if in DCC mode you program in<br />
003 on your Cab or Controller and nothing happens check the<br />
address to make sure it is active before pushing the panic button.<br />
Testing was performed in both DC & DCC modes, where I<br />
encountered no operational problems.<br />
What about the sound? I’ve become a fan of QSI sound, but<br />
not being familiar with Alco locomotives I had to find a set of<br />
Alcos on an old VHS tape to compare the sound. The model<br />
sounds like a 630, (a GE U Boat on steroids) to me. The engine<br />
comes with the volume set at maximum from the factory so be<br />
prepared to turn down the sound to a level that will not override<br />
other sound equipped engines, or run the cat out of the<br />
train room. The sound is also playable and adjustable in DC<br />
with the Quantum Engineer as well as most DCC systems and<br />
their programming abilities.<br />
The engine is equipped with yellow tinted LEDs for headlights<br />
and red class lights, which operate red to the rear during<br />
movement. There is no “Scace switch” to turn the class lights<br />
on or off, but the F11 function in DCC may do it.<br />
In Summary<br />
A very impressive model from AtlasO that looks sounds<br />
and operates great. If you’re an Alco or Atlas fan in the need<br />
for some heavy-duty 6-axle power, then here’s your engine. To<br />
the people at AtlasO, a big thumbs up. Now, how about some<br />
EMD and GEs from the same time period for competition purposes?<br />
Those I have experience on as a Hoghead.<br />
May/June ’08 - O <strong>Scale</strong> <strong>Trains</strong> • 61
Diesel<br />
2008 Chicago March Meet<br />
1st Place - Richard Rusnak, GTW<br />
SD-40, custom painted and detailed<br />
from kits.<br />
2nd Place - David Schultz, NP NW-2<br />
#99, started with an All Nation kit. Dave<br />
added scratchbuilt and other detail<br />
parts. Model has a full cab interior.<br />
Freight Car<br />
1st Place - Marc Knoll, N&W<br />
Wooden Hopper, scratchbuilt.<br />
2nd Place - Carl Jackson, PRR<br />
H-31 Hopper, QC kit with much<br />
added detail.<br />
Passenger Car<br />
1st Place - Bruce Aikman, 14-sec<br />
Pullman, kitbashed from Amer.<br />
Std. Car Co kit.<br />
2nd Place - Ed Campbell, UP<br />
Pullman Sleeper, rebuilt and<br />
redetailed import body.<br />
62 • O <strong>Scale</strong> <strong>Trains</strong> - May/June ’08
Contest Results<br />
Steam<br />
1st Place - Chuck Bard, CNR<br />
#6404 4-8-4, scratchbuilt.<br />
2nd Place - Lou Bartig, MoPac #1901<br />
2-8-4, scratchbuilt<br />
Best of Show: Lou Bartig MoPac<br />
#1901.<br />
1st Place - Marc Knoll, Covington (KY) Station, scratchbuilt.<br />
Structures<br />
2nd Place - Tim<br />
Anderson,<br />
Barber Shop,<br />
Bar Mills kit.<br />
Traction<br />
1st Place - Rich Nelson, CSL (Chicago<br />
Surface Lines) #1465, scratchbuilt from<br />
wood and Strathmore.<br />
2nd Place - Greg King,<br />
CSL #804, parts &<br />
scratchbuilt.<br />
May/June ’08 - O <strong>Scale</strong> <strong>Trains</strong> • 63
Southern New<br />
England Model<br />
railroad Club -<br />
Modular Layout<br />
By John Roberts<br />
In February<br />
1990 the Amherst<br />
Railway Society’s<br />
show director Robert Buck expressed concern to John Roberts<br />
over the lack of O <strong>Scale</strong> model railroads at their annual show.<br />
John, never one to duck a challenge, assured him that he and his<br />
friends would build an O <strong>Scale</strong> layout that would put O <strong>Scale</strong><br />
back in the minds of next year’s show attendees. With this commitment,<br />
the gauntlet had been laid down and it was up to this<br />
small group of O <strong>Scale</strong>rs to prove they could do it.<br />
The first brainstorming session was held in April 1990 and<br />
included John and Roland Roberts, Tom and Fred McCarthy, Rich<br />
Godfrey, Phil Ginkus and Bob Jones. Construction procedures<br />
and standards were established by slightly modifying those of the<br />
Chicago Area O <strong>Scale</strong> Club (ChAOS) published in O <strong>Scale</strong> News<br />
magazine the year before. These standards would allow each<br />
member to construct his section of the layout and then assemble<br />
the completed modules at the show the following year with the<br />
knowledge that they would connect into a fully operational model<br />
railroad. The modification was to reduce the main line radius from<br />
96” to 84”. This allowed us to cut down on the number of modules<br />
needed to build the curves from 24 modules to 12.<br />
We created an oval layout 21’ x 45’, with over 100 feet of<br />
length on the 2 mainlines. Not all the track was laid for the first<br />
show, but the mainlines and part of the receiving yard were<br />
operational. Ballast and scenery weren’t even started at this point.<br />
With the show just days away, a name was needed to indicate<br />
who we were, but who were we? Since the members were all<br />
from Massachusetts or Connecticut, the name Southern New England<br />
O <strong>Scale</strong>rs (SNEOS) was chosen, and Phil lettered two signboards<br />
to proudly display on the layout. Reaction of the 10,000<br />
people attending the 1991 show was very positive to the O <strong>Scale</strong><br />
trains that ran flawlessly.<br />
Each year something new was added or changed. The first<br />
addition was a freight yard that extended to the interior of the<br />
oval. The new yard gave the layout the ability to store over 100<br />
freight cars. Next all the switches in the receiving and departure<br />
yard were changed from number 6s to number 8s, providing better<br />
operations for moving large trains in and out of the yard.<br />
The layout was then lengthened to 63’. This allowed us to<br />
lengthen the freight yard and add a steam facility (Photo 3). The<br />
steam facility has a servicing area, a 112’ turntable and a five stall<br />
roundhouse with 11 service tracks. That was soon followed by a<br />
large industrial area that requires its own switcher.<br />
Shrinking the interior space even more, we decided to add a<br />
diesel facility (Photo 1) with 10 tracks, oil and sand facilities, and a<br />
repair shed. It was then decided to add a station scene to the front<br />
of the layout (Photo 2). Gardner Station was added with platforms<br />
and a parking area. We also added building flats for backdrops.<br />
They are cardboard flats that were modified and detailed, giving<br />
the buildings a wonderful three-dimensional look.<br />
A large bridge scene with a deep gorge was added to the rear<br />
of the layout. The scenery in the gorge almost reaches the floor.<br />
Another railroad passes through at the bottom of the gorge along<br />
the East Hubbardston River. There is a lot of whitewater tubing<br />
and rafting through this area. The truss bridge over the gorge is<br />
8’ long with shorter deck girder bridges at both ends. With these<br />
new additions the layout size became 21’ by 81’. At this point it<br />
was very difficult to move around the interior of the layout; so the<br />
next logical step was to make the layout wider. We added 6’ to<br />
the width so the dimensions now became 27’ by 81’.<br />
Still not satisfied, we now wanted to add a coach yard. In order<br />
to add the yard we added six more feet to the width of the layout<br />
and arrived at our final dimensions of 33’ by 81’. The coach<br />
yard was built on the rear of the layout and has seven tracks for<br />
coaches and two tracks for express reefer storage. We are planning<br />
to add an elevated station over the coach yard. Hopefully the<br />
scenery work will be done for East Wind ‘08.<br />
The club decided to convert from DC to DCC. DCC is the<br />
best invention for modular layouts. It cuts down on wiring and<br />
makes it much easier to setup or take down the layout. In 2004<br />
we purchased a signal system and went to town installing it however,<br />
the modular aspect made it difficult. We needed to find a<br />
way to setup and take down the signals quickly and delicately.<br />
We mounted the signals to a permanent base and changed the<br />
connections to computer DB type connectors. After trying five<br />
separate signal panels around the layout, we built a large panel on<br />
wheels for all the signal circuitry. Now we string two cables from<br />
the signal panel to the layout. It took a bit of work, but the signals<br />
are working well, providing block and interlocking indication.<br />
The detectors get detection from locomotives, lighted cars and<br />
cars with a 4.7K resistor across a set of wheels. The signals’ turnout<br />
control is done with Tortoise switch machines and accessory<br />
decoders. Now all the turnouts can be operated from the cab you<br />
operate with or from a laptop interfaced to a command station<br />
for a central dispatcher. The best feature is the macros where you<br />
can program a number of turnouts. This is a great feature for routing<br />
trains out of the yard to the main line. The only issue we have<br />
found with macros is to remember to re-align the turnouts after<br />
the train passes.<br />
Scenery has been an ongoing project throughout the evolution<br />
of the layout. The modules are only 24” wide and adding scenery<br />
is difficult at best; so we started with ground cover and ballast.<br />
We were able to place some hills on the curves along with removable<br />
trees. We added a backdrop using a combination of commercially-made<br />
scenes and in-house painting.<br />
The eras modeled cover the 1920s up through today’s modern<br />
Amtrak passenger trains and inter-modal fast freights, providing<br />
interest to model railroaders, railfans, and the general public<br />
regardless of their interest in trains.<br />
Transporting the layout is a large undertaking. The club built<br />
racks on wheels to transport all the modules. Each rack holds 6 to<br />
8 modules and allows us to roll them up on a truck or trailer. To<br />
transport the entire layout we use a 28’ automobile trailer and a<br />
12’ utility trailer. We have used a 24’ box truck in the past but that<br />
is not large enough to carry all the modules. Most of the members<br />
have SUVs or pickup trucks to help with transportation. Don’t forget<br />
to visit our layout at East Wind ‘08 The 2008 O <strong>Scale</strong> National<br />
convention.<br />
u<br />
Photo Captions (See photos next page)<br />
Photo 1: A wide variety of power is waiting assignment in the<br />
diesel facility. In the photo we see Santa Fe, D&H, CB&Q and<br />
Guilford power.<br />
Photo 2: A fast Pacific slows for a stop at Gardner Station with<br />
the morning limited.<br />
Photo 3: GN S1, #2588 heads off the turntable for assignment<br />
on the morning Empire Builder.<br />
Photo 4: A west bound SP freight waits under Interstate 90 for<br />
the block to clear.<br />
64 • O <strong>Scale</strong> <strong>Trains</strong> - May/June ’08
1 2<br />
3<br />
4<br />
May/June ’08 - O <strong>Scale</strong> <strong>Trains</strong> • 65
Just <strong>Trains</strong> TM Free Shipping over $200 on most orders Orders (888) 453-9742 Info (302) 453-0465 www.justrains.com<br />
Atlas 2-Rail<br />
Discountinuing Engines<br />
& Rolling Stock<br />
Atlas 2-Rail <strong>Scale</strong> Wheel Steam w/PS 2.0<br />
7840 BNSF Patch Job -8, DC 299<br />
7841 BNSF Patch Job Dmy 195<br />
Cass Scenic, Weyerhauser Shay 925 307 3-Stall Trolley Barn 23 x 11 95<br />
2110 BN GP-35, DC 250<br />
20-3199-2 L&NE 2-8-2 Mikado 650<br />
953 Joe’s Pickle Factory 14 x 9 69<br />
7848 GE Demo Dash 8, DC 299<br />
20-3216-2 NYC Dreyfus 4-6-4 875<br />
20-3255-2 JC P47 4-6-2 625<br />
310 Mitchell Textile Co. 39<br />
2111 Reading GP-35, DC 3# 250 GP60M SF, DC 299<br />
N&W Class A #1218 or #1242 1150<br />
20-3286-2 PRR 2-8-2 Mikado 725<br />
954 Buck Island Canning 8 x 12 49<br />
2112 SP GP-35, DC 2# 250<br />
2113 Savannah & Atlanta 250<br />
GP60M BNSF, DC 349<br />
GP60B BNSF Red/Silver DC 325<br />
GP60B BNSF Red/Sil, Dmy 190<br />
20-3288-2 UP 2-8-2 Mikado 725<br />
Royal Hudson 899 BC, Sou, CP<br />
315 Grain Silo 7 x 19 x 22 H 85<br />
956 James Company 13 x 8 x 9H 55<br />
UP SD40-2T <strong>Scale</strong> Wheels 399<br />
2114 WM GP-35, DC 250<br />
2115 NKP GP-35, DC 250<br />
GP-35 also in PRR, CNW, GA<br />
2263 VT Railway GP60, DC 299<br />
Undec, SF 349 Dmy 185<br />
GP-9, DC WM 299<br />
MTH Steam<br />
<strong>Scale</strong> Wheel Steam w/PS 2.0<br />
Available w/Electrocouplers<br />
SD70ACe UP Heritage 399<br />
Z-4000 375 AIU 85 DCS 249<br />
320 3-Stall Roundhouse 26” 159<br />
958 Mill Works 11 x 7 w/Tower 49<br />
2234 MR Hiawatha AA Set 449<br />
2235 MR Hiawatha Power B 250<br />
20-3130-2 Rdg T-1 4-8-4 825<br />
20-3131-2 Am. Freedom 4-8-4 799<br />
K-Line 2-R Shay $399<br />
902 Jaybar Company 6 x 8 27<br />
959 Midland Supply 8 x 6 35<br />
Weaver RPO 79 B60 75<br />
7890 Ann Arbor RS-1, DC 299 JC 4-6-2 P47 Baldwin Paciic 525<br />
NKP 4-6-2 P47 Baldwin Pacific 685<br />
Owned By Just <strong>Trains</strong><br />
908 Shanahan Freight 20 x 8 x 9 75<br />
966 Lehigh Engineering 6 x 8 25<br />
7892 Washington Terminal 299<br />
Other RS-1: NH, RI, C&O<br />
Lackawanna P47 4-6-2 Baldwin 525<br />
915 Quaker Foods 9 x 12 49<br />
302 One Stall Diesel Shed w/Shop 69<br />
967 Shoe Co. 7 skylts 20 x 9 x 11 69<br />
7805 Jersey Central SD-35 275<br />
7807 SP SD-35, DC 275<br />
PRR 2-8-0 H-3 #1187 or #1188 625<br />
20-3143-2 LI 2-8-0 H3 Consol 495<br />
304 3-Stall Roundhouse 30”D 189<br />
304A Xtra Stall or 304B Ext 45<br />
917 Gen Lt & Power Sub Station 32<br />
968 Freight Terminal 8 x 15 49<br />
7822 CSX SD-35, DC 275<br />
0-4-0 PRR, Sou 475<br />
305 Sandhouse, 16 x 6 45<br />
921 JLC Manufacturing 65<br />
969 Gen Lt & Pwr Office 6x13 65<br />
7823 Penn Central SD-35, DC 275<br />
20-3177-2 Phila & Rdg 2-8-0 495<br />
Dash 8, DC Und, UP, BC, SP 299<br />
Dummy for above 195<br />
DRG, WM 19 th Century 2-8-0 595<br />
See Website for More<br />
66 • O <strong>Scale</strong> <strong>Trains</strong> - May/June ’08<br />
306 2-Stall Shed 25 x 11 69<br />
306A Extender 12.5 x 11 27<br />
950 American Flag Co.14 x 9 69<br />
New Modular System Kit 74.95<br />
Unlimited configurations 24 walls<br />
ordernow@justrains.com
Jus <strong>Trains</strong><br />
Info (302) 453-0465<br />
Orders (888) 453-9742<br />
*Mon-Fri 9-6 *<br />
Fax Orders (302) 368-6447<br />
215 Newark Shopping Center<br />
Newark, DE 19711<br />
Store open 7 days a week<br />
$200 Free Ship on Most Orders<br />
MC VISA DISC. AMEX<br />
Third Rail Brass<br />
NYC Dreyfuss 4-6-4 1175<br />
Scullin Disc Drivers<br />
20 th Century Ltd 19<strong>38</strong> 4-pk 585<br />
3 different passenger sets<br />
PRR “Old Rivets” GG-1 875<br />
All Historical Schemes<br />
NYC Empire State J3 4-6-4 1125<br />
B&O Q4b 2-8-2, EOB 1125<br />
UP 4-8-4 FEF, TMCC, EOB 1199<br />
3 types up to $200 free rolling stock<br />
CN U2g, GTW U3b, OC U3b 1175<br />
4-8-4 w/TMCC, EOB Cruise<br />
PRR “Doodlebug”, TMCC 675<br />
C&O “Heaviest Hudson” L-2/A 1155<br />
GN 2-6-8-0 Articulated M2 1695<br />
2-10-4 “Colorado” 2 Heaters 1425<br />
CB&Q, B&LE, DMIR<br />
N&W Y-6B 2-8-8-2 , EOB 1695<br />
CPR D-10 4-6-0, 2 versions 875<br />
C&O 4-8-4 Greenbrier, EOB 1125<br />
Burlington S-4 #4000, EOB 1149<br />
Sante Fe Dash 9 Conv w/Sound 550<br />
Mercury 3-Car Passenger Set 775<br />
PRR Q-1 Skirted, TMCC, EOB 1100<br />
PRR N-1 2-10-2, Conv w/Sound 695<br />
PRR O-1 2-Unit Electric, TMCC 995<br />
LIRR BB1 Rats (2), Conv w/Snd 575<br />
B&M R-1 4-8-2, TMCC, EOB 925<br />
DZ Products<br />
DZ-1010 Crossing Gate Set 79<br />
DZ-1011 Block Signal Detectors 19<br />
DZ-1020 Crossing Signal Set 55<br />
DZ-1030 Wigwag Signal Set 79<br />
DZ-1040 UQ or LQ Semaphore 49<br />
DZ-1050 3-Light Trackside Signal 36<br />
DZ-1060 7-Light Trackside Signal 39<br />
DZ-1070 Track Sensor 15<br />
DZ-1080 Color Position Signal 39<br />
DZ-1200 Station Announcement 85<br />
DZ-1220 Trolley Stop & Control 79<br />
DZ-1240 Auto Stop & Reverse <strong>38</strong><br />
DZ-1260 Water Tower Animator 36<br />
DZ-1265 Fuel Station Animator <strong>38</strong><br />
DZ-2500 TMCC Switch Machine 25<br />
Transformers<br />
MRC Dual Pure Power 270W 229<br />
Lionel ZW 365 180W Brick 75<br />
Williams 150 Watt 99 Z-1000 75<br />
MTH Z-4000 375 Z-1000 Brick 59<br />
DCS System 249 Legacy #990 259<br />
Golden Gate Depot<br />
21” Aluminum Passenger 6-pk 525<br />
Full Interior, People, Detailed<br />
NYC, SF 2-Pk 239<br />
21” SP Daylt Alum 5-Pk 525<br />
SP Articulated Diner Set 525<br />
21” PRR Smooth Side 5Pk 525<br />
“Fleet of Mod”, Brown Post-War<br />
PRR “Queen Mary” Observation<br />
& PRR D78 Diner 265 Del<br />
PRR P70 20” Coach 4-Pk 399<br />
LIRR, PRSL, PRR Post-War 12#<br />
Heavyweight 20” 4-Pk Coaches 399<br />
C&O , B&O, CN<br />
Custom Runs Reading, DRG,<br />
MR, LV John Wilkes, Erie, JC<br />
PRR B70 Baggage, PB70 Combine,<br />
BM70 Mail RPO 3-Pk 359<br />
20” Head-End Set 359<br />
B&O, GN, NH, NYC, NP, N&W, SF,<br />
SP Green, SP Gray, SP Daylt, Pullman,<br />
UP Gray, UP Yellow, Undec Green<br />
20” Diner/Observation 2-Pk 265<br />
ACL, B&O, NYC, SF, GN, REA<br />
Green, REA Red Logo, Orig White<br />
Weaver Models 2008<br />
CP 4-4-4 Jubilee 939 Cmd 1039<br />
CN U4b Royal 4-8-4, Cmd 1045<br />
GTW U4a 4-8-4 2-R 925<br />
RPO w/ Clerestory Roof 4# 79<br />
80’ Aluminum 5-Car Set 549<br />
NW, PR, AK, CNJ, LV, CN, LN, GTW 50’ Flat w/Piggybacks 63 2-Pk 125<br />
B60 Baggage w/Celestory 75<br />
PRR, NYC, CN, NH, N&W, B&M, SF<br />
RPO w/Round Roof 4# 79<br />
B60 w/Round Roof 4# 75<br />
Rdg, NYC, CP, CSS, UP, NH, PRR,<br />
LIRR, Unlettered, N&W<br />
VO 1000 Cmd/EOB/RS 249<br />
WP, RI, NPR, C of GA<br />
MOW Troop Cars 50 2/$95<br />
Monon, N&W, CB&Q, Guard,<br />
C&O, GTW, Erie, WM, L&N, Lack<br />
Wartime Gondola w/Die-Cast Trucks<br />
$25 each or 4/$90 4#<br />
N&W, MEC, Sou, LN, B&M<br />
New Haven I-5 TMCC/EOB 1049<br />
O-54, 24” L, Script or Block<br />
NH Green Coach 4-Pk 375 6-Pk 550<br />
UP Gray, SLSW, KCS, LV 4-Pk 299<br />
Brass Switch Tower $55 3 Colors<br />
If Weaver has it in stock,<br />
We will get it for you<br />
at a discount & ship<br />
over $200 for free<br />
Lionel 2008 Volume I<br />
Frisco Meteor, Frisco Will Rogers<br />
Alco S-2 359 CVT, JC, NP, SF<br />
Brass John Bull Passenger Set <strong>38</strong>5<br />
F-7 ABA 649 B-Unit 139<br />
NS Dash 9 Tank Train Set 625<br />
CP, Clinchfield, MR, SP<br />
S-2 Diesel Switcher SP, CNW 342<br />
PRR P-5a Box Cab Electric 739<br />
Cotton Belt SD40T-2 395<br />
SD70Ace Power 411 Dummy 184 Diesels Pwr <strong>38</strong>9 Dmy w/Lts 169<br />
KCS, Ferromex AC6000 NS, CSX, BNSF, UP<br />
AC6000 Power 555 Dummy 184 AC4400cw CNW, KCS, Quebec, UP<br />
CSX, Union Pacific SD-80MAC NS, CSX<br />
U30C RI, MP Dash 8 ATSF 415 SD-9043MAC CP, UP<br />
D&H GP<strong>38</strong>-2 Power 368 Dmy 184 SD40-3 Tunnel CN<br />
GP7 368 Dmy 184 PRR, DRGW SD45T-2 Tunnel KCS, SP, SLSW<br />
Jersey Central F-3 ABA Set 785<br />
SD-35 Chessie, PRR, Sou, W. MD<br />
C&O E7 AA Power/Dmy Set 615<br />
Diesels Power 359 Dmy w/Lts 169<br />
2007 Volume I - Legacy GP-40 B&O, CNW, Rdg, WC<br />
11127 Sou Pac. GS-4, Legacy 1019<br />
11117 Sante Fe E6 Atlantic 499<br />
31755 Tex Special E-7 Pass Set 1025<br />
21” 2-Pk or 21” Sound Diner 227<br />
CSX SD40-2 Husky Stack Set 639<br />
UP FEF w/Legacy Grey or Blk 989<br />
Mikado WP, UP, SF, MR 699<br />
Shay Birch Valley, Cass Scenic 699<br />
2-8-0 Rdg, NYC, B&O, WM 377<br />
<strong>Scale</strong> Double Door Box Car 53<br />
UP, NKP, LV<br />
Lionel Blow-outs<br />
7-11020 Hogwarts Express 225<br />
w/o Track & Transformer 175<br />
Die-Cast 3-Bay 2-pk 79 SF, CNW<br />
Husky Stack 2-pk 99<br />
BN, Greenbriar, ARCZ<br />
Steel Reefer 2-Pk 65<br />
Dubuque, ADM, National<br />
Frisco or CE&I Hopper 35<br />
PS-2 Covered Hopper 32 NYC, PC<br />
18374 PRR GG-1 Silver 635<br />
Flat Car w/2 Trailers 2-Pk 105<br />
NYC, UP<br />
27562 NYC Flat w/Trailers 53<br />
21921 Imco PS-2 Hopper 2-Pk 75<br />
Heavyweight Passenger 4-Pk 315<br />
Santa Fe (Green)<br />
2-Pk 175 Snd Diner 180 7/$635<br />
MR, B&O, PRR Sound Diner 185<br />
U30C Diesel Dmy 119 CR, MR<br />
C&O 4-Pk 250 2-Pk 140 Diner 150<br />
All seven cars for $525<br />
25458 PRR CongSound Diner 150<br />
Op. Hot Box wRS 55 MDT, SF<br />
PRR F-7 Pwr B 160 Breakdn B 150<br />
24597 NYC E-7 Breakdown B 150<br />
SF F-7 Power B 165 Brkdwn B 150<br />
28250 N&W C420 Dummy 99<br />
MTH 2008 Vol I 2 or 3 R<br />
2-10-0 Russian Decapod 899<br />
ACL, Erie, Pitt Shaw& N, W. Md<br />
0-6-0 525 PRR, ACL, MP, NKP<br />
4-6-4 Royal Hudson 899<br />
SP AC-4 Cab Forward 1425 BC, CP, Southern, CP-Royal Tour<br />
Jersey Central G3 4-6-2 Pacific 939 J-1e Hudson 899 NYC, B&A<br />
Pere Marquette 2-8-4 Berkshire 1109 NYC w/PT Tender $899<br />
Legacy <strong>Scale</strong> Polar Exp. Tender 369 Orient Express 2-3-1 Pacifc 899<br />
4-8-8-2 AC-6 Cab Forward 1299<br />
SP Original, Rebuilt cab x 2<br />
Pennsylvania 4-8-2 M1b 1109 J-1e Hudson Pass Set 999<br />
Dreyfus J-3a Hudson, 4-6-4 989<br />
SP Cab Forward Freight Set 1<strong>38</strong>9<br />
NYC F-12e 4-6-0 Ten Wheeler 575<br />
GP-9 Powered 355 MR, Sou<br />
C-liner ABA 615 NH, NYC, CN<br />
C&O M-1 Stm Turbine Pass Set 899<br />
CNW E-4 Strm Hudson Pass Set 999<br />
4-8-4 Northern 999 ACL, SF,<br />
B&O, C&O, CBQ, CP, GN,N&W, NH,<br />
NP, NYC Gray, NYC Betterment,<br />
GP<strong>38</strong>-2 BNSF, B & Pitt, MEC, W&S<br />
Pullman, SP Gray, SP Green, SP Daylt,<br />
SD40-2 CN, Conrail, MoPac, UP<br />
UP Gray, UP Yellow, Undec<br />
GP-60M BNSF, Maersk, SF<br />
Pullman 8-1-2 Heavywt Sleeper 109<br />
Premier Specialty Sets<br />
Pullman, NYC, NYC Pullman, PRR<br />
Flying Yankee Zephyr 4-Unit 649<br />
Burlington Zephyr 4-Unit 649<br />
Mark Twain Zephyr 4-Unit 649<br />
Pullman 12-1 Heavywt Sleeper 109 2826x UP Heritage SD70ACe 377 Maersk GP-60M Twin-stack 649<br />
PRR & Pullman New Run MoPac, WP, Katy, UP, RG, CNW, SP NYC J-1e w/PT Passenger 999<br />
REA 54’ Reefer 4# $65 4/$245 Del GP-7 Power 335 Non-Power 145 CNW E-4 Hudson Passenger 999<br />
GN, RI, UP<br />
SP Cab Forward Freight Set 1399<br />
NYC Shark AA 519 Dmy B 137 C&O M-1 Steam Turbine Set 899<br />
NYC Transit R27 4-Pk 589 2-Pk 279<br />
PRR <strong>Scale</strong> GG-1 Beer Train 715<br />
East Wing GG-1 Passenger Set 715<br />
SP Black GS-4 Freight Set 1069<br />
PC E-44 Tropicana Reefer Set 475<br />
MTH 2007 Vol II 2/3-R<br />
4-12-2 UP 9000, 2# 1065<br />
4-6-2 PRR K-4 809<br />
Modern, Early, Streamline<br />
CNW 4-6-4 E-4 Hudson 809<br />
SP 4-8-4 Daylight 3# 975<br />
2-8-4 Berkshire 899<br />
Chessie, Erie, NKP, RF&P<br />
E44 Electric Conrail, PRR <strong>38</strong>5<br />
E33 Electric N&W, VA, NH <strong>38</strong>5<br />
SD50 3R <strong>38</strong>5 2R 399 Dmy 137<br />
Chessie, CSX, KCS, MP<br />
ES44AC 3R <strong>38</strong>5 2R 399 Dmy 142<br />
BNSF, CP, GE Demo, UP<br />
SD70ACe 3R <strong>38</strong>5 2R 399 Dmy 142<br />
MRL, G.W. Bush<br />
SD70M-2 3R <strong>38</strong>5 2R 399 Dmy 142<br />
EMD, FEC<br />
Dash 8-40C Narrow 3R <strong>38</strong>5 2R 402<br />
CNW, CSX, UP, NS Dmy $142<br />
GE U30C Power 3R <strong>38</strong>5 2R 399<br />
BN, NS, Rdg, UP Dummy $142<br />
GP-9 Diesel 3R 352 Dmy 137<br />
B&M, SF, Soo Line, WP<br />
Lionel TMCC & Power<br />
#990 Legacy Command Set 259<br />
#993 Legacy Expansion Set 219<br />
TMCC Cab-1 59 Command Base 59<br />
TMCC Command Set 109<br />
Lionel ZW 365 180W Brick 75<br />
TPC 400 149 TPC 300 109 PM-1 62<br />
ARC 73 ASC 67 AMC 73 BPC 67<br />
OTC 59 AVC 105 SC-2 Controller 74<br />
MTH Premier<br />
UP Heritage Series 2R 399<br />
UP, CNW, MKT, RG, SP, MP, WP<br />
Heritage High Cube 6-Pk 215<br />
F-3 ABA $605 PRR<br />
L-1 2-8-2 Mikado LNE 725<br />
0-6-0 USRA Switcher 529<br />
CNW, GT, SAL, P&WV, UP, PRR<br />
4-4-0 American CP, UP 575<br />
64’ Passenger 3-Pk $215 Coach 75<br />
B&O, PRR, UP, CP<br />
Diesel Locomotives<br />
Union Pacific #80 Coal Turbine 909<br />
Sharknose AB 488 A-Unit 135<br />
NYC, B&O, EJ&E, D&H<br />
R40 4-Car Set 439 Dmy 2-Car 168<br />
MTH Blow-outs, PS 2.0<br />
Premier<br />
N&W Class A $1150 <strong>Scale</strong><br />
F-7 ABA 525 C&O, MP<br />
FT ABA 525 LV, MR, WP<br />
2-8-2 USRA Light Mikado 725<br />
CN, NYC, PRR, Pere Marquette, UP<br />
0-4-0 Switcher w/Slope Tender 475<br />
NYC, C&O, Southern, PRR<br />
Premier 0-8-0 Steam Switcher 449<br />
A&S, Erie, NP, Sou<br />
20-3253/4-1 PRR 2-10-0 Decapod 925<br />
20-4053 Sou Crescent 18” 5-Pk 209<br />
PRR P5a 3 Variations 535<br />
FF-1 Electric Locomotives 615<br />
GN, PRR x 2<br />
PRR High Cube Box 35 6-Pk 185<br />
Harley-Davidson 3-Pk x 2 99<br />
Premier Flat w/2 Police Cars 39<br />
OC, CT, Denver, AK, FL, Detroit, WV<br />
K-Line 2008 Volume I<br />
MR EP-5 TMCC, Railsounds 395<br />
MR Aluminum 4-Pk 355 2-Pk 185<br />
RS-3 Diesel w/TMCC & Smoke 299<br />
NYC, PRR, PE, E-Lack<br />
Southern FM 355 Caboose 52<br />
PRR or NH Electric Boxcab 78<br />
PRR A-5 0-4-0 w/TMCC 285<br />
2-Bay DC Hopper <strong>38</strong> 3-Pk 102<br />
MR, Reading<br />
NP Aluminum Hopper 45 3-Pk 124<br />
Reading Alum Tank 45 3-Pk 124<br />
K-Line Tank Engine $399<br />
B&A 4-6-6 TMCC RS Cruise<br />
Overland Models $1800<br />
UP C44ACCTE #5735 Flag<br />
UP C44-9W #9700 or #9716<br />
UP C60AC #7567 or #7567<br />
UP SD90043AC #8024<br />
UP SD90AC #8201<br />
Atlas 2 & 3-Rail<br />
Discontinuing Engines &<br />
Rolling Stock All<br />
product @ or below cost<br />
Call for $200,000 List<br />
Atlas 0-6-0 UP, CNJ 3-R 498<br />
May/June ’08 - O <strong>Scale</strong> <strong>Trains</strong> • 67
Buy–Sell–Trade Events<br />
Buy-Sell-Trade ads are $5 for 30 words plus your address information. Additional words are $0.25 each. Subscribers are permitted one<br />
free ad per subscription cycle . All B-S-T ads are prepaid. You may send ads by postal service with a check or money order. Ads sent by<br />
email or called in must use a credit card. See our contact info on page 2.<br />
WANTED: Small N&W custom-built or<br />
scratchbuilt steam, 4-8-0, 2-8-0, 4-6-0.<br />
Also looking for N&W brass parts, e.g.,<br />
pilot, cylinders, domes, tenders, etc. Contact<br />
Joe Giannovario, jag@oscalemag.com<br />
or call 610-363-7117.<br />
WANTED: Looking for two Rich Yoder<br />
PRR/N&W H2a hopper cars, painted or<br />
unpainted. Contact Dave,[satintrain1250@<br />
yahoo.com].<br />
FREE O SCALE LIST: List of O <strong>Scale</strong> shows<br />
for 2008. Send LSSAE to Bob Retallack,<br />
Dept OST08, 2224 Adner Ct, Columbus,<br />
OH 43220.<br />
VAN BUREN, ARKANSAS. Area’s neatest<br />
hobby store from Z to O, new and used.<br />
Visit Dave’s Hobby Shop at 600 Main St in<br />
the Anhauser Busch Building or online at<br />
[www.daveswebshop.com], 479-471-0750.<br />
WANTED: Joe Fischer pass. and headend<br />
cars. PSC and Amer. Hvywt 10 sec.<br />
Pullmans. Walthers Erie coach, RTR only.<br />
ATSF double vestibule combine, kit or<br />
May 2008<br />
17: St. Paul, MN<br />
Twin City Model Railroad Museum<br />
Toy Train & Model Railroad Sale<br />
MN State Fairgrounds, Education<br />
Bldg., St. Paul, MN Saturday, May<br />
17, 9:00 AM - 3:00 PM. Admission<br />
$5. Ages 5 & under FREE. 200+<br />
tables of scale models, toy trains,<br />
railroadiana and operating layouts.<br />
FREE museum admission day of the<br />
sale wit a sale hand-stamp. Contact<br />
HobbySaleInfo@tcmrm.org<br />
July 2008<br />
23-26: Worcester, Mass.<br />
2008 O <strong>Scale</strong> National Convention<br />
The 2008 National O <strong>Scale</strong><br />
Convention will be held at<br />
the DCU Center in Worcester,<br />
Massachusetts. The DCU Center<br />
will provide us with over 50,000<br />
square feet of exhibition space. In<br />
this large area we plan to have a<br />
large amount of dealer tables, wide<br />
aisle spacing and many operating<br />
layouts including the Southern<br />
New England Modular Layout that<br />
68 • O <strong>Scale</strong> <strong>Trains</strong> - May/June ’08<br />
RTR. What have you? Mail only please. Jim<br />
Seacrest, PO Box 6397, Lincoln, NE 68506-<br />
0397<br />
FOR SALE: SP 2-8-0 (Glacier Park Models)<br />
F/P #2811 (Southern Pacific) TRO $2000;<br />
SP 0-6-0 (Glacier Park Models) F/P #1286<br />
(Southern Pacific) TRO $2000; SP MT-3 4-8-<br />
2 Max Gray (extreme super detailing and C/P<br />
by Gary Schrader), photo available, $1800.<br />
Linde-Union tank liquid Argon f/P (OMI<br />
#80017) $600. Best offers considered. Contact:<br />
[bantell@pacbell.net] or 650-347-4402;<br />
Bruce Antell, 50 S San Mateo Dr, Ste 105,<br />
San Mateo, CA 94401-<strong>38</strong>57<br />
WANTED: Weaver C&NW 4-6-2 Yellow<br />
Jacket, road# 1620, in 2-rail. Phone: 507-<br />
237-2782, Harold A Storm, 23633 491 Ave,<br />
Gaylord, MN 55334-2029<br />
FOR SALE: In-progress O <strong>Scale</strong> layout, 8 x<br />
10 ft, with Boston & Maine seashore theme.<br />
Includes 2 steam locos, 3 Diesel locos, passenger<br />
cars, freight cars and building kits.<br />
Take it away for $2000. Call 908-454-1246,<br />
weekdays after 3:00 PM.<br />
measures 27’ x 81’. The DCU Center<br />
is located in downtown Worcester<br />
about 2 blocks from the newly<br />
renovated Union Station. One of the<br />
Providence and Worcester mainlines<br />
runs across the street from the front<br />
of the DCU Center. An all day railfan<br />
trip is in the planned for Convention<br />
goers on Wednesday 7/23/08. Please<br />
check back later for more details.<br />
September 2008<br />
5-6: Indianapolis, IN<br />
Indy O <strong>Scale</strong> Meet Two days swap<br />
meet with plenty of tables/vendors<br />
in one large hall. Tables: $50 before<br />
August 1st, $60 after. Admission/<br />
registration $20 per person. Contact<br />
Jim Canter, 1203 Rotherham Ln.<br />
Beech Grove IN 46107. Phone 317-<br />
782-3322. Contact jcanternkp@aol.<br />
com<br />
October 2008<br />
30-Nov. 2 Napierville, IL<br />
Further Details to be announced<br />
FOR SALE: Large estate sale of over 600<br />
models from the late Tony Ambrose. For<br />
printed lists please send $5 to Bob Anson,<br />
2520 Spring Lake Rd West, Jacksonville FL<br />
32210. For list via email, contact Ron Dettmer<br />
at [roscaler@bellsouth.net].<br />
FOR SALE: Forced to leave hobby due to<br />
health problems. Kits, parts, supplies, some<br />
rare items, reasonably priced. Send $1 bill<br />
for 20 page list. Phil Shuster, 1325 Corbin Rd,<br />
Toledo, OH 43612-2249<br />
FOR SALE: 2-Rail, Sunset/3rd Rail SP MT-4,<br />
4-8-2, Daylight colors, new and unwrapped<br />
in box, $1000. Sunset 2-10-0 Russian Decapods:<br />
(1) MoPac, unptd, like new in box,<br />
$800; (1) WM, ptd, 99% new in box, $800<br />
-- both for $1450. Williams #6007 ATSF<br />
“3400” Pacific, brass construction, sprung<br />
drivers, constant lighting, new in box $500.<br />
Weaver Pullman-Bradleys: #G1256s Pullman<br />
2-pack, new in boxes $200; #G1251s SP 2-<br />
pack, new in boxes, $200 -- all four for $350.<br />
Plus shipping. Thomas, 3601 S. Noland Rd.<br />
#149, Independence, MO 64055, 417-230-<br />
9157.<br />
February 2009<br />
(TBA); Santa Clara, CA<br />
2009 O <strong>Scale</strong> West: swap meet,<br />
contests, clinics, home layout visits,<br />
and more...<br />
June 2009<br />
18-20: Towson, MD<br />
2009 O <strong>Scale</strong> National Convention<br />
2009 O <strong>Scale</strong> National Convention<br />
to be held on the campus of<br />
Towson University just north<br />
of Baltimore, Maryland. Event<br />
sponsored by Baltimore O <strong>Scale</strong>rs<br />
and the Baltimore Society of Model<br />
Engineers. In addition to very<br />
comfortable trading halls (about<br />
400 tables), convention features<br />
clinics, layout tours (June 17 through<br />
June 21), model contests and Friday<br />
(June 19th) banquet. Early set-up for<br />
dealers on June 17. Visits to B&O<br />
Transportation Museum, Baltimore<br />
Streetcar Museum and much more.<br />
Check www.oscaleeast.com often.<br />
More information available by<br />
email: info@oscaleeast.com Contact<br />
jmccloskey@oscaleeast.com
2008 O <strong>Scale</strong> Conv. 65<br />
AAA Turntables 44<br />
Allegheny <strong>Scale</strong> Models 34<br />
AM Hobbies 28<br />
Arttista 45<br />
Babbitt Railway Supply Co 20<br />
Bachmann 13<br />
Backdrop Warehouse 45<br />
Baldwin Forge & Machine 28<br />
Banta Modelworks 24<br />
Brummy’s Ballast 18<br />
BTS 16<br />
Buffalo Creek Graphics 24<br />
Caboose Hobbies 26<br />
Crusader Rail Services 18<br />
Custom Signals 24<br />
Get Real Productions 69<br />
Golden Gate Depot IFC<br />
Hackworth Model <strong>Trains</strong> 35<br />
Irish Tracklayer 28<br />
Keil-Line 20,28<br />
Just <strong>Trains</strong> 66,67<br />
LaBelle Woodworking Co. <strong>38</strong><br />
Model Building Services 26<br />
M.T.H. Electric <strong>Trains</strong> IBC<br />
Mullett River 15<br />
NCE Corp 35<br />
O <strong>Scale</strong> Realty 51<br />
O <strong>Scale</strong> <strong>Trains</strong> 14<br />
Old Pullman 44<br />
PA Heritage Models 14<br />
P&D Hobby Shop 8<br />
Railroad Collectibles 40<br />
Rails Unlimited 33<br />
Roscoe’s Model Structures 20<br />
San Juan Car Co. 20<br />
Scenic Express 30<br />
SceniKing 30<br />
SMARTT 41<br />
Steam Era Structures 45<br />
Stevenson Preservation Lines 33<br />
Sumpter Valley Depot 54<br />
Suncoast Models 33<br />
Sunset⁄3rd Rail<br />
BC<br />
Turner Model Works 18<br />
Tru-<strong>Scale</strong> <strong>38</strong><br />
Twin Whistle Sign & Kit 51<br />
Valley Model <strong>Trains</strong> <strong>38</strong><br />
Advertisers Index<br />
Deichman’s Depot 40<br />
Public Delivery Track <strong>38</strong><br />
Weaver 26<br />
DM&M Railroad Co. 20<br />
QSI Solutions 41<br />
Williams by Bachman 32<br />
Downtown Deco 51<br />
Raggs to Riches 14<br />
East Gary Car Co. 18<br />
Rail Dreams 28<br />
May/June ’08 - O <strong>Scale</strong> <strong>Trains</strong> • 69
Are You Expired?<br />
The most common questions I am asked are: “Is my subscription<br />
expired?” and “When will my subscription expire?”<br />
Well, now you won’t have to ask because we’re putting your<br />
expiration date on the mailing label. (Betcha threw it away<br />
already dincha, bunky?) Look for a field to the left of your<br />
address with the letters “EXP:” followed by a date in the format<br />
SEP 08. That would mean your subscription expires with the<br />
September 2008 issue, or OST#40.<br />
Don’t panic! We will still mail you a renewal notice when<br />
you have two issues left in your subscription cycle. But now<br />
you will be able to tell exactly when your last issue will arrive<br />
just by look at your mailing label! Ain’t science grand?<br />
The Return of the Kit?<br />
The cost of our models is going up! That’s a fact. A majority<br />
of the railroad models sold in the U.S. are made in China,<br />
and that’s for every scale from N to G. (Truth be told, nearly all<br />
the toys sold in the U.S. are made in China.) Costs have been<br />
rising in China due to wage inflation and the cost to control<br />
pollution. Plus, the Chinese Yuan has been rising in value while<br />
the U.S. dollar has been falling. All of this has led the Chinese<br />
manufacturers to raise prices to their U.S. customers.<br />
On top of this the rising cost of oil (107$ per barrel as I write<br />
this), which impacts everything from transportation costs to the<br />
paper to make boxes and the ink to print on those boxes, and<br />
the inevitable conclusion is model trains are going to cost more<br />
in the future. Add a recession in the U.S. economy (and some<br />
say stagflation), and one might predict hard times for the model<br />
railroad industry.<br />
That could be the case, but it could also present an opportunity<br />
for businesses flexible enough to pivot with the times. I<br />
think it’s time for a return to kit building.<br />
We’ve been spoiled by relatively inexpensive models in<br />
the last two decades. It was simpler and far cheaper to have<br />
models made in China and assembled there. But with Chinese<br />
costs rising so rapidly (China has its highest inflation rate in 11<br />
years), maybe it’s time to start offering kits again. There are several<br />
manufacturers who have stopped offering kits or stopped<br />
designing new kits because it was not economically feasible to<br />
compete with Chinese ready-to-run models. Maybe now is the<br />
time to revisit that spreadsheet analysis.<br />
Kit building and kit-bashing are two of the greatest pleasures<br />
for me in this hobby. They were the foundation of the hobby<br />
for nearly 50 years. Now, most of the hobby is take the model<br />
out of the box, put it on the track then run the train. To me,<br />
that’s boring. Nor does it help novices to acquire any modeling<br />
skills.<br />
I spoke with Boyce Yates of Babbitt Railway Supply recently.<br />
Babbitt is the only domestic supplier of steam locomotive kits<br />
in O <strong>Scale</strong>, and is the home of the General Models/Varney/All<br />
Nation, B&O 4-6-0 and several other kits. Mr. Yates told me<br />
that the cost of castings and the cost of motors have caused<br />
him to cease offering his kits once the current supply is depleted.<br />
(By the way, both of those costs are related, again, to China<br />
and its demands on strategic supplies like oil and copper).<br />
But what if there was a surge in demand for Babbitt kits?<br />
Would that offset the higher costs of castings and motors? And<br />
might not a modeler get more satisfaction from building a Babbitt<br />
B&O 4-6-0 than by pulling an Atonel Rail-Queen B&O 4-<br />
6-0 out of a styrene coffin? I know I would, but that’s just me.<br />
OST is all about kit building, kit-bashing and scratchbuilding,<br />
so you know where our bias is. Where is yours? Let us<br />
hear what you think about the future of kit building, kit-bashing<br />
and scratchbuilding in this hobby.<br />
That said if you are looking to sharpen your modeling skills<br />
there are many fine kits you might start with. There are loads of<br />
old All Nation boxcar kits floating around at swap meets and<br />
on eBay. They are not too expensive and fairly easy to assemble<br />
out of the box. The key with these kits is to update them<br />
with extra details. This way you get some experience with drilling<br />
and fitting fine parts. These kits usually have the modeler<br />
pin the pre-painted sides of the car to the wooden blocks holding<br />
the floor and roof together. I like to solder the ends to the<br />
roof and then slip the sides in and hold them with glue.<br />
A quick search of eBay turned up freight car kits by Red<br />
Caboose, Westbrook, Walthers, LaBelle, Ambroid, Graceline,<br />
Intermountain and more. Prices range from $15 to $30. Yer<br />
pays yer money and takes yer choice!<br />
Once you have experience, you may want to try one of the<br />
more challenging craftsman kits by San Juan (yes, San Juan<br />
makes some fine standard gauge kits as well as narrow gauge),<br />
Chooch, BTS and others. Kits in this class run from $50 to over<br />
$100 each.<br />
Now, how do you know what details to apply other than<br />
what came with the kit? Research and reading. While kit and<br />
scratchbuilding may have fallen out of favor of late, it was<br />
the meat and potatoes of the hobby mags during the 1940s,<br />
‘50s and ‘60s. So the first place to start is old copies of Model<br />
Railroader and Railroad Model Craftsman. If you are looking<br />
for details on a specific model try searching the MR <strong>Magazine</strong><br />
Index at [http://index.mrmag.com/]. Photos found on the Net<br />
are useful, too.<br />
Where do you get the extra detail parts? Those are available<br />
from a variety of sources like Precision <strong>Scale</strong> Co., Keil-Line,<br />
Grandt Line, and many others. Check our advertiser index<br />
for companies that make kits and detail parts. Don’t forget<br />
that you will need good tools in order to do fine detail work.<br />
Micro-Mark is a great source for tools.<br />
Finally, don’t forget to check out Walthers online catalog.<br />
They have tons of O <strong>Scale</strong> kits, detail parts, and tools as well.<br />
Keep Highballin’<br />
u<br />
70 • O <strong>Scale</strong> <strong>Trains</strong> - May/June ’08
O <strong>Scale</strong> <strong>Trains</strong> mth 5-2008.qxp 3/4/2008 4:01 PM Page 1<br />
ADD SOME<br />
COLOR<br />
TO YOUR RAILROAD<br />
O <strong>Scale</strong> Die-Cast Construction, Digital Sound Equipped<br />
In 1939 King George VI, accompanied by his wife<br />
Queen Elizabeth, became the first reigning British<br />
monarch to visit Canada. For 31 days Their<br />
Majesties toured their Canadian Dominion from<br />
coast to coast in a 12-car train described by the<br />
Canadian Pacific as "regal in appearance, luxurious<br />
in interior decorations and appointments," and "in<br />
every way a home and a castle." In recognition of<br />
2850's flawless performance, the Canadian Pacific<br />
was granted permission to designate its entire class<br />
of streamlined Hudsons as "Royal Hudsons," with<br />
the engines wearing the royal family crown on<br />
their running boards. If ever a locomotive was<br />
granted knighthood, this was it.<br />
New for 2008, the Canadian Pacific Royal Hudson<br />
joins the Premier lineup in four authentic paint<br />
schemes. Engine 2850 wears the blue livery and<br />
royal coats of arms applied for their Majesties visit.<br />
Hudson 2851 led the pilot train that preceded the<br />
royal train on its journey, bearing members of the<br />
press and other personnel. Engine 2839 was retired<br />
by the CP in 1960 and restored for service in the<br />
Southern Railway's steam program, where it hauled<br />
excursions in the late 1970s and early 1980s and<br />
performed in the movie Coal Miner's Daughter.<br />
Restored once again, it resides today in the<br />
Nethercutt Collection Museum in San Sylmar,<br />
California. Royal Hudson 2860 became a tourist<br />
icon of British Columbia, leading steam excursions<br />
for 25 years until a forced retirement in 1999.<br />
Restored in 2006, it steams today at West Coast<br />
Railway Heritage Park in Squamish, BC.<br />
Find your Nearest Dealer at<br />
www.mthtrains.com<br />
7020 Columbia Gateway Drive<br />
Columbia, MD 21046<br />
4-6-4 Royal Hudson Steam Engine<br />
20-3315-2 w/PS 2.0 (<strong>Scale</strong> Wheels) $999.95<br />
© 2008 M.T.H. Electric <strong>Trains</strong>
NYC DREYFUSS &<br />
20TH CENTURY LIMITED<br />
From the Collection of R. Cady<br />
Photo by John Ryan<br />
Sunset Models is Proud To Announce The All Brass NYC Dreyfuss<br />
Hudson. Coming in Fall 2008 only 70 will be produced in 2 Rail.<br />
In a coordinated effort GGD will be producing the 20th Century<br />
19<strong>38</strong> Train to scale in Aluminum. Since there are only going to be<br />
70 sets of engine and cars available we suggest you call in your<br />
reservation early. The locomotive is $1199.95 and each set of 4<br />
cars are $599.95 + S&H. There are 3 sets to choose from, but we<br />
highly recommend getting all 12 cars to have the complete train.<br />
Come Join The Fun.<br />
20th Century 19<strong>38</strong> Train<br />
By GGD - Aluminum Construction<br />
Full Interior Detail, Lighted, <strong>Scale</strong><br />
Set A:<br />
RPO/Baggage 5018<br />
Diner 681<br />
4-4-2 Imperial Highlands<br />
Observation Manhattan Is.<br />
Set B:<br />
Dorm/Club Century Club<br />
17-Roomette City of Albany<br />
10-5 Cascade Dawn<br />
13-Double Bedroom Cuyahoga County<br />
Set C:<br />
Diner 682<br />
17-Roomette City of Chicago<br />
10-5 Cascade Glory<br />
4-4-2 Imperial Falls<br />
CALL<br />
408-866-1727 TODAY!<br />
SUNSET MODELS INC.<br />
37 South Fourth Street · Campbell, CA 95008 · 408-866-1727 · fax to 408-866-5674 · www.3rdrail.com


