Classic Hoyer Lift Instructions (.pdf) - ActiveForever
Classic Hoyer Lift Instructions (.pdf) - ActiveForever
Classic Hoyer Lift Instructions (.pdf) - ActiveForever

You also want an ePaper? Increase the reach of your titles
YUMPU automatically turns print PDFs into web optimized ePapers that Google loves.
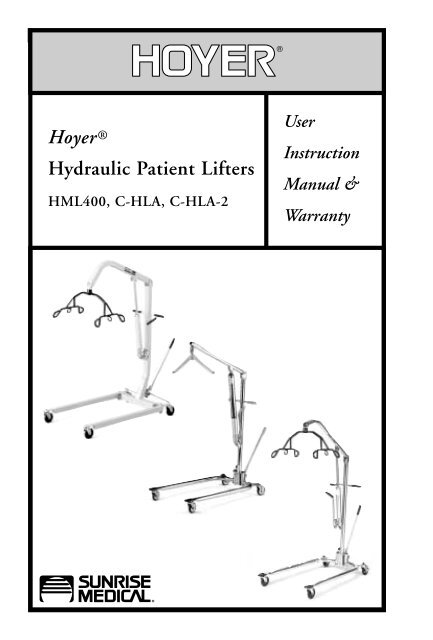
<strong>Hoyer</strong> ®<br />
Hydraulic Patient <strong>Lift</strong>ers<br />
HML400, C-HLA, C-HLA-2<br />
User<br />
Instruction<br />
Manual &<br />
Warranty
Table of Contents 3<br />
TABLE OF CONTENTS<br />
INTRODUCTION..................................................................................... 2<br />
TABLE OF CONTENTS.............................................................................. 3<br />
MODELS / SPECIFICATIONS .................................................................... 4<br />
ASSEMBLY............................................................................................ 5<br />
OPERATING INSTRUCTIONS..................................................................... 7<br />
MAINTENANCE AND CARE ...................................................................... 8<br />
TROUBLESHOOTING ............................................................................... 10<br />
LIMITED WARRANTY.............................................................................. 11<br />
This manual contains important safety and maintenance instructions. Please read it<br />
carefully before using your patient lifter and refer to it as often as needed for safe and<br />
efficient use.<br />
If you have questions regarding the safe use and/or assembly, maintenance, or specifications<br />
of your patient lifter, you should call Customer Service<br />
For service and repair, remember your authorized <strong>Hoyer</strong> dealer is able to provide the<br />
assistance you need.<br />
Save this manual for future reference. For non-homecare lifters, your maintenance<br />
department should keep this manual.<br />
CAUTION– For patient use, refer to the separate manual, “How To Use a Patient<br />
<strong>Lift</strong>er”. If you did not receive a copy or need additional copies contact:<br />
Customer Service<br />
Using other manufacturers’ parts on <strong>Hoyer</strong> products is unsafe and may result<br />
in serious injury to patient and/or attendant. Use only <strong>Hoyer</strong> parts. <strong>Hoyer</strong><br />
lifter parts are NOT interchangeable with other manufacturers’ products.<br />
Replace any worn parts immediately.
4<br />
Models / Specifications<br />
Assembly 5<br />
MODELS<br />
ASSEMBLY<br />
The following tools are required for assembly:<br />
HML400: 3/4" & 1/2" wrench, 3/16" hex wrench, 1/8"<br />
hex wrench, and a thin layer of grease should<br />
be applied to all bolts.<br />
C-HLA & C-HLA-2: two 9/16" wrenches, 1/8" hex<br />
wrench, and a thin layer of grease<br />
should be applied to all bolts.<br />
C-HLA C-HLA-2<br />
HML 400<br />
SPECIFICATIONS<br />
C-HLA<br />
C-HLA-2HML400<br />
Base Adj. U Adj. U Adj. U<br />
Max. Weight Capacity 400 lbs. 400 lbs. 400 lbs.<br />
<strong>Lift</strong>-range of Boom 29"-80" 29"-80" 28.25"-75"<br />
Width of Base 23"-39" 23"-38" 24"-40"<br />
Length of Base 41" 41" 43"<br />
Base Clearance 5.5" 5.5" 5.25"<br />
Finish Chrome Chrome Tan<br />
1. Carefully unpack <strong>Hoyer</strong> <strong>Lift</strong>er. Check for swivel<br />
bar/6-point cradle and adjusting lever handle.<br />
2a.C-HLA and C-HLA-2– Insert mast in base sleeve<br />
(Fig. 1). Be sure notch on end of mast fits over<br />
bolt in bottom of mast sleeve. Mast must lock<br />
into position in base sleeve, making it impossible<br />
to rotate. Check carefully to be certain mast<br />
cannot rotate.<br />
2b.HML400– Insert mast in base and tighten bolt.<br />
3. Make certain boom points in same direction as<br />
base legs. Thread mast safety lock and stud into<br />
threaded hole in mast sleeve. Tighten firmly,<br />
locking mast into base (Fig. 2). Keep mast and<br />
base locked at all times except when removing<br />
mast from base for storage.<br />
HML400 only– All sholder bolts must engage<br />
through bracket on both sides. If bolt is not<br />
fully engaged, misalignment and premature<br />
failure may result. Worn parts could fail,<br />
resulting in injury to resident/caregiver.<br />
4. a. C-HLA and C-HLA-2 only– Insert boom end into<br />
hole in yoke hinge at the top of mast. Fasten<br />
bolt and nut (Fig. 3). Be certain hex of bolt<br />
head fits into formed hex on side of hinge and<br />
that plastic washer is under lock nut.<br />
b. HML400– Attach boom to top of mast with<br />
hardware.<br />
5. Attach hydraulic pump to boom (Fig. 4).<br />
Figure 1<br />
Figure 2<br />
Figure 3<br />
Figure 4<br />
IM-459001<br />
IM-459001
6<br />
Assembly<br />
Operating <strong>Instructions</strong> 7<br />
6. Cradle/Swivel Bar Attachment<br />
OPERATING INSTRUCTIONS<br />
Cradle Attachment<br />
a. Remove nut and bolt from cradle.<br />
b. Hold cradle in position at the end of the<br />
boom and align the holes of the pin and cap<br />
with the holes in the boom end fork.<br />
c. C-HLA & C-HLA-2 only– Insert supplied bolt<br />
and washer through boom fork, cradle cap<br />
and pin. Washers must be placed on the outside<br />
of the fork under bolt head and under<br />
the nut (Fig. 5). Place nut on bolt, and<br />
secure tightly (Fig. 6).<br />
d. HML400– Attach cradle with hardware.<br />
e. Swivel cradle to check for free movement.<br />
Inside center attachment points on cradle are<br />
used only for <strong>Hoyer</strong> slings with chains or<br />
straps. The four outside attachments points are<br />
used for <strong>Hoyer</strong> 4-point slings.<br />
Figure 5<br />
Figure 6<br />
A. TO RAISE LIFTER:<br />
1. Tighten hydraulic pressure release knob by turning<br />
it clockwise. Release knob is located on<br />
pump near pump handle (Fig. 9). Base of lifter<br />
must be spread to widest possible position to<br />
maximize stability (Fig. 10).<br />
2. Pump hydraulic handle (Fig. 11). Do not lock rear<br />
casters. If needed, lifter base will move slightly<br />
to adjust for balance.<br />
B. TO LOWER LIFTER:<br />
1. Open hydraulic pressure release knob by turning<br />
it counter-clockwise, not more than one full turn<br />
(Fig. 12).<br />
2. Guide descent. Push gently on knees to attain<br />
correct sitting posture while lowering.<br />
3. After patient reaches seat, push down on boom<br />
to slacken chains.<br />
Figure 9<br />
Figure 10<br />
The large thrust washer must be inserted on<br />
the cradle hanger post as shown in Figure 7. If<br />
washer is not present, the cradle hanger post<br />
and cradle center may wear prematurely. Worn<br />
cradle parts could fail, resulting in injury to<br />
resident/caregiver. Hanger post should protrude<br />
cradle center by 1/16 th inch.<br />
Swivel Bar Attachment – C-HLA only<br />
a. Insert swivel bar hook into loop at end of<br />
boom. Check to be sure bar hook is inserted<br />
completely into the loop.<br />
7. Attach adjusting lever handle into base (Fig. 7).<br />
8. Wheel locks are provided for parking. To lock<br />
caster, step on cam lever on side of caster. To<br />
unlock, step on highest cam lever (Fig. 8).<br />
Figure 7<br />
BE SURE TO READ “HOW TO USE A PATIENT LIFTER”<br />
MANUAL BEFORE ATTEMPTING A LIFT.<br />
<strong>Lift</strong>ers can tip over. Keep base widened for stability.<br />
NEVER lock wheel locks or block wheels<br />
when lifting someone. Wheel locks are provided<br />
for parking. To lock casters, step on cam lever<br />
on side of casters. To unlock, step on highest<br />
cam lever.<br />
Figure 11<br />
Never lock wheel locks or block wheels when<br />
lifting someone. Wheel locks are provided for<br />
parking the lifter only.<br />
Figure 8<br />
Figure 12<br />
IM-459001<br />
IM-459001
Maintenance & Care<br />
Maintenance & Care<br />
8 9<br />
MAINTENANCE & CARE<br />
Regular maintenance of lifters and accessories is necessary to assure proper and safe<br />
operation. Read and observe the following recommended instructions:<br />
IM-459001<br />
Initially Before Bi-Monthly<br />
Each Use<br />
1. Base and Wheels<br />
Base is even and level<br />
(all four wheels are on the floor) x x<br />
Wheel bolts are tight x x<br />
Wheels swivel and roll easily x x<br />
2. Base Adjustment<br />
Base locks securely, all parts are present x x<br />
Base opens and closes smoothly x x<br />
Check spreader lock and all hardware for wear<br />
x<br />
3. Mast<br />
Mast fully engaged and locked into mast sleeve x x<br />
Inspect for bends or deflections<br />
x<br />
Inspect all bolts and nuts for wear<br />
x<br />
4. Boom<br />
Inspect all bolts and nuts for wear<br />
x<br />
Inspect to ensure the boom is centered<br />
between the base legs x x<br />
5. Cradle<br />
Check hanger post for wear or damage.<br />
Replace post if wear exceeds 1/16 inch.<br />
x<br />
Check sling attachments for wear or deflection x x<br />
6. Swivel Bar<br />
Check nut at bottom of swivel bar hook and<br />
eye hook on boom for wear.<br />
x<br />
Check for two nylon washers between nut of swivel<br />
bar hook and underside of swivel bar assembly. x x<br />
7. Pump Assembly<br />
Tighten seals around piston with spanner<br />
wrench provided x x<br />
Pump handle and valve work smoothly x x<br />
Check for oil leakage, a light film is normal,<br />
but not to the point of dripping x x<br />
8. Slings and Hardware<br />
Check metal parts for wear or damage<br />
x<br />
Check slings and web straps for wear or damage x x<br />
9. Lubrication<br />
Oil all pivot joints, including:<br />
Top of mast where boom attaches<br />
Top and bottom of actuator mounting<br />
Pump handle hinge<br />
Use a light grease to lubricate base<br />
adjustment lock plate and all rotating hardware<br />
Wheel and swivel bearings<br />
10. Cleaning<br />
Use mild soap to clean; dry thoroughly<br />
Apply auto or appliance wax<br />
Keep painted surface clean from oil<br />
Do not wash under water pressure<br />
NOTE– HYDRAULIC PUMP<br />
1. Use pump to raise boom to position for lifting patient.<br />
2. DO NOT lift up on end of boom to position for lifting patient as this causes air<br />
to be drawn in under ram, preventing pump from lifting when handle is pumped.<br />
3. DO NOT press down hard on handle when bottom of stroke is reached.<br />
4. It is a common occurrence after a few hours of non-use for the boom to lower<br />
with no weight suspended from the end of the boom. This does not indicate a<br />
faulty pump but is a trait common to hydraulic equipment.<br />
5. If trouble develops with the hydraulic pump, remove it and call your Sunrise<br />
Medical Supplier to receive an RMA. Provide serial number and date purchased.<br />
DO NOT attempt to lift someone with a faulty hydraulic pump.<br />
Do not wash slings with bleach. Bleach will damage material.<br />
Slings can suffer damage during washing and drying.<br />
Initially Before Bi-Monthly<br />
Each Use<br />
Always check slings before use. Bleached, torn, cut, frayed, or broken slings<br />
are unsafe and could result in serious injury or death to patient. Destroy and<br />
discard worn slings. Do not alter slings.<br />
x<br />
x<br />
x<br />
x<br />
x<br />
x<br />
x<br />
x<br />
IM-459001
10<br />
Troubleshooting<br />
TROUBLESHOOTING<br />
Symptom<br />
Handle mounting holes loosening or<br />
enlarging.<br />
Jack lowers with patient suspended.<br />
Jack fails to lift to full height.<br />
Oil leaking from around piston.<br />
Oil leaking around rim of top cap.<br />
Unit will not lower.<br />
Action<br />
• Periodically oil the pivot point.<br />
• Check to make sure the pressure release<br />
knob is completely closed.<br />
• Check valve not sealing. Pump handle<br />
rapidly several times, then open pressure<br />
release knob and pull down on boom.<br />
Repeat two or three times.<br />
• Release cartridge defective– lay jack on<br />
its side. Remove pressure release knob<br />
cartridge and clean or replace.<br />
• Air in oil under ram– pump unit up as far<br />
as it will go. Open pressure release knob<br />
and pull down on boom to lowest position.<br />
Repeat until lift raises to full height.<br />
• Unit may be low on oil– remove jack<br />
from lift, collapse ram. Remove socket<br />
screw (located on top of top cap) and<br />
put 1oz. of #10 weight hydraulic oil in at<br />
a time until the jack ram moves the<br />
proper distance.<br />
NOTE– Proper amounts of oil for a jack when completely<br />
empty are 7 3/4 oz. for 12" stroke; 11 1/2 oz.<br />
for 17" stroke; 3 3/4 oz. for 6" stroke; 12 1/2 oz. for<br />
19" stroke.<br />
• Tighten packing nut.<br />
• After use, seal should assume proper<br />
shape. If oil continues to leak, clamp jack<br />
base in vise with unit vertical; remove<br />
top cap and replace quad ring located in<br />
top cap. DO NOT loosen or remove reservoir<br />
tube from base as this will break seal<br />
around base, causing loss of oil in unit.<br />
• Lay jack on its side. Remove and clean<br />
release cartridge making sure small<br />
holes are cleaned out with pin or small<br />
diameter wire.<br />
• Replace release cartridge.<br />
IM-459001