Please read these instructions carefully before assembly - Wiedamark
Please read these instructions carefully before assembly - Wiedamark
Please read these instructions carefully before assembly - Wiedamark

You also want an ePaper? Increase the reach of your titles
YUMPU automatically turns print PDFs into web optimized ePapers that Google loves.
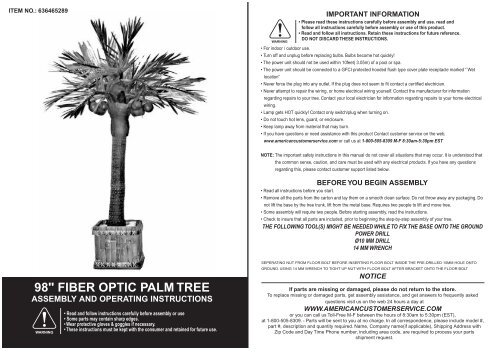
ITEM NO.: 636465289<br />
WARNING<br />
IMPORTANT INFORMATION<br />
• <strong>Please</strong> <strong>read</strong> <strong>these</strong> <strong>instructions</strong> <strong>carefully</strong> <strong>before</strong> <strong>assembly</strong> and use. <strong>read</strong> and<br />
follow all <strong>instructions</strong> <strong>carefully</strong> <strong>before</strong> <strong>assembly</strong> or use of this product.<br />
• Read and follow all <strong>instructions</strong>. Retain <strong>these</strong> <strong>instructions</strong> for future reference.<br />
DO NOT DISCARD THESE INSTRUCTIONS.<br />
• For indoor / outdoor use.<br />
• Turn off and unplug <strong>before</strong> replacing bulbs. Bulbs become hot quickly!<br />
• The power unit should not be used within 10feet( 3.05m) of a pool or spa.<br />
• The power unit should be connected to a GFCI protected hooded flush type cover plate receptacle marked “ Wet<br />
location”<br />
• Never force the plug into any outlet. If the plug does not seem to fit contact a certified electrician.<br />
• Never attempt to repair the wiring, or home electrical wiring yourself. Contact the manufacturer for information<br />
regarding repairs to your tree. Contact your local electrician for information regarding repairs to your home electrical<br />
wiring.<br />
• Lamp gets HOT quickly! Contact only switch/plug when turning on.<br />
• Do not touch hot lens, guard, or enclosure.<br />
• Keep lamp away from material that may burn.<br />
• If you have questions or need assistance with this product Contact customer service on the web.<br />
www.americancustomerservice.com or call us at 1-800-505-8309 M-F 8:30am-5:30pm EST<br />
NOTE: The important safety <strong>instructions</strong> in this manual do not cover all situations that may occur. It is understood that<br />
the common sense, caution, and care must be used with any electrical products. If you have any questions<br />
regarding this, please contact customer support listed below.<br />
BEFORE YOU BEGIN ASSEMBLY<br />
• Read all <strong>instructions</strong> <strong>before</strong> you start.<br />
• Remove all the parts from the carton and lay them on a smooth clean surface. Do not throw away any packaging. Do<br />
not lift the base by the tree trunk, lift from the metal base. Requires two people to lift and move tree.<br />
• Some <strong>assembly</strong> will require two people. Before starting <strong>assembly</strong>, <strong>read</strong> the <strong>instructions</strong>.<br />
• Check to insure that all parts are included, prior to beginning the step-by-step <strong>assembly</strong> of your tree.<br />
THE FOLLOWING TOOL(S) MIGHT BE NEEDED WHILE TO FIX THE BASE ONTO THE GROUND<br />
POWER DRILL<br />
Ø10 MM DRILL<br />
14 MM WRENCH<br />
98" FIBER OPTIC PALM TREE<br />
ASSEMBLY AND OPERATING INSTRUCTIONS<br />
WARNING<br />
• Read and follow <strong>instructions</strong> <strong>carefully</strong> <strong>before</strong> <strong>assembly</strong> or use<br />
• Some parts may contain sharp edges.<br />
• Wear protective gloves & goggles if necessary.<br />
• These <strong>instructions</strong> must be kept with the consumer and retained for future use.<br />
SEPERATING NUT FROM FLOOR BOLT BEFORE INSERTING FLOOR BOLT INSIDE THE PRE-DRILLED 10MM HOLE ONTO<br />
GROUND. USING 14 MM WRENCH TO TIGHT UP NUT WITH FLOOR BOLT AFTER BRACKET ONTO THE FLOOR BOLT<br />
NOTICE<br />
If parts are missing or damaged, please do not return to the store.<br />
To replace missing or damaged parts, get <strong>assembly</strong> assistance, and get answers to frequently asked<br />
questions visit us on the web 24 hours a day at<br />
WWW.AMERICANCUSTOMERSERVICE.COM<br />
or you can call us Toll-Free M-F between the hours of 8:30am to 5:30pm (EST),<br />
at 1-800-505-8309. - Parts will be sent to you at no charge. In all correspondence, please include model #,<br />
part #, description and quantity required. Name, Company name(if applicable), Shipping Address with<br />
Zip Code and Day Time Phone number, including area code, are required to process your parts<br />
shipment request.
PARTS DIAGRAM<br />
PARTS LIST (PLEASE REFER TO PARTS DIAGRAM AS NECESSARY)<br />
REF#<br />
PART#<br />
DESCRIPTION FIBER<br />
PART DIAGRAM<br />
QTY<br />
1<br />
PT1P1<br />
OPTIC PALM<br />
1<br />
2<br />
PT1P2<br />
TREE HEAD TRUNK AND<br />
BAMBOO BASE<br />
1<br />
3<br />
PT1P3<br />
TRANSFORMER<br />
1<br />
4<br />
PT1P4<br />
TRANSFORMER FUSE<br />
Ø5 X 20mm 10A<br />
(one included as spare)<br />
2<br />
5<br />
PT1P5<br />
COCONUT SET<br />
2<br />
6<br />
PT1P6<br />
HALOGEN BULB<br />
4<br />
7<br />
PT1P7<br />
LED SPOTLIGHT<br />
4<br />
8<br />
PT1P8<br />
MOSS PANEL<br />
2<br />
9<br />
PT1P9<br />
SPARE MOSS<br />
1<br />
10<br />
PT1P10<br />
BRACKET<br />
2<br />
11<br />
PT1P11<br />
REMOTE CONTROLLER<br />
2<br />
12<br />
PT1P12<br />
FLOOR BOLT<br />
2<br />
13<br />
PT1P13<br />
CHAIN FOR REMOTE<br />
1
ATTENTION<br />
This product should be grounded. In the event of an electrical short circuit, grounding reduces the risk of electrical<br />
shock by providing an escape wire with an appropriate grounding plug.<br />
• DO NOT REPAIR OR TAMPER WITH THE CORD OR PLUG<br />
• DO NOT USE EXTENSION CORDS<br />
• DO NOT SUBMERGE TRANSFORMER IN WATER<br />
• DO NOT ALLOW TO SIT IN STANDING WATER<br />
• DO NOT CONNECT TWO OR MORE POWER SUPPLIES IN PARALLEL<br />
• DO NOT USE WITH A DIMMER<br />
IF LIGHTS DO NOT WORK<br />
• Check household electric outlet connection<br />
• Check FUSE in transformer<br />
• Check HALOGEN BULB in coconut<br />
• Check connection between LED SPOTLIGHT & LIGHT SOCKET<br />
• Check connection between COCONUT & TREE / White Wire Connector<br />
• Check BATTERY in remote controller<br />
NOTE: DO NOT PLUG INTO OUTLET PRIOR TO<br />
COMPLETION OF ASSEMBLY<br />
1.) Unpack contents and lay them out on a smooth<br />
clean surface<br />
2.) With help from another person, screw the Palm Tree<br />
Head into the Tree Trunk. (See Figure 1).<br />
3.) Sp<strong>read</strong> branches out from very top level of the tree<br />
to lower level of the tree step by step & sp<strong>read</strong><br />
leaves out from very tip of the branch to lower of the<br />
branch step by step. (See Figure 2)<br />
ASSEMBLY STEPS<br />
Figure 1<br />
Figure 2 Figure 3<br />
4.) Attach Coconuts to branches by wrapping green<br />
wiring on coconut <strong>assembly</strong> around a branch<br />
near the position you would like the coconuts.<br />
(see Figure 3)<br />
INFORMATION TO USER<br />
The user that changes or modifications not expressly approved by the party responsible for compliance could void the<br />
user’s authority to operate the equipment. Modifications not authorized by the manufacturer may void users authority to<br />
operate this device.<br />
5.) Connect the coconut <strong>assembly</strong> to the palm tree<br />
head wires together at the white easy connect wire<br />
connectors. (see Figure 4)<br />
6.) Screw in Led Spot Lights into sockets located in<br />
the bamboo base. (see Figure 5)<br />
Caution : Do not use LED SPOTLIGHT onto any<br />
other electronic device, it will cause serious<br />
danger and damage on bulb<br />
Note: This equipment has been tested and found to comply with the limits for a class B digital device, pursuant to part<br />
15 of the FCC Rules, These limits are designed to provide reasonable protection against harmful interference in a<br />
residential installation, This equipment generates, uses and can radiate radio frequency energy and , if not installed<br />
and used in accordance with the instruction, may cause harmful interference to radio or television reception, which can<br />
be determined by turning the equipment off and on, the user is encouraged to try to correct the interference by one or<br />
more of the following measures:<br />
--Reorient or relocate the receiving antenna.<br />
--Increase the separation between the equipment and receiver.<br />
--Connect the equipment into an outlet on a circuit different from that to which the receiver is connected<br />
--Consult the dealer or an experienced radio/TV technician for help<br />
Figure 4<br />
7.) Set Moss panel in place around the Palm Tree<br />
trunk. (see Figure 6)<br />
Figure 5<br />
8.) Pull the power cord from the transmitter out<br />
through the rubber grommet. (see Figure 7)<br />
Figure 6<br />
Figure 7
TRANSFORMER FUSE REPLACEMENT<br />
With the tree unplugged unscrew knob labeled fuse on the transformer in the bamboo base. Replace used fuse with a<br />
new one and screw the knob back into place<br />
REMOTE CONTROLLER INSTRUCTIONS<br />
The remote controllers should be located in the red<br />
box in the bamboo base.<br />
Chain included to chain one to the red box.<br />
Ø5 X 20mm 10A<br />
1. LED TREE<br />
2. LED SPOT<br />
LIGHTS<br />
Figure 1<br />
Figure 2<br />
HALOGEN BULB REPLACEM ENT<br />
Before removing bulb turn unit off,<br />
unplug from outlet and let cool.<br />
Remove screw and the tempered<br />
glass lens by pulling on the edges<br />
until it swings open. Then <strong>carefully</strong><br />
slide the metal tab of the lens out of<br />
the slot of the spotlight casing.<br />
Figure 3<br />
Remove the old bulb by gently<br />
pulling it out.Using a tissue to hold<br />
onto the new bulb insert the bulb<br />
posts into thetwo socket holes.<br />
DO NOT TOUCH THE BULB WITH<br />
YOUR BARE HANDS.<br />
Replace the tempered glass and<br />
screw and turn the unit back on.<br />
Battery is located in the back<br />
compartment<br />
Battery Size: A23<br />
Caution :<br />
Low Battery will effect transmittance<br />
of remote control, replace with new<br />
battery when necessary<br />
LED / 280 LEDs<br />
Frond 176 LEDs<br />
Trunk 16 LEDs<br />
Coconut 6 PCs x 4 LEDs = 24LEDs<br />
Spotlight 4 PCs x 16 LEDs = 64 LEDs<br />
3. HALOGEN<br />
COCONUTS<br />
4. LED TREE<br />
AND LED<br />
SPOTLIGHTS<br />
5. ALL<br />
6. STANDBY<br />
PRODUCT SPECIFICATIONS<br />
Transformer / UL Listed Outdoor<br />
Input:120VAC 60HZ 120VA<br />
Output : 12VAC 8.3A 100VA<br />
Remote Control<br />
DC12V 1028<br />
Frequency 315MHz<br />
Figure 3


![Catalog - All Pages | Nexxus Lighting [PDF] - Wiedamark](https://img.yumpu.com/44592807/1/190x245/catalog-all-pages-nexxus-lighting-pdf-wiedamark.jpg?quality=85)