2009 AFR Fork Owner's Manual - Specialized Bicycles
2009 AFR Fork Owner's Manual - Specialized Bicycles
2009 AFR Fork Owner's Manual - Specialized Bicycles

You also want an ePaper? Increase the reach of your titles
YUMPU automatically turns print PDFs into web optimized ePapers that Google loves.
FSR OWNER’S MANUAL<br />
2010 S-WORKS / EPIC / ERA FSR 26” / 29er
CONTENTS<br />
INTRODUCTION....................................................................2<br />
ABOUT OFF ROAD, STUNT, DOWNHILL<br />
AND FREERIDING.................................................................... 2<br />
SERVICE AND MODIFICATIONS........................................... 3<br />
FORK SETUP INFORMATION.................................................4<br />
SEAT POST SETUP INFORMATION........................................5<br />
FRAME FEATURES................................................................5<br />
FRAME GEOMETRY..............................................................6<br />
EPIC 26” CARBON................................................................... 6<br />
EPIC 26” ALLOY....................................................................... 6<br />
EPIC 29er ALLOY..................................................................... 7<br />
ERA CARBON........................................................................... 7<br />
ERA ALLOY............................................................................... 7<br />
FRAME GEOMETRY..............................................................8<br />
SPECIALIZED/FOX BRAIN FADE SHOCK SETUP....................9<br />
SETTING SAG........................................................................... 9<br />
SETTING BRAIN FADE COMPRESSION.............................. 9<br />
SETTING REBOUND................................................................ 9<br />
DERAILLEUR GUARD INSTALLATION....................................10<br />
DOWN TUBE CABLE GUIDE INSTALLATION...........................11<br />
FRONT DERAILLEUR POSITION............................................11<br />
CARBON FRAME INSTRUCTIONS..........................................12<br />
SEAT POST................................................................................ 12<br />
BOTTOM BRACKET................................................................. 13<br />
HEADSET INSTALLATION / REMOVAL............................... 13<br />
COMPONENT TORQUE SETTINGS...................................... 13<br />
FRAME SCHEMATIC.............................................................14<br />
FRAME PIVOT SPECIFICATIONS...........................................15<br />
SETUP DATA.........................................................................16<br />
All instructions are subject to change for improvement without notice.<br />
Please visit www.specialized.com/tech for periodic tech updates.<br />
Rev. A, June <strong>2009</strong><br />
1
INTRODUCTION<br />
Congratulations on your purchase and welcome to the finest line of suspension bikes<br />
available!<br />
About Off Road, Stunt, Downhill and Freeriding<br />
This manual is designed to be used in conjunction with the Bicycle Owner’s <strong>Manual</strong><br />
and owner’s manuals supplied by the manufacturer of the front and rear suspension<br />
components. If you did not receive any of these manuals, download them from the<br />
Internet, contact your dealer, or contact us by telephone. There may be more current<br />
manuals and technical information available. For the most current information , regularly<br />
check the <strong>Specialized</strong> web site or consult your <strong>Specialized</strong> dealer. These manuals were<br />
written for an important reason: your safety while riding.<br />
This manual contains many “Warnings” and “Cautions” concerning the consequences<br />
of failure to maintain or inspect your bicycle or of failure to follow safe cycling practices.<br />
The combination of the safety alert symbol and the word Warning indicates a potentially<br />
hazardous situation which, if not avoided, could result in serious injury or death. The<br />
combination of the safety alert symbol and the word Caution indicates a potentially<br />
hazardous situation which, if not avoided, may result in minor or moderate injury, or<br />
damage to your bicycle or a component. Because the consequences of not following<br />
a Warning usually include “you may lose control and fall,” which could result in serious<br />
personal injury or death, we may not repeat this in conjunction with each Warning.<br />
Because it is impossible to anticipate every situation or condition which may occur, a<br />
practice or situation may be unsafe but not anticipated by this manual. So, don’t forget to<br />
use your common sense.<br />
WARNING! Make sure you have, review, and understand the warnings, instructions,<br />
and content of the manuals for your bicycle.<br />
ABOUT OFF ROAD, STUNT, DOWNHILL AND FREERIDING<br />
Downhill racing, severe off road riding, jumping, and stunt riding is extremely<br />
dangerous. Some downhill racers and freeriders reach speeds similar to motorcycles, thus<br />
face similar risks and hazards. When engaging in these activities, you, your bicycle and<br />
safety equipment must be in perfect condition. We recommend that at all times you wear<br />
appropriate safety gear, such as an approved full face helmet, full finger gloves, and body<br />
armor.<br />
Not every bicycle is built for every activity. Check with your <strong>Specialized</strong> dealer to make<br />
sure you have the right equipment.<br />
No bicycle is indestructible. Downhill racing, severe off road riding, jumping, and stunt<br />
riding increases the stress on every part of your bicycle. Frames or parts under high stress<br />
may fail, causing you to lose control or fall. Because of the risk involved, <strong>Specialized</strong><br />
recommends that you conduct a thorough inspection before each ride. If you miss a jump,<br />
ditch your bike in mid crash, dump or launch your bike without you on it, inspect yourself<br />
for injury, then carefully inspect your bicycle for damage.<br />
Here is what you should look for when you inspect your bicycle for this type of riding:<br />
bent or broken components, such as the handlebar, handlebar stem, seatpost, pedals;<br />
dents, cracks, scratches, deformation, or discoloration. Because damage may be internal<br />
and hidden, if any of these signs are present, stop riding until your bicycle has been<br />
thoroughly inspected by your <strong>Specialized</strong> dealer.<br />
2
WARNING! Although many catalogs, advertisements and articles about bicycling<br />
depict riders racing, jumping, riding hard off road, and/or stunt riding, this activity is<br />
extremely dangerous, increases the rider’s risk of injury or death, and potentially<br />
increases the severity of any injury. The action depicted is being performed by experts<br />
with many years of training and experience. Even with that training and experience,<br />
cyclists who engage in such activity often get seriously injured. It is also foreseeable<br />
that during some jumps or stunts, and even some races, that the rider will exceed the<br />
design capacity of the frame or components, which may result in something on the<br />
bicycle bending or breaking. If a frame or component bends or breaks, such may lead<br />
to loss of control, serious personal injury or death.<br />
As activities such as racing, jumping, severe off road riding, and stunt riding are<br />
extremely dangerous, SAFETY should always be the first consideration. Don’t ride in<br />
the race, ride hard off road, try the jump, or do the stunt, UNLESS YOU CAN DO SO<br />
SAFELY. Here are some additional recommendations:<br />
• Take lessons from a competent instructor first.<br />
• Do jumps or stunts only in areas designated for this type of riding.<br />
• Start with easy jumps and easy stunts first, and slowly develop skills before trying more<br />
dangerous jumps or stunts.<br />
• Wear appropriate safety gear, such as a full face helmet, body armor, full finger gloves.<br />
• Make sure by checking with your dealer that your bike is suitable for the kind of activity<br />
you intend to engage in.<br />
• Constantly inspect your bicycle for signs of stress: cracks in the paint; dents; crushing<br />
or bending of the frame; bent components. Do not ride your bicycle if it shows such<br />
signs of stress.<br />
• Do not seek to bend or break the frame or components. Remember, SAFETY FIRST!!!<br />
Understand and recognize that the stresses imposed on your bike by riding at speed,<br />
jumping or stunt riding may break or damage parts of the bicycle, which may result in loss<br />
of control, serious injury or death.<br />
<strong>Specialized</strong> does not warrant the bicycle frame or components for such activities, and<br />
expressly disclaims all warranties, including the warranty of fitness for particular purpose<br />
and merchantability.<br />
Stunt riding, severe off road riding, jumping, or riding downhill at speed is extremely<br />
dangerous, and the rider voluntarily assumes the risk that the bicycle frame and/or its<br />
components will bend or break, and voluntarily assumes the risk of injury or death.<br />
SERVICE AND MODIFICATIONS<br />
Technological advances have made bicycles and bicycle components more<br />
complex, and the pace of innovation is increasing. It is impossible for this manual or the<br />
accompanying manuals to provide all of the information required to properly repair and/or<br />
maintain your bicycle. In order to help minimize the chances of an injury, it is critical for you<br />
to have work performed by an authorized <strong>Specialized</strong> retailer.<br />
WARNING! Service on <strong>Specialized</strong> bicycles requires special knowledge and tools.<br />
<strong>Specialized</strong> recommends that all service and repairs be performed by an authorized<br />
<strong>Specialized</strong> retailer.<br />
Your bicycle has been engineered and tested with specific components and parts.<br />
Because of the great variety in these items, it is impossible for <strong>Specialized</strong> to test and<br />
approve of all possible combinations. Modifying the frame, fork, or any of the components<br />
may make your bike unsafe. For example, changing the front suspension on your bicycle<br />
may alter the steering characteristics and/or add stresses to the frame which have not<br />
been tested for. If you must replace any component, have this done by your authorized<br />
<strong>Specialized</strong> retailer.<br />
3
WARNING! Never modify your frame or bicycle in any way. Do not sand, drill, fill, or<br />
remove parts. Do not install incompatible forks or suspension parts. An improperly<br />
modified frame, fork, or component, can cause you to lose control and fall.<br />
CAUTION: Any modification of your frame, fork, or components means that your<br />
bike no longer meets our specifications and therefore voids your warranty.<br />
FORK SETUP INFORMATION<br />
WARNING! The Epic frame is compatible ONLY with single crown forks that have travel<br />
of 3.94” (100mm) or less. Use of different styled forks or forks with longer travel may<br />
result in catastrophic failure of the frame which may result in serious personal injury<br />
or death.<br />
Certain <strong>Specialized</strong> frames are equipped with tapered head tubes with a 1 1/8” upper<br />
bearing and a 1.5” lower bearing. There are three different setup options with these head<br />
tubes.<br />
1. <strong>Specialized</strong> proprietary fork: Installs with no adapters.<br />
2. After-Market brand fork with 1 1/8” to 1.5” tapered steerer tube:<br />
• 1.5 slip-fit adapter to lower the bearing in the head tube (part # S09250004).<br />
• 1.5 Crown race (part # S092500005)<br />
• 1.5 lower bearing (part # S092500001).<br />
3. After- market fork with 1 1/8” steerer tube: Requires adapter part # <strong>2009</strong>-9060<br />
This adapter presses into the head tube.<br />
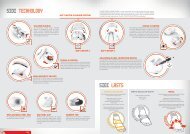
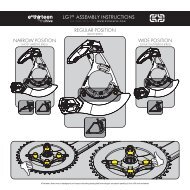
SPECIALIZED 1 1/8” - 1.5” TAPERED MOUNTAIN BIKE HEAD TUBES<br />
1 1/8” to 1.5” drop-in integrated bearing head tube<br />
(All carbon frames, all Enduro FSR, Stumpjumper FSR 29er, Epic 29er)<br />
1.5” Bearing (52x40x7)<br />
Part #: S092500001<br />
1.5” Adapter for<br />
non-<strong>Specialized</strong> 1.5” forks<br />
Part #: S092500004<br />
1.5” Bearing (52x40x7)<br />
Part #: S092500001<br />
1.5” Crown Race<br />
Part #: S092500005<br />
1.5” to 1 1/8” Adapter<br />
Part #: <strong>2009</strong>-9060<br />
1 1/8” Campy Bearing<br />
1 1/8” Crown Race<br />
1 1/8” to 1.5” <strong>Specialized</strong><br />
carbon steerer tube with<br />
built-in crown race<br />
1 1/8” to 1.5”<br />
Steerer Tube<br />
1 1/8” Steerer Tube<br />
1 2 3<br />
NOTE: SX /SX Trail and Big Hit frames use external press-in cups<br />
4
SEAT POST SETUP INFORMATION<br />
SEATPOST MINIMUM INSERTION: To prevent damage to the frame, it’s important<br />
to have a minimum amount of seatpost in the seat tube.<br />
Carbon frames:<br />
Small / Medium - 70mm insertion<br />
Large / X-Large - 100mm insertion<br />
Aluminum frames:<br />
If you cannot see the seatpost tube through the<br />
seat tube hole, your seatpost is too far extended.<br />
If a greater saddle height is required, replace the<br />
seatpost with a longer one.<br />
SM/MD:70mm<br />
LG/XL:100mm<br />
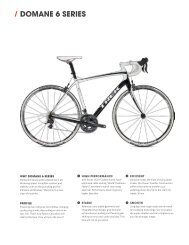
FRAME FEATURES<br />
2<br />
7<br />
9<br />
11<br />
10<br />
1<br />
4<br />
8<br />
5<br />
12<br />
6<br />
3<br />
1. Main Frame 5. Main Pivot 9. Lower Shock Eyelet<br />
2. Seatstay 6. Dropout (Horst) Pivot 10. Upper Shock Eyelet<br />
3. Chainstay 7. -Link @ Seatstay Pivot 11. Shock<br />
4. -Link 8. -Link @ Frame Pivot 12. Replaceable Derailleur Hanger<br />
5
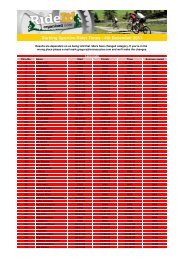
FRAME GEOMETRY<br />
1. Top Tube Length* 5. Head Tube Angle 9. Stack<br />
2. Chainstay Length 6. Wheelbase 10. Reach<br />
3. BB Height 7. Standover Height**<br />
4. Seat Tube Angle 8. Head Tube Length<br />
EPIC 26” CARBON<br />
SMALL MEDIUM LARGE X-LARGE<br />
1 554 21.81” 589 23.19” 615 24.21” 641 25.24”<br />
2 425 16.73” 425 16.73” 425 16.73” 425 16.73”<br />
3 331 13.03” 331 13.03” 331 13.03” 331 13.03”<br />
4 74° 74° 74° 74°<br />
5 70° 70° 70° 70°<br />
6 1061 41.77” 1098 43.23” 1126 44.33” 1153 45.39”<br />
7 726 28.58” 747 29.41” 757 29.80” 775 30.51”<br />
8 126 4.96” 144 5.67” 154 6.06” 184 7.24”<br />
9 547 21.54” 567 22.32” 585 23.03” 604 23.78”<br />
10 400 15.75” 429 16.89” 450 17.72” 470 18.50”<br />
EPIC 26” ALLOY<br />
SMALL MEDIUM LARGE X-LARGE<br />
1 554 21.81” 589 23.19” 615 24.21” 641 25.24”<br />
2 425 16.73” 425 16.73” 425 16.73” 425 16.73”<br />
3 331 13.03” 331 13.03” 331 13.03” 331 13.03”<br />
4 74.2° 74.2° 74.2° 74.2°<br />
5 70° 70° 70° 70°<br />
6 1061 41.77” 1098 43.23” 1126 44.33” 1153 45.39”<br />
7 729 28.70” 751 29.57” 759 29.88” 764 30.08”<br />
8 100 3.94” 120 4.72” 140 5.51” 160 6.30”<br />
9 547 21.54” 567 22.32” 585 23.03” 604 23.78”<br />
10 400 15.75” 429 16.89” 450 17.72” 470 18.50”<br />
Carbon Frame Headset: 1 1/8” top, 1.5” bottom<br />
Alloy Frame Headset (26”): 1 1/8”<br />
Oversized BB Shell: 84.5mm<br />
Standard BB shell: 73mm<br />
Alloy Frame Headset (29er): 1 1/8” top, 1.5 bottom Derailleur Hanger: 9895-4020<br />
Seatpost diameter: 30.9mm Eye to Eye: Epic MD/LG/XL: 187mm (7.36”)<br />
Front derailleur clamp: E-Type Direct Mount (DMD) Eye to Eye: Epic SM/29er, Era (all): 185mm (7.28”)<br />
Carbon Frame Seat Collar: 36.9mm Shock Stroke: Epic MD/LG/XL: 47mm (1.85”)<br />
Alloy Frame Seat Collar: 34.9mm Shock Stroke: Epic SM/29er, Era (all): 43mm (1.69”)<br />
Rear hub spacing: 135mm<br />
6
EPIC 29er ALLOY<br />
MEDIUM LARGE X-LARGE<br />
1 590 23.23” 615 24.21” 640 25.20”<br />
2 448 17.64” 448 17.64” 448 17.64”<br />
3 327 12.87” 327 12.87” 327 12.87”<br />
4 74° 74° 74°<br />
5 70.5° 70.5° 70.5°<br />
6 1109 43.66” 1136 44.72” 1163 45.79”<br />
7 767 30.20” 779 30.67” 781 30.75”<br />
8 110 4.33“ 120 4.72” 140 5.51”<br />
9 609 23.98” 618 24.33” 637 25.08”<br />
10 415 16.34” 438 17.24” 462 18.19”<br />
ERA CARBON<br />
SMALL MEDIUM LARGE<br />
1 540 21.26” 565 22.24” 595 23.43”<br />
2 425 16.73” 425 16.73” 425 16.73”<br />
3 331 13.03” 331 13.03” 331 13.03”<br />
4 74.2° 74.2° 74.2°<br />
5 70° 70° 70°<br />
6 1049 41.30” 1076 42.36” 1107 43.58”<br />
7 704 27.72” 721 28.39” 729 28.70”<br />
8 126 4.96“ 143 5.63” 154 6.06”<br />
9 548 21.57” 566 22.28” 575 22.64”<br />
10 386 15.20” 405 15.95” 433 17.05”<br />
ERA ALLOY<br />
SMALL MEDIUM LARGE<br />
1 540 21.26” 565 22.24” 595 23.43”<br />
2 425 16.73” 425 16.73” 425 16.73”<br />
3 331 13.03” 331 13.03” 331 13.03”<br />
4 74.2° 74.2° 74.2°<br />
5 70° 70° 70°<br />
6 1048 41.26” 1074 42.28” 1104 43.46”<br />
7 719 28.31” 722 28.43” 727 28.62”<br />
8 100 3.94“ 120 4.72” 130 5.12”<br />
9 548 21.57” 566 22.28” 575 22.64”<br />
10 386 15.20” 405 15.95” 433 17.05”<br />
* TT length is the Horizontal Measurement from the center-line of the HT at the top of<br />
the HT to the center-line of the projected seat tube.<br />
** Stand Over height is measured vertically at the centerpoint of the TT measurement.<br />
7
FRAME GEOMETRY<br />
1<br />
10<br />
8<br />
9<br />
4<br />
6<br />
2<br />
3<br />
7<br />
5
SPECIALIZED/FOX BRAIN FADE SHOCK SETUP<br />
SETTING SAG<br />
Set the sag at 20 to 25% of shock stroke.<br />
Epic 26” (MD/LG/XL) sag: 9.5-11.5mm of stroke<br />
Epic 26” (SM), Epic 29er, Era sag: 8.5-10.5mm of stroke<br />
See attached chart for starting air pressure.<br />
Turn Brain Fade knob counter-clockwise (1.5-2 turns from full firm) to allow shock to<br />
sag more easily. After setting the pressure, push the rubber ring up to the seal, sit on the<br />
bike gently, dismount, and measure sag.<br />
SETTING BRAIN FADE COMPRESSION<br />
After the sag is set, adjust the Brain Fade to full firm or rider preference.<br />
Brain Fade ride tips: Epic Brain Fade controls the Trail Tune inertia valve damping. The<br />
blue knob adjusts Trail Tune damping from firm (clockwise) to soft (counterclockwise) and<br />
does NOT completely lock out the shock.<br />
Backing off from full firm can help with tracking in loose terrain conditions while riding<br />
off camber sections or climbing. The soft setting can also help during lengthy downhill or<br />
rugged conditions where the rider may want the suspension active at all times.<br />
SETTING REBOUND<br />
Set rebound damping adjuster to rider preference. A good starting point is 3-4 clicks<br />
out from full firm. Typically a slower rebound for slow speed, bigger hits to eliminate<br />
kickback, or faster rebound for higher speeds and smaller hits, so the suspension does<br />
not pack up and has time to rebound between bumps. Refer to chart below for specific<br />
weight settings.<br />
Note - the chart is only a starting point, actual sag needs to the checked and adjusted on the<br />
bike, while riding, and at regular intervals. Please refer to your shock owner’s manual for additonal<br />
setup information.<br />
RIDER<br />
WEIGHT<br />
EPIC 26” (MD/LG/XL)<br />
Sag: 20-25%<br />
Sag: 9.5-11.5mm<br />
Stroke: 47mm<br />
Travel: 100mm<br />
FOX BRAIN 26”<br />
LBS (KG)<br />
90<br />
100<br />
110<br />
120<br />
130<br />
140<br />
150<br />
160<br />
170<br />
180<br />
190<br />
200<br />
210<br />
220<br />
230<br />
240<br />
250<br />
265<br />
280<br />
295<br />
41<br />
45<br />
50<br />
54<br />
60<br />
64<br />
68<br />
73<br />
77<br />
82<br />
86<br />
91<br />
95<br />
100<br />
104<br />
109<br />
113<br />
120<br />
127<br />
134<br />
100<br />
110<br />
120<br />
130<br />
140<br />
150<br />
160<br />
170<br />
180<br />
190<br />
200<br />
210<br />
220<br />
230<br />
240<br />
250<br />
260<br />
275<br />
290<br />
305<br />
4-6<br />
3-5<br />
2-4<br />
1-2<br />
REBOUND<br />
GUIDE:<br />
Full race / Uphill - 0-2 clicks from full firm<br />
Trail riding - 3 clicks from full firm to full open<br />
Downhill rough trails - Full open<br />
EPIC (SM, 29er) / ERA<br />
Sag: 20-25%<br />
Sag: 8.5-10.5mm<br />
Stroke: 43mm<br />
Travel: 100mm<br />
FOX BRAIN 26”<br />
FOX BRAIN 29er<br />
105<br />
115<br />
125<br />
135<br />
145<br />
155<br />
165<br />
175<br />
185<br />
195<br />
205<br />
215<br />
225<br />
235<br />
245<br />
255<br />
265<br />
280<br />
295<br />
310<br />
5-7<br />
4-6<br />
3-5<br />
2-4<br />
Full race / Uphill - 0-2 clicks from full firm<br />
Trail riding - 3 clicks from full firm to full open<br />
Downhill rough trails - Full open<br />
110<br />
120<br />
130<br />
140<br />
150<br />
160<br />
170<br />
180<br />
190<br />
200<br />
210<br />
220<br />
230<br />
240<br />
250<br />
260<br />
270<br />
285<br />
300<br />
315<br />
COMPRESSION<br />
GUIDE:<br />
4-6<br />
3-5<br />
2-4<br />
1-2<br />
Full race / Uphill - 0-2 clicks from full firm<br />
Trail riding - 3 clicks from full firm to full open<br />
Downhill rough trails - Full open<br />
E100<br />
Sag: 10-15%<br />
Sag: 10-15mm<br />
Travel: 100mm<br />
50<br />
55<br />
60<br />
65<br />
70<br />
75<br />
80<br />
85<br />
90<br />
95<br />
100<br />
105<br />
110<br />
115<br />
120<br />
Rev.<br />
2<br />
1.5<br />
1<br />
Loose Gravel / Muddy: 1 rotation from full firm<br />
Downhill / Technical: 4-6 clicks from full firm<br />
All Other Terrain: Full firm-3 clicks from full firm<br />
Clicks from<br />
full slow<br />
Clicks from<br />
full firm
DERAILLEUR GUARD INSTALLATION<br />
The <strong>Specialized</strong> Derailleur guard is available separately through your local <strong>Specialized</strong><br />
dealer. The guard works with solid or Q/R axle types and is compatible with all Mountain<br />
bike models using the 2005-2006 Enduro/Demo derailleur hanger.<br />
Guard Part #: 9896-4030<br />
Hanger Part #: 9895-4021<br />
Q/R Axle<br />
Guard<br />
Spacer<br />
Guard<br />
Q/R Nut<br />
31<br />
25<br />
10<br />
GUARD PINS<br />
Long (31mm):<br />
All SRAM derailleurs<br />
All Shimano Shadow derailleurs<br />
Medium (25mm):<br />
Shimano XTR / XT / LX<br />
(All Shimano derailleurs with<br />
countersunk hanger bolt)<br />
Short (10mm):<br />
(All Shimano derailleurs without<br />
countersunk hanger bolt)<br />
Derailleur Guard Installation (Q/R option):<br />
1. Install rear derailleur on derailleur hanger.<br />
2. Place rear wheel in frame and install Q/R, with springs and<br />
without Q/R end nut.<br />
3. Insert appropriate derailleur guard pin in derailleur.<br />
4. Place guard sleeve in derailleur guard.<br />
5. Slide derailleur guard and sleeve over guard pin and Q/R.<br />
6. Install supplied Q/R nut and tighten Q/R.<br />
7. Torque guard pinch bolt to 80 in-lbf (9 N-m).
DOWN TUBE CABLE GUIDE INSTALLATION<br />
The <strong>Specialized</strong> Epics are equipped<br />
with bolt-on down tube cable guides. For<br />
proper housing placement and function,<br />
the hydraulic rear brake housing goes in the<br />
larger middle slot, the gear cables go on the<br />
outside.<br />
Do not overtighten the guide bolts!<br />
FRONT DERAILLEUR POSITION<br />
Derailleur<br />
position:<br />
LOW<br />
Derailleur<br />
position:<br />
HIGH<br />
Stumpjumper FSR 26”<br />
Stumpjumper FSR 29er<br />
Enduro<br />
Safire<br />
Epic<br />
Epic 29er<br />
Era<br />
SX Trail<br />
SX<br />
The front derailleur chart is a starting point. Different front derailleurs may require a<br />
different mounting position. Adjust position according to the front derailleur to achieve<br />
proper positioning over the chainring.
CARBON FRAME INSTRUCTIONS<br />
The <strong>Specialized</strong> Epic Carbon frame utilizes advanced composite materials that require<br />
particular care during assembly, storage and riding. This installation and care guide<br />
contains instructions and warnings, plus torque specifications. Assembling a complete<br />
bicycle is a complicated task requiring training and experience, only a trained and<br />
experienced bicycle mechanic should install components to this frame. Reference should<br />
also be made to Barnett’s or some other comprehensive bicycle manual.<br />
WARNING! Failure to follow these instructions may result in a catastrophic failure of<br />
the frame and/or its components while riding, which may result in serious personal<br />
injury or death.<br />
WARNING! Bicycle assembly is an art which requires training and experience. Do not<br />
attempt installation of any component if you do not have experience and training as a<br />
bicycle mechanic.<br />
To ensure the best assembly possible and to prevent any damage to the components<br />
or frame, follow all torque specifications. Please refer to the specific owner’s manuals<br />
for mating component’s correct torque specifications. If the mating component’s<br />
recommended torque exceeds the frame’s recommended torque, use the lower torque<br />
spec. Due to torque considerations, not all components will be compatible.<br />
WARNING! Failure to follow the torque specifications in this installation guide will<br />
void your warranty, but most importantly may result in damage to the frame which<br />
may not be visible. If the frame is damaged, this can result in loss of structural<br />
integrity.<br />
Bicycle components such as a handlebar, handlebar stem, seat post, saddle, brakes,<br />
must be mutually compatible with each other, as well as the frame and the intended<br />
use. Any doubt regarding compatibility should be discussed with your local authorized<br />
<strong>Specialized</strong> retailer.<br />
WARNING! When placing the frame and/or bicycle in a repair stand, clamp the stand<br />
to the seat post and not the frame. Clamping the frame can cause damage to the frame<br />
that may or may not be visible, which may impair the structural integrity of the frame.<br />
SEAT POST<br />
Refer to your seat post owner’s<br />
manual prior to installation.<br />
<strong>Specialized</strong> Mountain frames have<br />
a 30.9mm seat post diameter and<br />
require that the seat post have a<br />
tolerance of 30.78mm to 30.95mm.<br />
Do not grease inside surface of carbon<br />
seat tube!<br />
The Epic Carbon frame uses<br />
a bolt-style seat post clamping<br />
mechanism. Since the components<br />
of this assembly are in direct contact<br />
with carbon fiber, pay special<br />
attention to ensure proper tightness<br />
for the seat post when correctly<br />
tightened to specifications.<br />
GREASE<br />
• SEAT TUBE I.D.<br />
• SEAT POST O.D.<br />
• To preserve smooth QR lever action,<br />
lubricate contact surfaces regularly<br />
36.9mm<br />
<strong>Specialized</strong> recommends the application of carbon assembly compound between the<br />
seat tube and post to increase friction. Recommended compounds can be found at www.<br />
tacx.com. See your authorized <strong>Specialized</strong> retailer if you have any questions.
WARNING! Do not extend seat post above the minimum insertion line. Extension<br />
beyond the minimum insertion line can result in failure, causing serious injury or<br />
death.<br />
WARNING! Do not pull down on downtube derailleur cables to pre-stress the cables.<br />
This can cause damage to the cable guides.<br />
Your <strong>Specialized</strong> frame does not require any Bottom Bracket or Head Tube<br />
pre-installation preparation. All surfaces are already prepared from the factory, with the<br />
exception of greasing the bottom bracket threads and head set cups. It is acceptable to<br />
chase the bottom bracket threads if necessary. Do not face bottom bracket cups.<br />
BOTTOM BRACKET<br />
Threaded Bottom Bracket: Ensure that the Bottom Bracket shell threads are clean<br />
and greased prior to installation. Recommended torque is 442 in-lbf (50 N-m).<br />
Oversized Bottom Bracket: Please refer to the carbon crank installation guide for<br />
assembly instructions and compatible tools<br />
HEADSET INSTALLATION / REMOVAL<br />
<strong>Specialized</strong> mtn carbon frames use a 48mm (41.8mm x 8mm x 45°) Campagnolo<br />
Standard compatible top and 1.5” (52mm x 7mm x 45°) bottom bearing. Ensure that<br />
replacement bearings are compatible with the <strong>Specialized</strong> headset specification. No tools<br />
are needed for installation or removal of both bearings. Grease bearing surfaces before<br />
installation.<br />
COMPONENT TORQUE SETTINGS<br />
• Front derailleur: Recommended torque is 44 in-lbf (5.0 N-m).<br />
• Rear derailleur: Recommended torque for the rear derailleur is 70 in-lbf (7.9 N-m).<br />
Ensure that threads are clean prior to installation.<br />
• Seat collar: Recommended torque is 45 in-lbf (5.1 N-m).<br />
• Water Bottle Cage: Recommended torque is 35 in-lbf (4.0 N-m).<br />
WARNING! Great care should be taken to not damage carbon fiber or composite<br />
materials, including the frame and any carbon fiber or composite components. Any<br />
damage may result in a loss of structural integrity, which may result in a catastrophic<br />
failure. This damage may or may not be visible in inspection. Before each ride, and<br />
after any crash, you should carefully inspect your bicycle for any dents, fraying,<br />
gouging, scratches through the paint, chipping bending, or any other signs of<br />
damage. Do not ride if your bicycle shows any of these signs. After any crash, and<br />
before you ride any further, take your bicycle to an authorized <strong>Specialized</strong> retailer for<br />
a complete inspection.
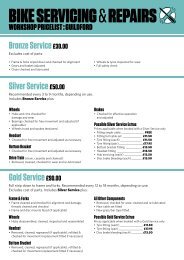
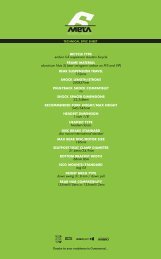
FRAME SCHEMATIC<br />
Schematic #23<br />
2.p<br />
SHOCK<br />
LOWER SHOCK EYE<br />
2.h<br />
2.m<br />
2.n<br />
2.m<br />
2.h<br />
SEATSTAY CLEVIS x2<br />
ALLOY FRAME ONLY<br />
SEATSTAY CLEVIS x2<br />
CARBON FRAME ONLY<br />
1.k<br />
1.d<br />
1.k<br />
1.h<br />
2.k<br />
1.h<br />
1.k<br />
1.d<br />
1.k<br />
Seat<br />
Tube<br />
2.g<br />
2.o<br />
1.c<br />
S-Link<br />
1.c<br />
2.f<br />
SHOCK ASSEMBLY<br />
S-LINK @ FRAME ASSEMBLY<br />
S-LINK @ SEATSTAY ASSEMBLY<br />
S-LINK<br />
ALL ALLOY SPACERS:<br />
Small diameter of<br />
spacer faces bearing<br />
SEATSTAY<br />
CHAINSTAY<br />
DROPOUT<br />
1.g<br />
1.f<br />
1.b<br />
1.f<br />
1.g<br />
Carbon<br />
Pivot<br />
2.c<br />
2.d 2.c<br />
2.d<br />
2.e<br />
Alloy<br />
Pivot<br />
CHAINSTAY CLEVIS x2<br />
CHAINSTAY<br />
BRIDGE<br />
2.a<br />
1.a<br />
1.e<br />
DROPOUT ASSEMBLY<br />
1.a<br />
2.b<br />
BOTTOM BRACKET ASSEMBLY<br />
SHOCK<br />
1.e<br />
2.q<br />
UPPER SHOCK EYE<br />
MAINFRAME<br />
BOLTS<br />
Derailleur Cage<br />
Derailleur Cage spacers<br />
Derailleur Mount<br />
CHAINSTAY<br />
BRIDGE<br />
DERAILLEUR MOUNT ASSEMBLY<br />
BB SHELL<br />
NOTE - Bearing and Bolt Kits are available only through your local <strong>Specialized</strong> dealer. To retain your<br />
warranty and for your safety, all maintenance should be performed by your local <strong>Specialized</strong> dealer.
FRAME PIVOT SPECIFICATIONS<br />
Part#<br />
1.a<br />
1.b<br />
1.c<br />
1.d<br />
1.e<br />
1.f<br />
1.g<br />
1.h<br />
1.k<br />
Part#<br />
2.a<br />
2.b<br />
2.c<br />
2.c<br />
2.d<br />
2.e<br />
2.f<br />
2.g<br />
2.h<br />
2.h<br />
2.k<br />
2.m<br />
2.n<br />
2.o<br />
2.p<br />
2.q<br />
2.q<br />
Qty<br />
2<br />
2<br />
2<br />
2<br />
2<br />
4<br />
4<br />
2<br />
4<br />
Qty<br />
1<br />
2<br />
2<br />
2<br />
2<br />
2<br />
1<br />
1<br />
4<br />
2<br />
1<br />
2<br />
1<br />
1<br />
1<br />
1<br />
1<br />
Part Description<br />
BB Bearing<br />
Dropout Bearing<br />
S- Link @ Frame Bearing<br />
S- Link @ Seatstay Bearing<br />
BB Spacer<br />
Dropout Bearing Spacer<br />
Dropout Teflon Thrust Spacer<br />
S-Link @ Frame Spacer<br />
S-Link @ Seatstay Spacer<br />
Part Description<br />
BB Axle<br />
BB Nut<br />
Dropout Bolt (Alloy Frame)<br />
Dropout Bolt (Carbon Frame)<br />
Dropout Washer (Carbon Frame)<br />
Dropout Nut (Carbon Frame)<br />
S- Link @ Frame Bolt<br />
S-Link @ Frame Nut<br />
S- Link @ Seatstay Bolt (Alloy frame)<br />
S- Link @ Seatstay Bolt (Carbon frame)<br />
S-Link @ Seatstay Nut (Carbon Frame)<br />
S-Link @ Seatstay Washer<br />
(Alloy / Carbon Frame, bolt side)<br />
S-Link @ Seatstay Washer<br />
(Carbon Frame, nut side)<br />
Lower (Rearward) Shock Eye Bolt<br />
Lower (Rearward) Shock Eye Nut<br />
Upper (Forward) Shock Eye Bolt (Alloy Frame)<br />
Upper (Forward) Shock Eye Bolt (Carbon Frame)<br />
Part Specification<br />
1524F Full Complement Bearing - 24mm O.D. x 15mm I.D. x 5mm Thick<br />
6800V-2RS Full Complement Bearing - 19mm O.D. x 10mm I.D. x 5mm Thick<br />
688 Series Bearing - 16mm O.D. x 8mm I.D. x 5mm Thick<br />
688 Series Bearing - 16mm O.D. x 8mm I.D. x 5mm Thick<br />
Alloy Spacer - 20mm O.D. x 15mm I.D. x 3mm Thick, Chamfered<br />
Alloy Spacer - 15mm O.D. x 10mm I.D. x 4.5mm Thick, Chamfered<br />
Teflon Washer - 22mm O.D. x 15mm I.D. x 0.85mm Thick<br />
Alloy Spacer - 12mm O.D. x 8mm I.D. x 1.4mm Thick, Chamfered<br />
Alloy Spacer - 12mm O.D. x 8mm I.D. x 1.4mm Thick, Chamfered<br />
B = Blue Loctite required<br />
Part Specification<br />
Alloy Axle - M14 Thread (23.5mm Head O.D.) x 64.5mm Shaft Length, 8mm Hex<br />
Alloy Nut - M14 Thread x 23.5mm O.D , 17mm Socket (use 6-point socket only)<br />
Alloy Bolt - M10 Thread x 23.6mm Shaft Length, 4mm Hex, Countersunk Head<br />
Alloy Bolt - M10 Thread x 26.5mm Shaft Length, 4mm Hex<br />
Steel Washer - 17mm O.D. x 13mm I.D. x 0.3mm Thick<br />
Alloy Nut - M10 Thread x 17mm O.D. x 7.6mm Thick, 13mm Open Wrench<br />
Alloy Axle - M8 Thread x 52.5mm Shaft Length, 4mm Hex<br />
Alloy Nut - M8 Thread x 15.7mm O.D., 11mm socket (use 6-point socket only)<br />
Alloy Bolt - M8 Thread x 18mm Shaft Length, 4mm Hex<br />
Alloy Bolt - M8 Thread x 21mm Shaft Length, 4mm Hex<br />
Alloy Nut - M10 Thread x 15.7mm O.D. x 7.6mm Thick, 13mm Open Wrench<br />
Torque in*lb<br />
200-230 B<br />
120-140 B<br />
120-140 B<br />
70-90 B<br />
70-90 B<br />
70-90 B<br />
Steel Washer - 14mm O.D. x 8mm I.D. x 0.3mm Thick<br />
Steel Washer - 15mm O.D. x 11.5mm I.D. x 0.3mm Thick<br />
Steel Bolt - M6 Thread x 32.5mm Shaft Length, 4mm Hex<br />
Alloy Nut - M6 Thread x 12.6mm O.D., 10mm Socket (use 6-point socket only)<br />
Alloy Bolt - M8 Thread x 34mm Shaft Length, 4mm hex<br />
Alloy Bolt - M8 Thread x 26.5mm Shaft Length, 4mm hex<br />
60-70 B<br />
70-90 B<br />
70-90 B<br />
70-90 B
SETUP DATA<br />
DATE<br />
RIDER WEIGHT<br />
FORK PSI<br />
FORK REBOUND DAMPING<br />
(# of clicks from fast)<br />
FORK COMPRESSION DAMPING<br />
(# of clicks from fast)<br />
SHOCK PSI<br />
SHOCK REBOUND DAMPING<br />
(# of clicks from fast)<br />
SHOCK COMPRESSION DAMPING<br />
(# of clicks from fast)
SPECIALIZED BICYCLE COMPONENTS<br />
15130 Concord Circle, Morgan Hill, CA 95037 (408) 779-6229<br />
www.specialized.com