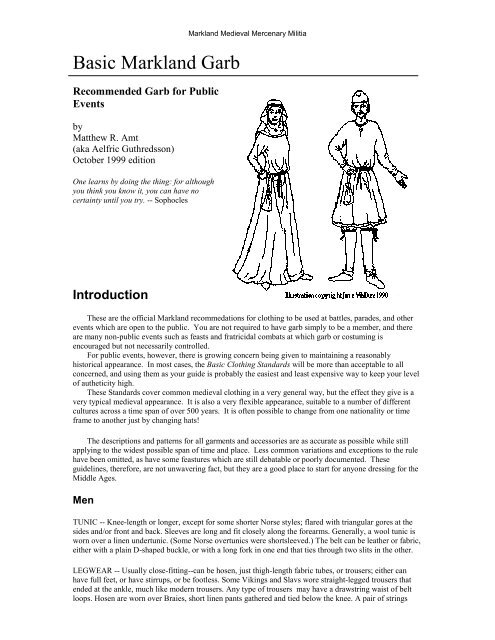
Basic Markland Garb - Markland Medieval Mercenary Militia
Basic Markland Garb - Markland Medieval Mercenary Militia
Basic Markland Garb - Markland Medieval Mercenary Militia

Create successful ePaper yourself
Turn your PDF publications into a flip-book with our unique Google optimized e-Paper software.
<strong>Basic</strong> <strong>Markland</strong> <strong>Garb</strong><br />
Recommended <strong>Garb</strong> for Public<br />
Events<br />
by<br />
Matthew R. Amt<br />
(aka Aelfric Guthredsson)<br />
October 1999 edition<br />
One learns by doing the thing: for although<br />
you think you know it, you can have no<br />
certainty until you try. -- Sophocles<br />
Introduction<br />
<strong>Markland</strong> <strong>Medieval</strong> <strong>Mercenary</strong> <strong>Militia</strong><br />
These are the official <strong>Markland</strong> recommedations for clothing to be used at battles, parades, and other<br />
events which are open to the public. You are not required to have garb simply to be a member, and there<br />
are many non-public events such as feasts and fratricidal combats at which garb or costuming is<br />
encouraged but not necessarily controlled.<br />
For public events, however, there is growing concern being given to maintaining a reasonably<br />
historical appearance. In most cases, the <strong>Basic</strong> Clothing Standards will be more than acceptable to all<br />
concerned, and using them as your guide is probably the easiest and least expensive way to keep your level<br />
of autheticity high.<br />
These Standards cover common medieval clothing in a very general way, but the effect they give is a<br />
very typical medieval appearance. It is also a very flexible appearance, suitable to a number of different<br />
cultures across a time span of over 500 years. It is often possible to change from one nationality or time<br />
frame to another just by changing hats!<br />
The descriptions and patterns for all garments and accessories are as accurate as possible while still<br />
applying to the widest possible span of time and place. Less common variations and exceptions to the rule<br />
have been omitted, as have some feastures which are still debatable or poorly documented. These<br />
guidelines, therefore, are not unwavering fact, but they are a good place to start for anyone dressing for the<br />
Middle Ages.<br />
Men<br />
TUNIC -- Knee-length or longer, except for some shorter Norse styles; flared with triangular gores at the<br />
sides and/or front and back. Sleeves are long and fit closely along the forearms. Generally, a wool tunic is<br />
worn over a linen undertunic. (Some Norse overtunics were shortsleeved.) The belt can be leather or fabric,<br />
either with a plain D-shaped buckle, or with a long fork in one end that ties through two slits in the other.<br />
LEGWEAR -- Usually close-fitting--can be hosen, just thigh-length fabric tubes, or trousers; either can<br />
have full feet, or have stirrups, or be footless. Some Vikings and Slavs wore straight-legged trousers that<br />
ended at the ankle, much like modern trousers. Any type of trousers may have a drawstring waist of belt<br />
loops. Hosen are worn over Braies, short linen pants gathered and tied below the knee. A pair of strings
<strong>Markland</strong> <strong>Medieval</strong> <strong>Mercenary</strong> <strong>Militia</strong><br />
sewn ot the waist of the braies tie to loops or holes at the top of the hosen to support them. Knee- or crossgarters<br />
may be worn.<br />
SHOES -- Commonly leather and ankle-height (or a couple inches above), with a flat sole. Can be "slipons",<br />
buttoned or laced at the side, or drawstringed. Most had pointed toes, but Norse fashions included<br />
round toes.<br />
Women<br />
GOWN or DRESS -- Generally a linen underdress, ankle-length or longer, with long, snug sleeves, and<br />
gores to give flare and fullness. Remember that decent ladies exposed only the face and hands--no slit<br />
hems, plunging necklines, or gaping bodices, please! Women's hosen need only be knee-length.<br />
Saxons: Unfitted overgown may be shorter, with untapered three-quarter-length sleeves.<br />
Normans and French: Full-length overgown either unfitted or laced up the back, sleeves either long and<br />
snug or flared (later 11th to 12th centuries).<br />
Norse: Various long aprons (see Accessories) worn over gowns which might have been pleated.<br />
HEADCOVERINGS -- Women should cover their heads!! Norse women wear a kerchief knotted at the<br />
back or side. For other nationalities, the veil - a white linen oval about 22"x36" draped over the head and<br />
held with a narrow band.<br />
Recommendations<br />
You are strongly urged to use only LINEN and WOOL for all your clothes. These were by far the<br />
most common medieval fabrics, and they will far outperform any modern substitutes. It is safest to use<br />
solid colors, because it is uncertain just what sorts of patterns were used, and how often. Don't bother to<br />
pick a color scheme, and be aware that black is rather over-used these days. Unfortunately, most modern<br />
trims should be avoided, but cuffs, hems, and necklines can be decorated with bands of contrasting color of<br />
fabric. Embroidery should be well-researched, and appropriated to time and place (e.g., don't put Celtic<br />
designs on a Viking tunic).<br />
Pre-wash your fabric! Ignore the "dry clean only" label - modern wools need a good thrashing in the<br />
machine (permanent press or gentle cycle) to give them the proper felted texture. Linen needs its cut ends<br />
secured against ravelling with a zig-zag stitch or a quick hem, then wash is on a normal cycle. Pre-washing<br />
shrinks the fabric at least 3 or 4 inches per yard (length and width!), so always buy extra. Iron well with<br />
steam just before cutting.<br />
Hand sew visible stitching such as cuffs or hems. Really, take the time to finish your clothes with the<br />
old needle and thread, using a plain running stitch, backstitch, or whip stitch. It's easy, educational, and it<br />
really impresses the spectators. Don't leave raw or ragged edges because of the misconception that<br />
"medieval = crude". Anyone too poor to buy a new tunic would certainly take care of the old one!<br />
Keep It Simple!<br />
Avoid the urge to embellish your appearance with inauthentic things like vests, wide kidney belts, long<br />
flowing capes, daggers, armguards, square tied-on leggings, and boots (especially "apache" boots!). Many<br />
people unwittingly spoil their look by adding inappropriate items to what could otherwise be good garb.<br />
Cluttering pieces of mail and leather are simply fantasy, while fur--which was used in several ways in the<br />
Middle Ages--is frequently mis-used nowadays. So keep it simple! A tunic, hosen, and shoes may seen<br />
unexciting, but it is very easy and very medieval.
<strong>Markland</strong> <strong>Medieval</strong> <strong>Mercenary</strong> <strong>Militia</strong><br />
If you wish to wear something not included in the Standards, you may need to find evidence of its<br />
existence. (If someone in charge of an event disagrees with you, he does not have to prove you wrong--it is<br />
up to you to prove yourself right.) Use medieval illustrations and descriptions (these are "primary<br />
sources") whenever possible; some recent (last 15-20 years) secondary sources are pretty good, too, but<br />
most things written in the 19th and early 20th centuries are worthless for clothing research.<br />
As you are getting your garb together, whether sewing or buying, TAKE YOUR TIME, and put some<br />
effort to get everything right the first time. Ask around for help with researching or sewing--there are<br />
plenty of experienced <strong>Markland</strong>ers who will be happy to lend a hand or a book. If someone does tell you<br />
that something of yours is wrong or inappropriate, don't assume he's an ignorant jerk (even if he acts like<br />
one!). Find a convenient time to talk to that person about your disagreement--<strong>Markland</strong> is supposed to be<br />
educational as well as fun, after all.<br />
The <strong>Markland</strong> <strong>Basic</strong> Clothing Standards were designed to be <strong>Markland</strong>'s official clothing guidelines<br />
for public events. This purposed was confired by vote of Council on April 1, 1989. There is no longer any<br />
need for new garb rules to be written for each event, and no need to give lengthy explanations of acceptable<br />
tunics or proper footwear. Event organizers and participants alike can simple refer to the Standards. As the<br />
Standards become more widely known and used, <strong>Markland</strong>'s appearance at re-enactments and living history<br />
displays will become more and more authentic, with comparatively little effort. This sort of improvement<br />
is vital if <strong>Markland</strong> is to maintain its status and reputation as an educational organization.<br />
These Standards were written, and are periodically updated, by Matthew Amt (Aelfic Guthredsson).<br />
Illustrations are by Matthew Amt or Jane Walker unless otherwise noted. The author can be contacted at:<br />
9416 Rhode Island Ave., College Park, MD 20740-1639; phone 301-345-0582; email<br />
amtwalker@erols.com.<br />
Tunic<br />
The tunic is the basic men's garment, and it was common to wear a wool one over a linen undertunic.<br />
Your tunic should reach at least to your knees, and the skirt is flared with gores. The sleeves should fit<br />
fairly closely along the forearms, and can end anywhere between wrist and fingertips.<br />
This first pattern is designed for 2 yards of 45"-wide fabric: 1 1/3 yards for the body, and 24 inches for<br />
the sleeves. Wrist measurement (narrow end of "S") equals the distance around your closed fist plus an<br />
inch for seam allowance. if your fabric is wider than 45 inches (most wool is), you can widen the body<br />
halves, but leave the sleeves 22 inches wide at the top unless you really need the space. The leftover fabric<br />
can become more gores.<br />
To assemble, sew the body halves together only at the top, and cur the neck-hole out as small as<br />
possible--round, semi-circular, or square, with a short slit. Sew the 2 little gore halves (G) together to
<strong>Markland</strong> <strong>Medieval</strong> <strong>Mercenary</strong> <strong>Militia</strong><br />
match the shape of the big gore; sew the gores to either side of the back panel, or in slits at the center front<br />
and back. (It is even better to have gores in the center and at the sides.) You will probably need to trim the<br />
sleeves to fit closer along the forearm, but not too tight. Sew the sleeves to the body, centered on the<br />
shoulder seam. Finally, fold the whole thing in half (into a tunic shape), and sew each side from wrist to<br />
armpit to hem.<br />
Kragelund Mose Tunic<br />
This is a medieval tunic found on a body in a<br />
Danish bog. It was very ingeniously cut from 22"wide<br />
wool, and therefore can be made from about 2<br />
1/2 yards of 45"-wide fabric (get about 3 yards, at least<br />
48" wide, and wash to pre-shrink). The narrow<br />
neckhole is slit front and back on the original. The use<br />
of gores to give fullness and the clever design to<br />
eliminate fabric waste are typical.<br />
Assembly is about the same as for the first tunic,<br />
except that you must put each sleeve together before<br />
sewing it to the body. When the sleeve is in place and<br />
you are ready to sew wrist-to-armpit, stretch the back<br />
edge of the sleeve slightly as shown, to make up for<br />
the extra length given by the triangular gusset. The<br />
sleeves of the finished tunic do not lie flat!<br />
When assembling gores from halves, always sew<br />
together the 2 edges that are parallel to the selvedge<br />
edge of the fabric, not the diagonal edges.<br />
Whatever tunic pattern you use, some variations<br />
are possible. Square gussets can be inserted under the<br />
arms to relieve tightness in the armhole or across the<br />
chest. The side gores can be extended up the armpits,<br />
or even to the top of the shoulder (behind the sleeve),<br />
which will widen the body. The front and back may<br />
be split from hem to crotch (in the middle of the gores,<br />
if any), but this might have been an upper-class<br />
feature.
Gown<br />
<strong>Markland</strong> <strong>Medieval</strong> <strong>Mercenary</strong> <strong>Militia</strong><br />
The gown is just a full-lengh tunic for women. The front and back gores reach to the<br />
waist, but the side gores may reach to the armpits. The sleeves are made to fit the<br />
forearms, but the body is not shaped--there are no darts, gathers, or curved seams.<br />
Certainly the hem is not slit!<br />
As with men's clothing, it was common to wear a wool dress over a linen underdress<br />
(shift or chemise), but women's fashions had a little more variation through time. Tenth<br />
and eleventh century Norse and Saxon dresses tended to be looser fit, bloused over the<br />
belt, and sometimes an extra overdress was worn, knee-length with shorter or unfitted<br />
sleeves. Norman styles were closer fit, so side gores should come only to the waist. In<br />
the twelfth century the overdress could be loose, or laced up the back or the sides to give<br />
a snug fit in the torso; flaired sleeves were common in the upper class. In the thirteenth<br />
century, everyone was back to a loose fit with tight sleeves, sometimes buttoned along<br />
the forearms.
Braies And Trousers<br />
<strong>Markland</strong> <strong>Medieval</strong> <strong>Mercenary</strong> <strong>Militia</strong><br />
Braies are short linen trousers over which are worn the hosen (long stockings). No medieval braies are<br />
known to exist today, but illustrations show that they were somewhat baggy, with a sort of "diaper" effect<br />
in the crotch, and the knees were gathered and tied. There was presumably a drawstring at the waist, and<br />
sometimes it seems that the waist was made extra high, and the excess fabric rolled down over the<br />
drawstring. A pair of points (laces) sewn inside the braies and hanging out over a waist roll would make<br />
effective and comfortable suspension for oneís hosen. Whether the waist is rolled or not, you will need<br />
some sort of points or loops to fasten the hosen.<br />
At the outside of each knee, make a 4" slit (or leave the seam unsewn) and hem the edges. Gather the<br />
fabric to match the circumference of your leg just below the knee, and sew it to the middle third of a knee<br />
band or placket 36" long or more--the ends of the band serve as ties. (see fig. 4)<br />
In the absence of any firm evidence, all braies patterns include some guesswork. Any of the styles<br />
shown here will have tied knees and a waist drawstring. Add 3 or 4 inches to the height of the waist if you<br />
want a waist roll.<br />
Fig. 1. The first pattern is the basis for most post-medieval trousers, and can be made from about 1.5 yards<br />
of linen. Cut out 2 halves to the dimensions shown (a) and sew together from crotch to top (b). Open and<br />
refold into a trouser shape and sew the inseams (c).<br />
Fig 2. The second pattern consists simply of 2 tubes and an 11"-square gusset. It uses about 1 1/3 yards of<br />
linen, and won't leave a lot of oddly-shaped scraps. Sewing a gusset between two tubes is much easier to<br />
do than to describe, but you may want some experienced help.<br />
Fig 3. These last braies are based on traditional Lappland trousers. They take about 2 1/2 yards of linen,<br />
but are very easy to make. They also have the weird baggy crotch seen in medieval illustrations--you will<br />
never split it! If you want to experiment first, grab an old bedsheet and spend about 15 minutes making a<br />
mock-up.
<strong>Markland</strong> <strong>Medieval</strong> <strong>Mercenary</strong> <strong>Militia</strong><br />
Scandanavians and some Saxons wore trousers, which can be made from the braies patterns. Simply<br />
lengthen the legs and make them fit your legs (snug, but not tight). The waist can have a drawstring or belt<br />
loops, and feet can be added from the hosen pattern.
Hosen<br />
<strong>Markland</strong> <strong>Medieval</strong> <strong>Mercenary</strong> <strong>Militia</strong><br />
The simplest hosen are just fabric tubes which fit the leg closely<br />
from crotch to ankle and have a lace or hole at the top to which the<br />
braies laces tie, and perhaps a stirrup under the foot. But hosen with<br />
feet were quite common, and are also warmer! Hosen are best made<br />
of wool and cut on the bias--diagonally across the fabric--which<br />
makes them surprisingly stretch and allows a tighter fit.<br />
Start by making pattern pieces out of scrap fabric first, and fit<br />
them to your feet and ankles, making any necessary adjustments<br />
before cutting your good fabric. Be careful to leave the ankle large<br />
enough for your foot to go through, and remember that the long seam<br />
runs up the back of the leg.<br />
Hosen were most frequently worn with just the ties to the braies<br />
supporting them, but you may wear simple garters below the knee, or<br />
crossgarter (at least 9 feet long each) for Hastings era or before. Also<br />
in use were leggings much like World War I puttees: leather or fabric<br />
bands 3 to 4 inches wide and at least 12 feet long, wrapped spirally<br />
down your leg from knee to ankle. Do NOT use a square of<br />
something tied to your leg.<br />
Ladies hosen need only cover the knee, where they are held up by<br />
knee garters or crossgarters.<br />
You will need 1-1/3 to 2 yards of fabric for full-length hosen cut<br />
on the bias, depending on the length and thickness of your legs, and<br />
the fabric width. (i.e., if you are 6'2" tall with 26" thighs, 2 yards of<br />
48"-wide fabric will do.)
<strong>Markland</strong> <strong>Medieval</strong> <strong>Mercenary</strong> <strong>Militia</strong>
<strong>Markland</strong> <strong>Medieval</strong> <strong>Mercenary</strong> <strong>Militia</strong>
Shoes<br />
<strong>Markland</strong> <strong>Medieval</strong> <strong>Mercenary</strong> <strong>Militia</strong><br />
Most medieval shoes were "turn shoes", sewn together inside out and then turned rightside out, to keep<br />
the stitching protected from wear. The sole is sewn to the upper with an edge/flesh seam: the stitch passes<br />
straight through the upper, then into the edge of the sole and out through the flesh (rough) side (fig 1.). The<br />
edges of the uppers can be butted together and sewn with an edge/flesh seam, or simple overlapped and<br />
stitched straight through.<br />
Like almost all shoes of the period, this pattern has an upper of one main piece with the seam on the<br />
inside of the foot; small inserts are added to close any gaps. The toe is pointed, and there can be an<br />
embroidered stripe running from the toe to the throat. Shoes were made with a right and left, and could be<br />
slip-ons or fastened with a drawstring.<br />
Be sure to use a good topgrain leather, not a suede or thin garment leather. Vegetable-tanned leather<br />
is by far the best. (Ask a leather dealer or other knowledgeable person is you don't know what these terms<br />
mean!) Before doing any cutting, make a good working pattern out of scrap cloth and cardboard that fits<br />
your foot. The "seam allowance" around the bottom edge of the upper will be 1/4" to 3/8", but the sole<br />
should have NO seam allowance, since the upper is sewn against its edge. It will look very narrow.<br />
When sewing the upper and sole together, start at the toe and sew the outside, then start again at the toe<br />
and sew the inside. Keep your stitches small and tight. A helpful trick is to contact-cement the pieces<br />
together first, then stitch them. (Glue alone will NOT hold the pieces together without stitching!) Also,<br />
you may wish to turn the shoe before sewing the side seam or adding any inserts. The shoe must be soaked<br />
in water for several hours before it can be turned. When the shoe has been turned and has dried<br />
completely, coat is tell with neatsfoot oil to make it waterproof and supple.
<strong>Markland</strong> <strong>Medieval</strong> <strong>Mercenary</strong> <strong>Militia</strong><br />
A FABULOUS website full of shoe patterns is at: http://www.personal.utulsa.edu/~marccarlson/shoe/SHOEHOME.HTM--just<br />
be sure to read the Introduction first!
Headwear<br />
<strong>Markland</strong> <strong>Medieval</strong> <strong>Mercenary</strong> <strong>Militia</strong><br />
Proper headwear is essential to socially acceptable clothing, especially for women. Usually a veil or<br />
coverchief is sufficient, simply a white linen oval draped over the head and secured with a narrow band or<br />
fillet. Saxon women wrapped the back end of the veil around the front of the neck, tucking it in at the back<br />
again--the veil needs to be at least a yard long for this. Fashionable Norman ladies and anyone from later<br />
years wore the veil loose over the wimple, a wide linen band wrapped under the chin and pinned at the top<br />
of the head. Norse women just wore a kerchief, knotted at the back or side.<br />
Phrygian caps were very popular among Saxon men. In the 12th and 13th centuries, linen coifs or<br />
padded arming caps were in general use, and were worn under hoods and hats as well as alone or with a<br />
helmet. Norman men in the 11th century, however, appear to have gone bearheaded, though they probably<br />
wore padded caps beneath helmets or mail coifs.<br />
Hoods have been discovered at the 10th century Norse town of Hedeby, but they don't seem to have<br />
been used by the rest of Europe until the 13th century. It was common just to pull a fold of the cloak over<br />
one's head when necessary.<br />
Accessories<br />
Your belt may be leather or fabric, one to two inches wide, with a<br />
simple D-shaped buckle, preferably brass. Instead of a buckle you can cut 2<br />
slits in one end of the belt, and cut the other end into a long swallowtail--the<br />
tails pass through the slits and tie. Keep the tooling to a minimum--straight<br />
lines, simple geometric patterns, or a bit of interlaced motif.<br />
From your belt, or from the drawstring of your braies, hangs your<br />
pouch or purse. This is a drawsting bag of leather or cloth up to about 6"<br />
square, with a double drawstring. Vikings and early Saxons seem to have<br />
worn a more substantial pouch with a flap, and 2 belt loops on the back.<br />
You may also wish to wear a knife, but be forewarned that correct belt<br />
knives are difficult to find, and most of those in use or available today are<br />
inauthentic. The typical Anglo-Norse scramasax-type knife had a singleedged<br />
blade about 3 to 5 inches long, with a cylindrical wood or bone grip
<strong>Markland</strong> <strong>Medieval</strong> <strong>Mercenary</strong> <strong>Militia</strong><br />
(NOT riveted) and NO GUARD. The blade was frequently "clipped", shaped much like a modern Barlow<br />
knife. Longer knives did indeed exist, but since it was common to carry one's spear in public, a "fighting"<br />
knife was much less practical than a small, utilitarian blade. The knife was carried on the hip (ONLY on<br />
the hip) in a leather sheath with enclosed half of the grip as well as the blade.<br />
A cloak is just a blanket-sized rectangle or half-circle of heavy wool (the hood is not attached--see<br />
"headwear"). An old wool blanket with the texture of an army blanket (ie, not fuzzy) can be found in a<br />
thrift shop or surplus store, and the corners cut round on one side to make something like a half-circle. The<br />
cloak is pinned on the right shoulder by a brooch, a common type being the ring-shaped penannular.<br />
Viking Options<br />
Some Norse tunics had very tight cuffs--sewing a husband's sleeves shut each morning was a wifely<br />
duty! There may also have been overtunics with shorter wider sleeves.<br />
Trousers were worn, generally of wool. Some were close-fitting and footed, others may have been<br />
more straight-legged, ending at the ankle.<br />
Shoes tended to have round toes, but were otherwise the same as those found elsewhere.<br />
Scandinavian women are believed to have worn an apron made of 2 narrow panels connected by<br />
shoulder straps - sewn to the back panel and pinned to the front. There is sketchy evidence for pleated,<br />
short-sleeved dresses, shawls, and other unusual garments.