Cortex Desktop Settings for Windows 7 and 8 Quick Reference
Cortex Desktop Settings for Windows 7 and 8 Quick Reference
Cortex Desktop Settings for Windows 7 and 8 Quick Reference

Create successful ePaper yourself
Turn your PDF publications into a flip-book with our unique Google optimized e-Paper software.
Setting up <strong>Cortex</strong> <strong>Desktop</strong> to Run As Administrator on<br />
<strong>Windows</strong> 7 <strong>and</strong> 8<br />
If you are running <strong>Cortex</strong> <strong>Desktop</strong> on <strong>Windows</strong> 7 or 8, you must allow <strong>Cortex</strong> <strong>Desktop</strong> to run as<br />
administrator. This permission ensures your ability to download <strong>Cortex</strong> <strong>Desktop</strong> updates.<br />
Downloading <strong>Cortex</strong> <strong>Desktop</strong> updates is vital to keeping <strong>Cortex</strong> <strong>Desktop</strong> functioning properly. An<br />
automatic download of updates occurs when you first login. Without downloading the updates, you will<br />
not be able to log in. It is also a highly recommended procedure <strong>for</strong> your subsequent work in <strong>Cortex</strong><br />
<strong>Desktop</strong>. For more details on updates, refer to your <strong>Cortex</strong> <strong>Desktop</strong> Installation Guide.<br />
To be able to set administrator permissions, you need to be defined as the administrator on the<br />
computer. If you need help, contact your IT personnel.<br />
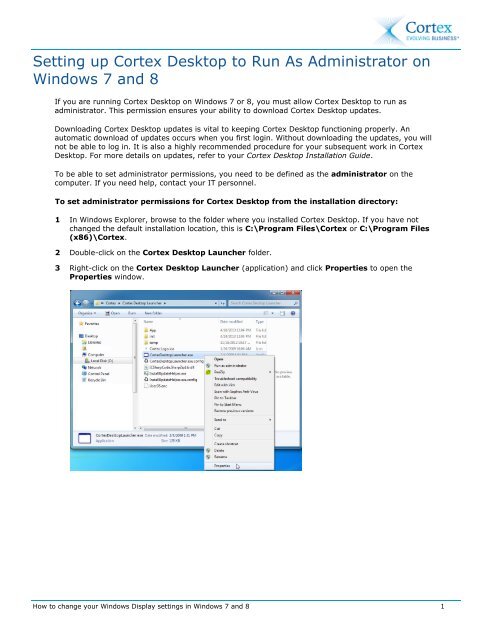
To set administrator permissions <strong>for</strong> <strong>Cortex</strong> <strong>Desktop</strong> from the installation directory:<br />
1 In <strong>Windows</strong> Explorer, browse to the folder where you installed <strong>Cortex</strong> <strong>Desktop</strong>. If you have not<br />
changed the default installation location, this is C:\Program Files\<strong>Cortex</strong> or C:\Program Files<br />
(x86)\<strong>Cortex</strong>.<br />
2 Double-click on the <strong>Cortex</strong> <strong>Desktop</strong> Launcher folder.<br />
3 Right-click on the <strong>Cortex</strong> <strong>Desktop</strong> Launcher (application) <strong>and</strong> click Properties to open the<br />
Properties window.<br />
How to change your <strong>Windows</strong> Display settings in <strong>Windows</strong> 7 <strong>and</strong> 8 1
4 In the Compatibility tab of the Properties window, check Run this program as an<br />
Administrator, <strong>and</strong> then click OK.<br />
5 Launch <strong>Cortex</strong> <strong>Desktop</strong> <strong>and</strong> click YES to download all available updates.<br />
6 Enter your User Name <strong>and</strong> Password <strong>and</strong> click Login.<br />
The <strong>Cortex</strong> <strong>Desktop</strong> window is displayed.<br />
To set administrator permissions <strong>for</strong> <strong>Cortex</strong> <strong>Desktop</strong> from the <strong>Windows</strong> desktop:<br />
1 On the <strong>Windows</strong> desktop, right-click on the <strong>Cortex</strong> <strong>Desktop</strong> Launcher icon <strong>and</strong> click Properties.<br />
2 On the Compatibility tab of the Properties window, check Run this program as an<br />
Administrator, <strong>and</strong> then click OK.<br />
3 Launch <strong>Cortex</strong> <strong>Desktop</strong> <strong>and</strong> click YES to download all available updates.<br />
4 Enter your User Name <strong>and</strong> Password <strong>and</strong> click Login.<br />
The <strong>Cortex</strong> <strong>Desktop</strong> window is displayed.<br />
2 How to change your <strong>Windows</strong> Display settings in <strong>Windows</strong> 7 <strong>and</strong> 8
How to change your <strong>Windows</strong> Display settings in<br />
<strong>Windows</strong> 7 <strong>and</strong> 8<br />
If you encounter problems viewing <strong>Cortex</strong> <strong>Desktop</strong> correctly in <strong>Windows</strong> 7 or 8, you may need to adjust<br />
your <strong>Windows</strong> Display settings.<br />
To change your settings in <strong>Windows</strong> 7 or <strong>Windows</strong> 8:<br />
5 Right click on your <strong>Windows</strong> <strong>Desktop</strong> <strong>and</strong> select Screen resolution.<br />
6 Click Screen resolution.<br />
How to change your <strong>Windows</strong> Display settings in <strong>Windows</strong> 7 <strong>and</strong> 8 3
The Change the appearance of your displays window appears.<br />
7 Click Make text <strong>and</strong> other items larger or smaller.<br />
4 How to change your <strong>Windows</strong> Display settings in <strong>Windows</strong> 7 <strong>and</strong> 8
The Make it easier to read what’s on your screen window appears.<br />
8 Select the Smaller – 100% (default) radio button <strong>and</strong> click Apply.<br />
9 Close the window by clicking the red X, close button.<br />
How to change your <strong>Windows</strong> Display settings in <strong>Windows</strong> 7 <strong>and</strong> 8 5