Symmetric Tripod - Rescue Consulting Canada
Symmetric Tripod - Rescue Consulting Canada
Symmetric Tripod - Rescue Consulting Canada
Create successful ePaper yourself
Turn your PDF publications into a flip-book with our unique Google optimized e-Paper software.
on tail of rope to take most of the slack out of loop. Repeat this with all three of<br />
the rope hobbles and fully close the quick links. To do final adjustments, tighten<br />
the rope hobble, one at a time, until each leg flexes in slightly, or in the case of<br />
an NFPA configuration, until the correct hobble length is reached. Tables<br />
included in Section 3 of this manual include the ideal hobble adjustment for the<br />
various configurations.<br />
Best Practice:<br />
Adjust the head angle, leg length and leg heights before the hobble is attached<br />
and tightened. Even a lightly tightened hobble can make other adjustments<br />
difficult to accomplish.<br />
Care & Maintenance:<br />
Check the rope hobble for cuts and worn areas and replace as necessary (Part<br />
number 230307).<br />
Check the prussics for proper operation.<br />
Make sure quick links are able to close completely and are free from burrs and<br />
sharp edges that may harm rope. File or sand if needed.<br />
Check lashing holes in articulating feet for sharp edges or burrs and file or sand<br />
to remove as needed.<br />
Warnings:<br />
• Do not use the TerrAdaptor without feet hobbled, lashed or somehow secured<br />
into position<br />
• Rope hobbles may deteriorate with prolonged exposure to the elements<br />
• Sharp edges may cut ropes and webbing. Do not tie directly into holes and<br />
quick links which have sharp edges<br />
• Use chain rather than rope when hobbling in an environment where<br />
chemicals are present that may damage or harm the rope<br />
Main attachment point<br />
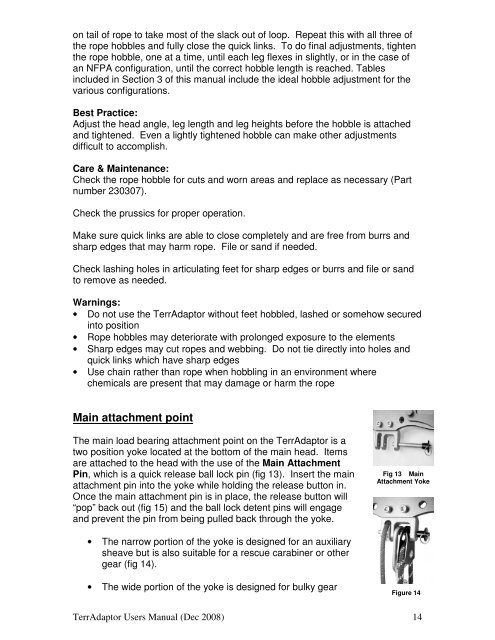
The main load bearing attachment point on the TerrAdaptor is a<br />
two position yoke located at the bottom of the main head. Items<br />
are attached to the head with the use of the Main Attachment<br />
Pin, which is a quick release ball lock pin (fig 13). Insert the main<br />
attachment pin into the yoke while holding the release button in.<br />
Once the main attachment pin is in place, the release button will<br />
“pop” back out (fig 15) and the ball lock detent pins will engage<br />
and prevent the pin from being pulled back through the yoke.<br />
Fig 13 Main<br />
Attachment Yoke<br />
• The narrow portion of the yoke is designed for an auxiliary<br />
sheave but is also suitable for a rescue carabiner or other<br />
gear (fig 14).<br />
• The wide portion of the yoke is designed for bulky gear<br />
Figure 14<br />
TerrAdaptor Users Manual (Dec 2008) 14


