Motion Sensor Quartz Security Light - Morris Products
Motion Sensor Quartz Security Light - Morris Products
Motion Sensor Quartz Security Light - Morris Products

Create successful ePaper yourself
Turn your PDF publications into a flip-book with our unique Google optimized e-Paper software.
3. Now turn the LITE control knob completely counter clockwise.<br />
At dusk turn the LITE control knob slowly clockwise<br />
until the light comes on. The <strong>Light</strong> Control will now be active<br />
only from dusk to dawn.<br />
NOTE: While adjusting the LITE control, you concurrently<br />
wave your hand slowly past the lens (detect) window so as to<br />
induce the sensor to detect motion.<br />
AUTO MODE:<br />
1. The sensor detects motion and turns on the lighting automatically.<br />
2. When the ON / OFF wall switch is turned ‘ ON ’ and the<br />
time control knob is set to the TEST position, the lamp<br />
should have been ‘ON’ for 1 minute to warm up and then it<br />
should turn off itself automatically. The light control now<br />
goes into AUTO MODE. Walk past the detection area and<br />
the lamp will turn on for the adjusted period of time.<br />
The built - in photocell turns the lamp off during the day<br />
when the LITE control knob is set at the ‘MOON’ position.<br />
TROUBLE SHOOTING GUIDE<br />
LIGHTS DO NOT COME ON AT ALL:<br />
1.Make sure that the lamp being used is not blown or<br />
replace a new bulb.<br />
2.Check to see that there is power to the motion sensor.<br />
3.Check all wiring and connections.<br />
LIGHTS STAY ON ALL DAY AND NIGHT:<br />
1.Switch off and on action too fast. IT takes minium 5 seconds<br />
to complete the action.<br />
2. Check all wiring and connections.<br />
4<br />
MOTION SENSOR TRIGGERS ON WITH MOTION<br />
AND STAYS ON:<br />
1. Reduce the time setting.<br />
2. Move the halogen away from the motion sensor head.<br />
3.Aim the motion sensor head downward slightly.<br />
NOT ENOUGH RANGE OR TOO MUCH RANGE:<br />
1. Your motion sensor is most sensitive to motion across its<br />
field of view, not towards or away from it. Try to mount the<br />
sensor’s head diagonally across the area to be protected.<br />
2. The motion sensor works best on flat terrain. Point the<br />
head downwards for valleys, and slightly upwards for hills.<br />
3. If there is too much range, point the motion sensor head<br />
sharply downwards.<br />
4. If a longer distance is required, there are two alternatives.<br />
a.) Upgrade the mounting height of the whole unit.<br />
b.) Adjust the motion sensor as horizontally as possible.<br />
When the motion sensor is adjusted to the horizorital<br />
position, you get the longest distance possible.<br />
5<br />
73220/73221<br />
<strong>Motion</strong> <strong>Sensor</strong><br />
<strong>Quartz</strong><br />
<strong>Security</strong> <strong>Light</strong><br />
The 73220/73221 is a <strong>Light</strong>ing fixture with a mini<br />
halogen lamp that may be installed indoors or<br />
outdoors. The 73220/73221 controls the lighting to<br />
provide convenience, security, economy and safety.<br />
When motion sensed, the light control automatically<br />
turns on a welcoming lamp for your family and<br />
friends as they approach your home. lntruders are<br />
suddenly showered with unexpected light when they<br />
come near your home, frightens them away.<br />
The light control also saves energy by activating<br />
only at night and only when needed. The<br />
73220/73221 provides efficient lighting control for<br />
your benefit. This unit uses a built-in passive<br />
infrared detector that reacts instantly to body heat<br />
and switches on the light. After an adjustable period<br />
of time, the light switches OFF automatically. A<br />
built-in photocell deactivates the <strong>Motion</strong> <strong>Sensor</strong><br />
during daylight.<br />
A501111677R
1 2 3<br />
★<br />
★<br />
READ THE ENTIRE INSTRUCTION BOOKLET.<br />
THOROUGHLY INSPECT THE CONTENTS OF THIS BOX.<br />
CAUTIONS-BEFORE YOU START<br />
★<br />
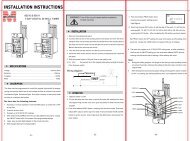
Select a location for the <strong>Light</strong>ing Control based on the coverage<br />
angles shown in (Figure 1 ). For best results, mount<br />
your sensor on a solid surface, 6 to 7 ft above the ground.<br />
★<br />
★<br />
★<br />
★<br />
★<br />
★<br />
★<br />
★<br />
★<br />
★<br />
COVERAGE ANGLES<br />
FIGURE 1<br />
6<br />
SIDE VIEW<br />
0<br />
UNIT:(ft)<br />
10<br />
TOP VIEW<br />
20<br />
30<br />
40<br />
30<br />
20<br />
10<br />
0<br />
10<br />
20<br />
30<br />
110°<br />
The detector is most sensitive to motion across its detection<br />
field and less sensitive to motion directly towards the detector<br />
(Figure 2).<br />
SENSOR<br />
SENSOR<br />
LEAST SENSITIVE<br />
MOST SENSITIVE<br />
SENSITIVITY TO MOTION<br />
FIGURE 2<br />
Use a regular AC 100-120V / 50-60Hz power source for this<br />
appliance.<br />
Do not use lamps rated higher than 150 watts.<br />
Route the power supply cord from a fused or circuit breaker<br />
source through wall switch and then to the location of your<br />
fixture.<br />
Figure 3 shows two installation methods either install on the<br />
wall or on the ceiling.<br />
For outdoor installation, a location under eaves is preferable.<br />
Always install this product in a position with the control knobs<br />
of motion sensor facing downward.<br />
This device is to be used with a rain tight or wet location suitable<br />
AC outlet.<br />
Do not install when it is raining.<br />
If you are not sure of the installation, consult with a qualified<br />
electrician.<br />
GASKET<br />
JUNCTION<br />
BOX<br />
YELLOW/GREEN<br />
BLACK<br />
WHITE<br />
WALL PLATE<br />
FIGURE 3<br />
CAUTION : ALWAYS INSTALL THIS PRODUCT IN A POSI -<br />
TION WITH THE CONTROL KNOBS OF THE MOTION<br />
SENSOR FACING DOWNWARD.<br />
AVOID THE SENSOR ( LENS ) FACING OR OVER SUCH<br />
LOCATIONS AS<br />
1. Water pools or ponds, trees, light bulbs or where it is easy<br />
for animals to access.<br />
2. Where it is likely to subject to a drastic change in temper -<br />
ature.<br />
3. Vents of air-conditioner,dryer or heater.<br />
4. Where direct sunlight falls on.<br />
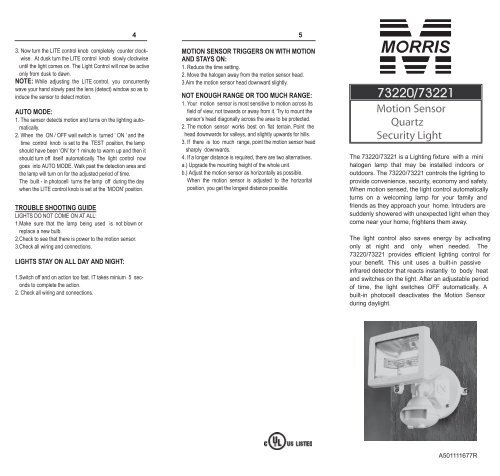
INSTALLATION : (SEE FIGURE 4)<br />
IMPORTANT : Some local building codes may require installation<br />
of this product by a qualified electrician.<br />
Check your local codes as they apply to your<br />
situation. If the house wiring is aluminum, consuit<br />
with an electrician about proper wiring<br />
methods.<br />
Before proceeding with the installation. TURN<br />
OFF THE POWER TO THE LIGHTING CIR-<br />
CUIT AT THE CIRCUIT BREAKER OR FUSE<br />
BOX to avoid electrical shock.<br />
1. Install a suitable junction box at the location you have<br />
selected for the installation of your fixture. If used, connect<br />
the bare ground ( or earth ground ) wire from the power<br />
source to the bare ground wire of the junction box ground<br />
ing screw.<br />
2. Run the power wire (House wire) through the gasket nole.<br />
3. Before mounting this unit make sure that the gasket is<br />
evenly and smoothly placed.<br />
NOTE: When mounting the 73220/73221 in uneven<br />
surfaces, please use silicone caulking between the mounting<br />
plate and the surface.<br />
FIGURE 4<br />
CAUTION:<br />
WALL PLATE MUST BE USED WITH PROVIDED GAS<br />
KET AND UNUSED HOLES MUST HAVE THE CLOSURE<br />
PLUGS.<br />
WHEN MOUNTING THE UNIT IN UNEVEN SURFACES<br />
PLEASE USE SILICONE CAULKING BETWEEN THE WALL<br />
PLATE AND THE SURFACE.<br />
USE ONLY DOUBLE - ENDED TUNGSTEN - HALOGEN<br />
LAMPS WITH MAXIMUM RATING OF 150 WATTS.<br />
★<br />
★<br />
★<br />
SETTING UP THE MOTION SENSOR<br />
BOTTOM OF SENSOR CONTROL<br />
FIGURE 5<br />
TEST MODE:<br />
1. Turn the LITE and TIME control knobs completely clockwise<br />
to the TEST position. (SEE FIG.5 for the location of<br />
the control knobs).<br />
2. Turn the wall switch on, the light will turn on immediately<br />
and wait for Approx. 1 minute to warm up the unit. After<br />
warming up time is expired and the light goes off ,you may<br />
make a walk test and the light will turn on. This confirms<br />
that the wiring was done properly and that the light is working.<br />
3.Walk through the coverage area. The light will turn ON<br />
when motion is detected and turn OFF shortly after motion<br />
stops. Wait about 5 seconds or more between test motions.<br />
4. Adjust the motion sensor to obtain the desired converage.<br />
TIME ADJUSTMENT:<br />
1. The TIME adjustment controls how long the light will stay<br />
on after motion has been detected.<br />
2. Turn the TIME control knob to mid-position. Note how long<br />
it takes for the lighting to turn OFF after motion stops.<br />
3. Adjust the TIME control counter-clockwise to lncrease the<br />
length of time the light stays on ( Approx. 12 minutes ) and<br />
clockwise to decrease the length of time the light stays<br />
on ( Approx. 5 seconds).<br />
LITE ADJUSTABLE:<br />
1. The LITE adjustment determines at what light level the<br />
<strong>Light</strong> Control will shut off. when in the auto mode.<br />
2. The LITE control was set at the factory clockwise to the<br />
TEST position so that would operate evening daylight.