shower
shower
shower

You also want an ePaper? Increase the reach of your titles
YUMPU automatically turns print PDFs into web optimized ePapers that Google loves.
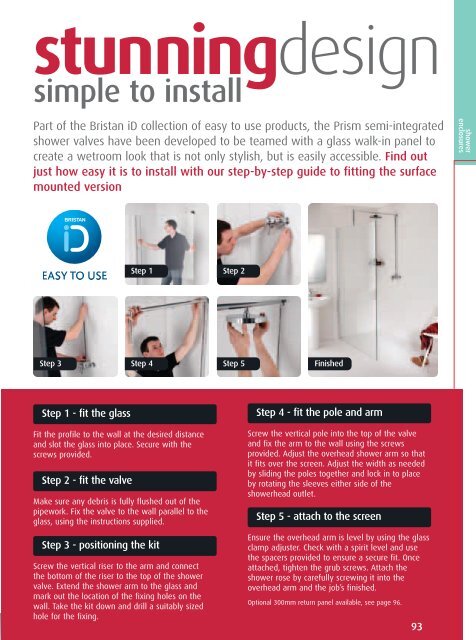
stunningdesign<br />
simple to install<br />
Part of the Bristan iD collection of easy to use products, the Prism semi-integrated<br />
<strong>shower</strong> valves have been developed to be teamed with a glass walk-in panel to<br />
create a wetroom look that is not only stylish, but is easily accessible. Find out<br />
just how easy it is to install with our step-by-step guide to fitting the surface<br />
mounted version<br />
<strong>shower</strong><br />
enclosures<br />
Step 1 Step 2<br />
Step 3 Step 4<br />
Step 5 Finished<br />
Step 1 - fit the glass<br />
Fit the profile to the wall at the desired distance<br />
and slot the glass into place. Secure with the<br />
screws provided.<br />
Step 2 - fit the valve<br />
Make sure any debris is fully flushed out of the<br />
pipework. Fix the valve to the wall parallel to the<br />
glass, using the instructions supplied.<br />
Step 3 - positioning the kit<br />
Screw the vertical riser to the arm and connect<br />
the bottom of the riser to the top of the <strong>shower</strong><br />
valve. Extend the <strong>shower</strong> arm to the glass and<br />
mark out the location of the fixing holes on the<br />
wall. Take the kit down and drill a suitably sized<br />
hole for the fixing.<br />
Step 4 - fit the pole and arm<br />
Screw the vertical pole into the top of the valve<br />
and fix the arm to the wall using the screws<br />
provided. Adjust the overhead <strong>shower</strong> arm so that<br />
it fits over the screen. Adjust the width as needed<br />
by sliding the poles together and lock in to place<br />
by rotating the sleeves either side of the<br />
<strong>shower</strong>head outlet.<br />
Step 5 - attach to the screen<br />
Ensure the overhead arm is level by using the glass<br />
clamp adjuster. Check with a spirit level and use<br />
the spacers provided to ensure a secure fit. Once<br />
attached, tighten the grub screws. Attach the<br />
<strong>shower</strong> rose by carefully screwing it into the<br />
overhead arm and the job’s finished.<br />
Optional 300mm return panel available, see page 96.<br />
93