Controller - Trop-Electronic GmbH
Controller - Trop-Electronic GmbH
Controller - Trop-Electronic GmbH

Create successful ePaper yourself
Turn your PDF publications into a flip-book with our unique Google optimized e-Paper software.
Operating instructions for pH - <strong>Controller</strong><br />
Article No.: 8/VII<br />
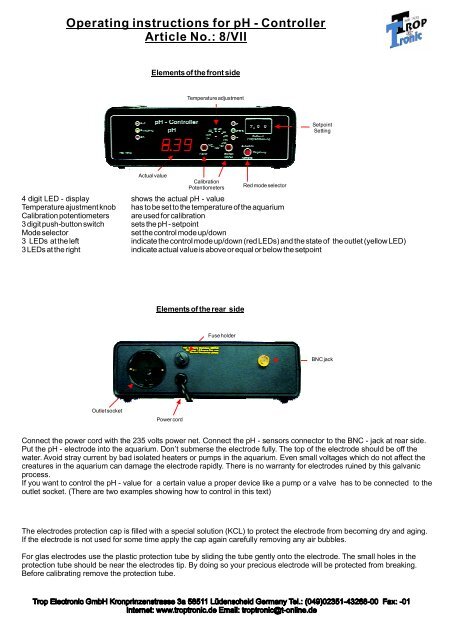
Elements of the front side<br />
Temperature adjustment<br />
Setpoint<br />
Setting<br />
Actualvalue<br />
Calibration<br />
Potentiometers<br />
Red mode selector<br />
4 digit LED - display shows the actual pH - value<br />
Temperature ajustment knob has to be set to the temperature of the aquarium<br />
Calibration potentiometers are used for calibration<br />
3 digit push-button switch sets the pH - setpoint<br />
Mode selector<br />
set the control mode up/down<br />
3 LEDs at the left indicate the control mode up/down (red LEDs) and the state of the outlet (yellow LED)<br />
3 LEDs at the right indicate actual value is above or equal orbelow the setpoint<br />
Elements of the rear side<br />
Fuse holder<br />
BNC jack<br />
Outlet socket<br />
Power cord<br />
Connect the power cord with the 235 volts power net. Connect the pH - sensors connector to the BNC - jack at rear side.<br />
Put the pH - electrode into the aquarium. Don’t submerse the electrode fully. The top of the electrode should be off the<br />
water. Avoid stray current by bad isolated heaters or pumps in the aquarium. Even small voltages which do not affect the<br />
creatures in the aquarium can damage the electrode rapidly. There is no warranty for electrodes ruined by this galvanic<br />
process.<br />
If you want to control the pH - value for a certain value a proper device like a pump or a valve has to be connected to the<br />
outlet socket. (There are two examples showing how to control in this text)<br />
The electrodes protection cap is filled with a special solution (KCL) to protect the electrode from becoming dry and aging.<br />
If the electrode is not used for some time apply the cap again carefully removing any air bubbles.<br />
For glas electrodes use the plastic protection tube by sliding the tube gently onto the electrode. The small holes in the<br />
protection tube should be near the electrodes tip. By doing so your precious electrode will be protected from breaking.<br />
Before calibrating remove the protection tube.
Operating instructions for pH - <strong>Controller</strong><br />
Article No.: 8/VII<br />
Calibration:<br />
With the measuring device comes a set of calibration solutions. This solutions should have the same temperature as<br />
adjusted at the pH - meters front. If neccessary turn the rotary knob to adjust. Before calibration flush the electrode under<br />
clear water. Fill the glass flasks half with pH7 and pH4 solution. Now dry the electrode cautiously with a clean cloth to<br />
prevent dilution of the calibration fluid. As there are only some millilitres in each flask every drop of water at the tip of the<br />
electrode will change the reading considerably. Now put the electrodes tip into the green pH7 - solution and wait for the<br />
display to stabilise. This may take some minutes. Time increases as the electrode age. When the display has settled<br />
adjust to 7.00 using the screwdriver with the left red adjustment potentiometer. Flush and dry the electrode again and put it<br />
into the red pH4 - solution. When the display has settled adjust to 4.00 using the screwdriver with the right red adjustment<br />
potentiometer. <strong>Trop</strong> <strong>Electronic</strong> devices are shipped already calibrated and ready to use. New devices should be<br />
recalibrated approximately two weeks after setting up operation.<br />
Examples:<br />
Please observe for both examples<br />
be cautious to start with low amount of gas or solution. Don’t place the pH - electrode to near to gas/solution outlet. Set<br />
the 3 digit push-button switch to the desired pH-value. The outlets state is indicated by the left yellow LED. It will take<br />
approx. 1 minute for the outlet (and the yellow LED) to be activated when the actual value is out of range. The outlet will<br />
shut off immediately if the actual value runs into the “good” range. When the actual value crosses the setpoint (dependng<br />
on the mode switch) the delay will start again. This delay is built in to enable mixing of water and gas/solution and to avoid<br />
unnecessary switching of the valve due to choppy water, avoiding unnecessary noise etc. After 10 minutes on for the<br />
outlet there will be a pause for 1 minute enabling the fluids to mix. The green LED (”>*”) should be on. After approx. 1 minute the outlet will<br />
switch on.<br />
Example 2: increasing the pH - value<br />
The devices outlet has to be connected to a dosing pump which controls the intake of liquid carbonate-bicarbonate into<br />
an aquarium. The red mode control selector has to be released (out). Now the device will try to hold the pH-value to the<br />
selected setpoint. If the pH-value is lower than the setpoint the lower right red LED (”