activity 6: make a fossil mold and cast - Arizona-Sonora Desert ...
activity 6: make a fossil mold and cast - Arizona-Sonora Desert ...
activity 6: make a fossil mold and cast - Arizona-Sonora Desert ...

Create successful ePaper yourself
Turn your PDF publications into a flip-book with our unique Google optimized e-Paper software.
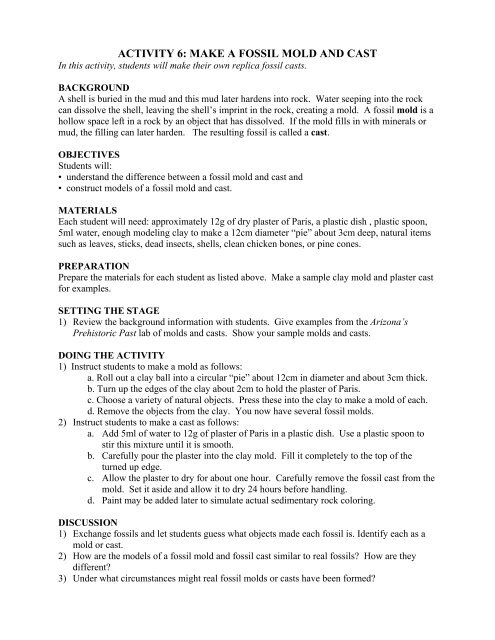
ACTIVITY 6: MAKE A FOSSIL MOLD AND CAST<br />
In this <strong>activity</strong>, students will <strong>make</strong> their own replica <strong>fossil</strong> <strong>cast</strong>s.<br />
BACKGROUND<br />
A shell is buried in the mud <strong>and</strong> this mud later hardens into rock. Water seeping into the rock<br />
can dissolve the shell, leaving the shell’s imprint in the rock, creating a <strong>mold</strong>. A <strong>fossil</strong> <strong>mold</strong> is a<br />
hollow space left in a rock by an object that has dissolved. If the <strong>mold</strong> fills in with minerals or<br />
mud, the filling can later harden. The resulting <strong>fossil</strong> is called a <strong>cast</strong>.<br />
OBJECTIVES<br />
Students will:<br />
• underst<strong>and</strong> the difference between a <strong>fossil</strong> <strong>mold</strong> <strong>and</strong> <strong>cast</strong> <strong>and</strong><br />
• construct models of a <strong>fossil</strong> <strong>mold</strong> <strong>and</strong> <strong>cast</strong>.<br />
MATERIALS<br />
Each student will need: approximately 12g of dry plaster of Paris, a plastic dish , plastic spoon,<br />
5ml water, enough modeling clay to <strong>make</strong> a 12cm diameter “pie” about 3cm deep, natural items<br />
such as leaves, sticks, dead insects, shells, clean chicken bones, or pine cones.<br />
PREPARATION<br />
Prepare the materials for each student as listed above. Make a sample clay <strong>mold</strong> <strong>and</strong> plaster <strong>cast</strong><br />
for examples.<br />
SETTING THE STAGE<br />
1) Review the background information with students. Give examples from the <strong>Arizona</strong>’s<br />
Prehistoric Past lab of <strong>mold</strong>s <strong>and</strong> <strong>cast</strong>s. Show your sample <strong>mold</strong>s <strong>and</strong> <strong>cast</strong>s.<br />
DOING THE ACTIVITY<br />
1) Instruct students to <strong>make</strong> a <strong>mold</strong> as follows:<br />
a. Roll out a clay ball into a circular “pie” about 12cm in diameter <strong>and</strong> about 3cm thick.<br />
b. Turn up the edges of the clay about 2cm to hold the plaster of Paris.<br />
c. Choose a variety of natural objects. Press these into the clay to <strong>make</strong> a <strong>mold</strong> of each.<br />
d. Remove the objects from the clay. You now have several <strong>fossil</strong> <strong>mold</strong>s.<br />
2) Instruct students to <strong>make</strong> a <strong>cast</strong> as follows:<br />
a. Add 5ml of water to 12g of plaster of Paris in a plastic dish. Use a plastic spoon to<br />
stir this mixture until it is smooth.<br />
b. Carefully pour the plaster into the clay <strong>mold</strong>. Fill it completely to the top of the<br />
turned up edge.<br />
c. Allow the plaster to dry for about one hour. Carefully remove the <strong>fossil</strong> <strong>cast</strong> from the<br />
<strong>mold</strong>. Set it aside <strong>and</strong> allow it to dry 24 hours before h<strong>and</strong>ling.<br />
d. Paint may be added later to simulate actual sedimentary rock coloring.<br />
DISCUSSION<br />
1) Exchange <strong>fossil</strong>s <strong>and</strong> let students guess what objects made each <strong>fossil</strong> is. Identify each as a<br />
<strong>mold</strong> or <strong>cast</strong>.<br />
2) How are the models of a <strong>fossil</strong> <strong>mold</strong> <strong>and</strong> <strong>fossil</strong> <strong>cast</strong> similar to real <strong>fossil</strong>s? How are they<br />
different?<br />
3) Under what circumstances might real <strong>fossil</strong> <strong>mold</strong>s or <strong>cast</strong>s have been formed?
EXTENSION<br />
Fossil Stories: Have students select a <strong>fossil</strong> to research. Refer students to their completed<br />
<strong>Arizona</strong>’s Prehistoric Past lab manual for ideas. Students can diagram the <strong>fossil</strong> in its<br />
prehistoric environment <strong>and</strong> write a short story about its life. Include information about its<br />
habitat, niche, adaptations, when it lived, <strong>and</strong> how it died <strong>and</strong> became a <strong>fossil</strong>.<br />
ACTIVITY 7: HOW BIG WERE PREHISTORIC ANIMALS?<br />
This demonstration gives students some perspective as to the sizes of dinosaurs <strong>and</strong> other<br />
prehistoric animals.<br />
MATERIALS<br />
• 50-foot length of rope or cording<br />
• dinosaur & prehistoric mammals books - optional (see reference list)<br />
GETTING READY<br />
1) Using a marker or masking tape, mark a 50-foot length of cording or rope at the following<br />
lengths:<br />
2' = Compsognathus - smallest (triassic) dinosaur<br />
8' = sabertooth cat (Pleistocene [ice ages] mammal)<br />
9' = woolly mammoth <strong>and</strong> mastodon (not counting tusks!)<br />
(Pleistocene mammals)<br />
10' = Coelophysis (Triassic dinosaur)<br />
15' = Half of all dinosaurs were under this length!<br />
20' = ground sloth (Pleistocene mammal)<br />
30' = Stegosaurus (Jurassic dinosaur) & Triceratops (Cretaceous dinosaur)<br />
35' = Parasaurolophus (Cretaceous crested duckbill dinosaur), Ankylosaurus<br />
(cretacceous dinosaur), <strong>and</strong> half of Brontosaurus/Apatosaurus (Jurassic dinosaur)<br />
40' = Tyrannosaurus (Cretaceous dinosaur)<br />
2) Then, list the animals’ names on the board.<br />
DOING THE ACTIVITY<br />
1) Show students pictures of those dinosaurs <strong>and</strong> other prehistoric animals with which they are<br />
not familiar.<br />
2) Have students guess the actual sizes of the animals you listed on the board.<br />
3) Have each student select an animal from the list <strong>and</strong> decide how long it might have been.<br />
4) Take the class outside or into the hallway <strong>and</strong> lay the rope on the floor.<br />
5) Ask students to st<strong>and</strong> at the marked spot on the rope that corresponds to the length of their<br />
prehistoric animal.<br />
6) Tell students the actual sizes.