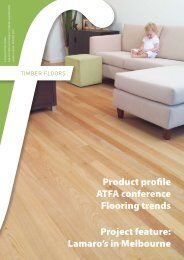
hurford hardwood stunning reds - The Australian Timber Flooring ...
hurford hardwood stunning reds - The Australian Timber Flooring ...
hurford hardwood stunning reds - The Australian Timber Flooring ...

You also want an ePaper? Increase the reach of your titles
YUMPU automatically turns print PDFs into web optimized ePapers that Google loves.
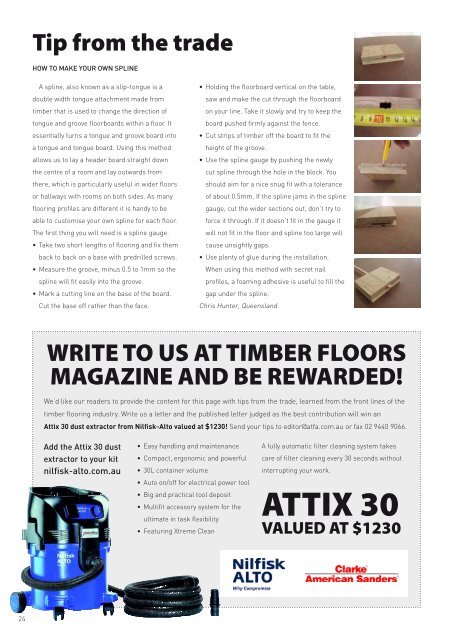
Tip from the trade<br />
HOW TO MAKE YOUR OWN SPLINE<br />
A spline, also known as a slip-tongue is a<br />
double width tongue attachment made from<br />
timber that is used to change the direction of<br />
tongue and groove floorboards within a floor. It<br />
essentially turns a tongue and groove board into<br />
a tongue and tongue board. Using this method<br />
allows us to lay a header board straight down<br />
the centre of a room and lay outwards from<br />
there, which is particularly useful in wider floors<br />
or hallways with rooms on both sides. As many<br />
flooring profiles are different it is handy to be<br />
able to customise your own spline for each floor.<br />
<strong>The</strong> first thing you will need is a spline gauge.<br />
• Take two short lengths of flooring and fix them<br />
back to back on a base with predrilled screws.<br />
• Measure the groove, minus 0.5 to 1mm so the<br />
spline will fit easily into the groove.<br />
• Mark a cutting line on the base of the board.<br />
Cut the base off rather than the face.<br />
Tips of the trade: How to make your own Spline.<br />
What is Spline?<br />
Spline, also known as a slip-tongue is a double width tongue attachment<br />
made from timber that is used to change the direction of tongue and<br />
groove floorboards within a floor. It essentially turns a tongue and<br />
groove board into a tongue and tongue board.<br />
Using this method allows us to lay a header board straight down the<br />
centre of a room and lay outwards from there which is particularly<br />
useful in wider floors or hallways with rooms on both sides.<br />
• Holding the floorboard It also allows us to vertical choose where to start on the the floor for table, example a focal<br />
point such the entry or the first view at the top of a staircase.<br />
saw and make As the many cut floorboard through profiles are different the it is floorboard<br />
handy to be able to<br />
customise your own spline for each floor. <strong>The</strong> first thing you will need<br />
is a spline gauge as shown in photo 1.<br />
on your line. Take it slowly and try to keep the<br />
(photo 1.) Take two short lengths from your batch of flooring and fix<br />
them back to back on a base with predrilled screws or brads.<br />
board pushed firmly against the fence.<br />
(photo 2.) measure the groove and minus approx 0.5 to 1mm space so<br />
the spline will fit easily into the groove of the floorboards<br />
• Cut strips of timber (photo 3.) Choose off a the nice straight board floorboard to under fit 2.4M the long. Longer<br />
boards tend to be difficult to keep accurate. Mark your cutting line on<br />
the base of the floorboard. It is important to cut the base of the board off<br />
height of the groove.<br />
rather than the face as the bottom grooves in the floor board will ruin<br />
the spline.<br />
• Use the spline gauge (Photo 4.) Holding by the pushing floorboard vertical on the table newly saw make the cut<br />
through the floorboard on your line, It helps to have two people do this.<br />
Take it slow and try to keep the board pushed firmly against the fence.<br />
Wear your goggles masks and earmuffs!<br />
cut spline through the hole in the block. You<br />
(Photo 5.) Cut strips of timber off the board to fit the height of the<br />
groove, you should get more than enough for any standard house floor<br />
should aim for out a of nice one board. snug fit with a tolerance<br />
Use the spline gauge by pushing the newly cut spline through the hole<br />
in the block. You should aim for a nice snug fit with a tolerance of<br />
of about 0.5mm. about If 0.5mm. the spline jams in the spline<br />
If the spline jams in the spline gauge, cut the wider sections out, don’t<br />
try to force it through, if it doesn’t fit in the gauge it will not fit in the<br />
gauge, cut the wider floor and spline sections too large will cause out, unsightly don’t gaps. try to<br />
Use plenty of glue during the installation, Pva in the grooves and<br />
force it through.<br />
polyurethane<br />
If it doesn’t<br />
underneath the boards.<br />
fit in<br />
When<br />
the<br />
using this<br />
gauge<br />
method with<br />
it<br />
secret nail profiles, a foaming adhesive such as Bostik Ultraset Overlay<br />
is useful to adequately fill the gap under the spline.<br />
will not fit in the<br />
To install<br />
floor<br />
your centre<br />
and<br />
header<br />
spline<br />
board cut small<br />
too<br />
blocks<br />
large<br />
of board for<br />
will<br />
every<br />
500mm and fix them to the subfloor along your stringline.<br />
Glue and place your header board into the grooves of the blocks.<br />
cause unsightly gaps.<br />
If used gently a secret nail gun will do a nice job. Be careful not to<br />
knock your line out by hitting to hard.<br />
• Use plenty of glue When one during side is fixed, remove the the installation.<br />
blocks and fix the other side the<br />
same way. It is useful when attaching the spline side to use a block next<br />
to the gun to hold the spline in place while fixing. When both sides are<br />
When using this fixed method install a fresh row with of flooring secret on either side nail of your header board<br />
this will provide a nice straight and solid start and a clean tongue to lay<br />
the rest of the flooring.<br />
profiles, a foaming<br />
Good Luck!<br />
adhesive is useful to fill the<br />
Chris Hunter<br />
gap under the spline.<br />
Chris Hunter, Queensland<br />
WRITE TO US AT TIMBER FLOORS<br />
MAGAZINE AND BE REWARDED!<br />
We’d like our readers to provide the content for this page with tips from the trade, learned from the front lines of the<br />
timber flooring industry. Write us a letter and the published letter judged as the best contribution will win an<br />
Attix 30 dust extractor from Nilfisk-Alto valued at $1230! Send your tips to editor@atfa.com.au or fax 02 9440 9066.<br />
Add the Attix 30 dust<br />
extractor to your kit<br />
nilfisk-alto.com.au<br />
• Easy handling and maintenance<br />
• Compact, ergonomic and powerful<br />
• 30L container volume<br />
• Auto on/off for electrical power tool<br />
• Big and practical tool deposit<br />
• Multifit accessory system for the<br />
ultimate in task flexibility<br />
• Featuring Xtreme Clean<br />
A fully automatic filter cleaning system takes<br />
care of filter cleaning every 30 seconds without<br />
interrupting your work.<br />
ATTIX 30<br />
VALUED AT $1230<br />
24