User's Manual - Gembird Europe BV
User's Manual - Gembird Europe BV
User's Manual - Gembird Europe BV

Create successful ePaper yourself
Turn your PDF publications into a flip-book with our unique Google optimized e-Paper software.
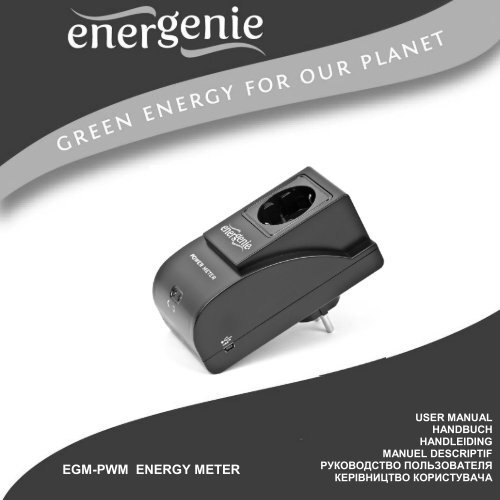
EGM-PWM ENERGY METER<br />
USER MANUAL<br />
HANDBUCH<br />
HANDLEIDING<br />
MANUEL DESCRIPTIF<br />
РУКОВОДСТВО ПОЛЬЗОВАТЕЛЯ<br />
КЕРІВНИЦТВО КОРИСТУВАЧА
EGM-PWM ENERGY METER<br />
Energy Meter<br />
Energiemessgerät<br />
Energiemeter<br />
Compteur d'énergie<br />
Измеритель мощности и энергии<br />
Вимірювач потужності та енергії<br />
All brands and logos are registered trademarks of their respective owners<br />
2
EGM-PWM ENERGY METER<br />
Features<br />
USB Energy Meter, allows insight in your energy consumption<br />
(voltage/current/power)<br />
Power Manager software helps calculate the actual energy costs of<br />
your equipment<br />
Software provides basic power consumption readings (home use) and<br />
advanced readings (business/scientific use)<br />
Specifications<br />
Input: 220-240 V AC 50-60 Hz<br />
Load max: 10 A<br />
Power consumption max: 1.2W<br />
USB 1.1 or 2.0 compatible interface<br />
Computer measurements: voltage and current measuring (RMS<br />
values), true power measuring, real energy consumed during a time<br />
period (kWh)<br />
Measurements range: up to 250 V AC, 10 A (RMS), 2500 W, 22 MW a<br />
year<br />
Measurements accuracy: ± 2% (within 50 W - 2500 W power range)<br />
Working conditions: (+ 10 to 40) C, below 90 % humidity<br />
Dimensions: 130 mm x 92 mm x 72 mm<br />
Net weight: 0.3 kg<br />
All brands and logos are registered trademarks of their respective owners<br />
3
EGM-PWM ENERGY METER<br />
1. Indicators and controls of the EGM-PWМ<br />
Socket<br />
Figure #1<br />
Day/Night mode<br />
indicator<br />
Load indicator<br />
USB socket<br />
All brands and logos are registered trademarks of their respective owners<br />
4
EGM-PWM ENERGY METER<br />
Indicator “Day/Night mode” is lit – it means that the night mode is<br />
active (when the day/night mode are enabled – see section 7 below)<br />
Indicator “Load” is lit up – it means that the connected equipment is<br />
consuming energy<br />
2. Hardware requirements<br />
A free USB port<br />
Windows XP/2000/Vista/Windows 7/Windows 8<br />
3. Package contents<br />
<br />
<br />
<br />
<br />
EGM-PWM<br />
User manual<br />
USB cable<br />
CD with Power Manager software for Windows<br />
4. Installation of EGM-PWM<br />
To install your EGM-PWM please follow the steps below:<br />
1. Install the Power Manager software (see chapter 5 below).<br />
2. Plug the EGM-PWM into the wall socket<br />
All brands and logos are registered trademarks of their respective owners<br />
5
EGM-PWM ENERGY METER<br />
Note:<br />
Avoid damp or wet places for installation<br />
EGM-PWM should be connected to a <strong>Europe</strong>an AC wall socket<br />
of the DIN 49 440 (German Schuko type) standard<br />
It is possible to connect the EGM-PWM to the power mains via<br />
socket strips, surge protectors, voltage regulators or a UPS<br />
3. Connect the EGM-PWM (see Figure #1 above) to your computer<br />
with the supplied USB cable.<br />
4. Plug any device into the Socket (see Figure #1 above) of the EGM-<br />
PWM and you are ready to measure its energy consumption.<br />
5. Software installation<br />
<br />
Insert software CD into the PC CD-ROM drive.<br />
If for any reason the automatic setup does not work, please use<br />
the “My computer” window to open the CD-ROM drive folder and launch<br />
SETUP.EXE from the CD.<br />
<br />
Follow the on-screen instructions of the installation software.<br />
Once the setup is completed the Power Manager software will<br />
open automatically (see chapter 6 below).<br />
All brands and logos are registered trademarks of their respective owners<br />
6
EGM-PWM ENERGY METER<br />
6. Power Manager<br />
Your EGM-PWM has an offline and an online working mode.<br />
It is “offline” whenever it is not connected to a PC, or when the PC is<br />
turned off. The device will come “online” automatically when it is connected<br />
to a PC with the Power Manager software running. In this mode the<br />
software keeps downloading the power readings from the EGM-PWM into<br />
a database. In the offline mode the EGM-PWM will only save Energy<br />
consumption data (kWh), which will be logged into the database when the<br />
device comes online again. The measured data can be viewed and<br />
analysed with the Power Manager software. The software shows different<br />
energy characteristics changing over time – including the money spent and<br />
the power consumption (kWh). When the software is started, the main<br />
power manager window will appear, which shows a list of all connected<br />
devices (see Figure #2 below).<br />
All brands and logos are registered trademarks of their respective owners<br />
7
EGM-PWM ENERGY METER<br />
Figure #2<br />
Push the Device settings button (bottom right here) to set the devicespecific<br />
options (see Figure #3 below)<br />
All brands and logos are registered trademarks of their respective owners<br />
8
EGM-PWM ENERGY METER<br />
Figure #3<br />
In the settings screen you are able to change the name of your<br />
device ( in the Name field) and the data downloading frequency (in the<br />
Measurement reading period field) - from 2 to 10 seconds.<br />
To delete all previous recorded data, just push the Clear database<br />
button.<br />
Note: Device IP, Port and Enabled fields will be grey – these functions<br />
are only available on the LAN version of the EGM-PWM<br />
All brands and logos are registered trademarks of their respective owners<br />
9
EGM-PWM ENERGY METER<br />
To open the Power Meter window, select your EGM-PWM device from<br />
the list (see Figure #2 above) and then click the Power meter button (see<br />
the chapter 7 below).<br />
7. Power Meter<br />
The Power Meter window can be opened in either a minimized or<br />
maximized mode. The minimized Power Meter window is shown in Figure<br />
#4 below. This window is useful for monitoring selected measured values.<br />
It displays:<br />
A single measured value (e.g. money spent)<br />
Note: Click with the right mouse button over this field to choose a<br />
different measured value to display<br />
Two warning indicators. These indicators by default would show<br />
you when the voltage is beyond its limits (too high or too low)<br />
Note: Read Chapter #9 below if you wish to customize these<br />
indicators<br />
Figure #4<br />
All brands and logos are registered trademarks of their respective owners<br />
10
EGM-PWM ENERGY METER<br />
Push Maximize button in this window to open the full-size Power<br />
Meter window – see Figure #5 below.<br />
Figure #5<br />
All brands and logos are registered trademarks of their respective owners<br />
11
EGM-PWM ENERGY METER<br />
This window displays all the measured values:<br />
Real power (P)<br />
Active impedance (R)<br />
Frequency of current (Fq)<br />
Energy consumed (E)<br />
The cost of energy consumed (money sign)<br />
RMS voltage (V rms)<br />
Peak voltage (V peak)<br />
RMS current (I rms)<br />
Peak current (I peak)<br />
It is beyond the scope of this manual to explain the physical meaning<br />
of these values. For most consumers the energy and its cost are the most<br />
interesting.<br />
The Energy (E) value shows the accumulated energy consumption (in<br />
watt-hours) since a certain date (the last time when Reset button was<br />
pressed). This date is shown below the Cost display. The Cost value is<br />
based on the amount of energy consumed and the energy costs. Push the<br />
Set button (near the Cost value) to specify the energy costs for your home<br />
or office situation– see Figure # 6 below.<br />
By Pushing the Reset button both Energy and Cost counters will be<br />
reset to zero.<br />
All brands and logos are registered trademarks of their respective owners<br />
12
EGM-PWM ENERGY METER<br />
Figure #6<br />
Choose the rate (per kWh) and currency. If you have different rates for<br />
peak hours and off-peak hours, just check the box Use Day/Night modes.<br />
You will then be able to enter the dual rates and the start/finish times for<br />
these modes.<br />
All brands and logos are registered trademarks of their respective owners<br />
13
EGM-PWM ENERGY METER<br />
8. Using the charts<br />
In the online mode the values of P, R, Fq, Irms, Vrms and Cost are<br />
continuously logged into the database. These readings can be used to<br />
build time charts. To display the charts just click on the desired value in the<br />
Main Power Meter window (see Figure #5 above) or push the Chart button<br />
in the Power Manager window (see Figure #2 above). This will open the<br />
Chart window as displayed in Figure # 7 below.<br />
All brands and logos are registered trademarks of their respective owners<br />
14
EGM-PWM ENERGY METER<br />
Figure #7<br />
The horizontal axis represents the date/time and the vertical axis<br />
represents the values of the chosen parameter.<br />
All brands and logos are registered trademarks of their respective owners<br />
15
EGM-PWM ENERGY METER<br />
Note: The scale of the vertical axis changes automatically once you<br />
browse or zoom the chart. The scale will be chosen in such a way that all<br />
the values within the displayed time period fit onto the screen.<br />
Some extra tools are placed under the chart:<br />
From the Displayed value list box you can choose the value<br />
which you wish to display in the graph area...<br />
The displayed chart normally shows the average values of the<br />
chosen parameter. You can determine the data point density with the<br />
Graph details level slider. With this slider you actually change the number<br />
of points within the chosen time interval for the averaging. Fewer points<br />
mean less details and a smoother chart. More points mean more details<br />
and a more precise chart.<br />
- The Sum tool is used to calculate energy statistics within a<br />
selected time period. Push the Σ- button to activate this feature and then<br />
select a time period on the chart area by dragging and dropping with the<br />
left mouse button. Doing so you will select the period as shown on the<br />
Figure # 8 below. The chosen period will be selected on the chart and the<br />
start and finish values of the interval will be shown in the corresponding<br />
fields inside Statistics for the period box. The calculated average value will<br />
be shown in the Mean value field.<br />
Tip: You can calculate the total energy consumption within a certain<br />
period using this function in Real power chart.<br />
Note: you can also adjust the Start and Finish fields manually.<br />
All brands and logos are registered trademarks of their respective owners<br />
16
EGM-PWM ENERGY METER<br />
Figure #8<br />
All brands and logos are registered trademarks of their respective owners<br />
17
EGM-PWM ENERGY METER<br />
<br />
- The zooming tool allows changing the time scale of the<br />
chart. Push the zooming tool button and then click with the left mouse<br />
button to adjust the scale to the desired level<br />
- When you select the home tool, the chart displays every<br />
record from the whole period where the selected parameter has any<br />
records in the database<br />
<br />
- The Excel tool exports the average values of the<br />
selected period into an Excel file for further analysis or archiving – see<br />
Figure #9 below.<br />
Figure #9<br />
All brands and logos are registered trademarks of their respective owners<br />
18
EGM-PWM ENERGY METER<br />
9. Advanced features<br />
The Power Manager software also allows you to define a number of<br />
user-defined events. Possible events are: Lighting up the indicators in the<br />
Power Meter window (see Chapter 7 above) , or run a user-specified<br />
application. To set the parameters for such events (see Figure #10 below),<br />
just push the Events button in the Power Manager window (see Figure #2<br />
above)<br />
Figure #10<br />
To define your event, first choose the parameter of your interest from<br />
the Value list box. If you wish the event to be triggered when the value of<br />
this parameter exceeds a certain maximum – fill in the Max field then. If<br />
you wish the event to be triggered when the value of this parameter drops<br />
All brands and logos are registered trademarks of their respective owners<br />
19
EGM-PWM ENERGY METER<br />
below a certain minimum – fill in the Min field. Secondly you select the<br />
desired action from the Action list box. If you choose to execute a specific<br />
application or program, you can select the path to this application in the<br />
Path field. It is possible to give the event a practical name in the Name field.<br />
Select the Use growth checkbox if you are interested in the difference<br />
between the current value of the parameter and its previous value, rather<br />
than in its absolute value.<br />
Tip: Use growth checkbox might be particularly useful if you wish to<br />
do something whenever a certain device gets switched on or off.<br />
All brands and logos are registered trademarks of their respective owners<br />
20
EGM-PWM ENERGY METER<br />
All brands and logos are registered trademarks of their respective owners<br />
21
EGM-PWM ENERGY METER<br />
All brands and logos are registered trademarks of their respective owners<br />
22
EGM-PWM ENERGY METER<br />
Waste disposal:<br />
Entsorgungshinweise:<br />
Do not deposit this equipment with the<br />
household waste. Improper disposal can harm<br />
both the environment and human health. For<br />
Information about waste collection facilities for<br />
used electrical and electronic devices, please<br />
contact your city council or an authorized<br />
company for the disposal of electrical and<br />
electronic equipment.<br />
Richtlijnen m.b.t. afvalverwerking<br />
Werfen Sie dieses Gerät nicht in den<br />
Hausmüll. Unsachgemäße Entsorgung kann<br />
sowohl der Umwelt als auch der menschlichen<br />
Gesundheit schaden. Informationen zu<br />
Sammelstellen für Altgeräte erhalten Sie bei<br />
Ihrer Stadtverwaltung oder einer autorisierten<br />
Stelle für die Entsorgung von Elektro-und<br />
Elektronikgeräten.<br />
Traitement des déchets:<br />
Batterijen en accu’s dienen als kleinchemisch<br />
afval afgeleverd te worden bij<br />
toegewezen afvalverzamelpunten (zie<br />
www.afvalgids.nl). U dient ervoor te zorgen<br />
dat de batterijen/accu’s leeg zijn en dus geen<br />
stroom meer kunnen leveren. Let op, de<br />
batterijen/accu’s dienen onbeschadigd<br />
ingeleverd te worden.<br />
Gooi dit product niet weg in uw vuilnisbak. Dit<br />
kan zowel het milieu als de menselijke<br />
gezondheid schade toebrengen. Informatie<br />
over het inleveren van dit product kunt u<br />
inwinnen bij uw gemeentelijke vuilnisdienst of<br />
andere geautoriseerde instelling in uw buurt.<br />
Ne jetez pas cet appareil dans les déchets<br />
domestiques. Un traitement inapproprié peut<br />
être dommageable à l'environnement et à la<br />
santé humain.<br />
Vous trouvez des informations sur les centres<br />
de rassemblement des appareils vieux chez<br />
l'administration municipale ou<br />
chez un centre autorisé pour le traitement des<br />
appareils électriques ou électroniques.<br />
All brands and logos are registered trademarks of their respective owners<br />
23
EGM-PWM ENERGY METER<br />
WARRANTY CONDITIONS<br />
GARANTIE BEDINGUNGEN<br />
The warranty period is 24 months and begins with<br />
the sale to the end user. The receipt must clearly list<br />
the date of purchase and the part number, in addition<br />
it should be printed. Keep the receipt for the entire<br />
warranty period since it is required for all warranty<br />
claims. During the warranty period the defective<br />
items will be credited, repaired or replaced at the<br />
manufacturer's expense. Work carried out under the<br />
warranty neither extends the warranty period nor<br />
starts a new warranty period. The manufacturer<br />
reserves the right to void any warranty claim for<br />
damages or defects due to misuse, abuse or<br />
external impact (falling down, impact, ingress of<br />
water, dust, contamination or break). Wearing parts<br />
(e.g. rechargeable batteries) are excluded from the<br />
warranty. Upon receipt of the RMA goods, <strong>Gembird</strong><br />
<strong>Europe</strong> B.V. reserves the right to choose between<br />
replacement of defective goods or issuing a credit<br />
note. The credit note amount will always be<br />
calculated on the basis of the current market value of<br />
the defective products<br />
<strong>Gembird</strong> <strong>Europe</strong> B.V.<br />
Wittevrouwen 56, 1358CD Almere<br />
The Netherlands<br />
www.gembird.nl/support<br />
support@gmb.nl<br />
Tel. +31-36-5211588<br />
Die Garantie beträgt 24 Monate ab Verkaufsdatum<br />
an den Endverbraucher. Das Kaufdatum und der<br />
Gerätetyp sind durch eine maschinell erstellte<br />
Kaufquittung zu belegen. Bitte bewahren Sie Ihren<br />
Kaufbeleg daher für die Dauer der Garantie auf, da<br />
er Voraussetzung für eine eventuelle Reklamation<br />
ist. Innerhalb der Garantiezeit werden alle Mängel,<br />
wahlweise durch den Hersteller entweder durch<br />
Instandsetzung, Austausch mangelhafter Teile oder<br />
im Austausch, behoben. Die Ausführung der<br />
Garantieleistung bewirkt weder eine Verlängerung<br />
noch einen Neubeginn der Garantiezeit.<br />
Eine Garantieleistung entfällt für Schäden oder<br />
Mängel die durch unsachgemäße Handhabung oder<br />
durch äußere Einwirkung (Sturz, Schlag, Wasser,<br />
Staub, Verschmutzung oder Bruch) herbeigeführt<br />
wurden. Verschleißteile (z.B. Akkus) sind von der<br />
Garantie ausgenommen.<br />
GEMBIRD Deutschland GmbH<br />
Coesterweg 45, 59494 Soest<br />
Deutschland<br />
www.gembird.de/support<br />
support@gembird.de<br />
Tel. +49-180 5-436247<br />
0,14 € pro Minute aus dem deutschen Festnetz.<br />
Mobilfunkpreise können abweichen<br />
All brands and logos are registered trademarks of their respective owners<br />
24
EGM-PWM ENERGY METER<br />
GARANTIE VOORWAARDEN<br />
CONDITIONS DE GARANTIE<br />
De garantietermijn bedraagt 24 maanden en gaat in<br />
op de aankoopdatum van het product door de<br />
eindgebruiker. Op de aankoopbon moeten de<br />
aankoopdatum en productomschrijving duidelijk<br />
vermeld staan. Gelieve de aankoopbon de gehele<br />
garantieperiode te bewaren, deze is ten alle tijden<br />
benodigd voor alle garantie aanspraken. Tijdens de<br />
garantieperiode zullen alle gebreken verholpen of<br />
vervangen worden door de fabrikant d.m.v. reparatie,<br />
omruiling van het defecte onderdeel of het gehele<br />
apparaat. Aanspraken tijdens de garantieperiode<br />
leiden niet tot verlenging hiervan. Garantieaanspraak<br />
vervalt bij schade of gebreken die ontstaan zijn door<br />
oneigenlijk gebruik, misbruik of invloeden van<br />
buitenaf (vallen, stoten, water, stof, vuil of breken).<br />
Slijtagegevoelige onderdelen (b.v. batterijen) zijn<br />
uitgesloten van garantie. Bij ontvangst van de RMA<br />
goederen behoudt <strong>Gembird</strong> zich het recht om te<br />
kiezen tussen vervanging van de defecte waren of<br />
het uitgeven van een kreditnota. Het bedrag van de<br />
kreditnota zal altijd gecalculeerd zijn op basis van de<br />
huidige marktprijs voor het defecte produkt.<br />
<strong>Gembird</strong> <strong>Europe</strong> B.V.<br />
Wittevrouwen 56, 1358CD Almere<br />
The Netherlands<br />
www.gembird.nl/support<br />
support@gmb.nl<br />
Tel. 0900-4362473<br />
€ 0,15 p/m binnen Nederland<br />
Exclusief mobiele telefoonkosten<br />
Garantie est de 24 mois a partir de la date d’achat de<br />
l'utilisateur final.<br />
Le talon de garantie doit énumérer clairement la date<br />
d'achat et le type d'appareil.<br />
Conservez le reçu d'achat pendant toute la durée de la<br />
garantie car elle est nécessaire pour toute réclamation.<br />
Au cours de la période de garantie tous les défauts<br />
doivent être remplacé aux frais du fabricant, soit par la<br />
réparation ou la remplacement de la pièce défectueuse<br />
ou l'ensemble du produit.<br />
Les travaux effectués sous garantie ne prolongent pas la<br />
période de garantie ni ne commencent pas une nouvelle<br />
période de garantie.<br />
Le fabricant se réserve le droit d'annuler toute demande<br />
de garantie pour les dommages ou défauts dus à une<br />
mauvaise utilisation, abus ou les effets externes (chute,<br />
choc, pénétration de l'eau, la poussière, etc..).<br />
Les pièces d'usure (par exemple les piles rechargeables)<br />
sont exclus de la garantie.<br />
Dès réception de la marchandise sous garantie, le SAV<br />
de <strong>Gembird</strong> <strong>Europe</strong> <strong>BV</strong> se réserve le droit de choisir<br />
entre le remplacement des produits défectueux ou de<br />
délivrer un avoir.<br />
Le montant d’avoir sera toujours calculée sur la base de<br />
la valeur actuelle du marché des produits défectueux.<br />
<strong>Gembird</strong> <strong>Europe</strong> B.V.<br />
Wittevrouwen 56<br />
1358CD Almere, The Netherlands<br />
www.gembird.nl/support<br />
support@gmb.nl<br />
Tel. +31-36-5211588<br />
Prix d'appel depuis telephone fixe Pays-Bas : 0.15 euro / min<br />
Prix d'appel depuis telephone mobile / autre pays - selon<br />
operateur<br />
All brands and logos are registered trademarks of their respective owners<br />
25
EGM-PWM ENERGY METER<br />
ГАРАНТИЙНЫЙ ТАЛОН<br />
1. Гарантийное обслуживание предоставляется в течение<br />
срока гарантии, при наличии правильно и четко заполненного<br />
гарантийного талона, и изделия в полной комплектации.<br />
Серийный номер и модель изделия должны соответствовать<br />
указанным в гарантийном талоне.<br />
2. Гарантийное обслуживание представляет собой бесплатное<br />
устранение всех неполадок (ремонт), или замену изделия на<br />
новое (аналогичное).<br />
3. Гарантия не распространяется на неисправности,<br />
вызванные следующими причинами:<br />
• использование изделия не по назначению.<br />
• нарушение условий эксплуатации, хранения или перевозки<br />
изделия, которые указаны в настоящей инструкции.<br />
• подключение нестандартных или неисправных периферийных<br />
устройств, аксессуаров.<br />
• механические повреждения, попадание внутрь изделия<br />
посторонних предметов, веществ, жидкостей, насекомых.<br />
• ремонт изделия не уполномоченными на то лицами.<br />
4. Комплектность и внешний вид изделия проверяются<br />
Покупателем при получении товара в присутствии персонала<br />
фирмы.<br />
Послепродажные претензии по укомплектованности и<br />
внешнему виду не принимаются.<br />
Наименование изделия: ___________________________<br />
Модель _________________________________________<br />
Серийный номер _________________________________<br />
Срок гарантии ___________________________________<br />
Дата продажи «____» ___________________ 20____ года<br />
Фирма-продавец: _________________________________<br />
Адрес и телефон фирмы-продавца:<br />
________________________________________________<br />
М.П. С условиями гарантии ознакомлен и согласен:<br />
Продавец: _____________ Покупатель: _____________<br />
УМОВИ ГАРАНТІЙНОГО ОБСЛУГОВУВАННЯ<br />
1. Гарантійне обслуговування надається протягом терміну<br />
гарантії, при наявності Гарантійного талону, заповненого<br />
належним чином, та виробу в повній комплектації.<br />
2. Гарантійне обслуговування не підтримується в разі<br />
порушення правил експлуатації, зберігання або перевезення<br />
виробу, що зазначені в інструкції по експлуатації виробу.<br />
3. Гарантійне обслуговування скасовується у випадках:<br />
- наявності механічних пошкоджень або слідів стороннього<br />
втручання;<br />
- пошкодження викликані стихійним лихом або нещасним<br />
випадком, включаючи й блискавку, потраплянням у виріб<br />
сторонніх предметів, рідин, комах, тощо;<br />
- пошкодження викликані застосуванням або підключенням<br />
нестандартних або несправних периферійних пристроїв,<br />
аксесуарів;<br />
4. Гарантія не поширюється на витратні матеріали та додаткові<br />
аксесуари;<br />
З гарантійними умовами згоден.<br />
Підпис покупця: ____________________<br />
ГАРАНТІЙНИЙ ТАЛОН № __________________________<br />
Товар/модель ____________________________________<br />
Серійний номер __________________________________<br />
Термін гаранії ____________________________________<br />
Дата продажу ____________________________________<br />
Продавець (назва, телефон)<br />
_________________________________________<br />
Печатка та підпис продавця<br />
_________________________________________<br />
З гарантійних питань звертайтесь до сервісних центрів<br />
<strong>Gembird</strong>. Про адреси та контакти Ви можете дізнатись на сайті<br />
www.gembird.ua або по телефону 044-4510213.<br />
All brands and logos are registered trademarks of their respective owners<br />
26