Ekasand Lightweight 3 in Random Orbital Sander
Ekasand Lightweight 3 in Random Orbital Sander
Ekasand Lightweight 3 in Random Orbital Sander

You also want an ePaper? Increase the reach of your titles
YUMPU automatically turns print PDFs into web optimized ePapers that Google loves.
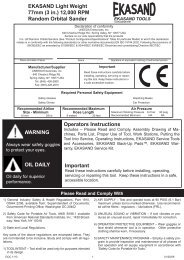
EKASAND Light Weight<br />
77mm (3 <strong>in</strong>.) 12,000 RPM<br />
<strong>Random</strong> <strong>Orbital</strong> <strong>Sander</strong><br />
EKASAND TOOLS<br />
© EKASAND•0701<br />
Features:<br />
• Free Speed of 12,000 Revolutions Per M<strong>in</strong>ute<br />
• Variable Speed Control with Palm Style On/Off Lever<br />
• 3 Sizes of Ergonomic Cushion-Grips for comfort and<br />
stability<br />
• Low Profile for Operator Control and Comfort<br />
• Rear Exhaust Directs Air away from work<br />
• Suggested Applications:<br />
Sand<strong>in</strong>g and F<strong>in</strong>ish<strong>in</strong>g a Variety of Materials <strong>in</strong>clud<strong>in</strong>g<br />
Wood, Metal, Plastic, Fiberglass Composites, Solid<br />
Surfaces and other Sandable Surfaces<br />
WARNING<br />
Always wear safety<br />
goggles to protect your<br />
eyes.<br />
OIL DAILY<br />
Oil daily for superior<br />
performance.<br />
Operators Instructions<br />
Includes – Features and Suggested Applications, Please Read and Comply,<br />
Assembly Draw<strong>in</strong>g of Mach<strong>in</strong>es, Parts List, Proper Use of Tool, Work<br />
Stations, Putt<strong>in</strong>g the Tool Into Service, Operat<strong>in</strong>g Instructions, EKASAND<br />
Service Tools and Accessories, EKASAND Back-Up Pads, EKASAND<br />
Service Kit, EKASAND Warranty<br />
Important<br />
Read these <strong>in</strong>structions carefully before <strong>in</strong>stall<strong>in</strong>g, operat<strong>in</strong>g, servic<strong>in</strong>g or<br />
repair<strong>in</strong>g this tool. Keep these <strong>in</strong>structions <strong>in</strong> a safe, accessible location.<br />
Please Read and Comply With<br />
1) General Industry Safety & Health Regulations, Part 1910, OSHA 2206,<br />
available from: Super<strong>in</strong>tendent of Documents; Government Pr<strong>in</strong>t<strong>in</strong>g Office;<br />
Wash<strong>in</strong>gton DC 20402<br />
2) Safety Code for Portable Air Tools, ANSI B186.1 available from: American<br />
National Standards Institute, Inc.; 1430 Broadway; New York, NY<br />
10018<br />
3) State and Local Regulations.<br />
Key parts of the above regulations are excerpted below. They are not <strong>in</strong>tended<br />
to be <strong>in</strong>clusive. Study and comply with all regulations.<br />
1) TOOL INTENT – Tool shall be used only for purposes <strong>in</strong>tended <strong>in</strong> its<br />
design.<br />
2) AIR SUPPLY – Test and operate tools at 90 PSIG (6.1 Bar) maximum<br />
unless tool is marked otherwise. Use recommended airl<strong>in</strong>e filters - regulators<br />
– lubricators (FRL).<br />
3) UNUSUAL SOUND or VIBRATION – If tool vibrates or produces an<br />
unusual sound, repair immediately for correction.<br />
4) OPERATOR PROTECTIVE EQUIPMENT – Wear goggles or face<br />
shield whenever tool is <strong>in</strong> operation. Other protective cloth<strong>in</strong>g shall be<br />
worn, if necessary.<br />
5) SAFETY MAINTENANCE PROGRAM – Employ a safety program to<br />
provide <strong>in</strong>spection and ma<strong>in</strong>tenance of all phases of tool operation and<br />
air supply equipment <strong>in</strong> accordance with “Safety Code for Portable Air<br />
Tools.”<br />
DOC1113 04/13/06
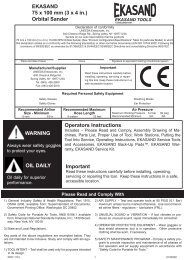
EKASAND Light Weight, 77 mm (3 <strong>in</strong>.) 12,000 RPM<br />
<strong>Random</strong> <strong>Orbital</strong> <strong>Sander</strong><br />
DOC1113 04/13/06
Parts List<br />
ITEM P/N DESCRIPTION QTY<br />
1 ESA0400 RETAINING RING 1<br />
2 ESA1200 BEARING 1<br />
3 ESA5600 REAR ENDPLATE 1<br />
4 ESA4000 PIN (<strong>in</strong>cluded with item 5, Assembly) 1<br />
5 ESA7600 CYLINDER ASSEMBLY (<strong>in</strong>cludes item 4, P<strong>in</strong>) 1<br />
6 ESA2400 O-RING 1<br />
7 ESA0100 VANE (5 are <strong>in</strong>cluded with item 8, Set) 5<br />
8 ESA3600 ROTOR, VANES (Qty. 5) AND KEY SET 1<br />
9 ESA1400 KEY (<strong>in</strong>cluded <strong>in</strong> item 8, Set) 1<br />
10 ESA4600 FRONT ENDPLATE 1<br />
11 ESA9100 BEARING 1<br />
12 ESA5400 O-RING 1<br />
13 ESA1000 LOCK RING 1<br />
14 ESB6720 2.5 mm (3/32 <strong>in</strong>.) ORBIT SHAFT BALANCER FOR 3 <strong>in</strong>. L.W. PADS 1<br />
15 ESA7010 RETAINING RING 1<br />
16 ESA2610 BEARING 1<br />
17 ESA6910 SHIM 1<br />
18 ESA1610 BEARING 1<br />
19 ESA8010 SHIM 1<br />
20 ESA6210 WASHER 1<br />
21 ESA7710 RETAINING RING 1<br />
22 ESB3800 SPINDLE 1<br />
23 ESA4120 LEVER FOR 12,000 RPM, 2.5 mm (3/32 <strong>in</strong>.) Orbit Mach<strong>in</strong>es 1<br />
24 ESA1300 PIN 1<br />
25 ESA3490 65 mm (2 ½ <strong>in</strong>.) GRIP OPT<br />
ESA4490 70 mm (2 ¾ <strong>in</strong>.) GRIP 1<br />
ESA5490 75 mm (3 <strong>in</strong>.) GRIP OPT<br />
26 ESA6601 HOUSING 1<br />
27 ESA8000 VALVE STEM ASSEMBLY (<strong>in</strong>cludes item 28 O-r<strong>in</strong>g) 1<br />
28 ESA8900 O-RING (<strong>in</strong>cluded with item 27 Valve Stem Assembly) 1<br />
29 ESA3400 O-RING 1<br />
30 ESB4100 SPEED CONTROL 1<br />
31 ESA9300 RETAINING RING 1<br />
32 ESC6400 77 mm (3 <strong>in</strong>.) NON-VAC SHROUD (Std on non-vac mach<strong>in</strong>es) 1<br />
33 ESC7400 77 mm (3 <strong>in</strong>.) SuperVAC SHROUD (Std on CV/SGV mach<strong>in</strong>es) 1<br />
34 ESA6410 17 mm PAD WRENCH 1<br />
DOC1113 04/13/06
35 2532100 77mm (3 <strong>in</strong>.) LOW PROFILE (1/4-20), NON-VAC, VINYL FACE PAD 1<br />
2532101 77mm (3 <strong>in</strong>.) LOW PROFILE (1/4-20), NON-VAC, HOOK FACE PAD 1<br />
2532110 77mm (3 <strong>in</strong>.) LOW PROFILE (1/4-20), VACUUM, VINYL FACE PAD 1<br />
2532111 77mm (3 <strong>in</strong>.) LOW PROFILE (1/4-20), VACUUM, HOOK FACE PAD 1<br />
36 ESA2600 BRONZE MUFFLER 1<br />
37 ESA8600 MUFFLER 1<br />
38 ESA6610 MUFFLER HOUSING 1<br />
39 ESA9000 SEAT 1<br />
40 ESA7000 VALVE 1<br />
41 ESA4100 VALVE SPRING 1<br />
42 ESA3100 INLET BUSHING (1/4-18 NPT) 1<br />
43 ESA6000 SGV RETAINER 1<br />
44 ESA4400 O-RING 1<br />
45 ESA8770 Ø 28 mm (1 <strong>in</strong>.) SuperVAC SGV SEAL (<strong>in</strong>cluded with item 46) 1<br />
46 ESA2411 Ø 28 mm (1 <strong>in</strong>.) SuperVAC SGV SWIVEL EXHAUST ASSY (Standard on SGV) 1<br />
47 ESA4580 Ø 19 mm (3/4 <strong>in</strong>.) SuperVAC SGV SEASL (<strong>in</strong>cluded with item 48) OPT<br />
48 ESA0411 Ø 19 mm (3/4 <strong>in</strong>.) SuperVAC SGV SWIVEL EXHAUST ASSY (Optional on SGV) OPT<br />
49 ESC8010 SuperVAC SGV SHROUD/SKIRT ADAPTER (Standard on SGV) 1<br />
50 ESA5020 SuperVAC CV Ø 19 mm (3/4 <strong>in</strong>.) SWIVEL EXHAUST ASSEMBLY (Standard on<br />
CV)<br />
51 ESA8400 NUT 1<br />
52 ESA9900 SuperVAC CV Ø 28 mm (1<strong>in</strong>.) SWIVEL EXHAUST ASSEMBLY (Optional on CV) OPT<br />
53 ESA7400 WASHER 1<br />
54 ESA9670 SCREW 1<br />
55 ESA2140 Ø 28 mm (1 <strong>in</strong>.) VAC HOSE TO DOUBLE BAG FITTING AND AIRLINE ASSY 1<br />
(Standard on SGV) INCLUDES: ESA3400 Ø 28 mm (1 <strong>in</strong>.) x 1.8 m (6 ft.) Vacuum<br />
Hose, ESB3210 Ø 28 mm (1 <strong>in</strong>.) Hose to Double Bag Vacuum Fitt<strong>in</strong>g, ESA3300<br />
Ø 6.3 mm (1/4 <strong>in</strong>.) x 1.8 m (6 ft.) Airl<strong>in</strong>e with Fitt<strong>in</strong>gs, ESA2700 Bungee for Ø 6.3<br />
mm (1/4 <strong>in</strong>.) Airl<strong>in</strong>e & Ø 28 mm (1 <strong>in</strong>.) Vacuum Hose (5)<br />
ESA1140 Ø 19 mm (3/4 <strong>in</strong>.) VAC HOSE TO DOUBLE BAG FITTING AND AIRLINE ASSY OPT<br />
(Optional on SGV) INCLUDES: ESA0020 Ø 19 mm x 1.5 m (5 ft.) Vacuum Hose,<br />
ESB3310 Ø 19 mm (3/4 <strong>in</strong>.) Hose to Double Bag Vacuum Fitt<strong>in</strong>g, ESA2030 Ø 6.3<br />
mm (1/4 <strong>in</strong>.) x 1.5 m (5 ft.) Airl<strong>in</strong>e with Fitt<strong>in</strong>gs, ESA1030 Bungee for Ø 6.3 mm<br />
(1/4 <strong>in</strong>.) Airl<strong>in</strong>e & Ø 19 mm (3/4 <strong>in</strong>.) Vacuum Hose (5)<br />
ESA0030 Ø 19 mm (3/4 <strong>in</strong>.)VAC HOSE TO Ø 19 mm (3/4 <strong>in</strong>.) x Ø 28 mm (1 <strong>in</strong>.) HOSE OPT<br />
ADAPTER COUPLING & AIRLINE ASSY INCLUDES: ESA0020 Ø 19 mm (3/4<br />
<strong>in</strong>.) x 1.5 m (5 ft.) Vacuum Hose, ESB8800 Ø 19 mm (3/4 <strong>in</strong>.) Hose to Ø 28<br />
mm (1 <strong>in</strong>.) Hose Adapter, ESA2030 Ø 6.3 mm (1/4 <strong>in</strong>.) x 1.5 m (5 ft.) Airl<strong>in</strong>e with<br />
Fitt<strong>in</strong>gs, ESA1030 Bungee for Ø 6.3 mm (1/4 <strong>in</strong>.) Airl<strong>in</strong>e & Ø 19 mm (3/4 <strong>in</strong>.)<br />
Vacuum Hose (5)<br />
56 ESC0110 VACUUM BAG (Standard on SGV) 1<br />
57 ESC9010 VACUUM BAG INSERT (Standard on SGV) 1<br />
1<br />
DOC1113 04/13/06
EKASAND Service Tools and Accessories<br />
When an EKASAND ROS needs to be serviced, we offer a tool kit to make the disassembly/assembly fast and easy. The Service Tools are highly recommended<br />
for use with the Overhaul Service Kit. NOTICE: To receive any expressed or implied warranty, the tool must be repaired by an authorized EKASAND<br />
Service Center.<br />
T-6 Motor Lock R<strong>in</strong>g<br />
Wrench/Sp<strong>in</strong>dle Puller<br />
T-7 Soft Collar<br />
T-8 Motor Face Plate<br />
Bear<strong>in</strong>g Removal Tool<br />
T-13 Bear<strong>in</strong>g<br />
Press Tool<br />
ESA9740 Universal Service Tool Kit<br />
ESA9740 Universal Service Tool Kit<br />
T-9 Bear<strong>in</strong>g<br />
Puller<br />
T-1 Bear<strong>in</strong>g<br />
Press Tool<br />
T-11 5/16-24 to 1/4 -20<br />
Sp<strong>in</strong>dle Puller Assembly<br />
T-5 LW ROS Sp<strong>in</strong>dle<br />
Bear<strong>in</strong>g Press Tools<br />
ESA3840 3 <strong>in</strong>. LW ROS Service Tool Kit<br />
EKASAND Back-Up Pads<br />
EKASAND back-up pads are perfectly mated for use on the<br />
EKASAND LP. Constructed from premium, <strong>in</strong>dustrial-quality materials<br />
and featur<strong>in</strong>g a riveted fiberglass and steel hub with molded<br />
urethane, their durability and precise construction are the ideal<br />
complement to the performance of the EKASAND<br />
Description<br />
Part#<br />
EKASAND 3 <strong>in</strong>. low profile, nv, v<strong>in</strong>yl face 2532100<br />
EKASAND 3 <strong>in</strong>. low profile, nv, hook face 2532101<br />
EKASAND 3 <strong>in</strong>. low profile, vacuum, v<strong>in</strong>yl face 2532110<br />
EKASAND 3 <strong>in</strong>. low profile, vacuum, hook face 2532111<br />
EKASAND Warranty<br />
All EKASAND <strong>Random</strong> <strong>Orbital</strong> <strong>Sander</strong>s are warranted for defects<br />
<strong>in</strong> materials or workmanship for 1 year follow<strong>in</strong>g the date of delivery<br />
to the user. Comb<strong>in</strong>ed with the EKASAND name, this Warranty expresses<br />
our total confidence <strong>in</strong> the superior quality, durability, and<br />
performance of the EKASAND<br />
EKASAND Overhaul Service Kit<br />
The ESA2311 EKASAND Overhaul Service Kit conta<strong>in</strong>s all the replacement<br />
parts that naturally wear over time and a straightforward<br />
manual to make servic<strong>in</strong>g an EKASAND sander simple.<br />
Overhaul<strong>in</strong>g the <strong>Random</strong> <strong>Orbital</strong> <strong>Sander</strong> can be made even easier<br />
with the use of the above Service Tools. The Service Tools also<br />
reduce the chance of improper assembly.<br />
ESA2311 Overhaul Service Kit Contents<br />
ESA2311 Overhaul Service Kit Contents<br />
Item Part No. Description Qty.<br />
1 ESA0400 Reta<strong>in</strong><strong>in</strong>g R<strong>in</strong>g 1<br />
2 ESA1200 Bear<strong>in</strong>g 1<br />
6 ESA2400 O-R<strong>in</strong>g 1<br />
7 ESA0100 Vane 5<br />
8 ESB5000 Rotor 1<br />
9 ESA1400 Key 1<br />
11 ESA9100 Bear<strong>in</strong>g 1<br />
16 ESA2610 Bear<strong>in</strong>g 1<br />
17 ESA6910 Spacer 1<br />
18 ESA1610 Bear<strong>in</strong>g 1<br />
27 ESA8000 Valve Stem Assembly Includes Item 25 1<br />
29 ESA3400 O-R<strong>in</strong>g 1<br />
31 ESA9300 Reta<strong>in</strong><strong>in</strong>g R<strong>in</strong>g 1<br />
36 ESA2600 Muffler (for NV and CV Mach<strong>in</strong>es) 1<br />
37 ESA8600 Muffler 1<br />
38 ESA6610 Muffler Hous<strong>in</strong>g 1<br />
39 ESA9000 Seat 1<br />
40 ESA7000 Valve 1<br />
41 ESA4100 Valve Spr<strong>in</strong>g 1<br />
NA ESA6620 Overhaul Service Manual 1<br />
DOC1113 04/13/06
Proper Use of Tool<br />
This sander is designed for sand<strong>in</strong>g all types of materials i.e. metals,<br />
wood, stone, plastics, etc. us<strong>in</strong>g abrasive designed for this<br />
purpose. Do not use this sander for any other purpose than that<br />
specified without consult<strong>in</strong>g the manufacturer or the manufacturer’s<br />
authorized supplier.<br />
Do not use back-up pads that have a work<strong>in</strong>g speed less than<br />
12,000 RPM free speed.<br />
Work Station<br />
The tool is <strong>in</strong>tended to be operated as a hand held tool. It is always<br />
recommended that the tool be used when stand<strong>in</strong>g on a solid floor.<br />
It can be <strong>in</strong> any position but before any such use, the operator must<br />
be <strong>in</strong> a secure position hav<strong>in</strong>g a firm grip and foot<strong>in</strong>g and be aware<br />
that the sander can develop a torque reaction. See the section<br />
“Operat<strong>in</strong>g Instructions”.<br />
Putt<strong>in</strong>g the Tool <strong>in</strong>to Service<br />
Use a clean lubricated air supply that will give a measured air pressure<br />
at the tool of 90 PSI/6.1 Bar when the tool is runn<strong>in</strong>g with the<br />
lever fully depressed. It is recommended to use an approved 3/8<br />
<strong>in</strong>./10 mm x 25 ft./8 meter maximum length airl<strong>in</strong>e. It is recommended<br />
that the tool be connected to the air supply as shown <strong>in</strong><br />
Figure 1. Do not connect the tool to the airl<strong>in</strong>e system without <strong>in</strong>corporat<strong>in</strong>g<br />
an easy to reach and operate air shut off valve. The air<br />
supply should be lubricated. It is strongly recommended that an air<br />
filter, regulator and lubricator (FRL) be used as shown <strong>in</strong> Figure 1<br />
as this will supply clean, lubricated air at the correct pressure to the<br />
tool. Details of such equipment can be obta<strong>in</strong>ed from your supplier.<br />
If such equipment is not used then the tool should be lubricated<br />
by shutt<strong>in</strong>g off the air supply to the tool, depressuriz<strong>in</strong>g the l<strong>in</strong>e by<br />
press<strong>in</strong>g the lever on the tool. Disconnect the airl<strong>in</strong>e and put 2 to<br />
3 drops of a suitable pneumatic motor lubricat<strong>in</strong>g oil, preferably <strong>in</strong>corporat<strong>in</strong>g<br />
a rust <strong>in</strong>hibitor <strong>in</strong>to the hose end (<strong>in</strong>let) of the mach<strong>in</strong>e.<br />
Reconnect tool to air supply and run tool slowly for a few seconds<br />
to allow air to circulate the oil. If tool is used frequently lubricate on<br />
daily basis and if tool starts to slow or lose power.<br />
It is recommended that the air pressure at the tool be 90 PSI/6.1<br />
Bar while the tool is runn<strong>in</strong>g so the maximum RPM is not exceeded.<br />
The tool can be run at lower pressures but should never be run<br />
higher than 90 PSI/6.1 Bars. If run at lower pressure the performance<br />
of the tool is reduced.<br />
Dra<strong>in</strong> Leg<br />
Operat<strong>in</strong>g Instructions<br />
1) Read all <strong>in</strong>structions before us<strong>in</strong>g this tool. All operators<br />
must be fully tra<strong>in</strong>ed <strong>in</strong> its use and aware of these safety<br />
rules. All service and repair must be carried out by tra<strong>in</strong>ed<br />
personnel.<br />
2) Make sure the tool is disconnected from the air supply. Select<br />
a suitable abrasive and secure it to the back-up pad. Be<br />
careful and center the abrasive on the back-up pad.<br />
3) When sand<strong>in</strong>g always place the tool on the work then start<br />
the tool. Always remove the tool from the work before stopp<strong>in</strong>g.<br />
This will prevent goug<strong>in</strong>g of the work due to excess<br />
speed of the abrasive.<br />
4) Always remove the air supply to the sander before fitt<strong>in</strong>g,<br />
adjust<strong>in</strong>g or remov<strong>in</strong>g the abrasive or back-up pad.<br />
5) Always adopt a firm foot<strong>in</strong>g and/or position and be aware of<br />
torque reaction developed by the sander.<br />
6) Use only correct spare parts.<br />
7) Always ensure that the material to be sanded is firmly fixed<br />
to prevent its movement.<br />
8) Check hose and fitt<strong>in</strong>gs regularly for wear. Do not carry the<br />
tool by its hose, always be careful to prevent the tool from<br />
be<strong>in</strong>g started when carry<strong>in</strong>g the tool with the air supply connected.<br />
9) Do not exceed maximum recommended air pressure.<br />
10) Use safety equipment as recommended.<br />
11) The tool is not electrically <strong>in</strong>sulated. Do not use where there<br />
is a possibility of com<strong>in</strong>g <strong>in</strong>to contact with live electricity, gas<br />
pipes, water pipes, etc. Check the area of operation before<br />
operation.<br />
12) Take care to avoid entanglement with the mov<strong>in</strong>g parts of<br />
the tool with cloth<strong>in</strong>g, ties, hair, clean<strong>in</strong>g rags, etc. If entangled,<br />
it will cause the body to be pulled towards the work and<br />
mov<strong>in</strong>g parts of the mach<strong>in</strong>e and can be very dangerous.<br />
13) Keep hands clear of the sp<strong>in</strong>n<strong>in</strong>g pad dur<strong>in</strong>g use.<br />
14) If the tool appears to malfunction, remove from use immediately<br />
and arrange for service and repair.<br />
15) Do not allow the tool to free speed without tak<strong>in</strong>g precautions<br />
to protect any persons or objects from the loss of the<br />
abrasive or pad.<br />
Closed Loop Pipe System<br />
Sloped <strong>in</strong> the direction of air flow<br />
Ball Valve<br />
To Tool Station<br />
Dra<strong>in</strong> Valve<br />
Ball<br />
Valve<br />
Filter<br />
Regulator<br />
Lubricator<br />
Ball Valve<br />
Air Flow<br />
Air Dryer<br />
Air Hose<br />
To Coupler<br />
at or near Tool<br />
Air Compressor<br />
and Tank<br />
Figure 1<br />
DOC1113 04/13/06