DriveSync_Client_Gui.. - Radioworld
DriveSync_Client_Gui.. - Radioworld
DriveSync_Client_Gui.. - Radioworld

Create successful ePaper yourself
Turn your PDF publications into a flip-book with our unique Google optimized e-Paper software.
<strong>Client</strong> User <strong>Gui</strong>de<br />
For More Information Contact Us<br />
161 Roger St. Waterloo, Ontario, N2J 1B1, Canada<br />
Toll Free: 1-877-273-7483<br />
info@drivesync.net
TABLE OF CONTENTS<br />
Section 1 INTRODUCTION 1<br />
1.0 Welcome to <strong>DriveSync</strong> 1<br />
1.1 About <strong>DriveSync</strong> <strong>Client</strong> 1<br />
1.2 <strong>DriveSync</strong> <strong>Client</strong> Software License Agreement 1<br />
Section 2 INSTALLING <strong>DriveSync</strong><strong>Client</strong> 3<br />
2.0 Before You Begin 3<br />
2.1 Installation Procedure 3<br />
Section 3 FIRST LAUNCH OF <strong>DriveSync</strong><strong>Client</strong> 9<br />
Section 4 CREATING and REGISTERING YOUR ACCOUNT 11<br />
4.0 Creating and Registering Your Account 11<br />
4.1 User Settings 15<br />
Section 5 TRANSFERRING DATA and VIEWING REPORTS 17<br />
Section 6 MANAGING MULTIPLE VEHICLES 21<br />
6.0 Managing Multiple Vehicles 21<br />
6.1 Assigning a Fleet Manager 21<br />
6.2 Creating a Fleet 23<br />
6.3 Adding Another Vehicle 23<br />
Section 7 UPGRADING <strong>DriveSync</strong><strong>Client</strong> 25<br />
Section 8 HELP and TROUBLESHOOTING 27<br />
Section 9 SPECIFICATIONS 31<br />
Section 10 CONTACT US 33<br />
DOC-0002-01, v2.4 (10-2-06)<br />
<strong>DriveSync</strong> <strong>Client</strong> User <strong>Gui</strong>de
1.0<br />
1.1<br />
1.2<br />
Welcome to <strong>DriveSync</strong><br />
INTRODUCTION 1<br />
Thank you for choosing <strong>DriveSync</strong>. Whether for family, personal or commercial<br />
fleet use, <strong>DriveSync</strong> tracks the route, mileage and speeds of each vehicle trip.<br />
You’ll know exactly when, where and how your vehicle is being driven – every<br />
time it’s on the road. This information provides you with a clear picture of vehicle<br />
use and driver behavior. With that knowledge comes peace of mind; which makes<br />
handing the car keys over to your teen, friend or employee a whole lot easier.<br />
About <strong>DriveSync</strong> <strong>Client</strong><br />
This guide describes installation and use of <strong>DriveSync</strong> <strong>Client</strong> software. This<br />
application is required to create one or more client accounts for transferring<br />
vehicle usage data from your data key to the <strong>DriveSync</strong> server for processing. A<br />
quick shortcut within <strong>DriveSync</strong> <strong>Client</strong> provides access to the <strong>DriveSync</strong> Web<br />
Portal, where you can log in and view an assortment of informative driving<br />
reports, route maps and other useful summaries generated by the server.<br />
<strong>DriveSync</strong> <strong>Client</strong> Software License Agreement<br />
This legal document is an agreement between the end user, an individual or<br />
business entity, "LICENSEE", and Intelligent Mechatronic Systems Inc., regarding<br />
the software downloaded and or installed on a desktop computer which enables<br />
data upload of <strong>DriveSync</strong> data and any copies made thereof "SOFTWARE".<br />
1) OWNERSHIP OF SOFTWARE. In order to preserve and protect its rights under<br />
applicable laws, Intelligent Mechatronic Systems Inc., does not sell any rights<br />
in SOFTWARE. An express condition of this License is that Intelligent<br />
Mechatronic Systems Inc., retains title and ownership of SOFTWARE and all<br />
copies, regardless of form or media. This License is not a sale of SOFTWARE<br />
or any copy.<br />
2) GRANT OF LICENSE. Intelligent Mechatronic Systems Inc., grants to LICENSEE,<br />
a nonexclusive right to use SOFTWARE as long as LICENSEE complies with the<br />
terms and conditions of this License. Intelligent Mechatronic Systems Inc.,<br />
reserves all rights not expressly granted to LICENSEE.<br />
3) LICENSE NOT TRANSFERABLE. The rights granted under this license are<br />
granted only to LICENSEE, and may not be transferred to any third party. In no<br />
event may LICENSEE transfer, assign, rent, lease, sell or otherwise dispose of<br />
SOFTWARE temporarily or permanently.<br />
4) COPY RESTRICTIONS. SOFTWARE and any accompanying written materials are<br />
copyrighted. Unauthorized copying or distribution of SOFTWARE, including<br />
SOFTWARE which has been modified, merged, or included with other<br />
software, or of the written materials is expressly forbidden. LICENSEE will be<br />
held legally responsible for any copyright infringement. Subject to the<br />
restrictions above, LICENSEE may make one (1) copy of SOFTWARE solely for<br />
backup purposes. LICENSEE must reproduce and include the copyright notice<br />
on the backup copy.<br />
<strong>DriveSync</strong> <strong>Client</strong> User <strong>Gui</strong>de
2 INTRODUCTION<br />
5) USE RESTRICTIONS. LICENSEE may not modify, adapt, reverse engineer,<br />
decompile, disassemble, or create derivative works based on the SOFTWARE<br />
or the written materials. LICENSEE may not use SOFTWARE to access or in<br />
conjunction with any competitive automotive monitoring services or products<br />
of Intelligent Mechatronic Systems Inc. This license will only be valid during<br />
the time period in which LICENSEE is a customer of Intelligent Mechatronic<br />
Systems Inc.<br />
6) BUSINESS ENTITY. If LICENSEE is a business entity, any failure to comply with<br />
the terms and conditions of this Agreement by any individual will be a failure<br />
to comply by LICENSEE and this License will terminate immediately.<br />
7) TERMINATION. This License is effective until terminated. This License will<br />
terminate automatically without notice from Intelligent Mechatronic Systems<br />
Inc., if LICENSEE fails to comply with any provision of this License. Upon<br />
termination LICENSEE shall destroy all copies of SOFTWARE and written<br />
materials. Termination shall not entitle LICENSEE or any other party to a full<br />
or partial refund any fees paid.<br />
8) WARRANTY. Intelligent Mechatronic Systems Inc., provides this SOFTWARE AS<br />
IS without warranty of any kind. If SOFTWARE is held to infringe a legal right<br />
and its use is enjoined by a court of competent jurisdiction AND SOFTWARE is<br />
returned to Intelligent Mechatronic Systems Inc., postage prepaid with a copy<br />
of the receipt, Intelligent Mechatronic Systems Inc., entire liability and your<br />
exclusive remedy shall be, at Intelligent Mechatronic Systems Inc., option is<br />
replacement of the SOFTWARE or media. If no replacement product is<br />
available there shall be no further liability to Intelligent Mechatronic Systems<br />
Inc.<br />
THE ABOVE IS THE ONLY WARRANTY OF ANY KIND EITHER EXPRESS OR IMPLIED,<br />
STATUTORY OR OTHERWISE, THAT IS MADE BY INTELLIGENT MECHATRONIC SYSTEMS<br />
INC., ON THIS INTELLIGENT MECHATRONIC SYSTEMS PRODUCT, INCLUDING BUT NOT<br />
LIMITED TO THE IMPLIED WARRANTIES OF MERCHANTABILITY AND FITNESS FOR A<br />
PARTICULAR PURPOSE. INTELLIGENT MECHATRONIC SYSTEMS DOES NOT WARRANT,<br />
GUARANTEE OR MAKE ANY REPRESENTATIONS OTHER THAN THE FOREGOING<br />
REGARDING THE USE, OR THE RESULTS OF USE, OF THE SOFTWARE OR WRITTEN<br />
MATERIALS IN TERMS OF CORRECTNESS, ACCURACY, RELIABILITY, CURRENTNESS, OR<br />
OTHERWISE. THE ENTIRE RISK AS TO THE RESULTS AND PERFORMANCE OF THE<br />
SOFTWARE IS ASSUMED BY YOU. NO ORAL OR WRITTEN INFORMATION OR ADVICE<br />
GIVEN BY INTELLIGENT MECHATRONIC SYSTEMS, ITS DEALERS, DISTRIBUTORS, AGENTS<br />
OR EMPLOYEES SHALL CREATE A WARRANTY OR IN ANY WAY INCREASE THE SCOPE OF<br />
THIS WARRANTY AND YOU MAY NOT RELY ON ANY SUCH INFORMATION OR ADVICE.<br />
NEITHER INTELLIGENT MECHATRONIC SYSTEMS NOR ANYONE ELSE WHO HAS BEEN<br />
INVOLVED IN THE CREATION, PRODUCTION OR DELIVERY OF THIS PRODUCT SHALL BE<br />
LIABLE FOR ANY DIRECT, INDIRECT, CONSEQUENTIAL OR INCIDENTAL DAMAGES<br />
(INCLUDING DAMAGES FOR LOSS OF BUSINESS PROFITS, BUSINESS INTERRUPTIONS, LOSS<br />
OF BUSINESS INFORMATION, AND THE LIKE) ARISING OUT OF THE USE OR INABILITY TO<br />
USE SUCH PRODUCT EVEN IF INTELLIGENT MECHATRONIC SYSTEMS HAS BEEN ADVISED<br />
OF THE POSSIBILITY OF SUCH DAMAGES.<br />
<strong>DriveSync</strong> <strong>Client</strong> User <strong>Gui</strong>de
INSTALLING <strong>DriveSync</strong> <strong>Client</strong> 3<br />
2.0<br />
2.1<br />
Before You Begin<br />
Please note the following before attempting to install <strong>DriveSync</strong> <strong>Client</strong>:<br />
<br />
<br />
<br />
<br />
<br />
<strong>DriveSync</strong> <strong>Client</strong> requires Windows 2000 or Windows XP; other<br />
operating systems are not currently supported.<br />
You need Administrative rights for installation and device driver testing.<br />
Older versions of <strong>DriveSync</strong> <strong>Client</strong> (v2.3.14 or lower) previously installed<br />
under another Windows user account and restricted with the “Just Me”<br />
accessibility option will no longer function properly after your installation<br />
of <strong>DriveSync</strong> <strong>Client</strong> v2.4 or higher—such versions should be removed.<br />
For best results, log on as that user and use Windows “Add/Remove<br />
Programs” utility to delete the old <strong>DriveSync</strong> <strong>Client</strong> prior to installing<br />
<strong>DriveSync</strong> <strong>Client</strong> v2.4 or higher. NOTE: A reminder will also pop up if<br />
one of these old versions is detected on your system during installation.<br />
Remove the <strong>DriveSync</strong> data key from your computer USB port<br />
As desired during installation, use the Back button to return to the<br />
previous window, or use the Cancel button to stop installation.<br />
Installation Procedure<br />
1. Place the <strong>DriveSync</strong> CD in your computer’s CD drive and follow the prompts<br />
to start the installation process.<br />
2. A CD-drive window containing the<br />
<strong>DriveSync</strong> icon will appear;<br />
double-click the icon.<br />
3. In the Attention dialog box<br />
requesting a temporary folder,<br />
click Yes.<br />
NOTE: At this point, if another Windows user has previously installed an older<br />
version of <strong>DriveSync</strong> <strong>Client</strong> on your PC, you will see a warning message<br />
explaining that the older software will be damaged by the current installation. For<br />
best results, click “No” to stop the installation, then log in as that user and use<br />
“Add/Remove Programs” to delete the older version before resuming a new install.<br />
Otherwise, click “Yes” to continue with your installation, noting that the older<br />
version will no longer function normally.<br />
<strong>DriveSync</strong> <strong>Client</strong> User <strong>Gui</strong>de
4 INSTALLING <strong>DriveSync</strong> <strong>Client</strong><br />
4. The first <strong>DriveSync</strong> Installation<br />
window will appear (see right),<br />
briefly displaying the extraction of<br />
files, and will be followed by the<br />
Welcome window.<br />
5. In the Welcome window, click<br />
Next.<br />
6. The <strong>DriveSync</strong> Logo window will<br />
appear; click Next to continue.<br />
<strong>DriveSync</strong> <strong>Client</strong> User <strong>Gui</strong>de
INSTALLING <strong>DriveSync</strong> <strong>Client</strong> 5<br />
7. The License Agreement window<br />
will appear. Please read this<br />
license carefully—it is also<br />
reprinted in this manual for your<br />
convenience.<br />
If you accept the license terms,<br />
click “I Agree” and Next.<br />
8. In the Installation Options<br />
window, select the desired<br />
<strong>DriveSync</strong> start-up options by<br />
entering a checkmark in the<br />
corresponding checkbox. Click<br />
Next to accept and continue.<br />
9. In the Select Installation Folder<br />
window, note the default<br />
installation path shown (see<br />
example). If this location is<br />
acceptable to you, click Next to<br />
continue with the installation. To<br />
select a different location, click<br />
Browse. Or, to check your<br />
available disk space, click Disk<br />
Cost.<br />
<strong>DriveSync</strong> <strong>Client</strong> User <strong>Gui</strong>de
6 INSTALLING <strong>DriveSync</strong> <strong>Client</strong><br />
(OPTIONAL) In the Browse<br />
window, use the drop down menu<br />
to select a different installation<br />
location, if desired. Click on the<br />
location—its path will appear in<br />
the data field. Click OK.<br />
10. In the Confirm Installation<br />
window, click Next to start the<br />
installation process.<br />
The Installing <strong>DriveSync</strong><br />
window shows the progress of the<br />
installation. When the progress<br />
bar is filled, the next window will<br />
appear automatically.<br />
<strong>DriveSync</strong> <strong>Client</strong> User <strong>Gui</strong>de
INSTALLING <strong>DriveSync</strong> <strong>Client</strong> 7<br />
11. In the Installation Complete<br />
window, click Close to exit.<br />
Depending on your setting in the<br />
Installation Options window<br />
(refer back to Step 8), <strong>DriveSync</strong><br />
<strong>Client</strong> will either launch<br />
immediately, or will remain closed<br />
until you start it from the desktop.<br />
<strong>DriveSync</strong> <strong>Client</strong> User <strong>Gui</strong>de
FIRST LAUNCH OF <strong>DriveSync</strong> <strong>Client</strong> 9<br />
3.0 First Launch of <strong>DriveSync</strong> <strong>Client</strong><br />
NOTES: 1) If you selected the “Launch <strong>DriveSync</strong> <strong>Client</strong> after installation”<br />
checkbox in the Installation Options window, the initial start-up described below<br />
begins immediately after your installation. 2) By default, your <strong>DriveSync</strong> <strong>Client</strong><br />
version is automatically checked for version information, and any available<br />
upgrade offered. See Section 7, Upgrading <strong>DriveSync</strong> <strong>Client</strong> for details.<br />
Your installation of <strong>DriveSync</strong> <strong>Client</strong> has included an auto-install of USB device<br />
drivers needed for the <strong>DriveSync</strong> data key. These drivers are auto-configured<br />
(i.e., mapped to the device) by Windows XP/2000 the first time you insert the<br />
data key and start <strong>DriveSync</strong> <strong>Client</strong>. The application then confirms the proper<br />
drivers by running a brief <strong>DriveSync</strong> Device Driver Test before continuing with<br />
the first launch of <strong>DriveSync</strong> <strong>Client</strong>. See below:<br />
1. Start <strong>DriveSync</strong> <strong>Client</strong> by selecting the <strong>DriveSync</strong> icon from your desktop<br />
or by using your Start menu <strong>DriveSync</strong> program folder group.<br />
2. In the <strong>DriveSync</strong> Device<br />
Driver Test dialog box, click<br />
Run.<br />
3. If you have not already done so,<br />
insert the <strong>DriveSync</strong> data key<br />
into one of your computer’s USB<br />
ports. In the data key Reminder<br />
dialog box (above), click OK to<br />
resume the device driver test.<br />
Windows XP/2000 will display a<br />
small “Found New Hardware”<br />
bubble message in the lower<br />
right corner of your desktop as<br />
the operating system configures<br />
the data key driver.<br />
<strong>DriveSync</strong> <strong>Client</strong> User <strong>Gui</strong>de
10 FIRST LAUNCH OF <strong>DriveSync</strong> <strong>Client</strong><br />
4. When Windows XP/2000 has<br />
finished and <strong>DriveSync</strong> <strong>Client</strong><br />
has confirmed, the Success dialog<br />
box will appear. This indicates<br />
that the device driver for your data<br />
key is properly mapped and<br />
confirmed. Click OK.<br />
NOTE: In the rare case of a test failure, there may be a problem with your<br />
USB port or <strong>DriveSync</strong> <strong>Client</strong> installation. First check the USB port by<br />
swapping in a known working USB device (such as a mouse) at the intended<br />
port. If this device is OK, refer to Section 8, Help and Troubleshooting for<br />
help—do not attempt to reinstall <strong>DriveSync</strong> <strong>Client</strong> until you have read this<br />
section.<br />
5. Restart <strong>DriveSync</strong> <strong>Client</strong>. You are now ready to register a <strong>DriveSync</strong><br />
account.<br />
<strong>DriveSync</strong> <strong>Client</strong> User <strong>Gui</strong>de
CREATING AND REGISTERING YOUR ACCOUNT 11<br />
4.0 Creating and Registering Your Account<br />
Your first step in using <strong>DriveSync</strong> <strong>Client</strong> is to create and register a <strong>DriveSync</strong><br />
client account. A valid account enables the secure client/server communications<br />
you will need for typical <strong>DriveSync</strong> tasks such as the transfer and viewing of data.<br />
1. Start <strong>DriveSync</strong> <strong>Client</strong> by selecting the <strong>DriveSync</strong> icon from your desktop<br />
or by using your Start menu <strong>DriveSync</strong> program folder group.<br />
2. Insert your <strong>DriveSync</strong> data key into a USB port on your computer.<br />
3. In the <strong>DriveSync</strong> <strong>Client</strong> main<br />
window, select Action. Then select<br />
Create New Account from the<br />
drop down menu.<br />
4. In the Create New Account<br />
window (below), complete all the<br />
data fields.<br />
<strong>DriveSync</strong> <strong>Client</strong> User <strong>Gui</strong>de
12 CREATING AND REGISTERING YOUR ACCOUNT<br />
NOTES: 1) Data fields are highlighted in red until you have entered valid data. 2)<br />
User ID defaults to your email address; to change it, activate the User ID check<br />
box and enter a new name. Make a note of your User ID and Password, as you will<br />
need this login later in order to access personal reports and routes via the<br />
<strong>DriveSync</strong> Web Portal.<br />
5. When you have entered all necessary data, click Select Vehicle.<br />
6. In the Select Vehicle window, use<br />
the drop down menus to select<br />
the descriptions representing your<br />
vehicle. Enter all data; click Add<br />
Vehicle, and go directly to Step 8.<br />
Or, if your vehicle is not listed,<br />
click Select Custom Vehicle and<br />
go to Step 7.<br />
7. If necessary, use the Add Custom Vehicle<br />
window for entering your vehicle data; click<br />
OK.<br />
<strong>DriveSync</strong> <strong>Client</strong> User <strong>Gui</strong>de
CREATING AND REGISTERING YOUR ACCOUNT 13<br />
8. In the Vehicle Verification window, click Yes if<br />
all information is correct.<br />
9. In the Create New Account window, click Create Account.<br />
10. In the User Verification window, click<br />
Yes if all information is correct.<br />
11. In the warning window (below), click OK.<br />
12. In the Success window (below), click OK.<br />
<strong>DriveSync</strong> <strong>Client</strong> User <strong>Gui</strong>de
14 CREATING AND REGISTERING YOUR ACCOUNT<br />
13. A return email notification will be sent to the email address you supplied.<br />
This indicates that your <strong>DriveSync</strong> <strong>Client</strong> account has been successfully<br />
registered. Activate the account by clicking on the URL provided in the email.<br />
Note: you cannot log into the <strong>DriveSync</strong> Web Portal until you activate<br />
your account.<br />
The following confirmation should appear:<br />
You now have a valid <strong>DriveSync</strong> <strong>Client</strong> account!<br />
<strong>DriveSync</strong> <strong>Client</strong> User <strong>Gui</strong>de
4.1 User Settings<br />
CREATING AND REGISTERING YOUR ACCOUNT 15<br />
Each launch of <strong>DriveSync</strong> <strong>Client</strong> remembers the user login—user settings—used<br />
during the previous session. To transfer or view data from a different <strong>DriveSync</strong><br />
<strong>Client</strong> account, or to carry out other tasks for that user, log on as the user defined<br />
for that account:<br />
1. Insert the data key belonging to the user account you wish to access.<br />
2. In the Options drop-down menu,<br />
select User Settings.<br />
3. In the User Settings dialog box,<br />
enter the User Name and<br />
Password defined for the account<br />
you wish to access.<br />
4. Transfer data or view reports for this user as desired.<br />
<strong>DriveSync</strong> <strong>Client</strong> User <strong>Gui</strong>de
TRANSFERRING DATA AND VIEWING REPORTS 17<br />
5.0 Transferring Data and Viewing Reports<br />
TRANSFERRING DATA<br />
As you use <strong>DriveSync</strong> , you will periodically transfer vehicle usage data from<br />
your data key to the <strong>DriveSync</strong> server. This upload process—also known as<br />
synchronization—will enable the server to process the data and generate your<br />
vehicle usage reports and route maps. Results are based on your user ID and the<br />
vehicle information entered when the account was registered.<br />
For best results, try to maintain a fairly regular data synchronization schedule to<br />
suit your driving habits. Some users may prefer a weekly schedule; for others,<br />
once a month is adequate. As a general rule of thumb, the more quickly you<br />
accumulate data on your data key, the more frequently you may want to<br />
synchronize. Sometimes you may wish to collect data for a specific trip or during<br />
a certain time interval, then transfer it immediately for processing and reports.<br />
After driving and recording some data, follow the steps below to transfer (sync)<br />
the data to the <strong>DriveSync</strong> server.<br />
1. Insert the data key into your computer USB port.<br />
2. Start <strong>DriveSync</strong> <strong>Client</strong> by selecting the <strong>DriveSync</strong> icon from your desktop<br />
or by using your Start menu <strong>DriveSync</strong> program folder group.<br />
3. In the <strong>DriveSync</strong> <strong>Client</strong> main<br />
window, click the Sync button (or<br />
select this option from the<br />
Actions menu). You’ll see a<br />
reminder that the data key must<br />
remain in your computer while<br />
uploading; click OK.<br />
IMPORTANT<br />
To prevent possible damage to your data<br />
key, do not remove the key or power down<br />
during the Sync process.<br />
<strong>DriveSync</strong> <strong>Client</strong> User <strong>Gui</strong>de
18 TRANSFERRING DATA AND VIEWING REPORTS<br />
4. The Synchronizing Data window will be displayed as your computer transfers<br />
data from your data key to the <strong>DriveSync</strong> server. Progress is shown in the<br />
various status bars, some of which may not fill completely. Note that a<br />
successful sync clears all vehicle usage data from the key.<br />
5. When OK button is enabled and the final success message appears (see<br />
above, right), click OK to complete the upload and return to the main<br />
<strong>DriveSync</strong> window. At this point, you have successfully transferred the<br />
vehicle usage data from your data key to the <strong>DriveSync</strong> server. You can view<br />
data as route maps and other reports at any time.<br />
6. You may now remove your empty data key from the computer USB port. When<br />
you are next in your vehicle, insert the data key into the <strong>DriveSync</strong> cradle to<br />
resume tracking.<br />
<strong>DriveSync</strong> <strong>Client</strong> User <strong>Gui</strong>de
TRANSFERRING DATA AND VIEWING REPORTS 19<br />
VIEWING REPORTS<br />
After uploading your data to the <strong>DriveSync</strong> server, follow these steps to view the<br />
resulting reports and route maps:<br />
1. In <strong>DriveSync</strong> main window, click<br />
the View Reports button (or select<br />
View Online Account from the<br />
Actions menu). This acts as a<br />
shortcut to the URL for the<br />
<strong>DriveSync</strong> Web Portal through<br />
which you can view your reports.<br />
2. A web browser window will open<br />
and take you directly to the <strong>DriveSync</strong> Web Portal.<br />
Alternatively, you can enter the following URL in your web browser without<br />
opening <strong>DriveSync</strong> <strong>Client</strong>:<br />
portal.drivesync.net<br />
NOTES: 1) It takes a few minutes for the server to generate the reports and route<br />
maps. During this processing time, the most recently synchronized data will not<br />
be displayed. 2) For further information regarding the use of the <strong>DriveSync</strong> Web<br />
Portal, refer to the online documentation available at the portal.<br />
<strong>DriveSync</strong> <strong>Client</strong> User <strong>Gui</strong>de
MANAGING MULTIPLE VEHICLES 21<br />
6.0 Managing Multiple Vehicles<br />
Every <strong>DriveSync</strong> unit requires a minimum of one valid user account for<br />
transferring and viewing vehicle usage data. Establish this account as described in<br />
Section 4, Creating and Registering Your Account. Once registered, this unique<br />
login enables you to securely transfer and view your data.<br />
In most cases, a single account login is all that you will ever need. However, users<br />
or administrators in organizations who must track multiple vehicles, each with its<br />
own <strong>DriveSync</strong>, can do so either as a fleet manager or as a multi-vehicle user.<br />
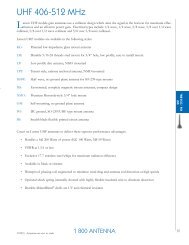
As shown below, both types of managers can transfer data from multiple data<br />
keys and access the resulting reports and map routes using their own account—<br />
however, each member of a fleet also retains access to their own account,<br />
whereas subordinates under a multi-vehicle user do not even have accounts.<br />
Keep in mind that you can set up either configuration but not both. Consider your<br />
needs carefully—you cannot switch between the two configurations.<br />
IMPORTANT<br />
Choose the multiple vehicle configuration which best suits your needs.<br />
Fleet managers (or members) cannot also be a multi-vehicle user, and vice versa.<br />
ACCT<br />
1<br />
#1<br />
#1<br />
data<br />
data<br />
#2<br />
#2<br />
data<br />
ACCT 2<br />
#2<br />
#2<br />
data<br />
ACCT 3<br />
FLEET MANAGER<br />
data<br />
data<br />
<strong>DriveSync</strong><br />
Web Portal<br />
A<br />
#3<br />
#3<br />
ACCT 1<br />
MULTI-VEHICLE USER<br />
data<br />
#1<br />
#1<br />
data<br />
<strong>DriveSync</strong><br />
Web Portal<br />
B<br />
Figure 6.0. Managing Multiple Vehicles as a<br />
Fleet Manager (left) or a Multi-Vehicle User (right)<br />
A NOTE ABOUT PRIVACY: Typically the persons who drive the vehicle have sole rights to the<br />
<strong>DriveSync</strong> vehicle usage data collected in that vehicle. You may have to obtain permission<br />
from all personnel driving the vehicle in order to view their <strong>DriveSync</strong> data. Please consult<br />
all applicable privacy laws in your region to ensure compliance.<br />
6.1 Assigning a Fleet Manager<br />
If desired, use the Set Fleet Manager control to authorize an additional user to<br />
synchronize your data key and view your vehicle data reports. This enables one<br />
user—the fleet manager—to access data from multiple vehicles and/or user<br />
accounts, and can help streamline and centralize the logistics of managing<br />
numerous sets of data. Each member of a fleet can still access their own account.<br />
<strong>DriveSync</strong> <strong>Client</strong> User <strong>Gui</strong>de
22 MANAGING MULTIPLE VEHICLES<br />
IMPORTANT: 1) Your authorization is permanent—once assigned, fleet manager<br />
permissions remain in place until the fleet manager removes your vehicle from<br />
their account. That is, you can only assign permissions to a fleet manager, not<br />
revoke them. 2) You cannot grant fleet manager status to yourself. 3) Due to<br />
privacy and security issues, fleet managers and fleet members cannot use the<br />
“Add Another Vehicle” function or change to this configuration. Please contact<br />
Technical Support for details.<br />
To assign a fleet manager to your account, follow these steps:<br />
1. Insert your data key into the computer USB port and start <strong>DriveSync</strong> <strong>Client</strong>.<br />
2. In the <strong>DriveSync</strong> main window,<br />
select Set Fleet Manager from the<br />
Action menu.<br />
3. In the Select Fleet Manager dialog<br />
box, enter the User ID of the<br />
person you wish to permanently<br />
assign as your fleet manager; click<br />
OK.<br />
4. In the Please Verify Fleet Manager window (below), click Yes.<br />
You have successfully assigned a fleet manager for your account. A notification<br />
email will be sent to the new fleet manager, indicating that your account has been<br />
added to their fleet.<br />
<strong>DriveSync</strong> <strong>Client</strong> User <strong>Gui</strong>de
MANAGING MULTIPLE VEHICLES 23<br />
6.2 Creating a Fleet<br />
In some cases, you may need to grant<br />
fleet manager privileges to yourself in<br />
order to create a fleet more efficiently.<br />
Since such permissions must be<br />
granted by each individual user rather<br />
than by the fleet manager, you can<br />
first create and register these separate<br />
user accounts using Create New<br />
Account (see right), then log in to each<br />
account and enter your own user ID in<br />
the Set Fleet Manager option. You can<br />
then access data from each user<br />
account without each user first having<br />
to grant this right to you themselves.<br />
6.3 Adding Another Vehicle<br />
If you have multiple <strong>DriveSync</strong> units installed in multiple vehicles, you may want<br />
to manage them exclusively from a single account by using the Add Another<br />
Vehicle function. Unlike Fleet Manager, data from each vehicle can then be<br />
transferred and viewed from your multiple-vehicle account only—there is no<br />
unique user account for each vehicle.<br />
For each vehicle, complete a new Add Another Vehicle form as described below:<br />
1. Insert the new data key into the computer USB port and start <strong>DriveSync</strong><br />
<strong>Client</strong>. Make sure this data key is for the new <strong>DriveSync</strong> unit and vehicle you<br />
wish to add.<br />
2. In the <strong>DriveSync</strong> main window,<br />
select Add Another Vehicle from<br />
the Action menu.<br />
<strong>DriveSync</strong> <strong>Client</strong> User <strong>Gui</strong>de
24 MANAGING MULTIPLE VEHICLES<br />
3.<br />
In the Select Vehicle dialog box,<br />
enter the description of the new<br />
vehicle; click the Add Vehicle<br />
button to submit.<br />
Repeat for each vehicle / <strong>DriveSync</strong><br />
data key, taking care to keep each<br />
data key correctly matched to its own<br />
<strong>DriveSync</strong>.<br />
NOTES: 1) Once you use the “Add Another Vehicle” function, you are a multi-<br />
user—you cannot be a fleet manager or assign a fleet manager. Please<br />
vehicle<br />
contact Technical Support for details. 2) You cannot remove a vehicle after you<br />
have added it.<br />
<strong>DriveSync</strong> <strong>Client</strong> User <strong>Gui</strong>de
7.0 Upgrading <strong>DriveSync</strong> <strong>Client</strong><br />
Each launch of <strong>DriveSync</strong> <strong>Client</strong><br />
includes an auto-upgrade function that<br />
quickly checks your version and<br />
determines whether or not a newer<br />
version is available for downloading<br />
from the <strong>DriveSync</strong> website. This<br />
service helps ensure optimized<br />
performance while eliminating the<br />
inconvenience of searching for<br />
upgrades on your own, and works as<br />
follows:<br />
<br />
<br />
If your <strong>DriveSync</strong> <strong>Client</strong> is<br />
up-to-date, the application will<br />
start and run normally.<br />
UPGRADING <strong>DriveSync</strong> <strong>Client</strong> 25<br />
If a new and mandatory<br />
version of <strong>DriveSync</strong> <strong>Client</strong> is available at the website, your version<br />
requires upgrading before use (see message below). This function cannot<br />
be disabled.<br />
<br />
<br />
If a new but optional<br />
version of <strong>DriveSync</strong><br />
<strong>Client</strong> is available at the<br />
website, you can (by<br />
default) choose to<br />
immediately accept the<br />
upgrade or not. If<br />
desired, you can also<br />
permanently turn off<br />
this query so that future start-ups will not be interrupted by offers of<br />
optional upgrades.<br />
If the website connection cannot be made at all, <strong>DriveSync</strong> <strong>Client</strong> will<br />
not start.<br />
<strong>DriveSync</strong> <strong>Client</strong> User <strong>Gui</strong>de
26 UPGRADING <strong>DriveSync</strong> <strong>Client</strong><br />
You can also check for updates at any<br />
time by selecting Check for Updates in<br />
the Help menu.<br />
<strong>DriveSync</strong> <strong>Client</strong> User <strong>Gui</strong>de
8.0 Help and Troubleshooting<br />
Several features in the Help drop-down<br />
menu help ensure trouble-free<br />
installation and use of <strong>DriveSync</strong><br />
<strong>Client</strong>:<br />
<br />
<br />
<br />
<br />
Email Support: opens a new<br />
Microsoft Outlook email<br />
message addressed to the<br />
<strong>DriveSync</strong> Customer<br />
Technical Support team. Feel<br />
free to email your question or<br />
describe an issue you have<br />
encountered during<br />
installation or use; a technical<br />
specialist will respond as<br />
promptly as possible.<br />
<strong>DriveSync</strong> Help: opens<br />
<strong>DriveSync</strong> online help for quick reference.<br />
HELP AND TROUBLESHOOTING 27<br />
Check for Updates: checks your <strong>DriveSync</strong> <strong>Client</strong> installation and<br />
determines whether or not a newer version is available for downloading<br />
from the <strong>DriveSync</strong> website. See also Upgrading <strong>DriveSync</strong> <strong>Client</strong>.<br />
About <strong>DriveSync</strong>: identifies the version of <strong>DriveSync</strong> you are currently<br />
running, and provides a link to other general information.<br />
TROUBLESHOOTING YOUR INSTALLATION<br />
NOTE: Illustrations show typical WindowsXP dialog boxes and windows.<br />
Equivalent views in Windows2000 may differ slightly.<br />
IF THE DEVICE DRIVER TEST FAILS: If your <strong>DriveSync</strong> Device Driver Test fails<br />
upon start-up of <strong>DriveSync</strong> <strong>Client</strong>, and you have confirmed that the USB port you<br />
are using is indeed functional with other USB devices, there may be an issue with<br />
the driver installation. Follow the instructions below to make sure that the device<br />
drivers are installed and that Windows is detecting the device:<br />
1. Plug the <strong>DriveSync</strong> data key into a working USB port on your computer.<br />
2. From the Windows Start menu, open the Control Panel.<br />
3. In the Control Panel, select System.<br />
4. In the System Properties dialog box, select the Hardware tab.<br />
<strong>DriveSync</strong> <strong>Client</strong> User <strong>Gui</strong>de
28 HELP AND TROUBLESHOOTING<br />
5. In the Hardware panel, click the Device<br />
Manager button (see right).<br />
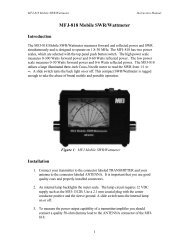
6. In the Device Manager window, find an entry called ‘Jungo’. Under the ‘Jungo’<br />
listing, locate either a ‘<strong>DriveSync</strong> Data Key’ or an ‘AT89C5130/AT89C5131’<br />
device. See Figures 8.1 (below) and 8.2 (next page):<br />
Figure 8.1. Device Manager window with<br />
the <strong>DriveSync</strong> Data Key device present.<br />
<strong>DriveSync</strong> <strong>Client</strong> User <strong>Gui</strong>de
HELP AND TROUBLESHOOTING 29<br />
Figure 8.2. Device Manager window with<br />
the AT89C5130/AT89C5131 device present.<br />
7. In the Device Manager window, locate a ‘WinDriver’ entry under the ‘System<br />
devices’ node. See Figure 8.3.<br />
Figure 8.3. Device Manager with the WinDriver<br />
device present under the System devices node.<br />
<strong>DriveSync</strong> <strong>Client</strong> User <strong>Gui</strong>de
30 HELP AND TROUBLESHOOTING<br />
If you have found all the devices shown so far AND your USB port is functioning<br />
properly when a known working USB device is swapped in:<br />
<br />
<br />
<br />
There may be an issue with the driver installation.<br />
Do not attempt to reinstall <strong>DriveSync</strong> <strong>Client</strong> at this point—your system<br />
must first undergo a careful “clean-up” so that problematic files<br />
interfering with Windows and/or the <strong>DriveSync</strong> <strong>Client</strong> device driver are<br />
properly deleted.<br />
Please contact <strong>DriveSync</strong> Customer Technical Support, and a qualified<br />
specialist will guide you through the step-by-step clean-up of your<br />
system.<br />
If you have NOT found the devices shown so far:<br />
<br />
The necessary USB device drivers are likely not on your system.<br />
1. Use Windows “Add/Remove Programs” to delete your current<br />
<strong>DriveSync</strong> <strong>Client</strong>.<br />
2. Reinstall <strong>DriveSync</strong> <strong>Client</strong>.<br />
3. If your <strong>DriveSync</strong> Device Driver Test still fails, contact <strong>DriveSync</strong><br />
Customer Technical Support for help.<br />
<strong>DriveSync</strong> <strong>Client</strong> User <strong>Gui</strong>de
9.0 Specifications<br />
SPECIFICATIONS 31<br />
COMPONENTS<br />
<strong>DriveSync</strong> Unit Dimensions (mm) 110 x 89 x 39 (L x W x H)<br />
<strong>DriveSync</strong> Unit Weight<br />
159 g<br />
<strong>DriveSync</strong> Unit Security<br />
Secure private-key encryption (RSA)<br />
Operating Voltage Range<br />
8 to 28V (requires 12V battery vehicle supply)<br />
Max. Current Consumption @ 13.5V 65 mA<br />
Stand-by Current Consumption @ 13.5V 24 mA<br />
Internal Backup Battery Life<br />
Estimated 10 years<br />
Operating Time with No Power Source 100 days<br />
Operating Temperature Range. -40 to 85ºC<br />
Storage Temperature Range -40 to 85ºC<br />
Data Key Dimensions (mm) 85.8 x 23.9 x 13.8 (L x W x H)<br />
GPS Antenna Dimensions (mm) 50 x 40 x 14 (L x W x H)<br />
GPS Antenna Weight<br />
115 g<br />
OBD-II Cable Length<br />
2 m (6 ft.)<br />
Hard-wired Cable (optional)<br />
3 m (10 ft.)<br />
SYSTEM REQUIREMENTS<br />
Operating System<br />
Windows 2000 (SP4) or Windows XP (SP2)<br />
Hard Disk Space<br />
15 MB<br />
Hardware Requirements<br />
Computer USB Port<br />
Internet Access Requirements<br />
Internet Explorer 6.0 or greater; Note firewalls<br />
must allow transfer via port 443<br />
PERFORMANCE AND GPS SENSING<br />
Memory Capacity with data key inserted 16 MB; approx. 25,000 km of driving data<br />
Memory Capacity without data key<br />
2 MB; approx. 3,000 km of driving data<br />
GPS Signal Acquisition Time (90%) Warm Start (vehicle ignition off): < 45 s<br />
Cold Start (recovery from power interruption):<br />
< 180 s<br />
GPS Accuracy < 9 meters / 30 ft. (90%)<br />
GPS Data Collection Time<br />
Once per second<br />
GPS Data Collection Range<br />
20 m x 20 m zones (65 ft x 65 ft); street level<br />
resolution<br />
Geographical Support<br />
• All of US, Canada and Mexico<br />
• Western Europe, including: Austria,<br />
Belgium, Denmark, Finland, France,<br />
Germany, Ireland, Iceland, Italy,<br />
Luxemburg, Malta, Netherlands, Norway,<br />
Sweden, Switzerland, Spain, United<br />
Kingdom<br />
<strong>DriveSync</strong> <strong>Client</strong> User <strong>Gui</strong>de
CONTACT US 33<br />
10.0 Contact Us<br />
Do you have questions or concerns? Please contact us by phone or email:<br />
TECHNICAL SUPPORT<br />
Phone: 1-866-534-7243<br />
E-mail: support@drivesync.net<br />
ALL OTHER INQUIRIES<br />
Phone: 1-877-273-7483<br />
E-mail: info@drivesync.net<br />
You can also reach us through the <strong>DriveSync</strong> Web Portal.<br />
<strong>DriveSync</strong> <strong>Client</strong> User <strong>Gui</strong>de