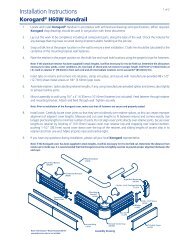
Installation Instructions - Korogard
Installation Instructions - Korogard
Installation Instructions - Korogard

You also want an ePaper? Increase the reach of your titles
YUMPU automatically turns print PDFs into web optimized ePapers that Google loves.
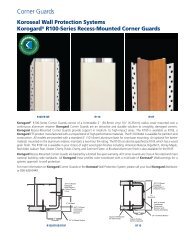
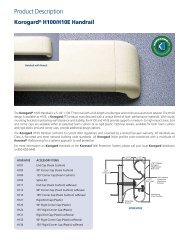
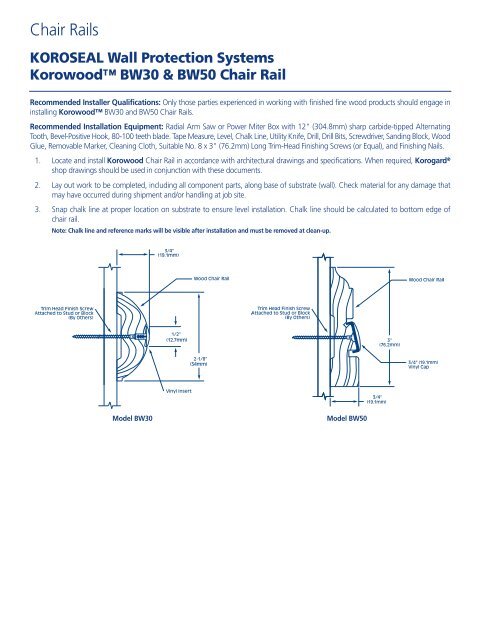
Chair Rails<br />
KOROSEAL Wall Protection Systems<br />
Korowood BW30 & BW50 Chair Rail<br />
Recommended Installer Qualifications: Only those parties experienced in working with finished fine wood products should engage in<br />
installing Korowood BW30 and BW50 Chair Rails.<br />
Recommended <strong>Installation</strong> Equipment: Radial Arm Saw or Power Miter Box with 12" (304.8mm) sharp carbide-tipped Alternating<br />
Tooth, Bevel-Positive Hook, 80-100 teeth blade. Tape Measure, Level, Chalk Line, Utility Knife, Drill, Drill Bits, Screwdriver, Sanding Block, Wood<br />
Glue, Removable Marker, Cleaning Cloth, Suitable No. 8 x 3" (76.2mm) Long Trim-Head Finishing Screws (or Equal), and Finishing Nails.<br />
1. Locate and install Korowood Chair Rail in accordance with architectural drawings and specifications. When required, <strong>Korogard</strong> ®<br />
shop drawings should be used in conjunction with these documents.<br />
2. Lay out work to be completed, including all component parts, along base of substrate (wall). Check material for any damage that<br />
may have occurred during shipment and/or handling at job site.<br />
3. Snap chalk line at proper location on substrate to ensure level installation. Chalk line should be calculated to bottom edge of<br />
chair rail.<br />
Note: Chalk line and reference marks will be visible after installation and must be removed at clean-up.<br />
(19.1mm)<br />
(12.7mm)<br />
(54mm)<br />
(19.1mm)<br />
(19.1mm)<br />
Model BW30<br />
Model BW50
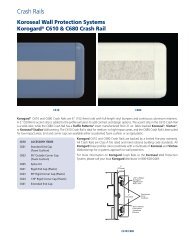
Chair Rails<br />
KOROSEAL Wall Protection Systems<br />
Korowood BW30 & BW50 Chair Rail<br />
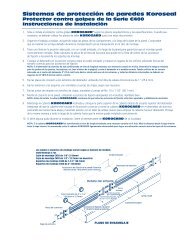
4. Determine cut length of rail by locating ends on substrate, measure distance, and allow 3/4" (19.05mm) at end cap, 0" (0mm)<br />
at substrate inside corners, and 0" (0mm) at substrate outside corners. Mark Chair Rail at back of wood and miter-cut rail in<br />
appropriate direction to appropriate length. Miter ends at outside corners, inside corners, and splices to 45° (see details). Use<br />
care to ensure accurate and clean cuts. (Wrap finished rail with masking tape at location of cut and cut so that saw blade<br />
rotates into face of rail as it cuts).<br />
5. Drill and countersink appropriately-sized holes through Chair Rail along and beneath vinyl cap and insert location at<br />
3" (76.2mm ) to 6" (152.4mm) in from each end of rail and intermediate locations not exceeding 32" (812.8mm) O.C.<br />
6. Trial-fit End Caps/Adjoining Piece to ensure proper fit. If satisfactory, ensure that surfaces to be glued are clean and unfinished<br />
(sand if required) and glue, using PVA wood glue or equal (supplied by installer), adjoining parts together, carefully aligning parts.<br />
Allow glue to set and wipe any excess from joint with water-moistened cloth. Use two finishing nails, one near the top and<br />
one near the bottom, through the cap into the rail end and finish with wood filler.<br />
7. Mount assembly to substrate using proper fasteners (supplied by installer). Tighten securely.<br />
8. Vinyl cap and insert is to be mitered at corners in the same manner as wood rail. Determine cut length of vinyl insert by<br />
measuring face of rail. Mark the measurements on the vinyl, using a soft pencil or other removable marker, at point where back<br />
of vinyl contacts face Chair Rail. Cut ends of vinyl to 45° in the appropriate direction, using a scrap piece of chair rail as<br />
holding fixture if necessary. Cut vinyl slightly longer than rail to ensure tight joints<br />
9. Install <strong>Korogard</strong> ® vinyl cap/insert starting at one end and progressing to the other.<br />
Note: Prior to installation of <strong>Korogard</strong> vinyl cap / insert strip, make sure all fasteners are secured and properly seated.<br />
10. Clean Chair Rail using water-moistened cloth. If necessary, use the Korowood Touch-Up Kit provided to repair stained wood<br />
where minor damages or blemishes may have occurred during handling and installation. Touch-Up Kits are not provided for<br />
“clear varnish” finished Chair Rails. Use Minwax ® brand “Satin Sheen Polyurethane” or equal to overcoat repairs to all finishes.<br />
11. If you have any questions during installation, please contact your local <strong>Korogard</strong> representative.<br />
800-628-0449 • www.korogard.com • Division 10 26 00<br />
<strong>Korogard</strong> ® and Korowood are registered trademarks of RJF International Corporation.<br />
Minwax ® is a registered trademark of The Sherwin-Williams Company.
Chair Rails<br />
KOROSEAL Wall Protection Systems<br />
Korowood BW30 & BW50 Chair Rail<br />
(–88.9mm)<br />
BW30 Typical Termination Application<br />
Terminate 1" (25.4mm) Prior to Corner<br />
(–44.5mm)<br />
(–25.4mm)<br />
BW30 Plan View<br />
(BW35)<br />
(D430)<br />
(54mm)<br />
(A285)<br />
BW30 Assembly Drawing
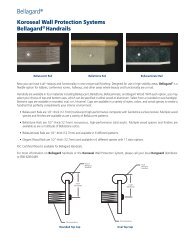
Chair Rails<br />
KOROSEAL Wall Protection Systems<br />
Korowood BW30 & BW50 Chair Rail<br />
(–88.9mm)<br />
BW50 Typical Termination Application<br />
Terminate 1" (25.4mm) Prior To Corner<br />
(–44.5mm)<br />
(–25.4mm)<br />
BW50 Plan View<br />
(BW55)<br />
(D450)<br />
(BW56)<br />
BW50 Assembly Drawing<br />
2588IBW3I11<br />
09-12<br />
800-628-0449 • www.korogard.com • Division 10 26 00<br />
<strong>Korogard</strong> ® and Korowood are registered trademarks of RJF International Corporation.<br />
Minwax ® is a registered trademark of The Sherwin-Williams Company.