UX2 Footswitch Control Guide - Line 6
UX2 Footswitch Control Guide - Line 6
UX2 Footswitch Control Guide - Line 6

Create successful ePaper yourself
Turn your PDF publications into a flip-book with our unique Google optimized e-Paper software.
TONEPORT <strong>UX2</strong> FOOTSWITCH CONTROL<br />
This document is designed to provide general information for using footswitch pedals with<br />
TonePort <strong>UX2</strong>. The two <strong>Footswitch</strong> jacks on the rear panel of TonePort <strong>UX2</strong> provide remote<br />
control of functions within the included Ableton Live Lite 5 and other audio software, or for<br />
remotely switching several functions within the GearBox software. To follow are instructions for<br />
configuring these footswitch setups.<br />
Note: This document covers both Windows and Mac recording environments.<br />
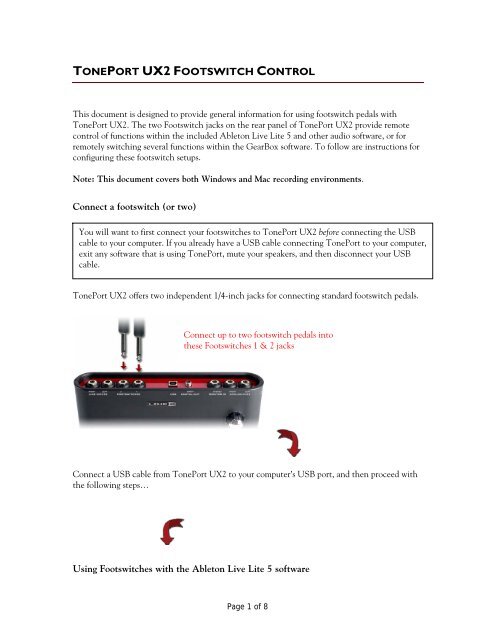
Connect a footswitch (or two)<br />
You will want to first connect your footswitches to TonePort <strong>UX2</strong> before connecting the USB<br />
cable to your computer. If you already have a USB cable connecting TonePort to your computer,<br />
exit any software that is using TonePort, mute your speakers, and then disconnect your USB<br />
cable.<br />
TonePort <strong>UX2</strong> offers two independent 1/4-inch jacks for connecting standard footswitch pedals.<br />
Connect up to two footswitch pedals into<br />
these <strong>Footswitch</strong>es 1 & 2 jacks<br />
Connect a USB cable from TonePort <strong>UX2</strong> to your computer’s USB port, and then proceed with<br />
the following steps…<br />
Using <strong>Footswitch</strong>es with the Ableton Live Lite 5 software<br />
Page 1 of 8
Both the included Ableton Live Lite 5 software and GearBox are configured by default to work<br />
together – all that is required is to choose your TonePort <strong>UX2</strong> as an “active” controller device<br />
within the Ableton Live software. <strong>Footswitch</strong> 1 is configured to toggle Live’s Play/Stop, and<br />
<strong>Footswitch</strong> 2 to toggle Record On/Off. Therefore, using two footswitch pedals connected to your<br />
TonePort <strong>UX2</strong> this way allows you to remotely control Live’s transport for playback, recording<br />
and even punch-in recording! The following steps show you how to make this device selection<br />
within Ableton Live…<br />
Select TonePort <strong>UX2</strong> as an active remote control device in Ableton Live Lite 5<br />
With TonePort <strong>UX2</strong> connected to your computer’s USB port and the GearBox software<br />
running, launch Ableton Live Lite 5 and go Options > Preferences (Windows) or Live<br />
> Preferences (Mac).<br />
Go to the MIDI tab<br />
Click both Track and Remote<br />
buttons On to make your<br />
TonePort <strong>UX2</strong> an active MIDI<br />
device/controller<br />
Once the above settings are made you should immediately be able to trigger Ableton<br />
Live’s transport functions. If you have changed the default settings in the GearBox<br />
Preferences, the following steps instruct you how to re-configure them for footswitch<br />
control of Ableton Live…<br />
Go to the GearBox Edit > Preferences (Windows), or GearBox > Preferences (Mac)…<br />
Page 2 of 8
Select the MIDI/<strong>Control</strong> tab<br />
Configure all settings as shown<br />
here to map to Ableton Live’s<br />
default settings for Play/Stop<br />
and Record Enable/Disable<br />
Be sure to click OK for the<br />
settings to take effect (or<br />
Apply then OK if the settings<br />
were changed)<br />
Using this special configuration with Toggle 1 and Toggle 2 settings for <strong>Footswitch</strong> 1 will<br />
alternately trigger Ableton Live’s transport “Play” and “Stop” buttons. <strong>Footswitch</strong> 2 will toggle<br />
the transport Record button on/off. This footswitch setup offers a few different possibilities with<br />
Ableton Live. If you arm a track for recording, you can effectively punch-in and punch-out “onthe-fly”<br />
by triggering Play (<strong>Footswitch</strong> 1) and, when you reach the desired punch-in location,<br />
press <strong>Footswitch</strong> 2 to trigger Record. This will actively start recording into the armed track.<br />
Momentary switch mode - Alternatively, you can set the Switch Mode to Momentary rather<br />
than Toggle. Set <strong>Footswitch</strong> 2’s Switch Mode to “Momentary” to change the behavior to where<br />
the Record button is triggered only while the pedal is held in the down position. This allows you<br />
to do a very specific punch-in, where you press and hold the button only for the duration that<br />
you want to punch record. This can be handy to punch yourself in to correct a few notes of a solo<br />
or vocal performance, for example.<br />
Setting up <strong>Footswitch</strong> <strong>Control</strong> manually in Ableton Live Lite 5<br />
This section will show you how to set up the Start/Stop and Punch In/Out functions for the<br />
TonePort <strong>UX2</strong> footswitches manually, in case Ableton Live 5 doesn’t recognize them. First, set<br />
up your TonePort as the active MIDI device/controller as described above, then set/verify the<br />
MIDI settings shown above in GearBox’s MIDI/<strong>Control</strong> window.<br />
Page 3 of 8
In Ableton Live Lite 5 <strong>Line</strong> 6 Edition, follow these steps…<br />
In the upper right<br />
corner of the Main<br />
Window, click on the<br />
MIDI button. It<br />
should light up blue,<br />
indicating you have<br />
entered Learn Mode<br />
Then go over to the<br />
Transport and click<br />
on the Play button<br />
Press <strong>Footswitch</strong> 1.<br />
The numbers 1/2<br />
appear inside the Play<br />
Button (MIDI CC 2)<br />
Click on the Stop<br />
Button then press<br />
<strong>Footswitch</strong> 1 again.<br />
The numbers 1/3<br />
appear (MIDI CC 3)<br />
Now click on the<br />
Record Button, then<br />
press <strong>Footswitch</strong> 2.<br />
The numbers 1/6<br />
appear, meaning MIDI<br />
CC 6 now toggles<br />
recording.<br />
Click on the MIDI button when done,<br />
to exit MIDI Learn Mode<br />
Page 4 of 8
<strong>Control</strong>ling other audio software with TonePort footswitches<br />
Since TonePort <strong>UX2</strong> allows you to configure these footswitches to send a variety of different<br />
MIDI message formats (MIDI CC, MMC, Mackie/Logic <strong>Control</strong>), it is also possible to remotely<br />
control functions within other audio software. Just as in Ableton Live Lite 5, TonePort appears<br />
as a selectable MIDI input device to other software as well. To follow are the types of MIDI<br />
messages you can send from TonePort’s footswitches and how they are selected in the Switch 1<br />
and 2 Function drop-down menus. Check the documentation for your audio software for its<br />
MIDI remote control capabilities and instructions for assigning functions.<br />
MIDI CC (On/Off) – Choosing this function allows selection of any CC from 0-127,<br />
listed by number and the standard command association (e.g. 007 Volume). On switch<br />
down a value of 127 will be sent for the given CC. On switch up a value of 0 will be sent<br />
for the selected CC. (Also see the <strong>Footswitch</strong> 2 example in the previous Ableton Live<br />
section as an example of this).<br />
Select MIDI CC (On/Off) as the<br />
Switch Function<br />
Choo se the des ired CC<br />
numb er in the Action men u<br />
MIDI CC (Advanced) – This function allows a pair of CC’s and values to be assigned so<br />
that the footswitch can trigger two different functions for each successive push of the<br />
footswitch. (Also see the <strong>Footswitch</strong> 1 example in the previous Ableton Live section for<br />
an example).<br />
Select MIDI CC (Advanced) as the<br />
Switch Function<br />
Choose the desired CC numbers and<br />
values for Toggle 1 & 2<br />
MIDI Machine <strong>Control</strong> – This function offers a set of MMC commands listed by name.<br />
The command is sent on push down of the pedal, and no command is sent on pedal up.<br />
When the Fast Forward or Rewind commands are selected, the Switch Mode menu<br />
becomes available and Momentary is a selectable option. This offers the ability to either<br />
toggle these functions on/off, or to have them perform when the pedal is held down only.<br />
Note that for some audio software, such as Apple Logic and Steinberg Cubase SX, MMC<br />
is the easiest option to configure and offers simple control of the transport functions.<br />
Page 5 of 8
Select MIDI CC Machine <strong>Control</strong><br />
as the Switch Function<br />
Choose the desired command as the<br />
Action<br />
Some MMC commands allow<br />
changing the Switch Mode<br />
Mackie/Logic <strong>Control</strong> – This function offers a limited set of commands that can be sent<br />
conforming to the Mackie <strong>Control</strong> or Logic <strong>Control</strong> format. If the audio software<br />
supports these popular controller devices, then it should also support these commands<br />
from TonePort.<br />
Select Mackie/Logic <strong>Control</strong> as the<br />
Switch Function<br />
Choose the desired command as the<br />
Action<br />
Configure <strong>Footswitch</strong>es to control GearBox functions<br />
Rather than have your footswitches control Ableton Live or other recording software, you can<br />
choose to have one or both footswitches toggle on/off any of the currently configured GearBox<br />
effects, increment through Presets, Mute outputs, switch to the tuner, and more! Go to the<br />
GearBox Edit > Preferences (Windows), or GearBox > Preferences (Mac)…<br />
Page 6 of 8
Select the<br />
MIDI/<strong>Control</strong> tab<br />
Choose GearBox<br />
<strong>Control</strong> as the Switch 1<br />
Function<br />
Select the GearBox effect or function<br />
that you want <strong>Footswitch</strong> 1 to toggle<br />
on and off from the Action menu<br />
Configure the <strong>Footswitch</strong> 2 Assignment – optionally, you can connect a 2 nd footswitch<br />
to control another GearBox function…<br />
Select GearBox <strong>Control</strong> as the Switch<br />
2 Function and then choose the<br />
preferred Action for it to toggle on and<br />
off<br />
You will need to click Apply then OK<br />
for these changes to take effect<br />
Page 7 of 8
Once the above settings are made, you should immediately see the Action you assigned to each<br />
footswitch within the GearBox software toggle on and off.<br />
Using footswitches to control your GearBox actions<br />
To follow are the actions you can control via footswitch:<br />
Effect bypass - The first several items in the <strong>Footswitch</strong> assignment Action menu are<br />
each of the GearBox effects. Choosing any of these items will allow the footswitch to<br />
toggle bypass for the currently selected Effect Model for this effect.<br />
Tap Tempo – This controls the Tap Tempo button with the currently loaded Delay<br />
Effect model, allowing you to tap the footswitch to set the desired tempo.<br />
Tuner – Toggles the GearBox Tuner function on/off (this is the same as clicking on the<br />
Tuner button at the top of the GearBox window).<br />
Bypass – Toggles bypassing the entire GearBox engine (same as clicking on the Bypass<br />
button at the top of the GearBox window).<br />
Next Tone/Previous Tone – These two commands incrementally step you through the<br />
saved tone presets, forward and backward in order. The tones are accessed in the<br />
alphabetical order that they appear in the Tone Preset folder menu. When the latest or<br />
earliest preset within the current folder is reached, the next press of the footswitch<br />
accesses the next/previous preset folder.<br />
Monitor Mute (All, 1-2, 3-4) options – These commands toggle mute/un-mute for the<br />
respective GearBox Sends’ monitor signals.<br />
Dual-Tone GearBox settings<br />
Note that if you have selected one of the Dual-Tone settings in the Source Select menu, then<br />
the footswitches will control the options for the first tone only. The Dual-Tone settings are the<br />
ones with the “&” in their names.<br />
Dual-Tone settings are the ones with<br />
the “&” in their names<br />
For example, if you are currently using Inst & Mic 1 as your Source, then both<br />
<strong>Footswitch</strong> 1 and 2 will only trigger their assigned functions for the Instrument tone.<br />
Page 8 of 8