MODEL NOS. 0986 0987 0995 0996 0997 80997 ... - Central Brass
MODEL NOS. 0986 0987 0995 0996 0997 80997 ... - Central Brass
MODEL NOS. 0986 0987 0995 0996 0997 80997 ... - Central Brass

You also want an ePaper? Increase the reach of your titles
YUMPU automatically turns print PDFs into web optimized ePapers that Google loves.
<strong>Central</strong> <strong>Brass</strong><br />
C O M P A N Y<br />
Brecksville, Ohio 44141<br />
Phone:(216)883-0220 Fax: (440)526-5745<br />
www.<strong>Central</strong><strong>Brass</strong>.com<br />
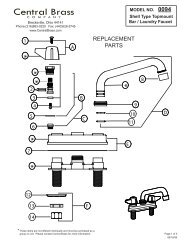
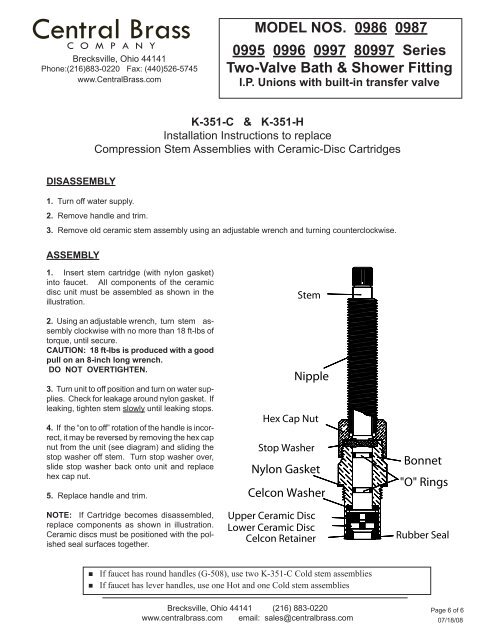
<strong>MODEL</strong> <strong>NOS</strong>. <strong>0986</strong> <strong>0987</strong><br />
<strong>0995</strong> <strong>0996</strong> <strong>0997</strong> 8<strong>0997</strong> Series<br />
Two-Valve Bath & Shower Fitting<br />
I.P. Unions with built-in transfer valve<br />
K-351-C & K-351-H<br />
Installation Instructions to replace<br />
Compression Stem Assemblies with Ceramic-Disc Cartridges<br />
DISASSEMBLY<br />
1. Turn off water supply.<br />
2. Remove handle and trim.<br />
3. Remove old ceramic stem assembly using an adjustable wrench and turning counterclockwise.<br />
ASSEMBLY<br />
1. Insert stem cartridge (with nylon gasket)<br />
into faucet. All components of the ceramic<br />
disc unit must be assembled as shown in the<br />
illustration.<br />
2. Using an adjustable wrench, turn stem assembly<br />
clockwise with no more than 18 ft-lbs of<br />
torque, until secure.<br />
CAUTION: 18 ft-lbs is produced with a good<br />
pull on an 8-inch long wrench.<br />
DO NOT OVERTIGHTEN.<br />
3. Turn unit to off position and turn on water supplies.<br />
Check for leakage around nylon gasket. If<br />
leaking, tighten stem slowly until leaking stops.<br />
4. If the “on to off” rotation of the handle is incorrect,<br />
it may be reversed by removing the hex cap<br />
nut from the unit (see diagram) and sliding the<br />
stop washer off stem. Turn stop washer over,<br />
slide stop washer back onto unit and replace<br />
hex cap nut.<br />
5. Replace handle and trim.<br />
NOTE: If Cartridge becomes disassembled,<br />
replace components as shown in illustration.<br />
Ceramic discs must be positioned with the polished<br />
seal surfaces together.<br />
Stem<br />
Nipple<br />
Hex Cap Nut<br />
Stop Washer<br />
Nylon Gasket<br />
Celcon Washer<br />
Upper Ceramic Disc<br />
Lower Ceramic Disc<br />
Celcon Retainer<br />
Bonnet<br />
"O" Rings<br />
Rubber Seal<br />
• If faucet has round handles (G-508), use two K-351-C Cold stem assemblies<br />
• If faucet has lever handles, use one Hot and one Cold stem assemblies<br />
Brecksville, Ohio 44141 (216) 883-0220<br />
www.centralbrass.com email: sales@centralbrass.com<br />
Page 6 of 6<br />
07/18/08