Spline Implant System - Zimmer Dental
Spline Implant System - Zimmer Dental
Spline Implant System - Zimmer Dental

Create successful ePaper yourself
Turn your PDF publications into a flip-book with our unique Google optimized e-Paper software.
Surgical Manual<br />
<strong>Spline</strong> ®<br />
<strong>Implant</strong><br />
<strong>System</strong>
Table of Contents<br />
Overview<br />
Overview 1<br />
Patient Evaluation & Selection<br />
Patient Evaluation & Selection 1<br />
Presurgical Planning<br />
Presurgical Planning 1<br />
Surgical Technique and <strong>Implant</strong> Placement<br />
Autoclave Tray Drill Sequence 3<br />
General Surgical Procedure 5<br />
Sterilization Technique/Surgical Instrumentation 6<br />
Bone Preparation 6<br />
General Instructions for <strong>Implant</strong> Bed Preparation 7<br />
Drill Extension Procedure 7<br />
Surgical Drilling Guidelines 8<br />
Surgical Autoclave Kit Drilling Sequence 10<br />
Tapping The Surgical Site - 3.75mm &<br />
5.0mm <strong>Spline</strong> Twist Threaded <strong>Implant</strong>s 10<br />
<strong>Implant</strong> Placement for <strong>Spline</strong> Reliance Cylinder <strong>Implant</strong>s 11<br />
<strong>Implant</strong> Placement for Self Tapping<br />
<strong>Spline</strong> Twist Threaded <strong>Implant</strong>s 12<br />
Optional First Stage Impression for<br />
<strong>Spline</strong> Twist Threaded <strong>Implant</strong>s Only 14<br />
Single-Stage Procedure for<br />
<strong>Spline</strong> Twist Threaded <strong>Implant</strong>s Only 14<br />
Placement into Extraction Sockets 14<br />
Exposure of <strong>Implant</strong>s - Temporary Gingival Cuffs 15<br />
Bone Contouring - <strong>Spline</strong> <strong>Dental</strong> <strong>Implant</strong> <strong>System</strong> Only 16<br />
<strong>Spline</strong> <strong>System</strong> Product Color - Coding<br />
<strong>Zimmer</strong> <strong>Dental</strong>’s <strong>Spline</strong> color-coding system is located on<br />
the <strong>Spline</strong> Surgical Kit tray, certain <strong>Spline</strong> prosthetics and<br />
the product packaging. It provides simplicity at a glance by<br />
indicating the diameter compatibility of the product based<br />
on the stripe found on the package or surgical kit.<br />
The chart indicates which color corresponds to each product<br />
interface diameter.<br />
COLOR<br />
Yellow<br />
Blue<br />
Green<br />
Black<br />
PRODUCT DIAMETER COMPATIBILITY<br />
3.25mm<br />
3.75mm & 4.0mm<br />
5.0mm<br />
Common products that are compatible with more<br />
than one diameter (i.e. 3.25mm & 4.0mm).
Overview, Patient Evaluation & Selection and Presurgical Planning<br />
1<br />
The Surgical Products Manual (SPM) is designed to provide<br />
a basic overview of the presurgical and surgical procedures<br />
applicable to <strong>Spline</strong> <strong>Implant</strong> <strong>System</strong>s.<br />
Team Approach<br />
Successful implant treatment requires the coordinated efforts<br />
of several dental professionals – the restorative dentist, the<br />
surgeon (periodontist, oral surgeon, general dentist), the<br />
laboratory technician, and the dental hygienist. By holding a<br />
presurgical conference, these individuals are able to develop<br />
an appropriate treatment strategy. This provides a balance<br />
between esthetic, functional, and surgical goals. In addition,<br />
the coordinated approach ensures that treatment is complete,<br />
guarding against omission of important technical considerations<br />
such as the use of a surgical template for implant location.<br />
Patient Evaluation & Selection<br />
• Take a general medical history<br />
• Undertake a psycho-social evaluation<br />
4. Cantilevering should not be part of a treatment plan due to<br />
the force amplification of the resultant moment arm.<br />
5. Strengthen the overall treatment plan in patients with<br />
either a heavy muscular profile or whose occlusal analysis<br />
indicates a strong bite by using the largest size implants,<br />
maximum numbers of abutments, minimizing the use of<br />
cantilevers, and placing abutments for the most even<br />
distribution of occlusal loads.<br />
<strong>Spline</strong> <strong>Dental</strong> <strong>Implant</strong>s require a minimum of 4-6mm of<br />
space (rim-to-rim) depending on the restoration. A minimum<br />
of 3mm (not applicable to single tooth cases) is required<br />
between a natural tooth and the rim of an implant.<br />
A 1:1 implant-to-natural tooth root ratio should be followed<br />
when possible. Eight (8) millimeter implants should never<br />
be placed freestanding. The use of implants with a<br />
diameter ≥ 3.75mm is recommended in the posterior.<br />
• Explore indications and contraindications<br />
• Determine anatomical landmark considerations related to<br />
implant positioning<br />
• Determine feasible vertical dimensions<br />
• Discuss treatment objectives and patient’s expectations<br />
• Perform various radiographic evaluations<br />
Presurgical Planning<br />
Proper stress distribution is essential to the long-term success<br />
of both the prosthesis and the implant. Overload is one of the<br />
key contributors to implant failure and is especially important<br />
in the cuspid and molar regions.<br />
To minimize excessive loads, the following guidelines apply:<br />
1. Reduce occlusal forces through reduction of the occlusal<br />
table width.<br />
2. Distribute occlusal forces optimally by maximizing the<br />
number of abutments used to support the prosthesis<br />
and placing implants of the maximum length and<br />
diameter allowable.<br />
3. Position and incline the implants properly to ensure good<br />
prosthetic design, function, and esthetics.
2 Presurgical Planning<br />
Presurgical Planning (continued)<br />
Per Ante’s Law, “The total periodontal membrane area of the abutment teeth should equal or exceed that of the teeth to be<br />
replaced.” The following tables provide the average surface areas of <strong>Zimmer</strong> <strong>Dental</strong> <strong>Implant</strong>s and natural teeth.<br />
<strong>Zimmer</strong> <strong>Dental</strong> <strong>Implant</strong> Body Surface Area<br />
<strong>Implant</strong> <strong>Implant</strong> Length (mm) <strong>Spline</strong><br />
3.25mm <strong>Spline</strong> Reliance Cylinder 8 89<br />
10 109<br />
13 140<br />
15 160<br />
18 190<br />
4.0mm <strong>Spline</strong> Reliance Cylinder 8 111<br />
10 136<br />
13 174<br />
15 199<br />
18 236<br />
5.0mm <strong>Spline</strong> Reliance Cylinder 8 148<br />
10 182<br />
13 229<br />
15 261<br />
3.75mm <strong>Spline</strong> Twist Threaded 8 110<br />
10 145<br />
13 197<br />
15 231<br />
18 282<br />
5.0mm <strong>Spline</strong> Twist Threaded 8 170<br />
10 218<br />
13 287<br />
15 331<br />
Comparison of the Root Surface Area of<br />
Types of Restoration<br />
Natural Dentition 1 Number of <strong>Implant</strong>s Restoration Desired (Design Options)<br />
Tooth Maxillary Mandibular<br />
Surface Area Ranking Surface Area Ranking<br />
(mm 2 ) (mm 2 )<br />
Central 204 6 154 7<br />
Lateral 179 7 168 6<br />
Canine 273 3 268 3<br />
First premolar 234 4 180 5<br />
Second premolar 220 5 207 4<br />
First molar 433 1 431 1<br />
Second molar 431 2 421 2<br />
1<br />
Root surface measurement and a method for x-ray determination of root<br />
surface area. Jepsen, A., Acta Odont Scand, 21:35-46, 1963.<br />
<strong>Implant</strong> Patient Maintenance<br />
• Review clinical hygiene procedures.<br />
• Outline patient’s home-care hygiene regimen.<br />
• Follow up on initial design, occlusion, and contouring for<br />
function, esthetic and hygienic evaluation.<br />
• Examine patient on a routine recall basis.<br />
1 implant Terminal abutment, pier abutment, single<br />
tooth (for molars, 2 implants with a<br />
minimum diameter of 3.75mm or greater<br />
should be used if space is available).<br />
2 implants <strong>Implant</strong>-supported bridge, overdenture.*<br />
3, 4 implants <strong>Implant</strong>-supported bridge, overdenture.<br />
Overdenture incorporates multiple bars,<br />
attachments, or clips. This produces more<br />
than one axis of rotation, requiring<br />
prosthesis to be implant supported.<br />
Support design should distribute load to<br />
soft tissue without producing excessive<br />
force to the implants.*<br />
5 or more implants <strong>Implant</strong>-supported bridge, overdenture,<br />
fixed detachable full arch reconstruction.<br />
*Overdenture using fewer than 5 implants should be supported by tissue or<br />
combination of tissue and implant. Designs utilize implant support in the<br />
anterior and soft tissue support in the posterior.
Surgical Technique and <strong>Implant</strong> Placement<br />
3<br />
Autoclave Tray Drill Sequence<br />
3.25mm <strong>Spline</strong> Reliance Cylinder <strong>Implant</strong><br />
1. Round Bur<br />
2. 2.3mm Pilot Drill<br />
3. Parallel Pin(s)<br />
4. 3.0mm Intermediate Drill<br />
5. Parallel Pin(s)<br />
6. 3.25mm Countersink Drill<br />
7. 3.25mm Final Drill<br />
8. 3.25mm <strong>Implant</strong> Body Try-in<br />
3.75mm <strong>Spline</strong> Twist Threaded <strong>Implant</strong><br />
1. Round Bur<br />
2. 2.3mm Pilot Drill<br />
3. Parallel Pin(s)<br />
4. 3.0mm Intermediate Drill<br />
5. Parallel Pin(s)<br />
6. 3.25mm Final Drill<br />
7. 3.25mm <strong>Implant</strong> Body Try-in<br />
8. 4.0mm Countersink Drill<br />
9. 3.75mm Tap (optional)**<br />
4.0mm <strong>Spline</strong> Reliance Cylinder <strong>Implant</strong><br />
1. Round Bur<br />
2. 2.3mm Pilot Drill<br />
3. Parallel Pin(s)<br />
4. 3.0mm Intermediate Drill<br />
5. Parallel Pin(s)<br />
6. 4.0mm Countersink Drill<br />
7. 4.0mm Final Drill<br />
8. 4.0mm <strong>Implant</strong> Body Try-in<br />
5.0mm <strong>Spline</strong> Reliance Cylinder <strong>Implant</strong><br />
1. Round Bur<br />
2. 2.3mm Pilot Drill<br />
3. Parallel Pin(s)<br />
4. 3.0mm Intermediate Drill<br />
5. Parallel Pin(s)<br />
6. 4.0mm Final Drill<br />
7. 4.5mm Intermediate Drill<br />
8. 4.5mm <strong>Implant</strong> Body Try-in<br />
9. 5.0mm Countersink Drill<br />
10. 5.0mm Final Drill<br />
5.0mm <strong>Spline</strong> Twist Threaded <strong>Implant</strong><br />
1. Round Bur<br />
2. 2.3mm Pilot Drill<br />
3. Parallel Pin(s)<br />
4. 3.0mm Intermediate Drill<br />
5. Parallel Pin(s)<br />
6. 4.0mm Final Drill<br />
10. 4.5mm Intermediate Drill<br />
11. 4.5mm <strong>Implant</strong> Body Try-in<br />
12. 5.0mm Countersink Drill<br />
13. 5.0mm Tap (optional)**<br />
**Use of a Thread Tap for self-tapping<br />
implants is not normally necessary.<br />
However, in dense bone (e.g. Type 1)<br />
pre-tapping the site may be necessary.<br />
Thread Taps should be available if<br />
needed.
4 Surgical Technique and <strong>Implant</strong> Placement<br />
Autoclave Tray Drill Sequence (continued)<br />
Surgical Kit comes with all the instrumentation needed to place 3.25mm and 4.0mm <strong>Spline</strong> Reliance cylinder implants,<br />
Part Number 2410A.<br />
3.25mm and 4.0mm <strong>Spline</strong> Reliance Cylinder<br />
and <strong>Spline</strong> Twist Threaded Surgical Kit,<br />
P/N 2410A Contents:<br />
Surgical Box and Tray<br />
Round Bur<br />
Pilot Drill, 8-13mm<br />
Pilot Drill, 8-18mm<br />
3.0mm Intermediate Drill, 8-13mm<br />
3.0mm Intermediate Drill, 8-18mm<br />
3.25mm Countersink Drill<br />
3.25mm Final Drill, 8-13mm<br />
3.25mm Final Drill, 8-18mm<br />
4.0mm Countersink Drill<br />
4.0mm Final Drill, 8-13mm<br />
4.0mm Final Drill, 8-18mm<br />
Drill Extension<br />
Parallel Pins, Straight (Qty 4)<br />
Parallel Pins, 15° (Qty 2)<br />
Try-in, 3.25mm<br />
Try-in, 4.0mm<br />
Tapper Handle<br />
3.25 Tapper Tips (Qty 4)<br />
4.0 Tapper Tips (Qty 2)<br />
<strong>Implant</strong> Body Retriever<br />
Tissue Punch<br />
Hex Driver, .035", Long (0.9mmD)<br />
Hex Driver, .035", Short (0.9mmD)<br />
Hex Driver, .050", Long (1.25mmD)<br />
Hex Driver, .050", Short (1.25mmD)<br />
3.25mm x 4.5mm Bone Contouring Tool<br />
4.0mm x 4.5mm Bone Contouring Tool<br />
Bone Contouring Tool Manual Driver<br />
5.0mm <strong>Spline</strong> Reliance Cylinder and <strong>Spline</strong> Twist<br />
Threaded Surgical Kit, P/N 2412A Contents:<br />
5.0mm Countersink Drill<br />
4.5mm Intermediate Drill, 8-13mm<br />
4.5mm Intermediate Drill, 8-15mm<br />
5.0mm Final Drill, 8-18mm<br />
5.0mm Final Drill, 8-15mm<br />
4.5mm <strong>Implant</strong> Body Try-in<br />
5.0mm x 6.5mm Bone Contouring Tool<br />
*Surgical tray and threaded delivery tools not included<br />
5.0mm <strong>Spline</strong> Twist Threaded Surgical Kit,<br />
P/N 2414A Contents:<br />
5.0mm Countersink Drill<br />
4.5mm Intermediate Drill, 8-13mm<br />
4.5mm Intermediate Drill, 8-15mm<br />
4.5mm <strong>Implant</strong> Body Try-in<br />
5.0mm x 6.5mm Bone Contouring Tool<br />
*Surgical tray and threaded delivery tools not included<br />
Sterilization Guidelines:<br />
Please remove any protective packaging from the surgical tray<br />
before sterilization. The following are suggested guidelines for<br />
sterilization. Use commercially available chemical or biological<br />
monitors to determine the efficacy of the cycle employed.<br />
• Steam Autoclave at 121°C/250°F, 15-20 psig for 40 minutes<br />
minimum followed by a 30 minute dry cycle.<br />
• Dry heat at 160°C/320°F, for 2 hours (do not exceed<br />
170°C/338°F).<br />
• Chemclaving and flashclaving is NOT recommended.<br />
Note: Exceeding these sterilization parameters may result in damage to<br />
plastic components. Verify the calibration of your unit to ensure recommended<br />
temperatures are not being exceeded.
Surgical Technique and <strong>Implant</strong> Placement<br />
5<br />
General Surgical Procedure<br />
It is important that the implant procedure be performed under<br />
aseptic conditions. Irrigation technique should be reviewed to<br />
ensure that compressed coolant air is not introduced into the<br />
surgical site via a drill. All instruments must be clean and<br />
sterile. Please note that the surgical instrumentation used to<br />
place dental implants is provided non-sterile and therefore<br />
must be sterilized prior to use. The sterilization chart on<br />
page 6 provides specific sterilization instructions.<br />
Handling<br />
Only powder-free gloved hands or non-metallic instruments<br />
should be used to handle the implant. <strong>Implant</strong>s are packaged<br />
to protect the product from damage during transit and storage.<br />
Cleaning<br />
Use the following guidelines for cleaning components:<br />
Surgical Drills - Rinse with cool to lukewarm water for<br />
two-and-one-half minutes. Use a 25-gauge or 30-gauge*<br />
needle to clean the lumen, making sure to flush water through<br />
the needle. Place in an ultrasonic cleaner with an enzymatic<br />
detergent mixed with tap water per the manufacturer’s<br />
guidelines. Sonicate for 10 minutes. Rinse with tap water<br />
for three minutes.<br />
Sterilization<br />
Sterile products have been gamma radiation sterilized and<br />
are for single use only. Only HA-Coated implant bodies may<br />
be resterilized. Resterilize once (HA-Coated implants can be<br />
sterilized by autoclaving or dry heat) if the sterile packaging<br />
has been opened, but only if the implant has not been<br />
contaminated in any manner. If resterilization is needed,<br />
remove the cap, healing screw, and any implant driver<br />
mounts from the body. Place the healing screw, implant,<br />
and any implant driver mount in an appropriate container for<br />
sterilization. Do not sterilize the implant body with the healing<br />
screw in place. Do not sterilize the cap or vial. Repeated<br />
autoclaving is not advised.<br />
<strong>Zimmer</strong> <strong>Dental</strong> <strong>Spline</strong> surgical instrumentation and prosthetic<br />
components are provided non-sterile and must be sterilized<br />
prior to use. Remove instrumentation or prosthetic components<br />
from packaging prior to sterilization. Refer to the following table<br />
for instrumentation sterilization guidelines. Note: Two-piece<br />
components should be disassembled prior to sterilization to<br />
ensure maximum efficacy.<br />
*All drills 2.8mmD or smaller will require a 30-gauge needle to clean the lumen.<br />
Prosthetic Components - Disassemble two piece components.<br />
Rinse in cool to lukewarm water for two-and-one-half minutes.<br />
Place in an ultrasonic cleaner with an enzymatic detergent<br />
mixed with tap water per the manufacturer’s guidelines.<br />
Sonicate for 10 minutes.<br />
Surgical and Prosthetic Tools - Rinse with cool to lukewarm<br />
water for two-and-one-half minutes. Wipe with cotton gauze<br />
moistened with tap water. Use multipurpose soft bristle brush<br />
to remove excess soil. Wipe with a two percent glutaraldehyde<br />
solution. Let tool sit for five minutes. Rinse with tap water for<br />
three minutes (see page 6).<br />
Surgical Tray and Second Stage/Prosthetic Tray - Remove all<br />
parts from the surgical tray, then remove the tray insert.<br />
Rinse the tray and tray insert thoroughly with cool to lukewarm<br />
(43°C/110°F or less) tap water. Use a damp cloth to wipe and<br />
remove any excess soil from each part. After rinsing, wipe<br />
each part with a cloth that has been dipped in an enzymatic<br />
detergent solution diluted to manufacturer’s specifications.<br />
Wipe parts until all visible contamination has been removed.<br />
To eliminate all residual enzymes and detergent, thoroughly<br />
rinse (minimum of three minutes) the cleaned parts with tap<br />
water. Note: This procedure should be performed after an<br />
instrument used during a surgery comes into contact with the<br />
surgical tray or second stage/prosthetic tray.
6 Surgical Technique and <strong>Implant</strong> Placement<br />
Sterilization Technique/Surgical Instrumentation<br />
Product Autoclave 1 Dry Heat<br />
HA-Coated <strong>Implant</strong>s yes 2 (only once) yes 2 (only once)<br />
Pilot Drill yes yes 4<br />
Round Bur yes yes<br />
Intermediate Drills yes yes 4<br />
Countersink Drills yes yes 4<br />
Final Drills yes yes 4<br />
<strong>Spline</strong> Bone Contouring Tools yes yes<br />
Manual Driver - <strong>Spline</strong> Bone yes no<br />
Contouring Tools<br />
Drill Extension yes yes<br />
Thread Taps yes no<br />
<strong>Implant</strong>/Tap Driver yes no<br />
Handpiece Adapter yes yes<br />
Manual Mount Driver yes yes<br />
Latch-Lock Mount Driver yes yes<br />
Countertorque Tool yes yes<br />
Healing Screws yes yes<br />
Parallel Pins yes yes<br />
<strong>Implant</strong> Body Try-ins yes yes<br />
Prosthetic Torque Wrench yes no<br />
Hex Drive Seating Tool yes yes<br />
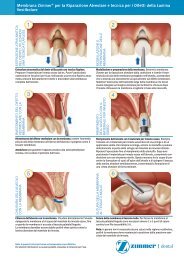
Bone Preparation<br />
Make a mesiodistal incision along the buccal side of the<br />
alveolar crest through the mucoperiosteum and attached<br />
gingiva to the bone. (Flap and incision designs may vary due<br />
to clinician preference.) The incision should be long enough<br />
to permit adequate reflection and a broad field of view without<br />
tearing the tissue. (Occasionally, vertical releasing incisions<br />
may be employed.) Using a periosteal elevator, carefully lift<br />
the periosteum to expose the alveolar bone only as necessary<br />
to provide an adequate surgical working area (Fig. 1).<br />
Place retractors or sutures to hold the tissues. Remove any<br />
spinous ridges or other bone irregularities using the round bur<br />
or a Rongeur Forceps to create as flat a bone plateau as<br />
possible (Fig. 2).<br />
Keep bone removal to a minimum. (Insufficient bone<br />
height/width and abnormal defects or contours not previously<br />
detected may now contraindicate placement of the implant.)<br />
Ridge width should allow at least 1mm of bone to remain<br />
buccal and lingual to the implant after placement. Maintain<br />
4-6mm of space (rim-to-rim) between implants or 3mm (not<br />
applicable to single tooth cases) from any adjacent natural<br />
dentition. Allow 1mm of bone circumferential and 2mm of<br />
bone apical to the implant when inserted (e.g., 10mm of<br />
alveolar bone is required to insert an 8mm length implant<br />
body). Ridge contour should be adequately palpated to estimate<br />
an angle of insertion which will achieve parallelism with other<br />
implants and natural tooth abutments where indicated.<br />
Tapper/Tapper Tips yes yes 4<br />
<strong>Implant</strong> Body Retriever yes yes<br />
Tissue Punch yes no<br />
Temporary Gingival Cuffs yes yes<br />
Autoclave Tray (Cat. No. 2309) yes yes 4<br />
Suggested Parameters 121°C/250°F 160°C/320°F<br />
(guidelines only) 3 15-20 psig 2 hrs<br />
40 minutes minimum<br />
followed by a<br />
30 minute dry cycle<br />
1<br />
A standard autoclave bag should be used. Check trays, autoclave interior, and<br />
water supply for cleanliness. The autoclave should have a drying cycle.<br />
2<br />
<strong>Implant</strong> body must not be contaminated.<br />
3<br />
Use commercially available chemical or biological monitors to determine the<br />
efficacy of the actual cycle employed.<br />
4<br />
Due to the melting point of the plastics used in these products, dry heat<br />
sterilization should not exceed 170°C/338°F.<br />
Figure 1. A mesiodistal incision with adequate reflection will provide a<br />
broad field of view for implant placement.<br />
Figure 2. Bone irregularities are removed to provide a flat plateau.
Surgical Technique and <strong>Implant</strong> Placement<br />
7<br />
Components<br />
Round Bur<br />
Pilot Drill<br />
Parallel Pins<br />
Drill Extension<br />
Intermediate and Final Drills<br />
Countersink Drill<br />
General Instructions for <strong>Implant</strong> Bed Preparation<br />
Bone cutting procedures involving the Pilot, 3.0mm Intermediate,<br />
and 3.25, 4.0, 4.5 and 5.0mm drills require a low speed (600-850<br />
rpm), high-torque, internally irrigated handpiece. This will minimize<br />
excessive heat generation and preserve the vitality of bone which is<br />
in contact with the implant. The Thread Taps do not accommodate<br />
internal irrigation and external irrigation is required. If the Thread<br />
Taps will be operated in a handpiece, a contra-angle that operates<br />
at less than 50 rpm is required and the handpiece must be capable<br />
of high torque operation.<br />
Irrigation techniques should be reviewed to ensure that<br />
compressed coolant air is not introduced into the surgical site via<br />
a surgical bur. Because profuse internal irrigation is required to<br />
keep the drill from clogging, avoid splitting or diverting the drill’s<br />
internal irrigation for external purposes. Accommodate external<br />
irrigation by utilizing a sterile, water-filled syringe.<br />
Perform all drilling, particularly with 2.3mmD Pilot, 3.0, 3.25,<br />
4.0, 4.5 and 5.0mm drills, with a straight, up-and-down motion<br />
in order to avoid creation of an oval-shaped osteotomy site.<br />
When additional drill length is required, a Drill Extension is<br />
available that extends the effective cutting length of the drill by<br />
10mm. The Drill Extension should be used when additional length<br />
is required due to interference caused by adjacent teeth. The Drill<br />
Extension has a standard latch-lock shank with a cylindrical shaft<br />
to lock any <strong>Zimmer</strong> <strong>Dental</strong> latch-lock type drill into the extension<br />
with a set screw. Do not use with drills other than the standard<br />
latch-lock type. In addition, do not use excessive drilling speeds<br />
(i.e., speeds greater than 850 rpm) with the Drill Extension.<br />
The Drill Extension allows for internal irrigation. Note: The Drill<br />
Extension is not used with the Thread Taps or Driver Extension.<br />
Drill Extension Procedure<br />
A. Insert any <strong>Zimmer</strong> <strong>Dental</strong> latch-lock drill into the internal bore.<br />
B. Rotate the drill until it seats positively inside of the bore.<br />
<strong>Implant</strong> Body Try-in<br />
C. Using the 1.25mmD (0.050") Hex Tool, tighten the set screw.<br />
Note: Tightening the set screw requires that the drill be<br />
positively engaged. Failure to engage may strip the set screw.<br />
D. To remove the drill from the extension, loosen the set screw<br />
one-half to three-quarters of a turn and remove the drill.<br />
Note: The drill extension is provided with a positive mechanical<br />
stop to prevent the set screw from being removed from the drill<br />
extension body. Do not use excessive force when loosening<br />
the screw.<br />
Note: Clean drill heads often to remove debris and ensure a<br />
sharp cutting surface. A 25-gauge or 30-gauge needle can be<br />
used to clean the drill’s irrigation hole. Due to the density of bone<br />
commonly found in the symphysis region, use newer drills.<br />
Rotate these drills for use in the maxilla or where more porous<br />
bone is found (Type II or III). A maximum of 20 uses per drill is<br />
recommended.
8 Surgical Technique and <strong>Implant</strong> Placement<br />
Surgical Drilling Guidelines<br />
Please refer to the additional surgical drilling guidelines<br />
below before following the surgical charts. These guidelines<br />
correspond and provide additional information to the surgical<br />
sequencing found in the charts.<br />
Figure 3. Round Bur creates dimple on the alveolar crest to<br />
accommodate tip of Pilot Drill.<br />
Explanation of Depth Bands<br />
The bands on the Pilot, 3.0mm, 3.25mm, 4.0mm, 4.5mm, and<br />
5.0mm diameter drills are cutting depth markings indicating<br />
implant length. The depth markings are machined and laser<br />
etched for increased visibility. Also note the addition of a<br />
depth band to indicate the placement of the 11.5mm <strong>Spline</strong><br />
Twist <strong>Implant</strong>. The bands are located 1mm longer than the<br />
implant abutment junction. (For example: The 13mm band is<br />
dimensioned 14mm from the tip of the drill.) This length<br />
should be chosen on a case by case basis taking into account<br />
bone irregularities at the crest. Always take into account vital<br />
anatomical structures when allowing for additional length<br />
during surgical site excavation.<br />
A. Use copious external irrigation with the Round (Rosette) Bur<br />
when creating a 1-1.5mm dimple in the dense ridge crest<br />
(Fig. 3).<br />
B. Use the Pilot Drill to create a pilot hole to the depth of<br />
implant length selected using the depth marks on the drill<br />
(Fig. 4). Flush the hole to remove debris.<br />
Figure 4. Pilot Drill creates a hole to the depth of implant length<br />
selected.<br />
C. Use Parallel Pins to check proper angularity before<br />
proceeding with 3.0mm diameter drill. The narrow end of<br />
the pin corresponds to the diameter of the Pilot Drill and<br />
the large end corresponds to the 3.0mm diameter drill.<br />
Insert the appropriate pin end into the corresponding<br />
diameter hole (Fig. 5). Repeat for additional implants,<br />
referring to the angularity and draw requirements<br />
established by prior sites. Floss may be threaded through<br />
the hole on the Parallel Pins for retention to prevent<br />
patient aspiration.<br />
Figure 5. Parallel Pin inserted into the pilot hole allows visual<br />
inspection of angulation.
Surgical Technique and <strong>Implant</strong> Placement<br />
9<br />
D. Drills 3.25mm, 4.0mm, 4.5mm, 5.0mm. Important: Use<br />
the appropriate length and diameter drill for each step<br />
(Figs. 6 and 7).<br />
E. Use the appropriate diameter countersink drill to create a<br />
recessed area in the cortical bone (Fig. 8). Note: For <strong>Spline</strong><br />
Twist Threaded <strong>Implant</strong>s the countersink is also used to<br />
create a proper contour in the bone that matches the<br />
coronal flare of the implant and healing screw.<br />
Figure 6. The Intermediate Drill is used to increase diameter of the<br />
osteotomy.<br />
F. Confirm the exact implant body size selection by trial<br />
fitting an appropriate diameter <strong>Implant</strong> Body Try-in into the<br />
prepared site. Note: The concentric rings on the <strong>Implant</strong><br />
Body Try-in correspond to the exact lengths of the implant<br />
from the apical end to the implant-abutment junction. Floss<br />
may be threaded through the hole for retention to prevent<br />
patient aspiration.<br />
Optional:<br />
G. Taps 3.75 and 5.0mm: Use the appropriate length and<br />
diameter Thread Tap for <strong>Spline</strong> Twist Threaded <strong>Implant</strong>s.<br />
Refer to Tapping The Surgical Site 3.75mm & 5.0mm<br />
<strong>Spline</strong> Twist Threaded <strong>Implant</strong>s for complete instructions.<br />
Note: The Thread Taps do not accommodate internal<br />
irrigation and external irrigation is required. Use of the<br />
Thread Tap is contraindicated in soft maxillary bone.<br />
Figure 7. The Final Drill is used to complete the desired diameter of<br />
the osteotomy.*<br />
*Use of a Thread Tap for self-tapping <strong>Spline</strong> Twist Threaded <strong>Implant</strong>s is not<br />
normally necessary. However, in dense bone (e.g., Type I) pre-tapping the site<br />
may be necessary. Thread Taps should be available if needed.<br />
Note: Use a surgical template as a guide. Refer to Surgical<br />
Drilling Guidelines first, then refer to table for recommended<br />
drilling sequence corresponding to implant(s) being placed<br />
and available instrumentation.<br />
**Please refer to the charts on the following pages for surgical drill sequencing.<br />
Figure 8. The Countersink Drill creates a recessed area in the<br />
cortical bone.**
10 Surgical Technique and <strong>Implant</strong> Placement<br />
Surgical Autoclave Kit Dríva Drilling Sequence<br />
Drill Speed<br />
600-850 rpm<br />
600-850 rpm<br />
600-850 rpm<br />
600-850 rpm<br />
600-850 rpm<br />
600-850 rpm<br />
50 rpm<br />
50 rpm<br />
N/A<br />
N/A<br />
3.25mm 3.75mm 4.0mm 5.0mm 5.0mm<br />
Drill or Thread Tap <strong>Spline</strong> Reliance <strong>Spline</strong> Twist <strong>Spline</strong> Reliance <strong>Spline</strong> Reliance <strong>Spline</strong> Twist<br />
Cylinder Threaded Cylinder Cylinder Threaded<br />
<strong>Implant</strong> <strong>Implant</strong> <strong>Implant</strong> <strong>Implant</strong> <strong>Implant</strong><br />
Round (Rosette) a 1 1 1 1 1<br />
Pilot b 2 2 2 2 2<br />
Parallel Pins c (narrow end) √ √ √ √ √<br />
3.0mm Intermediate d Drill 3 3 3 3 3<br />
Parallel Pins c (large end) √ √ √ √ √<br />
3.25mm Countersink Drill e 4<br />
3.25mm Final Drill d 5 4<br />
3.25mm <strong>Implant</strong> Try-in f √ √<br />
4.0mm Countersink Drill e 5 4<br />
4.0mm Final Drill d 5 4 4<br />
4.0mm <strong>Implant</strong> Try-in f<br />
√<br />
4.5mm Intermediate Drill d 5 5<br />
4.5mm <strong>Implant</strong> Try-in f √ √<br />
5.0mm Countersink Drill e 6 6<br />
5.0mm Final Drill d 7<br />
3.75mm Tap g * See: Tapping the Surgical Site –<br />
3.75mm & 5.0mm <strong>Spline</strong> Twist Threaded 6<br />
<strong>Implant</strong>s for additional instructions<br />
5.0mm Tap g * See: Tapping the Surgical Site –<br />
3.75mm & 5.0mm <strong>Spline</strong> Twist Threaded 7<br />
<strong>Implant</strong>s for additional instructions<br />
See: <strong>Implant</strong> Placement<br />
for <strong>Spline</strong> Reliance Cylinder <strong>Implant</strong>s<br />
6 6 8<br />
See: <strong>Implant</strong> Placement 7 8<br />
for <strong>Spline</strong> Twist Threaded <strong>Implant</strong>s<br />
Note: √ indicates should be used in drilling sequence.<br />
Components<br />
Thread Taps<br />
<strong>Implant</strong>/Tap Driver<br />
Figure 9. Thread Taps can be operated manually in the <strong>Implant</strong>/Tap<br />
Driver or used in a handpiece via the Handpiece Adapter.<br />
Tapping the Surgical Site - 3.75mm & 5.0mm<br />
<strong>Spline</strong> Twist Threaded <strong>Implant</strong>s<br />
Note: Use of a Thread Tap for self-tapping <strong>Spline</strong> Twist Threaded<br />
<strong>Implant</strong>s is not normally necessary. However, in dense bone<br />
(e.g., Type I) pre-tapping the site may be necessary. Thread<br />
Taps should be available if needed.<br />
The surgical site may be tapped with either a surgical<br />
handpiece or Manual Tap Driver (Fig. 9). When tapping by hand,<br />
insert the appropriate length Thread Tap into the bottom broach<br />
of the driver head so the driver rotates freely in a clockwise<br />
direction. Place the tip of the Thread Tap into the drilled<br />
implant site. Rotate the thumb wheel in a clockwise direction<br />
while applying moderate apical pressure to engage the Thread<br />
Tap into the surgical site. Ratchet the driver in a clockwise<br />
direction while applying moderate pressure (Fig. 10). Avoid<br />
any lateral movements when tapping. Thread the hole to the<br />
desired depth reference notch (also marked by a laser band).<br />
Grab hold of the superior portion of the tap and disengage the<br />
driver from the tap. Flip the driver over and re-engage the Thread<br />
Tap; the driver should now ratchet in a counterclockwise<br />
direction. Ratchet the driver in a counterclockwise direction<br />
to back the tap out. Do not pull on the bone tap. Use of the<br />
Thread Tap is contraindicated in soft maxillary bone.
Surgical Technique and <strong>Implant</strong> Placement<br />
11<br />
Figure 10. Thread Tap is ratcheted clockwise to the appropriate depth<br />
reference notch.<br />
When using the handpiece, place the appropriate length<br />
Thread Tap in the Handpiece Adapter. The Handpiece Adapter<br />
will fit any latch-lock handpiece. Place the tip of the Thread<br />
Tap into the drilled implant site. The rotational speed for the<br />
tapping procedure should be below 50 rpm. This may require<br />
a change in contra-angle, capable of low speed, high torque<br />
operation. Apply firm pressure and begin rotating the Thread<br />
Tap slowly. When the threads engage, allow the Thread Tap to<br />
feed without pressure. Thread the hole to the desired depth<br />
reference notch (also marked by a laser band). Switch the<br />
handpiece to the reverse mode and back the Thread Tap out.<br />
Do not pull on the Thread Tap. Use of the Thread Tap is<br />
contraindicated in soft maxillary bone. After site has been<br />
tapped reference: <strong>Implant</strong> Placement For <strong>Spline</strong> Twist<br />
Threaded <strong>Implant</strong>s.<br />
Components<br />
<strong>Spline</strong> Reliance Cylinder <strong>Implant</strong>s<br />
<strong>Implant</strong> Placement for Cylinder <strong>Implant</strong>s<br />
A. Irrigate the completed implant receptor site with additional<br />
sterile water.<br />
3.25 MP-1 ®<br />
4.0 MP-1 5.0 MP-1<br />
B. While holding the plastic cap, seat the implant into the<br />
prepared site (Fig. 11) until firm (at least halfway).<br />
C. Remove the plastic cap by applying a steady pressure to the<br />
cap perpendicular to long axis of implant in a mesial or distal<br />
direction. The cap will “snap” off. Fully seat the implant (the<br />
top of healing screw flush or slightly above crest of alveolar<br />
bone) using a gentle tapping action with a rubber mallet on<br />
the plastic-tipped Tapper (Fig. 12). Check the healing screw<br />
for tightness with the hex drive seating tool.<br />
D. A radiographic check of implant placement should be<br />
performed at this time.<br />
E. Carefully reposition the mucoperiosteal flap for maximum<br />
tissue adaptation, and then suture.<br />
Figure 11. The cylindrical implant is initially delivered to the site via<br />
the vial cap.<br />
Figure 12. The Tapper may be used to facilitate final seating of<br />
cylindrical implants.
12 Surgical Technique and <strong>Implant</strong> Placement<br />
Components<br />
<strong>Spline</strong> Twist Threaded <strong>Implant</strong>s<br />
Twist MTX MP-1 Manual Mount<br />
Both implants available in<br />
Drivers<br />
3.75mmD and 5.00mmD<br />
Countertorque Tool<br />
Figure 13.<br />
<strong>Implant</strong>/Tap Driver<br />
Latch-lock<br />
Driver<br />
<strong>Implant</strong> Placement for Self Tapping <strong>Spline</strong> Twist<br />
Threaded <strong>Implant</strong>s<br />
A. Irrigate the completed implant site with additional<br />
sterile water.<br />
B. The vial is opened by rotating the cap forward, away from<br />
the vial clip. (The cap remains secured to the vial by the<br />
hinge on the front of the vial.) The vial can be fastened to<br />
the front of the surgical tray utilizing the clip on the back of<br />
the vial (Fig. 13).<br />
C. The implant may be driven either manually or with the use<br />
of a Latch-Lock Driver. The Manual Mount Driver is inserted<br />
into the bottom broach of the <strong>Implant</strong>/Tap Driver Wrench so<br />
that the driver rotates freely in a clockwise direction. The<br />
Latch-Lock Mount Driver engages directly into the handpiece.<br />
The Mount Driver’s male hexagon is inserted into the female<br />
hexagon of the implant driver mount. The retaining clip on<br />
the Mount Driver provides mechanical retention to the<br />
implant driver mount. To remove the implant from the vial,<br />
engage the Mount Driver to the driver mount and lift out<br />
(Figs.14 and 15). Note: The use of mount drivers without<br />
retaining clips is not recommended for use with this delivery<br />
system. Screw the implant into the prepared site using the<br />
handpiece or the Manual Driver Wrench (Fig. 16). The<br />
implant must be driven into the site at less than 50 rpm.<br />
This requires a contra-angle capable of low speed, high<br />
torque operation. After the implant is seated, disengage the<br />
Mount Driver from the implant driver mount by pulling up in<br />
an axial direction.<br />
Note: Life expectancy of tools with retaining clip is 25<br />
sterilization cycles.<br />
Figure 14.<br />
D. After the implant is seated at the desired level, unscrew the<br />
implant driver mount by disengaging the retaining screw<br />
with the 1.25mmD (0.050") Hex Tool. The driver mount<br />
Countertorque Tool may be used to prevent rotation of the<br />
implant during driver mount removal (Fig. 17). The external<br />
hex of the Countertorque Tool engages the hex socket of the<br />
driver mount. A hole in the end of the Countertorque Tool<br />
allows the long Hex Drive Seating Tool to be passed through<br />
the Countertorque Tool and engage the retaining screw.<br />
While holding the Countertorque Tool in a fixed position,<br />
disengage the retaining screw by turning the Hex Drive<br />
Seating Tool in a counterclockwise direction. Remove the<br />
driver mount from the implant body. Both the driver mount<br />
and the retaining screw are disposable products.<br />
Figure 15.
Surgical Technique and <strong>Implant</strong> Placement<br />
13<br />
E. To remove the healing screw from the implant vial cap, place<br />
the 0.9mmD (0.035") Hex Tool through the rubber retaining<br />
boot, engage the female hex, and turn counterclockwise.<br />
The boot secures the healing screw to the hex driver.<br />
F. Flush the implant to remove debris before seating the<br />
healing screw onto the implant body and tighten with the<br />
0.9mmD (0.035") Hex Tool (Fig. 18). After tightening is<br />
completed, withdraw the Hex Drive Seating Tool from the oral<br />
cavity and remove the rubber boot. The rubber boot is a<br />
disposable product.<br />
Figure 16.<br />
G. A radiographic check of the implant should be taken at<br />
this time.<br />
H. Carefully reposition mucoperiosteal flap for maximum tissue<br />
adaptation, and then suture.<br />
Post-Operative Course<br />
Instruct the patient to follow a post-surgery regimen including<br />
cold packs for the initial 24 hours. An antibiotic may be<br />
prescribed. Sutures may be removed after one week. Relieve<br />
any removable prosthesis resting on the implant and reline<br />
using a soft tissue conditioner reline material.<br />
Figure 17.<br />
Allow a healing period of approximately three to four months<br />
for the mandible and five to six months for the maxilla. It is<br />
important to leave the implant unloaded during this healing<br />
period. Periodically monitor the proper healing of the soft and<br />
hard tissues.<br />
Figure 18.
14 Surgical Technique and <strong>Implant</strong> Placement<br />
Optional First Stage Impression for <strong>Spline</strong> Twist<br />
Threaded <strong>Implant</strong>s Only<br />
An impression can be taken at this time using the appropriate<br />
diameter Impression Post (reference section entitled<br />
Impression Posts in the Prosthetic Manual). Note: If the<br />
implant has been countersunk it may be necessary to utilize<br />
the Bone Contouring Tool first before an impression can be<br />
made; reference section entitled Bone Contouring. After the<br />
impression has been made continue with the single or<br />
two-stage implant placement steps.<br />
Caution: After the impression has been made, irrigate and<br />
flush the site to remove any impression debris.<br />
Single-Stage Procedure for <strong>Spline</strong> Twist Threaded<br />
<strong>Implant</strong>s Only<br />
A. After the removal of the driver mount from the implant<br />
body, use the appropriate Bone Contouring Tool that matches<br />
the cuff diameter of the Temporary Gingival Cuff being<br />
placed (reference section entitled Bone Contouring).<br />
B. When finished, remove the tool from the site. Flush and<br />
aspirate the <strong>Spline</strong> interface and internal threads to<br />
remove debris.<br />
An impression can be taken at this time using the<br />
appropriate diameter Impression Post (reference section<br />
entitled Impression Posts in the Prosthetic Manual). After<br />
the impression has been made continue with step C.<br />
Caution: After the impression has been made, irrigate and<br />
flush the site to remove any impression debris.<br />
C. Place the appropriate Temporary Gingival Cuff using the<br />
1.25mmD (0.050") Hex Tool and carefully reposition the<br />
mucoperiosteal flap for maximum adaptation around the<br />
Temporary Gingival Cuff, ensuring that no greater than<br />
0.5mm-1mm of the cuff is exposed supragingivally and<br />
then suture.<br />
E. A radiographic check of the implant should be taken at<br />
this time.<br />
Caution: The implant’s Temporary Gingival Cuff must not be in<br />
occlusion during the healing period.<br />
F. Irrigate the completed implant site with additional<br />
sterile water.<br />
Placement Into Extraction Sockets<br />
A. Ensure that the socket is free from infection, purulent<br />
drainage, remaining tooth structures, and soft or<br />
granulation tissue. Gently curette to remove any soft<br />
tissue remnants.<br />
B. Ensure that the socket size is small enough that<br />
bone-to-implant contact is achieved after use of the final<br />
drill. Note: Bone must be present apical to the tooth socket<br />
to achieve initial stabilization.<br />
C. Countersink the implant by 2mm. Note: This may require<br />
the use of drills (Intermediate and Final Drills) that are<br />
longer than the length of the implant being placed.<br />
D. Achieve primary closure after implant placement.<br />
Postoperative Course<br />
Instruct the patient to follow a post-surgery regimen including<br />
cold packs for the initial 24 hours. An antibiotic may be<br />
prescribed. Sutures may be removed after one week. Relieve<br />
any removable prosthesis resting on the implant and reline<br />
using a soft tissue conditioner reline material. Allow a healing<br />
period of approximately three to four months for the mandible<br />
and five to six months for the maxilla. It is important to leave<br />
the implant unloaded during this healing period. Periodically<br />
monitor the proper healing of the soft and hard tissues.<br />
D. Relieve any removable prosthesis resting on the Temporary<br />
Gingival Cuff and reline using a soft tissue conditioner<br />
reline material. It is important to leave the Temporary<br />
Gingival Cuff unloaded during this healing period.
Surgical Technique and <strong>Implant</strong> Placement<br />
15<br />
Components<br />
Temporary Gingival Cuffs<br />
Exposure of <strong>Implant</strong>s – Temporary Gingival Cuffs<br />
Description<br />
Second-stage healing screw with variable cuff heights.<br />
Note: <strong>Spline</strong> cuffs do not engage their respective implant’s<br />
anti-rotational feature. Each implant platform has its own<br />
variety of cuff heights and diameters available.<br />
Indications<br />
For use at second stage surgery to allow healing of the soft<br />
tissue to coincide with the flare of the abutment cuffs for<br />
suitable emergence profile of the final prosthesis (Fig. 19).<br />
Cuff should protrude through the soft tissue by at least 2mm<br />
(0.5mm – 1mm when used in a single stage procedure,<br />
<strong>Spline</strong> Twist Threaded only). Note: Cuffs do not engage their<br />
respective implant’s anti-rotational feature.<br />
Contraindications<br />
Not to be used as an impression transfer component or<br />
temporary abutment.<br />
Figure 19. The Temporary Gingival Cuff adapts the soft tissue for the<br />
final restoration.<br />
Note: <strong>Spline</strong> only - If a single stage surgery was done, the<br />
Temporary Gingival Cuff was placed at first stage surgery.<br />
Unscrew the Temporary Gingival Cuff using the 1.25mmD<br />
(0.050") Hex Tool and reference the section entitled<br />
<strong>Spline</strong> Interface Abutment General Guidelines in the<br />
Prosthetic Manual (Part Number 4789).<br />
Procedure<br />
Following the healing period, uncover the implant healing<br />
screw. The location can be determined by palpation of the soft<br />
tissue or use of a periodontal probe. Expose the healing screw<br />
using a scalpel, taking care to preserve an adequate amount<br />
of keratinized gingiva. Remove the healing screw with the<br />
appropriate Hex Tool. Choose a Temporary Gingival Cuff that<br />
has a maximum diameter matching the abutment planned for<br />
the case. Remove all bone and soft tissue from the superior<br />
aspect of the implant body to guarantee complete seating of<br />
the Temporary Gingival Cuff. The presence of tissue or bone<br />
fragments between the implant and abutment can lead to<br />
abutment loosening. Do not use a bur or other drilling instrument,<br />
which may compromise the integrity of the implant or its<br />
coating. Screw the Temporary Gingival Cuff into the implant<br />
using the appropriate Hex Tool. Allow the soft tissues to heal.<br />
Note: For <strong>Spline</strong> <strong>Implant</strong>s only: The Bone Contouring Tool may<br />
be used to facilitate removal of bone and soft tissue at the<br />
interface. Use the appropriately flared Bone Contouring Tool<br />
that matches the diameter of the Temporary Gingival Cuff<br />
being placed. When using the narrow (3.25mm x 3.75mm)<br />
Temporary Gingival Cuff, utilize the 3.25mm x 4.5mm<br />
Bone Contouring Tool. Reference: Bone Contouring - <strong>Spline</strong><br />
<strong>Dental</strong> <strong>Implant</strong> <strong>System</strong> Only.
16 Surgical Technique and <strong>Implant</strong> Placement<br />
Components<br />
Bone Contouring Tools<br />
Bone Contouring – <strong>Spline</strong> <strong>Dental</strong> <strong>Implant</strong><br />
<strong>System</strong> Only<br />
Description<br />
A series of specially designed Bone Contouring Tools<br />
of various diameters, operated either manually or in<br />
a handpiece. The bullet nose on the Bone Contouring<br />
Tool is inserted into the thread opening on the implant.<br />
The Bone Contouring Tool is not internally irrigated.<br />
Indications<br />
Used to remove bone from the coronal aspect of an implant<br />
body to assist the seating of the Temporary Gingival Cuff<br />
and/or abutment.<br />
Contraindications<br />
Not to be used as a countersink drill.<br />
Hex Drive Seating Tool Kit, 0.035"<br />
Note: If a single stage surgery was done, bone contouring was<br />
performed during implant placement. Unscrew the Temporary<br />
Gingival Cuff using the 1.25mmD (0.050") Hex Tool and<br />
proceed to the <strong>Spline</strong> Interface Abutment General Guidelines<br />
in the Prosthetic Manual.<br />
Procedure<br />
A. Remove the implant healing screw with the 0.9mmD<br />
(0.035") Hex Tool.<br />
Manual Driver<br />
B. The Bone Contouring Tool may be operated either manually<br />
in the Manual Driver or in the handpiece by engagement of<br />
the Latch-Lock.<br />
C. When using a Manual Driver, insert the appropriate<br />
flared bone contouring that matches the diameter of the<br />
Temporary Gingival Cuff being placed. Place the tip of the<br />
Bone Contouring Tool into the internal thread of the implant<br />
body. The Bone Contouring Tool should be oriented such<br />
that it is axially parallel to the implant trajectory (Figs. 20<br />
and 21). Turn the driver in a clockwise direction while<br />
applying moderate axial pressure. Continue until enough<br />
bone is removed to seat the Temporary Gingival Cuff flush<br />
with the implant interface.<br />
Figure 20. The Bone Contouring Tool is oriented axially parallel to the<br />
implant trajectory.<br />
D. When using the handpiece, choose the appropriate flared<br />
Bone Contouring Tool that matches the diameter of the<br />
Temporary Gingival Cuff being placed. Place the tip of the<br />
Bone Contouring Tool into the internal threads of the implant<br />
body. The rotational speed for the contouring procedure<br />
should be between 50-100 rpm. Apply light axial pressure<br />
until enough bone is removed to seat the Temporary<br />
Gingival Cuff flush with the implant interface. Maintain<br />
proper angularity of the Bone Contouring Tool during use.<br />
Note: Use of excessive force and duration may cause damage.<br />
External irrigation must be used during this procedure.<br />
correct<br />
incorrect<br />
E. Remove the tool from the site. Flush and aspirate the <strong>Spline</strong><br />
interface and internal threads to remove debris. A Temporary<br />
Gingival Cuff or abutment can now be placed.<br />
Figure 21. Use of the Bone Contouring Tool with the Manual Driver.
Surgical Technique and <strong>Implant</strong> Placement<br />
17<br />
Contraindictions<br />
<strong>Zimmer</strong> <strong>Dental</strong> <strong>Implant</strong>s should not be placed if there is<br />
insufficient alveolar bone width and height to surround the<br />
implant. <strong>Implant</strong>s placed in the maxilla should not perforate<br />
the sinus. Insufficient availability of bone (minimum 1mm<br />
circumferential and 2mm apical), poor bone quality, poor<br />
patient oral hygiene, heavy smoking or use of chewing tobacco,<br />
and generalized diseases (diabetes, etc.) may contribute to<br />
lack of integration and subsequent implant failure. Severe<br />
bruxism, clenching, or overloading may cause failure of<br />
abutments and implants. Psychologically unstable patients<br />
may not be good implant candidates. Clinicians should select<br />
patients who they feel will be satisfied psychologically, as well<br />
as esthetically and functionally, with the restoration. Exposure<br />
to magnetic resonance imaging, radiation, and chemotherapy<br />
may impact the viability of the implant. <strong>Dental</strong> implant<br />
patients should be instructed to consult with their physician<br />
prior to undergoing such treatment options.<br />
Warnings<br />
Surgical techniques required to place dental implants are highly<br />
specialized and complex procedures. Specialized training is<br />
strongly recommended. Practitioners should attend courses<br />
of study to prepare them in established techniques of oral<br />
implantology. Improper technique can cause implant failure<br />
and loss of bone. Irrigation technique should be reviewed to<br />
ensure that compressed coolant air is not introduced into the<br />
surgical site via a surgical bur. <strong>Zimmer</strong> <strong>Dental</strong> <strong>Implant</strong><br />
<strong>System</strong>s are intended to be used only with <strong>Zimmer</strong> <strong>Dental</strong>’s<br />
specially-designed bone drills and prosthetic abutments.<br />
<strong>Implant</strong>s placed at severe angles relative to existing dentition<br />
or multiple implants placed in a convergent/divergent manner<br />
can result in complex restorations that may overload the<br />
implants, potentially leading to implant failure. Templates or<br />
surgical guides should be used when possible to help ensure<br />
proper angulation.<br />
Excessive mobility, bone loss, or infection may indicate that<br />
the implant is failing. Any implant which appears to be failing<br />
should be treated or removed as soon as possible. If removal<br />
is necessary, curette any soft tissue from the implant site and<br />
allow the site to heal as though it were an atraumatic extraction.<br />
Changes in Performance<br />
It is the responsibility of the clinician to instruct the patient on<br />
all appropriate contraindications, side effects, and precautions<br />
as well as to seek the services of a trained dental professional<br />
if there are any changes in the status of the implant (e.g.,<br />
looseness of the prosthesis, infection or exudate around the<br />
implant, pain, or any other unusual symptoms that the patient<br />
has not been told to expect). If these conditions occur, the<br />
patient should be instructed to see a trained dental<br />
professional immediately.<br />
Precautions<br />
Adequate palpation and direct visual inspection of the<br />
prospective implant site are necessary to determine the<br />
anatomy of available bone. The location of anatomical<br />
features to be avoided should be established prior to use of<br />
<strong>Zimmer</strong> <strong>Dental</strong> <strong>Implant</strong>s. Care must be taken to evaluate the<br />
quality and quantity of the residual bone prior to placement<br />
of the implant and after an implant failure.<br />
Hygiene & Maintenance<br />
Long-term health of the implant can be directly related to the<br />
quality of oral hygiene. Potential implant candidates should<br />
establish an adequate oral hygiene regimen prior to implant<br />
therapy. Following implant placement, the clinician should<br />
instruct the patient on proper tools and techniques to ensure<br />
long-term maintenance of the implant(s). The patient should<br />
also be instructed to periodically visit their dental professional<br />
for professional cleanings and evaluation.<br />
Caution<br />
Federal (U.S.A.) law restricts this device to sale by or on the<br />
order of a licensed dentist.<br />
Cleaning<br />
Cleaning of reusable products should be performed according<br />
to current dental standard practices. Select a suitable method<br />
of cleaning that removes all visible contamination from the<br />
product. After cleaning, package the product appropriately and<br />
then sterilize according to the guidelines for sterilization (see<br />
pages 5 and 6).<br />
Side Effects<br />
By carefully following the instructions for use and utilizing good<br />
surgical technique, complications can be kept to a minimum.<br />
The following complications may occur: dehiscence, delayed<br />
healing, paresthesia, hyperesthesia, edema, hemorrhage,<br />
hematoma, infection, inflammation, and local and generalized<br />
allergic reaction.
For more information about our Products, Professional Programs<br />
and Continuing Education, contact us:<br />
1900 Aston Avenue<br />
Carlsbad, CA 92008-7308, USA<br />
In the U.S. 800 854 7019<br />
To fax an order 888 225 2483<br />
Outside the U.S. +1 760 929 4300<br />
Australia +61 (0)2 9950 5444<br />
Canada +1 905 567 2073 or 1 800 265 0968<br />
France +33 (0)1 45 12 35 35<br />
Germany +49 (0)761 4584 722/723<br />
Israel +972 (0)3 6124242<br />
Spain +34 93 846 05 43<br />
©2006 <strong>Zimmer</strong> <strong>Dental</strong> Inc. All rights reserved. 4788, Rev. 5/06.<br />
To receive our eNews visit us at http://www.zimmerdental.com/news_eNewsLetterSignUp.aspx<br />
www.zimmerdental.com