x 20' Master Series High Peak Frame Tent Directions - Celina Tent
x 20' Master Series High Peak Frame Tent Directions - Celina Tent
x 20' Master Series High Peak Frame Tent Directions - Celina Tent

You also want an ePaper? Increase the reach of your titles
YUMPU automatically turns print PDFs into web optimized ePapers that Google loves.
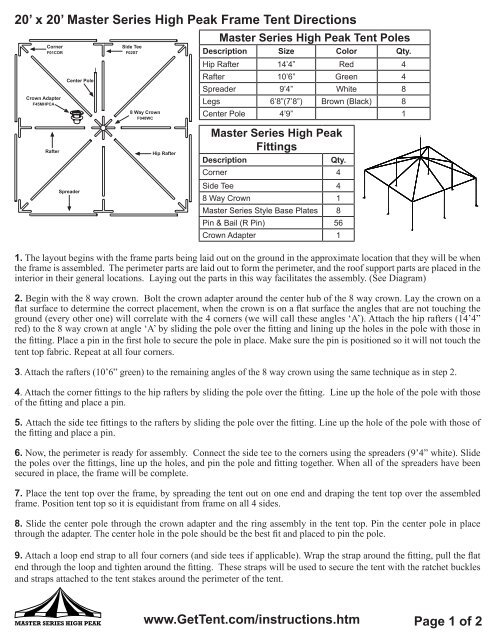
20’ x 20’ <strong>Master</strong> <strong>Series</strong> <strong>High</strong> <strong>Peak</strong> <strong>Frame</strong> <strong>Tent</strong> <strong>Directions</strong><br />
Corner<br />
F01COR<br />
Crown Adapter<br />
F45MHPCA<br />
Rafter<br />
Center Pole<br />
Spreader<br />
Side Tee<br />
F02ST<br />
8 Way Crown<br />
F048WC<br />
Hip Rafter<br />
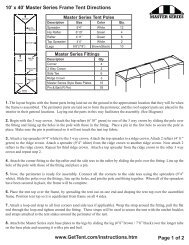
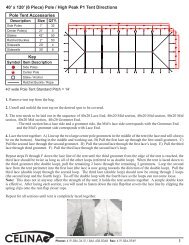
<strong>Master</strong> <strong>Series</strong> <strong>High</strong> <strong>Peak</strong> <strong>Tent</strong> Poles<br />
Description Size Color Qty.<br />
Hip Rafter 14’4” Red 4<br />
Rafter 10’6” Green 4<br />
Spreader 9’4” White 8<br />
Legs 6’8”(7’8”) Brown (Black) 8<br />
Center Pole 4’9” 1<br />
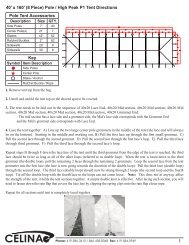
<strong>Master</strong> <strong>Series</strong> <strong>High</strong> <strong>Peak</strong><br />
Fittings<br />
Description Qty.<br />
Corner 4<br />
Side Tee 4<br />
8 Way Crown 1<br />
<strong>Master</strong> <strong>Series</strong> Style Base Plates 8<br />
Pin & Bail (R Pin) 56<br />
Crown Adapter 1<br />
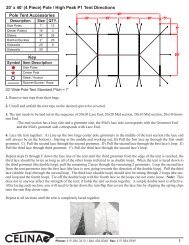
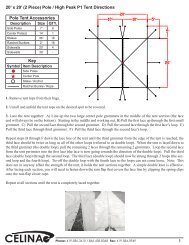
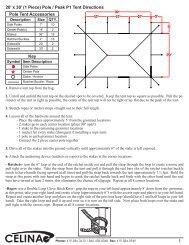
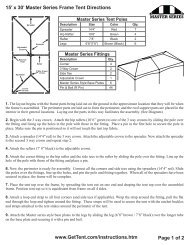
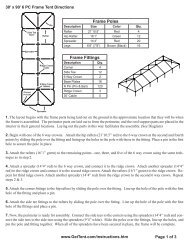
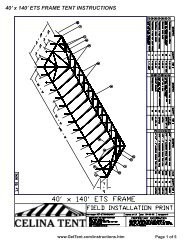
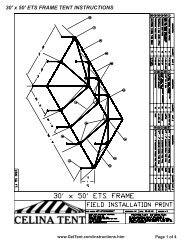
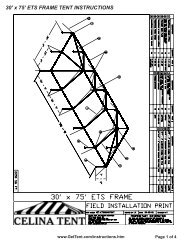
1. The layout begins with the frame parts being laid out on the ground in the approximate location that they will be when<br />
the frame is assembled. The perimeter parts are laid out to form the perimeter, and the roof support parts are placed in the<br />
interior in their general locations. Laying out the parts in this way facilitates the assembly. (See Diagram)<br />
2. Begin with the 8 way crown. Bolt the crown adapter around the center hub of the 8 way crown. Lay the crown on a<br />
flat surface to determine the correct placement, when the crown is on a flat surface the angles that are not touching the<br />
ground (every other one) will correlate with the 4 corners (we will call these angles ‘A’). Attach the hip rafters (14’4”<br />
red) to the 8 way crown at angle ‘A’ by sliding the pole over the fitting and lining up the holes in the pole with those in<br />
the fitting. Place a pin in the first hole to secure the pole in place. Make sure the pin is positioned so it will not touch the<br />
tent top fabric. Repeat at all four corners.<br />
3. Attach the rafters (10’6” green) to the remaining angles of the 8 way crown using the same technique as in step 2.<br />
4. Attach the corner fittings to the hip rafters by sliding the pole over the fitting. Line up the hole of the pole with those<br />
of the fitting and place a pin.<br />
5. Attach the side tee fittings to the rafters by sliding the pole over the fitting. Line up the hole of the pole with those of<br />
the fitting and place a pin.<br />
6. Now, the perimeter is ready for assembly. Connect the side tee to the corners using the spreaders (9’4” white). Slide<br />
the poles over the fittings, line up the holes, and pin the pole and fitting together. When all of the spreaders have been<br />
secured in place, the frame will be complete.<br />
7. Place the tent top over the frame, by spreading the tent out on one end and draping the tent top over the assembled<br />
frame. Position tent top so it is equidistant from frame on all 4 sides.<br />
8. Slide the center pole through the crown adapter and the ring assembly in the tent top. Pin the center pole in place<br />
through the adapter. The center hole in the pole should be the best fit and placed to pin the pole.<br />
9. Attach a loop end strap to all four corners (and side tees if applicable). Wrap the strap around the fitting, pull the flat<br />
end through the loop and tighten around the fitting. These straps will be used to secure the tent with the ratchet buckles<br />
and straps attached to the tent stakes around the perimeter of the tent.<br />
www.Get<strong>Tent</strong>.com/instructions.htm Page 1 of 2
20’ x 20’ <strong>Master</strong> <strong>Series</strong> <strong>High</strong> <strong>Peak</strong> <strong>Frame</strong> <strong>Tent</strong> <strong>Directions</strong><br />
10. Attach the <strong>Master</strong> <strong>Series</strong> style base plates to the legs by sliding the leg (6’8” brown / 7’8” black) over the longer tube<br />
on the base plate and securing it with a pin and bail.<br />
11. Start at one corner and manually lift the frame so that the top of the leg (6’8” brown / 7’8” black) can slide into the<br />
top corner fitting positioning the leg so that the smaller tube on the base plate is facing out. This will allow the “D ring”<br />
on the ratchet assembly to easily fit onto the base plate hook feature molded on the small tube. Attach the “D ring” to the<br />
hook assemblies on each base plate and feed the end of top strap attached to the tent top through the ratchet buckle and<br />
secure loosely. Cinch the ratchet straps together in a uniform manner until the tent top is taut over the frame.<br />
12. The tent should be anchored down using traditional methods, incorporating the loop end straps attached to the corner/<br />
side fittings and a ratchet buckle strap attached to stakes positioned outside of the tent footprint. A double head tent stake<br />
should also be anchored through the smaller tube on the base plate for additional stability.<br />
13. The tent top should now be complete! If sidewalls are desired, unroll the sidewalls between the stakes and the side<br />
poles around the perimeter of the tent. Starting at a side pole, clip the sidewall snap hooks to the rope line that is attached<br />
to the tent top.<br />
Why two sets of holes in frame fittings?<br />
Two holes are located in each protrusion of almost every frame tent fitting. The first hole (furthest from the center of the<br />
fitting) is for the pin that holds the pole in place. The second pin (located closest to the center of the fitting) is an alignment<br />
hole. When a pin is placed in this alignment hole, it prevents the frame pole from moving to far.<br />
1. Insert the pin in the hole closest to the center of the fitting (alignment hole).<br />
2. Slide the pole on the protrusion until it meets the pin.<br />
3. Rotate the pole until the holes on the pole and fitting is aligned properly.<br />
4. Insert the pin through the pole and fitting.<br />
5. Remove the first pin (the alignment pin).<br />
If you have any questions, please contact <strong>Celina</strong> <strong>Tent</strong>s support department at:<br />
support@celinatent.com<br />
1-866-GET-TENT /419-586-3610<br />
www.Get<strong>Tent</strong>.com<br />
Page 2 of 2