2.2 The GENios, GENios FL, and GENios Plus - AFAB Lab
2.2 The GENios, GENios FL, and GENios Plus - AFAB Lab
2.2 The GENios, GENios FL, and GENios Plus - AFAB Lab

Create successful ePaper yourself
Turn your PDF publications into a flip-book with our unique Google optimized e-Paper software.
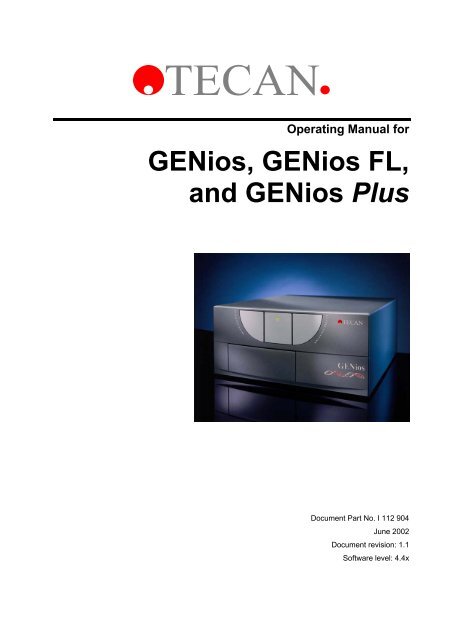
Operating Manual for<br />
<strong>GENios</strong>, <strong>GENios</strong> <strong>FL</strong>,<br />
<strong>and</strong> <strong>GENios</strong> <strong>Plus</strong><br />
Document Part No. I 112 904<br />
June 2002<br />
Document revision: 1.1<br />
Software level: 4.4x
TECAN Affiliates <strong>and</strong> Service Centers<br />
Austria<br />
Tecan Austria GmbH<br />
Untersbergstrasse 1a<br />
A-5082 Grödig / Salzburg<br />
Austria<br />
Tel.: +43 62 46 89 33<br />
Fax: +43 62 46 72 770<br />
Switzerl<strong>and</strong><br />
Tecan Schweiz AG<br />
Seestrasse 103<br />
CH-8708 Männedorf<br />
Switzerl<strong>and</strong><br />
Tel.: + 41 1 922 81 11<br />
Fax. : +41 1 922 81 12<br />
France<br />
Tecan France S.A.<br />
Parc d'Activités de Pissaloup<br />
Batiment Hermes II<br />
Rue Edouard Branly<br />
F-78190 Trappes<br />
France<br />
Tel.: +33 1 30 68 81 50<br />
Fax: +33 1 30 68 98 13<br />
Japan<br />
Tecan Japan Co. Ltd<br />
Meiji Seimei Fuchu Building 10F<br />
1-40 Miyamachi<br />
Fuchu City, Tokyo<br />
Japan<br />
Tel.: +81 42 334 88 55<br />
Fax: +81 42 334 04 01<br />
Spain<br />
Tecan Spain<br />
Sabino de Arana, 32<br />
E-08028 Barcelona<br />
Spain<br />
Tel.: +34 93 490 01 74<br />
Fax: +34 93 411 24 07<br />
USA<br />
Tecan Boston<br />
200 Boston Avenue<br />
Suite 3000<br />
Medford, MA 02155<br />
USA<br />
Tel.: +1 781 306 08 27<br />
Fax: +1 781 306 0837<br />
United Kingdom<br />
Tecan UK<br />
<strong>The</strong>ale Court<br />
11-13 High Street<br />
<strong>The</strong>ale<br />
UK-Reading RG7 5AH<br />
United Kingdom<br />
Tel.: +44 11 89 300 300<br />
Fax: +44 11 89 305 671<br />
Asia<br />
Tecan Asia (Pte) Ltd.<br />
80, Marine Parade #13-04<br />
Singapore 449269<br />
Singapore<br />
Tel.: +65 44 41 886<br />
Fax: +65 44 41 836<br />
Belgium<br />
Tecan Benelux B.V.B.A.<br />
Vaartdijk 55<br />
B-2800 Mechelen<br />
Belgium<br />
Tel.: +32 15 42 13 19<br />
Fax. +32 15 42 16 12<br />
Italy<br />
Tecan Italia S.r.l.<br />
Via F.lli Cervi<br />
Palazzo Bernini<br />
Centro Direzionale Milano2<br />
I-20090 Segrate (Mi)<br />
Italy<br />
Tel.: +39 02 215 21 28<br />
Fax: +39 02 215 97 441<br />
USA<br />
Tecan US<br />
P.O. Box 13953<br />
Research Triangle Park,<br />
NC 27709<br />
USA<br />
Tel.: +1 919 361 5200<br />
Fax: +1 919 361 5201<br />
Germany<br />
Tecan Deutschl<strong>and</strong> GmbH<br />
<strong>The</strong>odor-Strom-Straße 17<br />
D-74564 Crailsheim<br />
Germany<br />
Tel.: +49 79 51 94 170<br />
Fax: +49 79 51 50 38<br />
Netherl<strong>and</strong>s<br />
Tecan Benelux B.V.B.A.<br />
Industrieweg 30,<br />
NL-4283 Giessen,<br />
Netherl<strong>and</strong>s;<br />
Tel.: +31 018 34 48 17 4<br />
Fax: +31 018 34 48 06 7<br />
2 Operating Manual for <strong>GENios</strong>, <strong>GENios</strong> <strong>FL</strong>, <strong>and</strong> <strong>GENios</strong> <strong>Plus</strong> No: I 112 904 Rev No: 1.1 June 2002
WARNING<br />
CAREFULLY READ AND FOLLOW THE INSTRUCTIONS<br />
PROVIDED IN THIS MANUAL BEFORE OPERATING THE<br />
INSTRUMENT.<br />
Notice<br />
Every effort has been made to avoid errors in text <strong>and</strong> diagrams, however,<br />
TECAN Austria Ges.m.b.H. assumes no responsibility for any errors which may<br />
appear in this publication.<br />
It is the policy of TECAN Austria Ges.m.b.H. to improve products as new<br />
techniques <strong>and</strong> components become available. TECAN Austria Ges.m.b.H.<br />
therefore reserves the right to change specifications at any time.<br />
We would appreciate any comments on this publication.<br />
TECAN Austria Ges.m.b.H.<br />
Untersbergstraße 1A<br />
A-5082 Grödig/Salzburg<br />
AUSTRIA / EUROPE<br />
Telephone: 0043 (0)6246/8933<br />
FAX: 0043 (0) 6246/72770<br />
E-Mail: office.austria@tecan.com<br />
Copyright Information<br />
<strong>The</strong> contents of this manual are the property of TECAN Austria Ges.m.b.H <strong>and</strong><br />
are not to be copied, reproduced or transferred to another person or persons<br />
without our prior written permission.<br />
Copyright © TECAN Austria Ges.m.b.H<br />
All rights reserved.<br />
Printed in Austria.<br />
About this Manual<br />
This manual describes the <strong>GENios</strong>, <strong>GENios</strong> <strong>FL</strong>, <strong>and</strong> <strong>GENios</strong> <strong>Plus</strong> instruments,<br />
which are detection devices designed for measuring samples in a microplate.<br />
It is intended as a reference <strong>and</strong> instruction manual for the user.<br />
This manual instructs how to:<br />
• Install the instrument<br />
• Operate the instrument<br />
• Insert <strong>and</strong> define filter slides<br />
• Perform quality control tests<br />
• Clean <strong>and</strong> maintain the instrument<br />
June 2002 Operating Manual for <strong>GENios</strong>, <strong>GENios</strong> <strong>FL</strong>, <strong>and</strong> <strong>GENios</strong> <strong>Plus</strong> No: I 112 904 Rev No: 1.1 3
Warnings, Cautions <strong>and</strong> Notes<br />
<strong>The</strong>re are three types of informational notices used in this manual. <strong>The</strong>se notices<br />
highlight important information or warn the user of a potentially dangerous<br />
situation. <strong>The</strong> following notices are:<br />
Note:<br />
Gives helpful information.<br />
Caution<br />
Indicates a possibility of instrument damage or data loss if<br />
instructions are not followed.<br />
WARNING<br />
INDICATES THE POSSIBILITY OF SEVERE PERSONAL INJURY,<br />
LOSS OF LIFE OR EQUIPMENT DAMAGE IF THE INSTRUCTIONS<br />
ARE NOT FOLLOWED.<br />
4 Operating Manual for <strong>GENios</strong>, <strong>GENios</strong> <strong>FL</strong>, <strong>and</strong> <strong>GENios</strong> <strong>Plus</strong> No: I 112 904 Rev No: 1.1 June 2002
Registration Form<br />
Dear Customer,<br />
Congratulations on purchasing one of TECAN's microplate readers: <strong>GENios</strong>,<br />
<strong>GENios</strong> <strong>FL</strong>, or <strong>GENios</strong> <strong>Plus</strong>. We are sure that the performance of the instrument<br />
will show that you have made the right choice.<br />
In order to ensure that you will be satisfied with your instrument for a long time we<br />
would like to ask you to fill in the registration form below or send us an email at<br />
office.austria@tecan.com with the relevant information. By doing this you are<br />
qualified to receive all updates of <strong>GENios</strong> software X<strong>FL</strong>UOR free of charge as they<br />
are released.<br />
We would appreciate any comments or questions you may have regarding the<br />
performance of the instrument.<br />
TECAN<br />
Your partner in microplate measurement <strong>and</strong> h<strong>and</strong>ling<br />
Registration Form<br />
<strong>GENios</strong><br />
Serial Number: ---------------------------------------<br />
Company / University: ---------------------------------------<br />
Department / Institute: ---------------------------------------<br />
User Name: ---------------------------------------<br />
Address: ---------------------------------------<br />
Street: --------------------------------------------<br />
City / State / Zip code: --------------------------------------------<br />
Country: --------------------------------------------<br />
Phone: ---------------------------------------<br />
Fax: ---------------------------------------<br />
TECAN Austria GmbH<br />
Untersbergstr. 1A<br />
A-5082 Grödig<br />
AUSTRIA<br />
Place<br />
postage<br />
here<br />
Applications /<br />
Field of use: ---------------------------------------<br />
---------------------------------------<br />
June 2002 Operating Manual for <strong>GENios</strong>, <strong>GENios</strong> <strong>FL</strong>, <strong>and</strong> <strong>GENios</strong> <strong>Plus</strong> No: I 112 904 Rev No: 1.1 5
Table of Contents<br />
1. Safety<br />
1.1 Instrument Safety .......................................................................... 1-1<br />
2. General Description<br />
2.1 Introduction.................................................................................... 2-1<br />
<strong>2.2</strong> <strong>The</strong> <strong>GENios</strong>, <strong>GENios</strong> <strong>FL</strong>, <strong>and</strong> <strong>GENios</strong> <strong>Plus</strong>................................. 2-2<br />
3. Installation<br />
3.1 Unpacking & Inspection................................................................ 3-1<br />
3.2 Removal of the Transport Lock.................................................... 3-2<br />
3.3 Power Requirements..................................................................... 3-3<br />
3.4 Switching the Instrument ON ....................................................... 3-4<br />
4. Inserting <strong>and</strong> Defining Filter Slides<br />
4.1 About Filters .................................................................................. 4-1<br />
4.1.1 Fluorescence Filters ........................................................................ 4-1<br />
4.1.2 Absorbance Filters........................................................................... 4-1<br />
4.1.3 Organization of Filters in Filter Slides.............................................. 4-2<br />
4.2 Inserting the Filter Slides.............................................................. 4-3<br />
4.3 How Do I Install the Custom Filter? ............................................. 4-4<br />
4.3.1 Defining the Filter ............................................................................ 4-6<br />
5. Instrument Features<br />
5.1 Specifications (<strong>GENios</strong>)................................................................ 5-1<br />
5.1.1 Fluorescence ................................................................................... 5-3<br />
5.1.2 Absorbance ..................................................................................... 5-4<br />
5.1.3 Glow Type Luminescence ............................................................... 5-4<br />
5.2 Specifications (<strong>GENios</strong> <strong>FL</strong>) .......................................................... 5-5<br />
5.2.1 Fluorescence ................................................................................... 5-7<br />
5.3 Specifications (<strong>GENios</strong> <strong>Plus</strong>) ....................................................... 5-8<br />
5.3.1 Fluorescence ................................................................................. 5-10<br />
5.3.2 Absorbance ................................................................................... 5-11<br />
5.3.3 Glow Type Luminescence ............................................................. 5-11<br />
6. Interface<br />
6.1 Hardware Specifications............................................................... 6-1<br />
6.2 Pin Designation ............................................................................. 6-1<br />
6.3 RS-232-C Interface Lines .............................................................. 6-2<br />
6.4 Synchronization <strong>and</strong> Data Format ............................................... 6-3<br />
6.5 Signal Levels.................................................................................. 6-3<br />
6 Operating Manual for <strong>GENios</strong>, <strong>GENios</strong> <strong>FL</strong>, <strong>and</strong> <strong>GENios</strong> <strong>Plus</strong> No: I 112 904 Rev No: 1.1 June 2002
7. Quality Control<br />
7.1 Periodic Quality Control Tests ..................................................... 7-1<br />
7.2 Fluorescence ................................................................................. 7-1<br />
7.2.1 Sensitivity Test ................................................................................ 7-1<br />
7.<strong>2.2</strong> Linearity Test ................................................................................... 7-2<br />
7.2.3 Precision Test.................................................................................. 7-3<br />
7.2.4 Cross-Talk Test ............................................................................... 7-3<br />
7.3 Glow Type Luminescence ............................................................ 7-4<br />
7.3.1 Sensitivity Test ................................................................................ 7-4<br />
7.3.2 Cross-Talk Test ............................................................................... 7-5<br />
8. Cleaning & Maintenance<br />
8.1 Introduction.................................................................................... 8-1<br />
8.2 Liquid Spills ................................................................................... 8-1<br />
8.3 Replacing the Fuse........................................................................ 8-2<br />
8.4 Maintenance................................................................................... 8-3<br />
8.4.1 Daily................................................................................................. 8-3<br />
8.4.2 Weekly............................................................................................. 8-3<br />
8.4.3 Every Six Months............................................................................. 8-3<br />
8.4.4 Yearly Maintenance......................................................................... 8-3<br />
8.5 Instrument Disinfection ................................................................ 8-4<br />
8.5.1 Disinfection Solutions ...................................................................... 8-4<br />
8.5.2 Disinfection Procedure .................................................................... 8-5<br />
8.6 Disinfection Certificate ................................................................. 8-6<br />
9. Application Note for DNA Quantification<br />
9.1 Introduction.................................................................................... 9-1<br />
9.1.1 Common techniques for the quantitation of DNA ............................ 9-1<br />
9.2 Experimental Setup ....................................................................... 9-2<br />
9.2.1 DNA extraction ................................................................................ 9-2<br />
9.<strong>2.2</strong> Assay Procedure ............................................................................. 9-2<br />
9.3 Typical Results .............................................................................. 9-3<br />
9.3.1 Detection techniques vs detection limits.......................................... 9-3<br />
9.3.2 Sensitivities in comparison: ............................................................. 9-4<br />
9.3.3 Results from Plasmid <strong>and</strong> Blood DNA Sample................................ 9-4<br />
9.3.4 DNA Purity at 260/280 nm............................................................... 9-5<br />
9.4 Conclusion ..................................................................................... 9-5<br />
Acknowledgements ......................................................................... 9-5<br />
Index<br />
June 2002 Operating Manual for <strong>GENios</strong>, <strong>GENios</strong> <strong>FL</strong>, <strong>and</strong> <strong>GENios</strong> <strong>Plus</strong> No: I 112 904 Rev No: 1.1 7
1. Safety<br />
1. Safety<br />
1.1 Instrument Safety<br />
1. Always follow basic safety precautions when using this product to reduce the<br />
risk of injury, fire, or electrical shock.<br />
2. Read <strong>and</strong> underst<strong>and</strong> all information in the Operating Manual. Failure to<br />
read, underst<strong>and</strong>, <strong>and</strong> follow the instructions in the manual may result in<br />
damage to the product, injury to operating personnel or poor instrument<br />
performance.<br />
3. Observe all STOP <strong>and</strong> CAUTION statements in the manual.<br />
4. Never open the instrument while it is plugged into a power source.<br />
5. Never force a microplate or filter slide into the instrument.<br />
6. <strong>The</strong> <strong>GENios</strong>, <strong>GENios</strong> <strong>FL</strong>, <strong>and</strong> <strong>GENios</strong> <strong>Plus</strong> are intended for laboratory research use only. Observe<br />
proper laboratory safety precautions, such as wearing protective clothing <strong>and</strong> using approved<br />
laboratory safety procedures.<br />
7. When using <strong>GENios</strong>, <strong>GENios</strong> <strong>FL</strong>, or <strong>GENios</strong> <strong>Plus</strong> please refer to<br />
5. Instrument Features.I13737~1.PDF<br />
June 2002 Operating Manual for <strong>GENios</strong>, <strong>GENios</strong> <strong>FL</strong>, <strong>and</strong> <strong>GENios</strong> <strong>Plus</strong> No: I 112 904 Rev No: 1.1 1-1
2. General Description<br />
2. General Description<br />
2.1 Introduction<br />
<strong>The</strong> <strong>GENios</strong> instruments are fully automatic, computer controlled microplate<br />
readers for measuring samples in a microplate. <strong>The</strong> instruments fulfill the<br />
requirements for numerous fluorescence, absorbance <strong>and</strong> glow type<br />
luminescence applications in research <strong>and</strong> routine investigations.<br />
Note:<br />
<strong>The</strong> <strong>GENios</strong> <strong>FL</strong> instrument does not have absorbance or glow type<br />
luminescence measurement capabilities.<br />
<strong>The</strong> <strong>GENios</strong> Reader offers fluorescence, absorbance, <strong>and</strong> glow type<br />
luminescence <strong>and</strong> can be used with 384, 96, 24, 12 or 6 well microplates.<br />
<strong>The</strong> <strong>GENios</strong> <strong>FL</strong> Reader offers fluorescence top measurement with 384, 96, 24,<br />
12 or 6 wells.<br />
<strong>The</strong> <strong>GENios</strong> <strong>Plus</strong> Reader offers glow type luminescence, absorbance <strong>and</strong><br />
fluorescence with high sensitivity especially in the UV range <strong>and</strong> the capability of<br />
measuring fluorescence in 1536 well plates.<br />
<strong>The</strong> filters are arranged in filter slides; four excitation filters <strong>and</strong> four emission<br />
filters respectively. <strong>The</strong> instrument has no on-board software <strong>and</strong> is exclusively<br />
controlled via an external computer using Windows format.<br />
June 2002 Operating Manual for <strong>GENios</strong>, <strong>GENios</strong> <strong>FL</strong>, <strong>and</strong> <strong>GENios</strong> <strong>Plus</strong> No: I 112 904 Rev No: 1.1 2-1
2. General Description<br />
<strong>2.2</strong> <strong>The</strong> <strong>GENios</strong>, <strong>GENios</strong> <strong>FL</strong>, <strong>and</strong> <strong>GENios</strong> <strong>Plus</strong><br />
Front View<br />
Ensure that the instrument<br />
is held on both sides<br />
during transportation!<br />
2<br />
1<br />
4<br />
3<br />
1 = power LED<br />
2 = emission filter<br />
3 = excitation filter<br />
4 = plate carrier<br />
Caution<br />
If the instructions given in this manual are not correctly performed, the<br />
instrument may be damaged or the procedure may not be performed<br />
correctly <strong>and</strong> the safety of the instrument can not be guaranteed.<br />
2-2 Operating Manual for <strong>GENios</strong>, <strong>GENios</strong> <strong>FL</strong>, <strong>and</strong> <strong>GENios</strong> <strong>Plus</strong> No: I 112 904 Rev No: 1.1 June 2002
3. Installation<br />
3. Installation<br />
3.1 Unpacking & Inspection<br />
<strong>The</strong> delivered packaging includes the following:<br />
• Instrument with absorbance, excitation <strong>and</strong> emission filter slides<br />
• Operating manual <strong>and</strong> X<strong>FL</strong>UOR manual<br />
• Fluorescence Microplate Assays catalog<br />
• Fluorescence Probes <strong>and</strong> Research Chemicals h<strong>and</strong>book<br />
• Software (disk, CD)<br />
• Cables (interface <strong>and</strong> mains)<br />
• Transport lock<br />
• Spare fuses<br />
• 2 mm Allen key<br />
• Cover plate for use with luminescence measurements<br />
• Adapter plate for use with cuvettes<br />
Note<br />
Due to its specifications, the <strong>GENios</strong> <strong>FL</strong> instrument does not come<br />
delivered with absorbance filter slides, cover plate used for<br />
luminescence measurements or adapter plate for use with cuvettes.<br />
Visually inspect the container for damage before it is opened.<br />
Report any damage immediately.<br />
Select a location to place the instrument that is flat, level, vibration free, away<br />
from direct sunlight <strong>and</strong> free from dust, solvents <strong>and</strong> acid vapors. Allow at least<br />
10cm distance between the back of the instrument <strong>and</strong> the wall or any other<br />
equipment. Ensure that the main switch <strong>and</strong> the mains cable can be reached at<br />
all times <strong>and</strong> are in no way obstructed.<br />
Place the carton in an upright position <strong>and</strong> open it.<br />
Lift the instrument out of the carton <strong>and</strong> place it in the selected location. Take<br />
care when lifting the instrument <strong>and</strong> ensure that it is held on both sides.<br />
Visually inspect the instrument for loose, bent or broken parts.<br />
Report any damage immediately.<br />
Compare the serial number on the rear panel of the instrument with the serial<br />
number on the packing slip.<br />
Report any discrepancy immediately.<br />
Check the instrument accessories against the packing list.<br />
Save packing materials <strong>and</strong> transport lock for further transportation purposes.<br />
Define <strong>and</strong> insert the filters<br />
June 2002 Operating Manual for <strong>GENios</strong>, <strong>GENios</strong> <strong>FL</strong>, <strong>and</strong> <strong>GENios</strong> <strong>Plus</strong> No: I 112 904 Rev No: 1.1 3-1
3. Installation<br />
3.2 Removal of the Transport Lock<br />
<strong>The</strong> instrument is delivered with the plate support locked into place, so that it can<br />
not be damaged.<br />
Before the instrument can be used the transport lock must be removed using the<br />
following procedure:<br />
1. Ensure that the instrument is disconnected from the mains power supply.<br />
2. Open the plate compartment flap.<br />
3. Using the 2mm Allen key supplied, remove the two screws holding the<br />
transport lock in place. (See diagram below).<br />
2 screws<br />
4. Remove the transport lock.<br />
Note:<br />
<strong>The</strong> transport lock should be saved for further transportation purposes.<br />
3-2 Operating Manual for <strong>GENios</strong>, <strong>GENios</strong> <strong>FL</strong>, <strong>and</strong> <strong>GENios</strong> <strong>Plus</strong> No: I 112 904 Rev No: 1.1 June 2002
3. Installation<br />
3.3 Power Requirements<br />
<strong>The</strong> instrument is auto sensing <strong>and</strong> it is therefore unnecessary to make any<br />
changes to the voltage range. Check the voltage specifications on the rear panel<br />
of the instrument <strong>and</strong> ensure that the voltage supplied to the instrument is correct<br />
to this specification.<br />
<strong>The</strong> voltage range is 100-120 / 220-240V.<br />
If the voltage is not correct, please contact your distributor.<br />
Caution<br />
Do not use the instrument if the voltage setting is not correct.<br />
If the instrument is switched ON with the incorrect voltage<br />
setting it will be damaged.<br />
Ensure that the correct type <strong>and</strong> rating of fuse is fitted.<br />
Fuse = T 2A / 250 (slow blow)<br />
WARNING<br />
RISK OF FIRE!<br />
REPLACE ONLY WITH THE SAME TYPE AND RATING OF FUSE.<br />
June 2002 Operating Manual for <strong>GENios</strong>, <strong>GENios</strong> <strong>FL</strong>, <strong>and</strong> <strong>GENios</strong> <strong>Plus</strong> No: I 112 904 Rev No: 1.1 3-3
3. Installation<br />
3.4 Switching the Instrument ON<br />
Caution<br />
Before the instrument is switched on for the first time after installation,<br />
it should be left to st<strong>and</strong> for at least 3 hours, so there is no possibility of<br />
condensation causing a short circuit.<br />
• Ensure the computer is switched OFF <strong>and</strong> the instrument's mains power<br />
switch in the back panel of the instrument is in the OFF position.<br />
• Connect the computer to the instrument with the delivered RS 232 interface<br />
cable.<br />
• Insert the power cable into the mains power socket (with protective earth<br />
connection) in the back panel of the instrument.<br />
• Connect the connecting cable to the computer <strong>and</strong> the instrument. All<br />
connected devices must be proved <strong>and</strong> listed with regulations EN 60950,<br />
UL 1950 or CSA C2<strong>2.2</strong> No. 950 for Data Processing Devices<br />
• Switch the instrument ON using the switch in the back panel of the<br />
instrument.<br />
Caution<br />
When installing or uninstalling the instrument ensure that the instrument<br />
<strong>and</strong> the computer are both switched off <strong>and</strong> disconnected from the mains<br />
before the RS 232 interface cable is connected or removed.<br />
Rear View<br />
On/Off Switch<br />
0 = OFF<br />
1 = ON<br />
RS 232<br />
<strong>The</strong> instrument is now ready to be used with a suitable software program.<br />
If the instructions given in this manual are not correctly performed the<br />
instrument may be damaged or procedures may not be correctly performed.<br />
Consequently the safety of the instrument can not be guaranteed.<br />
To operate the software, refer to the X<strong>FL</strong>UOR manual.<br />
3-4 Operating Manual for <strong>GENios</strong>, <strong>GENios</strong> <strong>FL</strong>, <strong>and</strong> <strong>GENios</strong> <strong>Plus</strong> No: I 112 904 Rev No: 1.1 June 2002
4. Inserting <strong>and</strong> Defining Filter Slides<br />
4. Inserting <strong>and</strong> Defining Filter<br />
Slides<br />
4.1 About Filters<br />
4.1.1 Fluorescence Filters<br />
4.1.2 Absorbance Filters<br />
<strong>The</strong> optical filters (b<strong>and</strong>pass style) in the EX <strong>and</strong> EM filter slides are specially<br />
designed for fluorescence measurements. <strong>The</strong> spectral rejection <strong>and</strong> the<br />
b<strong>and</strong>width of the fluorescence filters are optimized for achieving excellent<br />
sensitivity.<br />
Contact TECAN for filters other than those supplied on the st<strong>and</strong>ard filter slides.<br />
B<strong>and</strong>pass filters, which are commonly used in microplate readers for absorbance<br />
measurements, usually have a b<strong>and</strong>width of 10 nm. <strong>The</strong>refore, it is not<br />
recommended to use fluorescence filters for absorbance measurements,<br />
because the b<strong>and</strong>width (FWHM) is usually larger than 10 nm. This could cause a<br />
bright value error or low OD values when measuring dyes with narrow peaks.<br />
June 2002 Operating Manual for <strong>GENios</strong>, <strong>GENios</strong> <strong>FL</strong>, <strong>and</strong> <strong>GENios</strong> <strong>Plus</strong> No: I 112 904 Rev No: 1.1 4-1
4. Inserting <strong>and</strong> Defining Filter Slides<br />
4.1.3 Organization of Filters in Filter Slides<br />
Our filter slides allow for eight different codes. <strong>The</strong> eight filter codes are: A, B, C,<br />
D, E, F, G, <strong>and</strong> H. <strong>The</strong> fluorescence filter slides (EX <strong>and</strong> EM) that contain<br />
st<strong>and</strong>ard filters are coded as A.<br />
<strong>The</strong> absorbance filter slides that contain st<strong>and</strong>ard filters are coded as D.<br />
You can order empty filter slides for:<br />
* Without request it is coded as "B".<br />
<strong>The</strong> barcodes are labeled as follows:<br />
ABS/EX as B 126301 coded as<br />
requested *<br />
EM as B 126102 coded as requested *<br />
A<br />
B<br />
C<br />
D<br />
E<br />
F<br />
G<br />
H<br />
4-2 Operating Manual for <strong>GENios</strong>, <strong>GENios</strong> <strong>FL</strong>, <strong>and</strong> <strong>GENios</strong> <strong>Plus</strong> No: I 112 904 Rev No: 1.1 June 2002
4. Inserting <strong>and</strong> Defining Filter Slides<br />
4.2 Inserting the Filter Slides<br />
<strong>The</strong> filter slides are fitted with up to four interference filters which have a fixed<br />
wavelength <strong>and</strong> are specially designed for fluorescence. Additionally there are<br />
filter slides which are specially designed for absorbance measurements. Do not<br />
use fluorescence filters for absorbance measurements.<br />
Excitation <strong>and</strong> Absorbance Filters<br />
Emission Filter<br />
To insert a filter slide, open the filter compartment manually <strong>and</strong> slot it in so that the<br />
filter end of the slide is inserted first. <strong>The</strong> filter is then inserted automatically if it is<br />
equipped with the automatic insertion code.<br />
<strong>The</strong> excitation filter is<br />
located on the left <strong>and</strong><br />
the emission filter on<br />
the right side of the<br />
instrument.<br />
If the filter slide is not equipped with the automatic insertion code start the X<strong>FL</strong>UOR<br />
program <strong>and</strong> click the Filter in button in the Movements dialog box. <strong>The</strong> filter slide<br />
is then inserted.<br />
(You may have to push the filter slide gently).<br />
Ensure that the filter slides are only inserted into their respective<br />
compartments <strong>and</strong> that they do not get mixed up.<br />
Depending on the measurements that are to be performed, the appropriate filter<br />
slide containing the required wavelength filters, must be inserted into the<br />
instrument. <strong>The</strong> instrument can store the data for up to eight excitation <strong>and</strong> eight<br />
emission filter slides.<br />
<strong>The</strong> filter slides have a specific code which enables the instrument to distinguish<br />
between the filter slides.<br />
Please note<br />
A ex. & em. Fitted with st<strong>and</strong>ard filters - see specifications for values.<br />
D ex. Fitted with st<strong>and</strong>ard absorbance filters.<br />
B, C, E, F, G & H For free configuration.<br />
When a wavelength is selected, the instrument compares the entered wavelength<br />
against the list of entered filter values for this filter carriage.<br />
If the required filter is fitted in the filter slide, the instrument then moves the filter<br />
slide so that the required filter is in the light beam.<br />
June 2002 Operating Manual for <strong>GENios</strong>, <strong>GENios</strong> <strong>FL</strong>, <strong>and</strong> <strong>GENios</strong> <strong>Plus</strong> No: I 112 904 Rev No: 1.1 4-3
4. Inserting <strong>and</strong> Defining Filter Slides<br />
4.3 How Do I Install the Custom Filter?<br />
Caution<br />
<strong>The</strong> filters are precision optical components, which should be h<strong>and</strong>led by<br />
the edges, <strong>and</strong> not scratched or stored face down in a drawer <strong>and</strong> so on.<br />
Once the filters are installed in the slide, they are relatively protected, but<br />
care should be exercised when h<strong>and</strong>ling or storing them.<br />
In order to install a custom filter do the following:<br />
1. If necessary, remove the securing screw (is used with fluorescence filters<br />
which have an aluminum housing) from the filter slide using a 1.5 mm Allen<br />
key.<br />
2. Remove the inner filter securing ring from the filter slide. <strong>The</strong> inner filter<br />
securing ring is used with absorbance filters, which do not have an aluminum<br />
housing.<br />
3. Carefully insert the filter into the opening, taking care not to scratch or get<br />
fingerprints on the filter.<br />
Caution<br />
Take care when removing or replacing filters. <strong>The</strong>y are easily scratched.<br />
If necessary, use the eraser part of a pencil to aid in removing the filter from<br />
the holder. Do this with extreme care as the filters are easily damaged.<br />
4. For filters without aluminum housing, place the filter-securing ring into the<br />
filter slide on top of the filter.<br />
5. For filters with aluminum housing, carefully tighten the securing screw to<br />
secure the filter.<br />
6. If there are unused openings remaining after filter insertion, filter dummies<br />
should be mounted in the holes that are still open. With <strong>GENios</strong> or<br />
<strong>GENios</strong> <strong>Plus</strong>, the emission filter slide can have one hole opened, which is<br />
used for luminescence measurements.<br />
7. Affix the bar code that came with the filter to the back of the filter slide. This<br />
is done by first removing the current bar code if one is present, <strong>and</strong> then affix<br />
the new bar code ensuring that the bar code is in position in the deep<br />
groove. <strong>The</strong> hole of the label must be placed on the centering pin of the filter<br />
slide.<br />
Do not use the two bar codes currently used for the st<strong>and</strong>ard excitation (A)<br />
emission (A), <strong>and</strong> absorbance (D) filter slides for a combination of<br />
customized filters.<br />
4-4 Operating Manual for <strong>GENios</strong>, <strong>GENios</strong> <strong>FL</strong>, <strong>and</strong> <strong>GENios</strong> <strong>Plus</strong> No: I 112 904 Rev No: 1.1 June 2002
4. Inserting <strong>and</strong> Defining Filter Slides<br />
Bar Code<br />
Position<br />
126101<br />
635 nm 595 nm 535 nm 465 nm<br />
04102<br />
EM-A<br />
Centering<br />
Pin for<br />
Bar Code<br />
<strong>Lab</strong>el<br />
Securing Screw<br />
Figure A-1. Location of Securing Screw <strong>and</strong> Bar Code <strong>Lab</strong>el on the Filter Slide (st<strong>and</strong>ard).<br />
<strong>The</strong> EX/ABS <strong>and</strong> EM filter slide can have the same coding.<br />
<strong>The</strong> filter slide is now ready to be placed into the appropriate filter slide<br />
opening <strong>and</strong> be recognized by the software.<br />
June 2002 Operating Manual for <strong>GENios</strong>, <strong>GENios</strong> <strong>FL</strong>, <strong>and</strong> <strong>GENios</strong> <strong>Plus</strong> No: I 112 904 Rev No: 1.1 4-5
4. Inserting <strong>and</strong> Defining Filter Slides<br />
4.3.1 Defining the Filter<br />
Caution<br />
Any changes to the filters in the filter slide are to be carried out by the<br />
service engineer! <strong>The</strong> instrument is able to recognize predefined filter<br />
slides <strong>and</strong> you should not attempt to change the filter values.<br />
However, if the filters in the filter slide have been changed (by a service<br />
engineer) or if a new undefined customized filter slide is to be used, the<br />
filter slides need to be defined.<br />
Define a filter as follows:<br />
1. Close X<strong>FL</strong>UOR.<br />
2. Click the RdrOLE icon in the TECAN group, <strong>and</strong> the RdrOLE screen is<br />
displayed.<br />
3. Select Connect from the Instrument menu. You are now connected to the<br />
<strong>GENios</strong>.<br />
4. Select Define Filter from the Setup menu.<br />
5. <strong>The</strong> following dialog box is displayed showing the filter values for the<br />
excitation <strong>and</strong> the emission filters:<br />
<strong>The</strong> Define Filter Dialog Box:<br />
You can choose the options from the right<br />
column of the dialog box for GENIOS.<br />
6. Enter the new wavelength for each new filter. Ensure that the wavelength<br />
corresponds with the filter position.<br />
7. Accept the new filter values by clicking OK. You are now ready to collect<br />
data with the new filters.<br />
8. Exit RdrOLE by clicking Exit in the File menu <strong>and</strong> restart X<strong>FL</strong>UOR.<br />
9. This completes the installation procedure.<br />
4-6 Operating Manual for <strong>GENios</strong>, <strong>GENios</strong> <strong>FL</strong>, <strong>and</strong> <strong>GENios</strong> <strong>Plus</strong> No: I 112 904 Rev No: 1.1 June 2002
5. Instrument Features<br />
5. Instrument Features<br />
5.1 Specifications (<strong>GENios</strong>)<br />
<strong>The</strong> following types of measurement are provided with the <strong>GENios</strong> microplate<br />
reader.<br />
Measurement Type Read Mode Microplates to be Used<br />
Fluorescence (see 5.1.1)<br />
Absorbance (see 5.1.2)<br />
Glow type luminescence<br />
(see 5.1.3)<br />
St<strong>and</strong>ard <strong>and</strong> timeresolved,<br />
top <strong>and</strong> bottom<br />
Single <strong>and</strong> dual<br />
wavelength<br />
6 - 384 wells<br />
6 - 384 wells<br />
96 wells<br />
<strong>The</strong> instrument allows for kinetic measurements.<br />
Reading may be restricted to one part of the microplate.<br />
Up to four-measurement parameter sets can be queued using X<strong>FL</strong>UOR.<br />
Use of cuvettes<br />
Please Note:<br />
For cuvette use TECAN provides an adapter plate which fits up to 4<br />
st<strong>and</strong>ard 10 mm cuvettes that can be measured simultaneously<br />
(compatible with Hellma 10 mm 110-QS cuvettes equipped with PTFE<br />
plug).<br />
<strong>The</strong> cuvettes are positioned horizontally in the 4 designated areas.<br />
<strong>The</strong> cuvette should be filled completely <strong>and</strong> closed tightly in order to exclude air<br />
from the measurement chamber <strong>and</strong> ensure reliablity of results.<br />
Select the provided CUV.pdf plate format from the plate definition file before the<br />
measurement is started.<br />
<strong>The</strong> table below lists the technical specifications for the instrument.<br />
Parameters<br />
Characteristics<br />
Measurement<br />
Software controlled<br />
Interface Serial interface: RS 232<br />
Filter h<strong>and</strong>ling<br />
Plate definition<br />
External filter exchange<br />
Up to 4 excitation filters <strong>and</strong> 4 emission filters in<br />
separate filter slides.<br />
Up to 8 excitation <strong>and</strong> emission filter slides can be<br />
defined when using software.<br />
Via scanning software<br />
Temperature control From ambient +5°C up to 42°C<br />
Plate shaking<br />
Orbital or linear shaking - both offer 3 speeds<br />
June 2002 Operating Manual for <strong>GENios</strong>, <strong>GENios</strong> <strong>FL</strong>, <strong>and</strong> <strong>GENios</strong> <strong>Plus</strong> No: I 112 904 Rev No: 1.1 5-1
5. Instrument Features<br />
Parameters<br />
Characteristics<br />
Light source<br />
Optics<br />
Detector<br />
High energy Xenon flash lamp<br />
Quartz / PMMA fibers <strong>and</strong> lenses<br />
Side window, low dark current photomultiplier tube<br />
Power supply Auto-sensing:100-120V / 220-240V<br />
50/60 Hz<br />
Power consumption<br />
Main fuse<br />
200 VA<br />
T 2A / 250 (slow blow)<br />
Physical<br />
Outer dimensions<br />
Weight<br />
Width: 380 mm<br />
Depth: 415 mm<br />
Height: 170 mm<br />
18.8 kg<br />
Environmental<br />
Ambient temperature<br />
Operation 15°C - 30°C 59°F - 86°F<br />
Non-operation -20°C - +60°C -4°F - +140°F<br />
Relative humidity<br />
Operation<br />
90% non-condensing<br />
Overvoltage category<br />
Pollution degree 2<br />
Usage<br />
Noise level<br />
Method of disposal<br />
II<br />
Commercial<br />
< 70 dBA<br />
Electronic waste<br />
(infectious waste)<br />
5-2 Operating Manual for <strong>GENios</strong>, <strong>GENios</strong> <strong>FL</strong>, <strong>and</strong> <strong>GENios</strong> <strong>Plus</strong> No: I 112 904 Rev No: 1.1 June 2002
5. Instrument Features<br />
5.1.1 Fluorescence<br />
Parameters<br />
Sensitivity<br />
Wavelength Range<br />
Characteristics<br />
≤ 3 pg fluorescein / well (200 µl / well) or<br />
≤ 8 fmol / well<br />
in a Greiner 96 well black plate using 100 flashes /<br />
well<br />
340 - 700 nm<br />
St<strong>and</strong>ard Filters Wavelength B<strong>and</strong> Width <br />
Excitation 1. 360nm 35nm<br />
2. 485nm 20nm<br />
Emission 1. 465nm 35nm<br />
2. 535nm 25nm<br />
Read Mode<br />
Top <strong>and</strong> bottom (bottom for transparent plates)<br />
Integration Time 20 - 2000 µs<br />
Lag Time 0 - 2000 µs<br />
Gain setting Values Measurement range<br />
Manual 1 - 255 0 - 60,000 RFU<br />
Optimal Automatic 0 - 60,000 RFU<br />
Extended Dynamic<br />
Range<br />
Automatic<br />
0 - 6,000,000 RFU<br />
(using X<strong>FL</strong>UOR)<br />
B<strong>and</strong> width for st<strong>and</strong>ard filters may have some tolerance ± 10%<br />
<br />
Needs to be adjusted for Time Resolved Measurements.<br />
Lag Time is typically ≥ 40 µs.<br />
No. of Flashes /<br />
Well<br />
1 - 3 Plate carrier does<br />
not stop at the<br />
measurement<br />
point (on the fly)<br />
4 - 255 Plate carrier stops<br />
at the meas. point<br />
Definition Characteristic Meas. Time for<br />
96 Wells<br />
max. speed<br />
max. precision<br />
≤ 30 sec<br />
Dependent on the<br />
flash parameter<br />
setting<br />
June 2002 Operating Manual for <strong>GENios</strong>, <strong>GENios</strong> <strong>FL</strong>, <strong>and</strong> <strong>GENios</strong> <strong>Plus</strong> No: I 112 904 Rev No: 1.1 5-3
5. Instrument Features<br />
5.1.2 Absorbance<br />
<strong>The</strong> specifications only apply to 96 well plates.<br />
Absorbance can not be measured in 1536 well plates.<br />
Parameters<br />
Wavelength<br />
range<br />
Meas. range<br />
Resolution<br />
Characteristics<br />
230 - 1000 nm<br />
0 - 3 OD<br />
0.0001 OD<br />
Accuracy 0.0 – 2.0 OD ± 1 % <strong>and</strong> ± 0.010 OD 492 nm<br />
2.0 - 3.0 OD ± 1.5 % <strong>and</strong> ± 0.010 OD 492 nm<br />
Precision 0 - 3.0 OD ± 1 % <strong>and</strong> ± 0.005 OD 492 nm<br />
Linearity 0 - 3.0 OD ± 1.5 % <strong>and</strong> ± 0.005 OD 492 nm<br />
No. of Flashes /<br />
Well<br />
St<strong>and</strong>ard filters<br />
1 - 255<br />
5.1.3 Glow Type Luminescence<br />
260 nm / 280 nm / 340 nm / 595 nm<br />
<strong>The</strong> specifications only apply to 96 well plates.<br />
Luminescence can only be measured in 96 well plates.<br />
Parameters<br />
Sensitivity<br />
Wavelength<br />
range<br />
Characteristics<br />
< 0.4 10-6 DEA activity units/well of molecular biology<br />
grade alkaline phosphatase (20 µl/well) using<br />
CDP-Star (Tropix) chemiluminescent substrate mix with<br />
Emerald-II enhancer (100 µl/well) in a Greiner 96 well<br />
white plate. Use of the provide cover plate greatly<br />
reduces the cross-talk.<br />
0.4 10-6 DEA activity units/well correspond to 200<br />
fg/well of alkaline phosphatase when using a lot of 2000<br />
DEA activity units/mg protein.<br />
400 - 700 nm<br />
Gain Optimal: preset value<br />
Manual: 1 - 255<br />
Integration setting Integration time Measurement range<br />
Manual 1 - 5000 ms 0 - 55,000 RLU<br />
Maximum Dynamic<br />
Range<br />
automatic<br />
(1 - 1000 ms)<br />
0 - 55,000,000 RLU<br />
(using X<strong>FL</strong>UOR)<br />
5-4 Operating Manual for <strong>GENios</strong>, <strong>GENios</strong> <strong>FL</strong>, <strong>and</strong> <strong>GENios</strong> <strong>Plus</strong> No: I 112 904 Rev No: 1.1 June 2002
5. Instrument Features<br />
5.2 Specifications (<strong>GENios</strong> <strong>FL</strong>)<br />
<strong>The</strong> following types of measurement are provided with the <strong>GENios</strong> <strong>FL</strong> microplate<br />
reader.<br />
Measurement Type Read Mode Microplates to be Used<br />
Fluorescence (see 5.2.1)<br />
St<strong>and</strong>ard <strong>and</strong> time-resolved,<br />
top measurement<br />
6 - 384 wells<br />
<strong>The</strong> instrument allows for kinetic measurements.<br />
Reading may be restricted to one part of the microplate.<br />
Up to four-measurement parameter sets can be queued using X<strong>FL</strong>UOR.<br />
June 2002 Operating Manual for <strong>GENios</strong>, <strong>GENios</strong> <strong>FL</strong>, <strong>and</strong> <strong>GENios</strong> <strong>Plus</strong> No: I 112 904 Rev No: 1.1 5-5
5. Instrument Features<br />
<strong>The</strong> table below lists the technical specifications for the instrument.<br />
Parameters<br />
Measurement<br />
Characteristics<br />
Software controlled<br />
Interface Serial interface: RS 232<br />
Filter h<strong>and</strong>ling<br />
Plate definition<br />
Plate shaking<br />
Light source<br />
Optics<br />
Detector<br />
External filter exchange<br />
Up to 4 excitation filters <strong>and</strong> 4 emission filters in<br />
separate filter slides.<br />
Up to 8 excitation <strong>and</strong> emission filter slides can be<br />
defined when using software.<br />
Via scanning software<br />
Orbital or linear shaking - both offer 3 speeds<br />
High energy Xenon flash lamp<br />
PMMA fibers <strong>and</strong> lenses<br />
Side window, low dark current photomultiplier tube<br />
Power supply Auto-sensing:100-120V / 220-240V<br />
50/60 Hz<br />
Power consumption<br />
Main fuse<br />
200 VA<br />
T 2A / 250 (slow blow)<br />
Physical<br />
Outer dimensions<br />
Weight<br />
Width: 380 mm<br />
Depth: 415 mm<br />
Height: 170 mm<br />
18.8 kg<br />
Environmental<br />
Ambient temperature<br />
Operation 15°C - 30°C 59°F - 86°F<br />
Non-operation -20°C - +60°C -4°F - +140°F<br />
Relative humidity<br />
Operation<br />
90% non-condensing<br />
Overvoltage category<br />
Pollution degree 2<br />
Usage<br />
Noise level<br />
Method of disposal<br />
II<br />
Commercial<br />
< 70 dBA<br />
Electronic waste<br />
(infectious waste)<br />
5-6 Operating Manual for <strong>GENios</strong>, <strong>GENios</strong> <strong>FL</strong>, <strong>and</strong> <strong>GENios</strong> <strong>Plus</strong> No: I 112 904 Rev No: 1.1 June 2002
5. Instrument Features<br />
5.2.1 Fluorescence<br />
Parameters<br />
Sensitivity<br />
Wavelength Range<br />
Characteristics<br />
≤ 3 pg fluorescein / well (200 µl / well) or<br />
≤ 8 fmol / well<br />
in a Greiner 96 well black plate using 100 flashes /<br />
well<br />
340 - 700 nm<br />
St<strong>and</strong>ard Filters Wavelength B<strong>and</strong> Width <br />
Excitation 1. 360nm 35nm<br />
2. 485nm 20nm<br />
Emission 1. 465nm 35nm<br />
2. 535nm 25nm<br />
Read Mode<br />
Top<br />
Integration Time 20 - 2000 µs<br />
Lag Time 0 - 2000 µs<br />
Gain setting Values Measurement range<br />
Manual 1 - 255 0 - 60,000 RFU<br />
Optimal Automatic 0 - 60,000 RFU<br />
Extended Dynamic<br />
Range<br />
Automatic<br />
0 - 6,000,000 RFU<br />
(using X<strong>FL</strong>UOR)<br />
B<strong>and</strong> width for st<strong>and</strong>ard filters may have some tolerance ± 10%<br />
Needs to be adjusted for Time Resolved Measurements.<br />
Lag Time is typically ≥ 40 µs.<br />
No. of Flashes /<br />
Well<br />
1 - 3 Plate carrier does<br />
not stop at the<br />
measurement<br />
point (on the fly)<br />
4 - 255 Plate carrier stops<br />
at the meas. point<br />
Definition Characteristic Meas. Time for<br />
96 Wells<br />
max. speed<br />
max. precision<br />
≤ 30 sec<br />
Dependent on the<br />
flash parameter<br />
setting<br />
June 2002 Operating Manual for <strong>GENios</strong>, <strong>GENios</strong> <strong>FL</strong>, <strong>and</strong> <strong>GENios</strong> <strong>Plus</strong> No: I 112 904 Rev No: 1.1 5-7
5. Instrument Features<br />
5.3 Specifications (<strong>GENios</strong> <strong>Plus</strong>)<br />
<strong>The</strong> following types of measurement are provided with the SPECTRA<strong>FL</strong>UOR PLUS<br />
microplate reader.<br />
Measurement Type Read Mode Microplates to be Used<br />
Fluorescence (see 5.3.1)<br />
Absorbance (see 5.3.2)<br />
Glow type luminescence<br />
(see 5.3.3)<br />
St<strong>and</strong>ard <strong>and</strong> timeresolved,<br />
top <strong>and</strong> bottom<br />
Single <strong>and</strong> dual<br />
wavelength<br />
6 - 1536 wells<br />
≤ 384 wells<br />
96 wells<br />
<strong>The</strong> instrument allows for kinetic measurements.<br />
Reading may be restricted to one part of the microplate.<br />
Up to four-measurement parameter sets can be queued using X<strong>FL</strong>UOR.<br />
Use of cuvettes<br />
Please Note:<br />
For cuvette use TECAN provides an adapter plate which fits up to 4<br />
st<strong>and</strong>ard 10 mm cuvettes that can be measured simultaneously<br />
(compatible with Hellma 10 mm 110-QS cuvettes equipped with PTFE<br />
plug).<br />
<strong>The</strong> cuvettes are positioned horizontally in the 4 designated areas.<br />
<strong>The</strong> cuvette should be filled completely <strong>and</strong> closed tightly in order to exclude air<br />
from the measurement chamber <strong>and</strong> ensure reliablity of results.<br />
Select the provided CUV.pdf plate format from the plate definition file before the<br />
measurement is started.<br />
<strong>The</strong> table below lists the technical specifications for the instrument.<br />
Parameters<br />
Measurement<br />
Characteristics<br />
Software controlled<br />
Interface Serial interface: RS 232<br />
Filter h<strong>and</strong>ling<br />
Plate definition<br />
External filter exchange<br />
4 excitation filters <strong>and</strong> 4 emission filters in separate<br />
filter slides.<br />
Up to 8 excitation <strong>and</strong> emission filter slides can be<br />
defined when using software.<br />
Via scanning software<br />
Temperature control From ambient +5°C up to 42°C<br />
Plate shaking<br />
Orbital or linear shaking - both offer 3 speeds<br />
5-8 Operating Manual for <strong>GENios</strong>, <strong>GENios</strong> <strong>FL</strong>, <strong>and</strong> <strong>GENios</strong> <strong>Plus</strong> No: I 112 904 Rev No: 1.1 June 2002
5. Instrument Features<br />
Parameters<br />
Characteristics<br />
Light source<br />
Optics<br />
Detector<br />
High energy Xenon flash lamp<br />
Quartz fibers <strong>and</strong> lenses<br />
Side window, low dark current photomultiplier tube<br />
Power supply Auto-sensing:100-120V / 220-240V<br />
50/60 Hz<br />
Power consumption<br />
Main fuse<br />
200 VA<br />
T 2A / 250 (slow blow)<br />
Physical<br />
Outer dimensions<br />
Weight<br />
Width: 380 mm<br />
Depth: 415 mm<br />
Height: 170 mm<br />
18.8 kg<br />
Environmental<br />
Ambient temperature<br />
Operation 15°C - 30°C 59°F - 86°F<br />
Non-operation -20°C - +60°C -4°F - +140°F<br />
Relative humidity<br />
Operation<br />
90% non-condensing<br />
Overvoltage category<br />
Pollution degree 2<br />
Usage<br />
Noise level<br />
Method of disposal<br />
II<br />
Commercial<br />
< 70 dBA<br />
Electronic waste<br />
(infectious waste)<br />
June 2002 Operating Manual for <strong>GENios</strong>, <strong>GENios</strong> <strong>FL</strong>, <strong>and</strong> <strong>GENios</strong> <strong>Plus</strong> No: I 112 904 Rev No: 1.1 5-9
5. Instrument Features<br />
5.3.1 Fluorescence<br />
Parameters<br />
Sensitivity<br />
Wavelength Range<br />
Characteristics<br />
≤ 1.5 pg fluorescein / well (200 µl / well) or<br />
≤ 4 fmol / well<br />
in a Greiner 96 well black plate using 100 flashes /<br />
well<br />
230 - 700 nm<br />
St<strong>and</strong>ard Filters Wavelength B<strong>and</strong> Width <br />
Excitation 1. 360nm 35nm<br />
2. 430nm 35nm<br />
3. 485nm 20nm<br />
4. 590nm 20nm<br />
Emission 1. 465nm 35nm<br />
Read Mode<br />
2. 535nm 25nm<br />
3. 595nm 35nm<br />
4. 635nm 35nm<br />
Integration Time 20 - 2000 µs<br />
Lag Time 0 - 2000 µs<br />
Top <strong>and</strong> bottom<br />
(bottom for transparent plates)<br />
Gain setting Values Measurement range<br />
Manual 1 - 255 0 - 60,000 RFU<br />
Optimal Automatic 0 - 60,000 RFU<br />
Extended Dynamic<br />
Range<br />
Automatic<br />
0 - 6,000,000 RFU<br />
(using X<strong>FL</strong>UOR)<br />
B<strong>and</strong> width for st<strong>and</strong>ard filters may have some tolerance ± 10%<br />
<br />
Needs to be adjusted for Time Resolved Measurements. Lag Time is<br />
typically ≥ 40 µs.<br />
No. of Flashes /<br />
Well<br />
1 - 3 Plate carrier does<br />
not stop at the<br />
measurement<br />
point (on the fly)<br />
4 - 255 Plate carrier stops<br />
at the meas. point<br />
Definition Characteristic Meas. Time for<br />
96 Wells<br />
max. speed<br />
max. precision<br />
≤ 30 sec<br />
Dependent on the<br />
flash parameter<br />
setting<br />
5-10 Operating Manual for <strong>GENios</strong>, <strong>GENios</strong> <strong>FL</strong>, <strong>and</strong> <strong>GENios</strong> <strong>Plus</strong> No: I 112 904 Rev No: 1.1 June 2002
5. Instrument Features<br />
5.3.2 Absorbance<br />
<strong>The</strong> specifications only apply to 96 well plates.<br />
Absorbance can not be measured in 1536 well plates.<br />
<strong>The</strong> absorbance filters are not within the instrument's st<strong>and</strong>ard configuration.<br />
Parameters<br />
Wavelength<br />
range<br />
Meas. range<br />
Resolution<br />
Characteristics<br />
230 - 1000 nm<br />
0 - 3 OD<br />
0.0001 OD<br />
Accuracy 0.0 - 2.0 OD ± 1 % <strong>and</strong> ± 0.010 OD 492 nm<br />
2.0 – 3.0 OD ± 1.5 % <strong>and</strong> ± 0.010 OD 492 nm<br />
Precision 0 - 3.0 OD ± 1 % <strong>and</strong> ± 0.005 OD 492 nm<br />
Linearity 0 - 3.0 OD ± 1.5 % <strong>and</strong> ± 0.005 OD 492 nm<br />
No. of Flashes /<br />
Well<br />
St<strong>and</strong>ard filters<br />
1 - 255<br />
5.3.3 Glow Type Luminescence<br />
405 nm / 450 nm / 492 nm / 620 nm<br />
(not included in st<strong>and</strong>ard delivery)<br />
<strong>The</strong> specifications only apply to 96 well plates.<br />
Luminescence can only be measured in 96 well plates.<br />
Parameters<br />
Sensitivity<br />
Wavelength range<br />
Characteristics<br />
< 0.4 10 -6 DEA activity units/well of molecular biology<br />
grade alkaline phosphatase (20 µl/well) using<br />
CDP-Star (Tropix) chemiluminescent substrate mix<br />
with Emerald-II enhancer (100 µl/well) in a Greiner<br />
96 well white plate. Use of the cover plate greatly<br />
reduces the cross-talk.<br />
0.4 10 -6 DEA activity units/well correspond to 200 fg/<br />
well of alkaline phosphatase when using a lot of<br />
2000 DEA activity units/mg protein.<br />
400 - 700 nm<br />
Gain Optimal: preset value<br />
Manual: 1 - 255<br />
Integration setting Integration time Measurement range<br />
Manual 1 - 5000 ms 0 - 55,000 RLU<br />
Maximum Dynamic<br />
Range<br />
Automatic<br />
(1 - 1000 ms)<br />
0 - 55,000,000 RLU<br />
(using X<strong>FL</strong>UOR)<br />
June 2002 Operating Manual for <strong>GENios</strong>, <strong>GENios</strong> <strong>FL</strong>, <strong>and</strong> <strong>GENios</strong> <strong>Plus</strong> No: I 112 904 Rev No: 1.1 5-11
6. Interface<br />
6. Interface<br />
6.1 Hardware Specifications<br />
6.2 Pin Designation<br />
<strong>The</strong> instrument is controlled by the computer <strong>and</strong> the communication between the<br />
computer <strong>and</strong> the instrument is done through an RS-232-C interface.<br />
<strong>The</strong> interface specifications may be either to the CCITT interface st<strong>and</strong>ard or to<br />
the EIA RS-232-C interface st<strong>and</strong>ard.<br />
<strong>The</strong> illustration below shows the pin assignment of the DB 9 connector fitted to<br />
the instrument.<br />
Pin 5 Pin 1<br />
Pin 9<br />
Pin 6<br />
All connected devices must be approved <strong>and</strong> listed as per EN 60950, UL 1950 or<br />
CSA C2<strong>2.2</strong> No. 950 for Data Processing Devices.<br />
June 2002 Operating Manual for <strong>GENios</strong>, <strong>GENios</strong> <strong>FL</strong>, <strong>and</strong> <strong>GENios</strong> <strong>Plus</strong> No: I 112 904 Rev No: 1.1 6-1
6. Interface<br />
6.3 RS-232-C Interface Lines<br />
<strong>The</strong> serial interface of the instrument is connected to a start-stop synchronized<br />
serial RS-232-C circuit.<br />
<strong>The</strong> list below names the interface lines of the 9 pin connector of the instrument.<br />
PIN Number<br />
DESCRIPTION<br />
1 DTR Data Terminal Ready<br />
2 TD Transmit Data<br />
3 RD Receive Data<br />
4 DCD Data Carrier Detect<br />
5 GND Ground<br />
6 No connection<br />
7 RTS Request To Send<br />
8 CTS Clear To Send<br />
9 No connection<br />
<strong>The</strong> connecting cable used to connect the instrument to the computer should be<br />
wired as given below.<br />
INSTRUMENT<br />
TD<br />
RD<br />
GND<br />
COMPUTER<br />
connected to RD<br />
connected to TD<br />
connected to GND<br />
RTS connected to CTS<br />
DSR connected to DCD <strong>and</strong> DTR<br />
Use the computer h<strong>and</strong>book to find the correct pin connections.<br />
Instrument<br />
Computer 25 pin<br />
Instrument<br />
Computer 9 pin<br />
1<br />
2<br />
3<br />
4<br />
5<br />
6<br />
7<br />
8<br />
9<br />
1<br />
2<br />
3<br />
4<br />
5<br />
6<br />
7<br />
8<br />
20<br />
1<br />
2<br />
3<br />
4<br />
5<br />
6<br />
7<br />
8<br />
9<br />
1<br />
2<br />
3<br />
4<br />
5<br />
6<br />
7<br />
8<br />
9<br />
6-2 Operating Manual for <strong>GENios</strong>, <strong>GENios</strong> <strong>FL</strong>, <strong>and</strong> <strong>GENios</strong> <strong>Plus</strong> No: I 112 904 Rev No: 1.1 June 2002
6. Interface<br />
6.4 Synchronization <strong>and</strong> Data Format<br />
6.5 Signal Levels<br />
For the instrument to communicate with the computer correctly, the instrument<br />
<strong>and</strong> the computer must be set for the same communication parameters.<br />
Check that following parameters are set correctly on the computer:<br />
1 Start-stop synchronous system asynchron<br />
2 Start bit length 1<br />
3 Stop bit length 1<br />
4 Data format 8 databits<br />
5 Parity bit none<br />
6 Baud Rate 9600<br />
<strong>The</strong> table below lists the voltage levels <strong>and</strong> their definitions.<br />
VOLTAGE LEVEL DATA SIGNALS CONTROL SIGNALS<br />
+3 to +12 SPACE (Logic 0) ON<br />
-3 to -12 MARK (Logic 1) OFF<br />
+3 to -3 UNDEFINED RANGE UNDEFINED RANGE<br />
June 2002 Operating Manual for <strong>GENios</strong>, <strong>GENios</strong> <strong>FL</strong>, <strong>and</strong> <strong>GENios</strong> <strong>Plus</strong> No: I 112 904 Rev No: 1.1 6-3
7. Quality Control<br />
7. Quality Control<br />
7.1 Periodic Quality Control Tests<br />
7.2 Fluorescence<br />
7.2.1 Sensitivity Test<br />
Depending on usage <strong>and</strong> application we recommend a periodic evaluation of the<br />
instrument on TECAN site.<br />
<strong>The</strong> tests described in the following chapters do not replace a full evaluation by<br />
the manufacturer or authorized dealers. But the tests maybe performed<br />
periodically by the user to check significant aspects of the instrument<br />
performance.<br />
<strong>The</strong> results are strongly influenced by errors in pipetting <strong>and</strong> the setting of the<br />
parameters in the instrument. <strong>The</strong>refore please follow the instructions carefully.<br />
<strong>The</strong> user should determine the appropriate intervals for this testing based on how<br />
frequently the instrument is operated.<br />
We recommend adapting these tests <strong>and</strong> the acceptance criteria to the<br />
laboratory’s primary application. Ideally these tests must be performed with the<br />
laboratory’s own plates, fluorophore, buffers, volumes <strong>and</strong> all the appropriate<br />
settings (filters, flashes, delays, top/bottom reading, <strong>and</strong> so on).<br />
• Use a black 96 well plate, for example: Greiner flat bottom, black microplate<br />
• Apply 200 µl of 1 nM Fluorescein in 0.01 M NaOH solution to wells A1 to H1.<br />
We recommend SIGMA fluorescein F-6377 (acid yellow 73, FW 376.3)<br />
• All other wells are blank (B), for example: 200 µl 0.01 M NaOH solution<br />
without fluorescein<br />
1 2 3 4 5 6 7 8 9 10 11 12<br />
A<br />
B B B B B B B B B<br />
B<br />
B<br />
B<br />
B<br />
B<br />
B<br />
B<br />
B<br />
B<br />
B<br />
B<br />
B<br />
B<br />
B<br />
C<br />
B<br />
B<br />
B<br />
B<br />
B<br />
B<br />
B<br />
B<br />
B<br />
B<br />
B<br />
D<br />
B<br />
B<br />
B<br />
B<br />
B<br />
B<br />
B<br />
B<br />
B<br />
B<br />
B<br />
E<br />
B<br />
B<br />
B<br />
B<br />
B<br />
B<br />
B<br />
B<br />
B<br />
B<br />
B<br />
F<br />
B<br />
B<br />
B<br />
B<br />
B<br />
B<br />
B<br />
B<br />
B<br />
B<br />
B<br />
G<br />
B<br />
B<br />
B<br />
B<br />
B<br />
B<br />
B<br />
B<br />
B<br />
B<br />
B<br />
H<br />
B<br />
B<br />
B<br />
B<br />
B<br />
B<br />
B<br />
B<br />
B<br />
B<br />
B<br />
• Use 100 flashes <strong>and</strong> optimal gain function.<br />
June 2002 Operating Manual for <strong>GENios</strong>, <strong>GENios</strong> <strong>FL</strong>, <strong>and</strong> <strong>GENios</strong> <strong>Plus</strong> No: I 112 904 Rev No: 1.1 7-1
7. Quality Control<br />
7.<strong>2.2</strong> Linearity Test<br />
For <strong>GENios</strong> / <strong>GENios</strong> <strong>FL</strong>:<br />
<strong>The</strong> procedure to achieve the sensitivity is as follows:<br />
Divide the st<strong>and</strong>ard deviation of the blanks by the blanked average value of<br />
column 1.<br />
Arrive at physical units (g/well) by multiplication with the concentration (1 nMol/l),<br />
the volume per well (200 µl) <strong>and</strong> the molecular weight (376 g/Mol).<br />
<strong>The</strong> sensitivity is expected to be 3pg fluorescein per well.<br />
For <strong>GENios</strong> <strong>Plus</strong>:<br />
<strong>The</strong> procedure to achieve the sensitivity is as follows:<br />
Divide the st<strong>and</strong>ard deviation of the blanks by the blanked average value of<br />
column 1.<br />
Multiply with a factor 2 to achieve statistical reliability.<br />
Arrive at physical units (g/well) by multiplication with the concentration (1 nMol/l),<br />
the volume per well (200 µl) <strong>and</strong> the molecular weight (376 g/Mol).<br />
<strong>The</strong> sensitivity is expected to be 1.5pg fluorescein per well.<br />
1 2 3 4 5 6 7 8 9 10 11 12<br />
A<br />
B<br />
B<br />
B<br />
C<br />
B<br />
D<br />
B<br />
E<br />
B<br />
F<br />
G<br />
B<br />
B<br />
H<br />
B<br />
• Use a 96 well plate, for example: a Greiner flat bottom, black microplate.<br />
• Prepare a 1:1 dilution series of fluorescein in 0.01 M NaOH solution - each<br />
column will take a different concentration (compare figure).<br />
• Highest concentration = 1 µM fluorescein, max. volume per well = 200 µl.<br />
• Provide column 12 as blank (B), that is filled with pure NaOH solution.<br />
• Use 10 flashes <strong>and</strong> optimal gain function.<br />
Calculate the blanked average RFU (Relative Fluorescence Units) for each of the<br />
columns 1 to 11. Compute the coefficient of correlation using the blanked<br />
average RFUs <strong>and</strong> the corresponding concentrations. <strong>The</strong> coefficient of<br />
correlation is expected to be ≥ 0.995.<br />
7-2 Operating Manual for <strong>GENios</strong>, <strong>GENios</strong> <strong>FL</strong>, <strong>and</strong> <strong>GENios</strong> <strong>Plus</strong> No: I 112 904 Rev No: 1.1 June 2002
7. Quality Control<br />
7.2.3 Precision Test<br />
7.2.4 Cross-Talk Test<br />
• Use the same plate as mentioned in 7.<strong>2.2</strong>.<br />
• Perform 7 measurements with number of flashes set to 10, gain as above.<br />
Compute the CV (Coefficient of Variation) value of each well in column 4.<br />
<strong>The</strong> CV value should be
7. Quality Control<br />
7.3 Glow Type Luminescence<br />
7.3.1 Sensitivity Test<br />
• Use a white Greiner 96 well plate <strong>and</strong> the black cover plate, which is<br />
supplied with the instrument.<br />
• Prepare a 1:1 dilution series of alkaline phosphatase (molecular biology<br />
grade source: Boehringer) in assay buffer (20 mM Tris HCl pH 9.8, 1 mM<br />
MgCl 2 ; source: Tropix). Highest concentration for measurement of sensitivity<br />
may be 10 -6 DEA activity units / µl.<br />
• Apply 20 µl of pure buffer to wells A1,...,A4;...;D1,...,D4 these will serve as<br />
blanks. Continue applying 20 µl of increasing AP dilution to the next columns<br />
in replicates of 4.<br />
• Finally add 100 µl of chemiluminescent substrate (CDP-Star with Emerald-II<br />
enhancer, source: Tropix) per well <strong>and</strong> mix thoroughly. Incubate at room<br />
temperature for 20 minutes.<br />
• Integrate 2 seconds per well using gain 100. Chemiluminescent signal will<br />
change very slowly over the following hour when using the above maximum<br />
enzyme concentration.<br />
<strong>The</strong> procedure to achieve the sensitivity is as follows:<br />
Plot the blanked values of the dilution series against the corresponding activity<br />
units <strong>and</strong> calculate a linear fit. Divide the st<strong>and</strong>ard deviation of the blanks by the<br />
slope of the fitting curve. Multiply with a factor of 2 to achieve statistical reliability.<br />
<strong>The</strong> sensitivity is expected to be
7. Quality Control<br />
7.3.2 Cross-Talk Test<br />
Cross talk is a measure for increase of blank values (blank contains pure buffer<br />
<strong>and</strong> substrate) due to optical leakage from neighboring wells.<br />
• Greiner 96 well plate, flat bottom, white using black cover plate.<br />
• A single well (for example: E5) is supplied with 20µl of 0.3 10 -3 activity<br />
units/µl alkaline phosphatase dilution <strong>and</strong> with 100µl of substrate<br />
• Fill all other wells with pure buffer <strong>and</strong> substrate.<br />
1 2 3 4 5 6 7 8 9 10 11 12<br />
A<br />
B<br />
B B B B B B B B<br />
B B B<br />
B<br />
B<br />
B<br />
B<br />
B<br />
B<br />
B<br />
B<br />
B<br />
B<br />
B<br />
B<br />
B<br />
C<br />
B<br />
B<br />
B<br />
B<br />
B<br />
B<br />
B<br />
B<br />
B<br />
B<br />
B<br />
B<br />
D<br />
B<br />
B<br />
B<br />
B<br />
N<br />
B<br />
B<br />
B<br />
B<br />
B<br />
B<br />
B<br />
E<br />
B<br />
B<br />
B<br />
N<br />
N<br />
B<br />
B<br />
B<br />
B<br />
B<br />
B<br />
F<br />
B<br />
B<br />
B<br />
B<br />
N<br />
B<br />
B<br />
B<br />
B<br />
B<br />
B<br />
B<br />
G<br />
B<br />
B<br />
B<br />
B<br />
B<br />
B<br />
B<br />
B<br />
B<br />
B<br />
B<br />
B<br />
H<br />
B<br />
B<br />
B<br />
B<br />
B<br />
B<br />
B<br />
B<br />
B<br />
B<br />
B<br />
B<br />
• Select maximum dynamic range <strong>and</strong> adjust gain to get a<br />
RLU (Relative Luminescence Units) reading greater than 10 6 .<br />
Measurement should be performed 10 minutes after preparation but not later<br />
than 30 minutes.<br />
Calculation method:<br />
Compute MVB (B) from all wells except the nearest neighbor wells (N) <strong>and</strong> the<br />
well filled with alkaline phosphatase (for example: E5).<br />
Calculate the SD (St<strong>and</strong>ard Deviation) of MVB. Use factor 3 to get higher<br />
statistical reliability.<br />
Calculate the MVN (Mean Value of the Neighbors), using the wells indicated with<br />
the letter N.<br />
If MVN is within the interval MVB +/- 3 SD, cross talk cannot be clearly<br />
distinguished from the background.<br />
If MVN is higher than MVB +3 SD the cross talk CT (Cross Talk) calculates<br />
according to:<br />
CT = (MVN – MVB ) / RLU reading<br />
CT is expected to be ≤ 0.0001<br />
June 2002 Operating Manual for <strong>GENios</strong>, <strong>GENios</strong> <strong>FL</strong>, <strong>and</strong> <strong>GENios</strong> <strong>Plus</strong> No: I 112 904 Rev No: 1.1 7-5
8. Cleaning & Maintenance<br />
8. Cleaning & Maintenance<br />
8.1 Introduction<br />
Caution<br />
Ensure that the microplate is removed from the instrument before it is<br />
prepared for shipment. If a microplate is left in the instrument, fluorescent<br />
solutions may spill onto the optical parts <strong>and</strong> damage the instrument.<br />
See 8.2<br />
See 8.3<br />
See 8.4<br />
<strong>The</strong> cleaning <strong>and</strong> maintenance procedures are important in order to prolong the<br />
instrument's life <strong>and</strong> to reduce the need for servicing.<br />
This section contains the following procedures:<br />
• Liquid Spills<br />
• Replacing the Fuse<br />
• Instrument Disinfection<br />
8.2 Liquid Spills<br />
1. Wipe up the spill immediately with absorbent material.<br />
2. Dispose of contaminated material appropriately.<br />
3. Clean the instrument surfaces with mild detergent.<br />
4. For biohazard spills, clean with a 5-10 % solution of bleach in deionized<br />
water.<br />
5. Wipe cleaned areas dry.<br />
WARNING<br />
ENSURE THAT THE MICROPLATE IS REMOVED FROM<br />
THE INSTRUMENT BEFORE IT IS PREPARED FOR SHIPMENT.<br />
IF A MICROPLATE IS LEFT IN THE INSTRUMENT,<br />
<strong>FL</strong>UORESCENT SOLUTIONS MAY SPILL ONTO THE<br />
OPTICAL PARTS AND DAMAGE THE INSTRUMENT.<br />
June 2002 Operating Manual for <strong>GENios</strong>, <strong>GENios</strong> <strong>FL</strong>, <strong>and</strong> <strong>GENios</strong> <strong>Plus</strong> No: I 112 904 Rev No: 1.1 8-1
8. Cleaning & Maintenance<br />
8.3 Replacing the Fuse<br />
• Turn the instrument OFF <strong>and</strong> unplug the mains cable from the instrument.<br />
<strong>The</strong> fuse is located on the right h<strong>and</strong> side of the mains cable connection in<br />
the rear of the instrument.<br />
• Open the fuse compartment by inserting a screwdriver into the slot in the top<br />
of the cover <strong>and</strong> push the fuse holder out.<br />
Mains power socket<br />
Fuse compartment<br />
On/Off Switch<br />
0 = ON<br />
1 = OFF<br />
• Pull the fuse holder out <strong>and</strong> replace the defective fuse(s) with the spare<br />
fuse(s).<br />
• Ensure that the fuse(s) has/have the correct rating.<br />
• T 2 / 250V (slow blow)<br />
Caution<br />
Risk of Fire<br />
For continued protection replace only with the<br />
same type <strong>and</strong> rating of fuse.<br />
• Replace the fuse holder.<br />
• Reconnect the mains cable.<br />
• Turn the instrument on.<br />
If the fuse continues to blow, call for service.<br />
8-2 Operating Manual for <strong>GENios</strong>, <strong>GENios</strong> <strong>FL</strong>, <strong>and</strong> <strong>GENios</strong> <strong>Plus</strong> No: I 112 904 Rev No: 1.1 June 2002
8. Cleaning & Maintenance<br />
8.4 Maintenance<br />
CAUTION<br />
Ensure that the instrument positioning is checked<br />
using the service tool plate once a year.<br />
8.4.1 Daily<br />
8.4.2 Weekly<br />
No daily maintenance is necessary.<br />
8.4.3 Every Six Months<br />
Clean the cover <strong>and</strong> the transport with a mild detergent.<br />
8.4.4 Yearly Maintenance<br />
Clean the filters using an optical cleaning solution (Lens tissue recommended).<br />
Check the belts tension (between 50 an 60 Hz, tension meter necessary).<br />
Perform a FlouCheck test.<br />
June 2002 Operating Manual for <strong>GENios</strong>, <strong>GENios</strong> <strong>FL</strong>, <strong>and</strong> <strong>GENios</strong> <strong>Plus</strong> No: I 112 904 Rev No: 1.1 8-3
8. Cleaning & Maintenance<br />
8.5 Instrument Disinfection<br />
All parts of the instrument that come into contact with the patient samples,<br />
positive control samples or hazardous material must be treated as potentially<br />
infectious areas.<br />
It is very important that the instrument is thoroughly disinfected before it is<br />
removed from the laboratory or any servicing is performed on it.<br />
Before the instrument is returned to the distributor for servicing, it must be<br />
disinfected <strong>and</strong> a disinfection certificate completed. If a disinfection certificate is<br />
not supplied, the instrument may not be accepted by the servicing center or it<br />
may be held by the customs authorities.<br />
8.5.1 Disinfection Solutions<br />
If the laboratory has no specific disinfection procedure, the following procedure<br />
should be used to disinfect the instrument.<br />
<strong>The</strong> instrument should be disinfected using a solution such as:<br />
Lysetol<br />
Aseptisol<br />
Manufacturer: Schülke & Mayr Ges.m.b.H.<br />
Manufacturer: Bode Chemie Hamburg<br />
If neither of these solutions is available 70% ethanol should be used as an<br />
alternative.<br />
Caution<br />
<strong>The</strong> disinfection procedure should be performed by authorized trained<br />
personnel in a well ventilated room wearing disposable gloves <strong>and</strong><br />
protective glasses <strong>and</strong> clothing.<br />
Please note that the disinfectant can influence the performance of your<br />
instrument if it applied inside the instrument.<br />
8-4 Operating Manual for <strong>GENios</strong>, <strong>GENios</strong> <strong>FL</strong>, <strong>and</strong> <strong>GENios</strong> <strong>Plus</strong> No: I 112 904 Rev No: 1.1 June 2002
8. Cleaning & Maintenance<br />
8.5.2 Disinfection Procedure<br />
<strong>The</strong> following procedure should be used to disinfect the outside surfaces of the<br />
instrument.<br />
1. Disconnect the instrument from the mains power supply.<br />
2. Disconnect the instrument from any accessories that are used.<br />
Ensure that you are wearing disposable gloves.<br />
3. Carefully wipe all the outside surfaces of the instrument with a wad of cotton<br />
wool that has been soaked in the disinfecting solution.<br />
4. Ensure that the same disinfection procedure is performed with the plate<br />
carrier.<br />
5. Repeat the disinfection procedure on any accessories which are also being<br />
moved or returned.<br />
6. After the disinfection procedure has been performed, ensure that the<br />
disinfection certificate is completed.<br />
See 8.5 for an example of the disinfection certificate that must be completed<br />
before the instrument is returned to the distributor for servicing.<br />
June 2002 Operating Manual for <strong>GENios</strong>, <strong>GENios</strong> <strong>FL</strong>, <strong>and</strong> <strong>GENios</strong> <strong>Plus</strong> No: I 112 904 Rev No: 1.1 8-5
8. Cleaning & Maintenance<br />
8.6 Disinfection Certificate<br />
This disinfection certificate must be completed before the instrument is returned<br />
to the distributor for servicing.<br />
<strong>The</strong> certificate must be attached to the top of the outer package in which the<br />
instrument is returned. It must be visible from the outside of the shipping<br />
container!<br />
I declare that the instrument in this package has been decontaminated or<br />
disinfected to remove or inactivate any biological material that could be<br />
dangerous to the service personnel or that it has never been exposed to any<br />
hazardous biological material.<br />
Name:...................................................................................................................<br />
Firm: .....................................................................................................................<br />
Address: ...............................................................................................................<br />
.............................................................................................................................<br />
.............................................................................................................................<br />
Country:................................................................................................................<br />
Signature:.............................................................................................................<br />
--------------------------------------------------------------------------------------------------------<br />
I declare that the instrument in this package has been decontaminated or<br />
disinfected to remove or inactivate any biological material that could be<br />
dangerous to the service personnel, or that it has never been exposed to any<br />
hazardous biological material.<br />
Name:...................................................................................................................<br />
Firm: .....................................................................................................................<br />
Address: ...............................................................................................................<br />
.............................................................................................................................<br />
.............................................................................................................................<br />
Country:................................................................................................................<br />
Signature:.............................................................................................................<br />
8-6 Operating Manual for <strong>GENios</strong>, <strong>GENios</strong> <strong>FL</strong>, <strong>and</strong> <strong>GENios</strong> <strong>Plus</strong> No: I 112 904 Rev No: 1.1 June 2002
9. Application Note for DNA Quantification<br />
9. Application Note for DNA<br />
Quantitation<br />
9.1 Introduction<br />
Comparison of two different detection techniques for DNA quantitation:<br />
Absorbance vs. Fluorescence<br />
<strong>The</strong> quantitation of small<br />
amounts of dsDNA is important<br />
for a variety of biological<br />
applications. <strong>The</strong>se include<br />
st<strong>and</strong>ard molecular biology<br />
techniques, such as<br />
synthesizing cDNA for library<br />
production <strong>and</strong> purifying DNA<br />
fragments for subcloning, as<br />
well as diagnostic techniques,<br />
such as quantitating DNA<br />
amplification products <strong>and</strong><br />
detecting DNA molecules in<br />
drug preparations.<br />
9.1.1 Common techniques for the quantitation of DNA<br />
<strong>The</strong> most commonly used technique for measuring nucleic acid concentration is<br />
the determination of absorbance at 260 nm (A 260 ). <strong>The</strong> major disadvantages of<br />
the absorbance method are the relative contribution of nucleotides <strong>and</strong> singlestr<strong>and</strong>ed<br />
nucleic acids to the signal, the interference caused by contaminants<br />
commonly found in nucleic acid preparations, the inability to distinguish between<br />
DNA <strong>and</strong> RNA <strong>and</strong> the relative insensitivity of the assay (an A 260 of 0.1<br />
corresponds to a 5 µg/ml dsDNA solution, referring to 1 cm pathlength for<br />
measurements in a cuvette). Hoechst (bisbenzimide) dyes are sensitive<br />
fluorescent nucleic acid stains. H33258 is selective for dsDNA, but does not show<br />
significant fluorescence enhancement in the presence of protein <strong>and</strong> allows the<br />
detection <strong>and</strong> quantitation of DNA concentrations as low as 10 ng/ml DNA.<br />
Cyanine dyes such as YO-PRO TM -1 <strong>and</strong> YOYO ® -1 (cyanine monomers <strong>and</strong><br />
dimers) from Molecular Probes are also known for the quantitation of nucleic<br />
acids - 0.5 ng/ml DNA in solution is the detectable concentration.<br />
June 2002 Operating Manual for <strong>GENios</strong>, <strong>GENios</strong> <strong>FL</strong>, <strong>and</strong> <strong>GENios</strong> <strong>Plus</strong> No: I 112 904 Rev No: 1.1 9-1
9. Application Note for DNA Quantification<br />
A commonly used DNA probe, PicoGreen TM allows direct quantitation of PCR<br />
amplicons without purification from the reaction mixture <strong>and</strong> makes it possible to<br />
detect low levels of DNA contamination in recombinant protein products. In<br />
comparison to the Hoechst 33258 dye, which shows significant AT selectivity, the<br />
PicoGreen reagent shows little if any AT- or GC-selectivity <strong>and</strong> is thus accurate<br />
for quantitating DNA from almost any source.<br />
We demonstrate here an example for the quantitation of DNA, comparing<br />
absorbance (260 nm) with fluorescence detection using PicoGreen TM . We are<br />
able to show the advantage to have instrumentation available for both detection<br />
techniques, dependent on the yield of extracted DNA. <strong>The</strong> DNA samples used for<br />
the measurements were plasmid DNA <strong>and</strong> genomic DNA, extracted with the<br />
TECAN GENESIS RSP 150.<br />
9.2 Experimental Setup<br />
9.2.1 DNA extraction<br />
• Plasmid extraction<br />
Plasmid extraction from E.coli (DH5α) with a bluescript vector with a 1.2 kb insert<br />
grown in LB or TB media was performed using the QIAprepR 96 Turbo BioRobot<br />
Kit from QIAGENR <strong>and</strong> the QIA_96 Turbo T Gemini script on a GENESIS RSP 150<br />
with a Te-VacS-B from TECAN.<br />
• Genomic DNA Extraction<br />
9.<strong>2.2</strong> Assay Procedure<br />
Genomic DNA was extracted from human blood samples using a Genomic DNA<br />
Extraction Kit on a GENESIS RSP 150 with a Te-MagS from TECAN.<br />
<strong>The</strong> extracted DNA was quantified using UV absorbance at 260 nm <strong>and</strong><br />
fluorescence measurements with PicoGreen TM (from Molecular Probes Inc.) at<br />
485/535 nm with the TECAN <strong>GENios</strong>. Absorbance measurements were<br />
performed in special UV compatible plates (GREINER UV Star® Nr. 655801),<br />
<strong>and</strong> for fluorescence quantitation, black flat bottom 96 well plates (GREINER; Nr<br />
655076) were used.<br />
For UV absorbance at 260 nm, 100 µl of DNA solution per well was used. In<br />
addition to the samples, a λ DNA dilution series was pipetted onto the same plate<br />
to calculate a calibration curve. <strong>The</strong> fluorescence measurements with<br />
PicoGreen TM dye were performed refering to the protocol for the PicoGreen<br />
dsDNA Quantiation Kit (Molecular Probes, P-7589). <strong>The</strong> solutions were mixed<br />
by shaking for 5 sec prior to the measurement. A dilution series of λ DNA was<br />
used as calibration st<strong>and</strong>ard.<br />
9-2 Operating Manual for <strong>GENios</strong>, <strong>GENios</strong> <strong>FL</strong>, <strong>and</strong> <strong>GENios</strong> <strong>Plus</strong> No: I 112 904 Rev No: 1.1 June 2002
9. Application Note for DNA Quantification<br />
9.3 Typical Results<br />
9.3.1 Detection techniques vs. detection limits<br />
Figure 1 Dilution series of λ-DNA from two different DNA samples (Roche <strong>and</strong><br />
Molecular Probes) measured with absorbance at 260 nm<br />
Figure 2 Dilution series of λ-DNA measured with PicoGreen fluorescence at<br />
485 nm (excitation) <strong>and</strong> 535 nm (emission ).<br />
June 2002 Operating Manual for <strong>GENios</strong>, <strong>GENios</strong> <strong>FL</strong>, <strong>and</strong> <strong>GENios</strong> <strong>Plus</strong> No: I 112 904 Rev No: 1.1 9-3
9. Application Note for DNA Quantification<br />
9.3.2 Sensitivities in comparison:<br />
260 nm absorbance: approximately 50 – 250 ng DNA/ml<br />
PicoGreen<br />
fluorescence:<br />
approximately 300 pg DNA /ml<br />
<strong>The</strong> comparison between absorbance <strong>and</strong> fluorescence measurements show that<br />
fluorescence quantitation is 100 to 1000 times more sensitive. <strong>The</strong> calibration<br />
curves show the linear range of the different methods. It should be emphasized,<br />
that the sensitivities are dependent on filling volumes (especially for absorbance),<br />
flash numbers, type of diluent <strong>and</strong> even the type of DNA can influence the final<br />
result.<br />
9.3.3 Results from Plasmid <strong>and</strong> Blood DNA Sample<br />
(a) DNA from Blood<br />
In some cases the amount of blood <strong>and</strong> DNA is not sufficient for UV quantitation.<br />
DNA from human blood was extracted with different treatments. <strong>The</strong> volume <strong>and</strong><br />
concentration of the extracted samples did not allow to quantify with absorbance.<br />
1 10 µl blood fresh/EDTA 5 10 µl blood old/EDTA<br />
2 20 µl blood fresh/EDTA 6 20 µl blood old/EDTA<br />
3 10 µl blood fresh/Citrate 7 10 µl blood old/Citrate<br />
4 20 µl blood fresh/Critrate 8 20 µl blood old/Critrate<br />
Treatment 1 2 3 4 5 6 7 8<br />
485/535 1.02 1.06 2.99 4.15 3.88 3.92 1.23 <strong>2.2</strong>7<br />
(b) Plasmid DNA<br />
Table 1 Calculated DNA concentrations in µg/ml stock solution of the same<br />
samples with different treatment.<br />
<strong>The</strong> same samples from a plasmid extraction have been measured with both<br />
methods. Since the fluorescence method is a lot more sensitive, the samples<br />
were diluted 1:100 before the measurement – both of the detection techniques<br />
show comparable results.<br />
485/535 nm 46 44 46 49 59 50 39 48 48 51 43 48 36<br />
Abs 260 nm 44 45 45 65 53 46 36 49 38 46 55 54 34<br />
Table 2 Comparison of the stock concentrations (referring to the calibration<br />
curves above) in µg/ml of the samples measured with fluorescence (485/535) <strong>and</strong><br />
absorbance (260).<br />
9-4 Operating Manual for <strong>GENios</strong>, <strong>GENios</strong> <strong>FL</strong>, <strong>and</strong> <strong>GENios</strong> <strong>Plus</strong> No: I 112 904 Rev No: 1.1 June 2002
9. Application Note for DNA Quantification<br />
9.3.4 DNA Purity at 260/280 nm<br />
Table 3 Determination of the purity (DNA/protein ratio) of plasmid DNA samples.<br />
<strong>The</strong> high impurity of the samples may be due to the extraction method used<br />
9.4 Conclusion<br />
Depending on origin <strong>and</strong> further use of the DNA, the concentration <strong>and</strong> volume of<br />
samples may not be sufficient for quantitation using absorbance. In order to<br />
obtain comparable accuracy <strong>and</strong> reduce the amount of DNA required, the use of<br />
fluorescence is recommended. From the plasmid extractions, a stock solution<br />
volume of 50 µl was obtained with a DNA concentration high enough for<br />
absorbance measurements. <strong>The</strong> DNA extractions from human blood yielded<br />
50 µl of stock solution with concentrations between 1 <strong>and</strong> 5 µg/ml, so the amount<br />
of extracted DNA was not sufficient for quantitation with absorbance.<br />
This application example clearly demonstrates the advantage of having 2<br />
detection techniques in one instrument. Both techniques offer a variety of<br />
advantages depending on the method of extraction <strong>and</strong> amount of available DNA.<br />
DNA quantitation by UV absorbance measurement is easy to perform,<br />
inexpensive <strong>and</strong> allows a rapid check of DNA purity (260/280nm ratio) although<br />
the extraction method, interference with RNA, ssDNA, or single nucleotides <strong>and</strong><br />
contaminants (such as phenol or EDTA) may influence the quality of the results.<br />
In contrast, fluorescence assays provide the perfect combination of sensitivity<br />
<strong>and</strong> selectivity for dsDNA <strong>and</strong> extend the detection range significantly.<br />
Acknowledgements<br />
We would like to thank Robert Liebhart for carrying out the practical experiments<br />
at ETH Zürich, Inst. for Plant Sciences (Phytopathology), Universitätsstrasse 2,<br />
CH-8092 Zürich (<strong>Lab</strong>oratory Dr. Cesare Gessler).<br />
June 2002 Operating Manual for <strong>GENios</strong>, <strong>GENios</strong> <strong>FL</strong>, <strong>and</strong> <strong>GENios</strong> <strong>Plus</strong> No: I 112 904 Rev No: 1.1 9-5
Index<br />
Index<br />
A<br />
Absorbance ...........................................5-5, 5-17<br />
C<br />
Cleaning..........................................................8-1<br />
D<br />
Disinfection .....................................................8-4<br />
F<br />
Filter Slides<br />
Absorbance Filters......................................4-1<br />
Defining.......................................................4-6<br />
Fluorescence Filters....................................4-1<br />
Inserting ......................................................4-3<br />
Fluorescence ........................ 5-3, 5-10, 5-15, 7-1<br />
G<br />
GENIOS..........................................................2-2<br />
Glow Type Luminescence ............. 5-5, 5-17, 7-4<br />
H<br />
Hardware Specifications.................................6-1<br />
I<br />
Instrument<br />
Features...................................................... 5-1<br />
Installation................................................... 3-1<br />
Power Requirements .................................. 3-3<br />
Safety.......................................................... 1-1<br />
Transport Lock............................................ 3-2<br />
M<br />
Maintenance................................................... 8-1<br />
Q<br />
Quality Control................................................ 7-1<br />
T<br />
Test<br />
Cross-Talk ...........................................7-3, 7-5<br />
Linearity ...................................................... 7-2<br />
Precision ..................................................... 7-2<br />
Sensitivity.............................................7-1, 7-4<br />
June 2002 Operating Manual for <strong>GENios</strong>, <strong>GENios</strong> <strong>FL</strong>, <strong>and</strong> <strong>GENios</strong> <strong>Plus</strong> No: I 112 904 Rev No: 1.1 Index