INSTALLATION INSTRUCTIONS-BASE, I3838N NEO ... - Sterling
INSTALLATION INSTRUCTIONS-BASE, I3838N NEO ... - Sterling
INSTALLATION INSTRUCTIONS-BASE, I3838N NEO ... - Sterling

You also want an ePaper? Increase the reach of your titles
YUMPU automatically turns print PDFs into web optimized ePapers that Google loves.
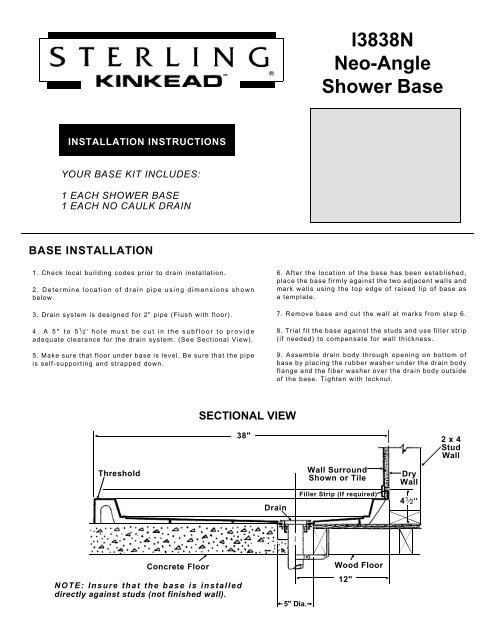
<strong>I3838N</strong><br />
Neo-Angle<br />
Shower Base<br />
<strong>INSTALLATION</strong> <strong>INSTRUCTIONS</strong><br />
YOUR <strong>BASE</strong> KIT INCLUDES:<br />
1 EACH SHOWER <strong>BASE</strong><br />
1 EACH NO CAULK DRAIN<br />
<strong>BASE</strong> <strong>INSTALLATION</strong><br />
1. Check local building codes prior to drain installation.<br />
2. Determine location of drain pipe using dimensions shown<br />
below.<br />
3. Drain system is designed for 2" pipe (Flush with floor).<br />
4. A 5" to 5 1 ⁄2‘‘ hole must be cut in the subfloor to provide<br />
adequate clearance for the drain system. (See Sectional View).<br />
5. Make sure that floor under base is level. Be sure that the pipe<br />
is self-supporting and strapped down.<br />
6. After the location of the base has been established,<br />
place the base firmly against the two adjacent walls and<br />
mark walls using the top edge of raised lip of base as<br />
a template.<br />
7. Remove base and cut the wall at marks from step 6.<br />
8. Trial fit the base against the studs and use filler strip<br />
(if needed) to compensate for wall thickness.<br />
9. Assemble drain body through opening on bottom of<br />
base by placing the rubber washer under the drain body<br />
flange and the fiber washer over the drain body outside<br />
of the base. Tighten with locknut.<br />
SECTIONAL VIEW<br />
Threshold<br />
38"<br />
Drain<br />
Wall Surround<br />
Shown or Tile<br />
Filler Strip (If required)<br />
Dry<br />
Wall<br />
4 1 ⁄2‘‘<br />
2 x 4<br />
Stud<br />
Wall<br />
Concrete Floor<br />
NOTE: Insure that the base is installed<br />
directly against studs (not finished wall).<br />
5" Dia.<br />
Wood Floor<br />
12"
38"<br />
12"<br />
WRENCH<br />
STRAINER<br />
NUT<br />
WRENCH<br />
12"<br />
DRAIN SEAL<br />
DRAIN BODY<br />
38"<br />
RUBBER WASHER<br />
FIBER WASHER<br />
LOCKNUT<br />
PLAN<br />
VIEW<br />
DRAIN<br />
STRAINER<br />
10. Carefully set the base in place by sliding the drain body of the base over the drain pipe.<br />
NOTE: There is no need to fasten the base to the stud or sit the base in any type of bath to hold it in place.<br />
11. Seal the drain pipe by installing the drain seal around the 2" drain pipe.<br />
12. Using the wrench provided, screw in the nut (clockwise) until it is tight enough to compress the seal and remove wrench.<br />
13. Install the strainer by snapping it into the drain body.<br />
IMPORTANT: Do not use abrasive cleaners for cleaning the base.<br />
Wash regularly with warm water, use soft cloth with mild detergent.<br />
PROFESSIONAL CAULKING TIPS<br />
Shower Door or<br />
Wall Surround<br />
3 ⁄16"<br />
1. Check all instruction sheets for the recommended<br />
caulking location.<br />
Masking<br />
Tape<br />
2. Apply masking tape to the base, 3 ⁄16‘‘ away from<br />
shower door or wall surround, as shown.<br />
3. Apply caulking with 3 ⁄16‘‘ dia. bead. Immediately<br />
remove tape, taking care not to disturb caulking.<br />
Excess caulking can be removed with mineral spirits.<br />
4. Allow caulking to set for 24 hours before using.<br />
Base<br />
Caulk<br />
North Fifth Street, Union City, TN 38261<br />
Printed in U.S.A. ©1997, <strong>Sterling</strong> Plumbing Group, Inc. (4/97) 882001