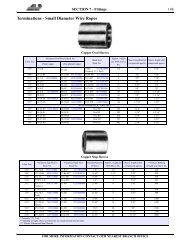
Wire Rope Clips
Wire Rope Clips
Wire Rope Clips

Create successful ePaper yourself
Turn your PDF publications into a flip-book with our unique Google optimized e-Paper software.
SECTION 7 - Fittings 96<br />
FITTINGS<br />
<strong>Clips</strong>, Links, Shackles, Hooks & Latches<br />
Forged <strong>Wire</strong> <strong>Rope</strong> <strong>Clips</strong><br />
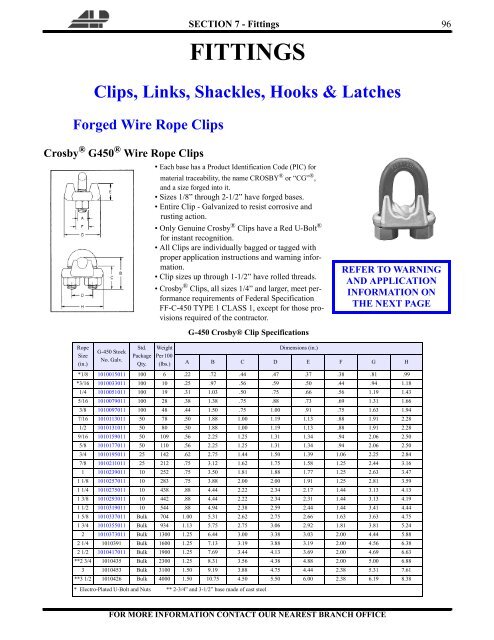
Crosby ® G450 ® <strong>Wire</strong> <strong>Rope</strong> <strong>Clips</strong><br />
• Each base has a Product Identification Code (PIC) for<br />
material traceability, the name CROSBY ® or “CG” ® ,<br />
and a size forged into it.<br />
• Sizes 1/8” through 2-1/2” have forged bases.<br />
• Entire Clip - Galvanized to resist corrosive and<br />
rusting action.<br />
• Only Genuine Crosby ® <strong>Clips</strong> have a Red U-Bolt ®<br />
for instant recognition.<br />
• All <strong>Clips</strong> are individually bagged or tagged with<br />
proper application instructions and warning information.<br />
• Clip sizes up through 1-1/2” have rolled threads.<br />
• Crosby ® <strong>Clips</strong>, all sizes 1/4” and larger, meet performance<br />
requirements of Federal Specification<br />
FF-C-450 TYPE 1 CLASS 1, except for those provisions<br />
required of the contractor.<br />
REFER TO WARNING<br />
AND APPLICATION<br />
INFORMATION ON<br />
THE NEXT PAGE<br />
<strong>Rope</strong><br />
Size<br />
(in.)<br />
G-450 Stock<br />
No. Galv.<br />
Std.<br />
Package<br />
Qty.<br />
Weight<br />
Per 100<br />
(lbs.)<br />
G-450 Crosby® Clip Specifications<br />
Dimensions (in.)<br />
A B C D E F G H<br />
*1/8 1010015011 100 6 .22 .72 .44 .47 .37 .38 .81 .99<br />
*3/16 1010033011 100 10 .25 .97 .56 .59 .50 .44 .94 1.18<br />
1/4 1010051011 100 19 .31 1.03 .50 .75 .66 .56 1.19 1.43<br />
5/16 1010079011 100 28 .38 1.38 .75 .88 .73 .69 1.31 1.66<br />
3/8 1010097011 100 48 .44 1.50 .75 1.00 .91 .75 1.63 1.94<br />
7/16 1010113011 50 78 .50 1.88 1.00 1.19 1.13 .88 1.91 2.28<br />
1/2 1010131011 50 80 .50 1.88 1.00 1.19 1.13 .88 1.91 2.28<br />
9/16 1010159011 50 109 .56 2.25 1.25 1.31 1.34 .94 2.06 2.50<br />
5/8 1010177011 50 110 .56 2.25 1.25 1.31 1.34 .94 2.06 2.50<br />
3/4 1010195011 25 142 .62 2.75 1.44 1.50 1.39 1.06 2.25 2.84<br />
7/8 1010211011 25 212 .75 3.12 1.62 1.75 1.58 1.25 2.44 3.16<br />
1 1010239011 10 252 .75 3.50 1.81 1.88 1.77 1.25 2.63 3.47<br />
1 1/8 1010257011 10 283 .75 3.88 2.00 2.00 1.91 1.25 2.81 3.59<br />
1 1/4 1010275011 10 438 .88 4.44 2.22 2.34 2.17 1.44 3.13 4.13<br />
1 3/8 1010293011 10 442 .88 4.44 2.22 2.34 2.31 1.44 3.13 4.19<br />
1 1/2 1010319011 10 544 .88 4.94 2.38 2.59 2.44 1.44 3.41 4.44<br />
1 5/8 1010337011 Bulk 704 1.00 5.31 2.62 2.75 2.66 1.63 3.63 4.75<br />
1 3/4 1010355011 Bulk 934 1.13 5.75 2.75 3.06 2.92 1.81 3.81 5.24<br />
2 1010373011 Bulk 1300 1.25 6.44 3.00 3.38 3.03 2.00 4.44 5.88<br />
2 1/4 1010391 Bulk 1600 1.25 7.13 3.19 3.88 3.19 2.00 4.56 6.38<br />
2 1/2 1010417011 Bulk 1900 1.25 7.69 3.44 4.13 3.69 2.00 4.69 6.63<br />
**2 3/4 1010435 Bulk 2300 1.25 8.31 3.56 4.38 4.88 2.00 5.00 6.88<br />
3 1010453 Bulk 3100 1.50 9.19 3.88 4.75 4.44 2.38 5.31 7.61<br />
**3 1/2 1010426 Bulk 4000 1.50 10.75 4.50 5.50 6.00 2.38 6.19 8.38<br />
* Electro-Plated U-Bolt and Nuts ** 2-3/4” and 3-1/2” base made of cast steel<br />
FOR MORE INFORMATION CONTACT OUR NEAREST BRANCH OFFICE
97 SECTION 7 - Fittings<br />
G-450 Crosby® <strong>Wire</strong> <strong>Rope</strong> <strong>Clips</strong><br />
Warnings & Application Instructions<br />
WARNING<br />
• Failure to read, understand and follow these instructions may<br />
cause death or serious injury.<br />
• Read and understand these instructions before using clips.<br />
• Match the same size clip to the same size wire rope.<br />
• Prepare wire rope end termination only as instructed.<br />
• Do not use plastic coated wire rope.<br />
• Apply first load to test the assembly. This load should be of<br />
equal or greater weight than loads expected in use. Next check<br />
and retighten nuts to recommended torque. (See table below)<br />
Efficiency ratings for wire rope end terminations are based upon the catalog<br />
breaking strength of wire rope. The efficiency rating of a properly prepared<br />
loop or thimble - eye termination for clip sizes 1/8” through 7/8” is 80%,<br />
and for sizes 1” through 3-1/2” is 90%.<br />
The number of clips shown (see Table 1) is based upon using RRL or RLL<br />
wire rope, 6 x 19 or 6 x 37 Class, FC or IWRC; IPS or XIP, XXIP. If Seale<br />
construction or similar large outer wire type construction in the 6 x 19 Class<br />
is to be used for sizes 1 inch and larger, add one additional clip. If a pulley<br />
(sheave) is used for turning back the wire rope, add one additional clip.<br />
The number of clips shown also applies to rotation - resistant RRL wire<br />
rope, 8 x 19 Class, IPS, XIP, XXIP sizes 1-1/2 inch and smaller; and to<br />
rotation-resistant RRL wire rope, 19 x 7 Class, IPS, XIP, XXIP sizes 1-3/4<br />
inch and smaller.<br />
For other classes of wire rope not mentioned above, we recommend contacting<br />
Crosby Engineering at the address or telephone number on the back<br />
cover to ensure the desired efficiency rating.<br />
For elevator, personnel hoist, and scaffold applications, refer to ANSI<br />
A17.1 and ANSI A10.4. These standards do not recommend U-Bolt style<br />
wire rope clip terminations. The style wire rope termination used for any<br />
application is the obligation of the user.<br />
For OSHA (Construction) applications, see OSHA 1926.251.<br />
1.<br />
Refer to Table 1 in following these<br />
instructions. Turn back specified<br />
amount of rope from thimble or<br />
loop. Apply first clip one base width<br />
from dead end of rope. Apply U-<br />
Bolt over dead end of wire rope - live end rests in saddle (Never saddle a<br />
dead horse!). Use torque wrench to tighten evenly, alternate from one nut to<br />
the other until reaching the recommended torque.<br />
2.<br />
When two clips are required, apply<br />
the second clip as near the loop or<br />
thimble as possible. Use torque<br />
wrench to tighten evenly, alternating until reaching the recommended<br />
torque. When more than two clips are required, apply the second clip as<br />
near the loop or thimble as possible, turn nuts on second clip firmly, but do<br />
not tighten. Proceed to Step 3.<br />
3.<br />
When three or more clips are<br />
required, space additional clips<br />
equally between first two - take up<br />
rope slack - use torque wrench to tighten on each U-Bolt evenly, alternating<br />
from one nut to the other until reaching recommended torque.<br />
4.<br />
If a pulley (sheave) is<br />
used, in place of a<br />
thimble add one additional<br />
clip. Clip spacing<br />
should be as<br />
shown.<br />
5.<br />
WIRE ROPE<br />
SPLICING PROCEDURES:<br />
The preferred method of splicing two wire ropes together is to use interlocking<br />
turnback eyes with<br />
thimbles, using the recommended<br />
number of clips on<br />
each eye (See Figure 5).<br />
An alternate method is to<br />
use twice the number of<br />
clips as used for a turnback<br />
termination. The rope ends<br />
are placed parallel to each<br />
other, overlapping by twice<br />
the turnback amount shown<br />
in the application instructions. The minimum number of clips should be<br />
installed on each dead end (See Figure 6). Spacing, installation torque, and<br />
other instructions still apply.<br />
6.<br />
IMPORTANT<br />
Apply first load to test the assembly. This load should be of equal or<br />
greater weight than loads expected in use. Next, check and use torque<br />
wrench to retighten to recommended torque.<br />
In accordance with good rigging and maintenance practices, the wire rope<br />
end termination should be inspected periodically for wear, abuse, and general<br />
adequacy.<br />
G450 Crosby® <strong>Wire</strong> <strong>Rope</strong> Clip Specifications<br />
Clip Size (In) <strong>Rope</strong> Size (In) Minimum No. of<br />
<strong>Clips</strong><br />
<strong>Rope</strong> Turnback<br />
(In)<br />
*Torque<br />
(Ft Lbs.)<br />
1/8 1/8 2 3-1/4 4.5<br />
3/16 3/16 2 3-3/4 7.5<br />
1/4 1/4 2 4-3/4 15<br />
5/16 5/16 2 5-1/4 30<br />
3/8 3/8 2 6-1/2 45<br />
7/16 7/16 2 7 65<br />
1/2 1/2 3 11-1/2 65<br />
9/16 9/16 3 12 95<br />
5/8 5/8 3 12 95<br />
3/4 3/4 4 18 130<br />
7/8 7/8 4 19 225<br />
1 1 5 26 225<br />
1-1/8 1-1/8 6 34 225<br />
1-1/4 1-1/4 7 44 360<br />
1-3/8 1-3/8 7 44 360<br />
1-1/2 1-1/2 8 54 360<br />
1-5/8 1-5/8 8 58 430<br />
1-3/4 1-3/4 8 61 590<br />
2 2 8 71 750<br />
2-1/4 2-1/4 8 73 750<br />
2-1/2 2-1/2 9 84 750<br />
2-3/4 2-3/4 10 100 750<br />
3 3 10 106 1200<br />
3-1/2 3-1/2 12 149 1200<br />
If a pulley (sheave) is used for turning back the wire rope, add one additional clip. See Figure 4.<br />
If a greater number of clips are used than shown in the table, the amount of turnback should be<br />
increased proportionately.<br />
*The tightening torque values shown are based upon the threads being clean, dry, and free of<br />
lubrication.<br />
FOR MORE INFORMATION CONTACT OUR NEAREST BRANCH OFFICE
SECTION 7 - Fittings 98<br />
Fist Grip <strong>Clips</strong><br />
3/16” - 5/8”<br />
New Style G429<br />
3/4” - 1-1/2”<br />
G429<br />
• Bolts are an intregal part of the saddle. Nuts can be installed in such a<br />
way as to enable the operator to swing the wrench in a full arc for fast<br />
installation.<br />
• All sizes have forged steel saddles.<br />
• Entire clip is galvanized to resist corrosive and rusting action.<br />
• All clips are individually bagged or tagged with proper application<br />
instructions and warning information.<br />
• Assembled with standard heavy hex nuts.<br />
• Fist Grip® wire clips meet or exceed the performance requirements of<br />
Federal Specification FF-C-450 Type III, Class 1, except for those<br />
provisions required of the Contractor.<br />
REFER TO THE APPLICATION<br />
AND WARNING INFORMATION<br />
ON THE NEXT PAGE<br />
<strong>Rope</strong> Size<br />
(in.)*<br />
G-429 Stock<br />
No. Galv.<br />
G429 Fist Grip® <strong>Wire</strong> <strong>Rope</strong> Clip Specifications<br />
Std.<br />
Package<br />
Qty.<br />
Weight Per<br />
100 (lbs.)<br />
Dimensions (in.)<br />
C D E G N<br />
3/16-1/4 1010471011 100 23 .40 .94 .38 1.41 1.44<br />
5/16 1010499011 100 28 .47 1.06 .38 1.50 1.54<br />
3/8 1010514011 50 40 .51 1.06 .44 1.84 1.78<br />
7/16-1/2 1010532011 50 62 .59 1.25 .50 2.21 2.15<br />
9/16-5/8 1010550011 50 103 .72 1.50 .63 2.72 2.57<br />
3/4 1010578011 25 175 .86 1.81 .75 2.94 2.67<br />
7/8 1010596011 25 225 .97 2.12 .75 3.31 2.86<br />
1 1010612011 10 300 1.13 2.25 .75 3.72 3.06<br />
1-1/8 1010630011 10 400 1.28 2.38 .88 4.22 3.44<br />
1-1/4 1010658011 10 400 1.34 2.50 .88 4.25 3.56<br />
1-3/8 -1-1/2 1010676 Bulk 700 1.56 3.00 1.00 5.56 4.12<br />
* Sizes through 5/8” incorporate New Style design.<br />
FOR MORE INFORMATION CONTACT OUR NEAREST BRANCH OFFICE
99 SECTION 7 - Fittings<br />
G-429 Crosby® Fist Grip Clip<br />
Warnings & Application Instructions<br />
3.<br />
When three or more clips are<br />
required, space additional clips<br />
equally between first two - take up<br />
rope slack - tighten nuts on each bolt evenly, alternating from one nut to the<br />
other until reaching recommended torque.<br />
4.<br />
If a pulley (sheave) is<br />
used, in place of a<br />
thimble add one additional<br />
Fist Grip. Fist<br />
Grip spacing should<br />
be as shown.<br />
Efficiency ratings for wire rope end terminations are based upon the catalog<br />
breaking strength of wire rope. The efficiency rating of a properly prepared<br />
loop or thimble-eye termination for clip sizes 1/8” through 7/8” is<br />
80%, and for sizes 1” through 3-1/2” is 90%.<br />
The number of clips shown (see Table 1) is based upon using RRL or<br />
RLL wire rope, 6 x 19 or 6 x 37 Class, FC or IWRC; IPS or XIP. If Seale<br />
construction or similar large outer wire type construction in the 6 x 19 Class<br />
is to be used for sizes 1 inch and larger, add one additional clip. If a pulley<br />
(sheave) is used for turning back the wire rope, add one additional clip.<br />
The number of clips shown also applies to rotation - resistant RRL wire<br />
rope, 8 x 19 Class, IPS, XIP, sizes 1-1/2 inch and smaller; and to rotation -<br />
resistant RRL wire rope, 19 x 7 Class, IPS, XIP, sizes 1-1/2 inch and<br />
smaller.<br />
For other classes of wire rope not mentioned above, we recommend contacting<br />
Crosby Engineering at the address or telephone number on the back<br />
cover to ensure the desired efficiency rating.<br />
The style of wire rope termination used for any application is the obligation<br />
of the user.<br />
For OSHA (Construction) applications,<br />
see OSHA 1926.251<br />
WARNING<br />
• Failure to read, understand and follow these instructions may<br />
cause death or serious injury.<br />
• Read and understand these instructions before using clips.<br />
• Match the same size clip to the same size wire rope.<br />
• Do not mismatch Crosby clips with other manufacturers clips.<br />
• Prepare wire rope end termination only as instructed.<br />
• Do not use plastic coated wire rope.<br />
• Apply first load to test the assembly. This load should be of<br />
equal or greater weight than loads expected in use. Next<br />
check and retighten nuts to recommended torque. (See table<br />
below)<br />
1.<br />
Refer to Table 1 in following these instructions. Turn back specified<br />
amount of rope from thimble or loop. Apply first clip one base width from<br />
dead end of rope. Tighten nuts evenly, alternating from one nut to the other<br />
until reaching the recommended<br />
torque.<br />
2.<br />
When two clips are required, apply the second clip as near the loop or thimble<br />
as possible. Tighten nuts evenly, alternating until reaching the recommended<br />
torque. When more than two clips are required, apply the second<br />
clip as near the loop or thimble as possible, turn nuts on second clip firmly,<br />
but do not tighten. Proceed to Step 3.<br />
5.<br />
WIRE ROPE SPLICING PROCEDURES:<br />
The preferred method of splicing two wire ropes together is to use interlocking<br />
turnback eyes with thimbles, using the recommended number of<br />
clips on each eye (See Figure 5).<br />
An alternate method is to use twice the number of clips as used for a turnback<br />
termination. The rope ends are placed parallel to each other, overlapping<br />
by twice the turnback amount shown in the application instructions.<br />
The minimum number of clips should be installed on each dead end (See<br />
Figure 6). Spacing, installation torque, and other instructions still apply.<br />
6.<br />
IMPORTANT<br />
Apply first load to test<br />
the assembly. This load<br />
should be of equal or<br />
greater weight than<br />
loads expected in use.<br />
Next, check and<br />
retighten nuts to recommended<br />
torque.<br />
In accordance with good<br />
rigging and maintenance<br />
practices, the wire rope end termination should be inspected periodically for<br />
wear, abuse, and general adequacy.<br />
G-429 Crosby® Fist Grip® - Recommendations<br />
Clip Size<br />
(Inches)<br />
<strong>Rope</strong> Size<br />
(Inches)<br />
Minimum No. of<br />
<strong>Clips</strong><br />
Amount of<br />
<strong>Rope</strong> to Turn<br />
Back in Inche<br />
*Torque in Ft.<br />
Lbs.<br />
3/16 3/16 2 4 30<br />
1/4 1/4 2 4 30<br />
5/16 5/16 2 5 30<br />
3/8 3/8 2 5-1/4 45<br />
7/16 7/16 2 6-1/2 65<br />
1/2 1/2 3 11 65<br />
9/16 9/16 3 12-3/4 130<br />
5/8 5/8 3 13-1/2 130<br />
3/4 3/4 3 16 225<br />
7/8 7/8 4 26 225<br />
1 1 5 37 225<br />
1-1/8 1-1/8 5 41 360<br />
1-1/4 1-1/4 6 55 360<br />
1-3/8 1-3/8 6 62 500<br />
1-1/2 1-1/2 7 78 500<br />
If a pulley (sheave) is used for turning back the wire rope, add one additional clip. See<br />
Figure 4<br />
If a greater number of clips are used than show in the table, the amount of turnback<br />
should be increased proportionately.<br />
*The tightening torque values shown are based upon the threads being clean, dry, and<br />
free of lubrication.<br />
FOR MORE INFORMATION CONTACT OUR NEAREST BRANCH OFFICE